Ubuntu 网络连接成功 但是图标问号,可以尝试 (没有验证)
To continue using ifupdown, but display it correctly on Gnome GUI you need to edit /etc/NetworkManager/NetworkManager.conf and change managed=false to managed=true for the [ifupdown] section.
sudo apt-get install uml-utilities
sudo apt-get install bridge-utils

一 网桥
1、创建网桥 (永久) 推荐
sudo gvim /etc/network/interfaces
auto lo
iface lo inet loopback

auto br0
iface br0 inet dhcp
bridge_ports enp0s3
bridge_stp on
bridge_fd 0
bridge_maxwait 0
注:enp0s3根据实际名称相应修改 (ip addr 查看)
2、nm-connection-editor工具创建 (永久)
https://linux.cn/article-5445-1.html
3、临时创建
ip addr del 192.168.2.100/24 dev eth0 #将宿主机网卡的IP删除(会断网,根据宿主机IP相应修改IP地址)
brctl addbr br0
brctl addif br0 enp0s3
brctl stp br0 on
dhclient br0
或者
ifconfig enp0s3 0.0.0.0
brctl addbr br0
brctl addif br0 enp0s3
brctl stp br0 on
dhclient br0
brctl addbr br0 #增加一个虚拟网桥br0
brctl addif br0 eth0 #在br0中添加一个接口eth0
brctl stp br0 on #打开STP协议,否则可能造成环路
ifconfig eth0 0 #将eth0的IP设置为0
dhclient br0 #设置动态给br0配置ip、route等
二 qemu-ifup
/etc/qemu-ifup
#!/bin/sh

echo "Executing /etc/qemu-ifup"
echo "Bringing up $1 for bridged mode..."
sudo ip link set $1 up promisc on
echo "Adding $1 to br0..."
sudo brctl addif br0 $1
sleep 1
brctl show
Create the script that QEMU uses to bring up the tap adapter with root:kvm 750 permissions:
或者
#!/bin/sh

set -x

switch=br0

if [ -n "$1" ];then
  #ip tuntap add $1 mode tap user `whoami`  #QEMU自动创建
  ip link set $1 up
  sleep 0.5s
  #ip link set dev $1 master $switch
  ip link set $1 master $switch

  brctl show
  exit 0
else
  echo "Error: no interface specified"
  exit 1
fi
或者
#!/bin/sh

sudo ifconfig $1 0.0.0.0 promisc up
sudo brctl addif br0 $1
sleep 1

brctl show
/etc/qemu-ifdown #新版QEMU 的/qemu-ifdown内容为空即可 如下
#!/bin/sh

echo "Executing /etc/qemu-ifdown"
#sudo ip link set $1 down
#sudo brctl delif br0 $1
#sudo ip link delete dev $1

brctl show
Create the script that QEMU uses to bring down the tap adapter in /etc/qemu-ifdown with root:kvm 750 permissions:
https://wiki.qemu.org/Documentation/Networking
https://help.ubuntu.com/community/KVM/Networking
https://help.ubuntu.com/community/NetworkConnectionBridge
https://linux.cn/article-5445-1.html
https://wiki.linuxfoundation.org/networking/bridge
https://blog.csdn.net/swimming_in_it_/article/details/53142997
https://wiki.debian.org/BridgeNetworkConnections
https://wiki.archlinux.org/index.php/QEMU#Tap_networking_with_QEMU
https://wiki.archlinux.org/index.php/Network_bridge
http://smilejay.com/2012/08/kvm-bridge-networking/
http://wiki.sylixos.com/index.php/Linux%E7%8E%AF%E5%A2%83%E5%BC%80%E5%8F%91%E6%8C%87%E5%8D%97
Ubuntu Bridge创建方法
Question: 我需要在我的Ubuntu主机上建立一个Linux网桥,共享一个网卡给其他一些虚拟主机或在主机上创建的容器。我目前正在Ubuntu上使用网络管理器(Network Manager),所以最好>能使用网络管理器来配置一个网桥。我该怎么做?
网桥是一个硬件装备,用来将两个或多个数据链路层(OSI七层模型中第二层)互联,以使得不同网段上的网络设备可以互相访问。当你想要互联一个主机里的多个虚拟机器或者以太接口时,就需要在Linux主机里有一个类似桥接的概念。这里使用的是一种软网桥。
有很多的方法来配置一个Linux网桥。举个例子,在一个无外接显示/键盘的服务器环境里,你可以使用brct手动地配置一个网桥。而在桌面环境下,在网络管理器里也支持网桥设置。那就让我们测试一下如何用网络管理器配置一个网桥吧。
要求
为了避免任何问题,建议你的网络管理器版本为0.9.9或者更高,它用在 Ubuntu 15.04或者更新的版本。
$ apt-cache show network-manager | grep Version
Version: 0.9.10.0-4ubuntu15.1Version: 0.9.10.0-4ubuntu15
创建一个网桥
使用网络管理器创建网桥最简单的方式就是通过nm-connection-editor。这款GUI(图形用户界面)的工具允许你傻瓜式地配置一个网桥。
首先,启动nm-connection-editor。
$ nm-connection-editor
该编辑器的窗口会显示给你一个列表,列出目前配置好的网络连接。点击右上角的“添加”按钮,创建一个网桥。

接下来,选择“Bridge”(网桥)作为连接类型。
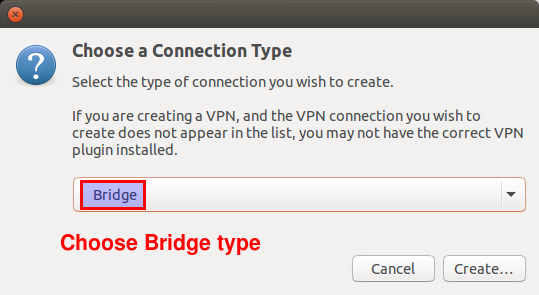
现在,开始配置网桥,包括它的名字和所桥接的连接。如果没有创建过其他网桥,那么默认的网桥接口会被命名为bridge0。
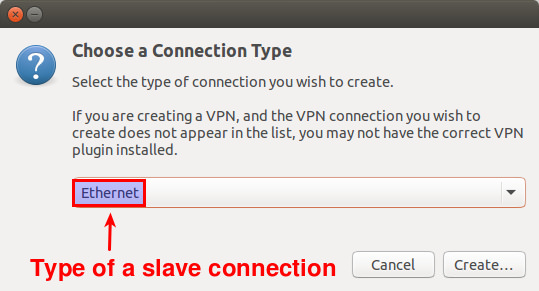
回顾一下,创建网桥的目的是为了通过网桥共享你的以太网卡接口,所以你需要添加以太网卡接口到网桥。在图形界面添加一个新的“桥接的连接”可以实现上述目的。点击“Add”按钮。

选择“以太网”作为连接类型。
在“设备的 MAC 地址”区域,选择你想要从属于网桥的接口。本例中,假设该接口是eth0。
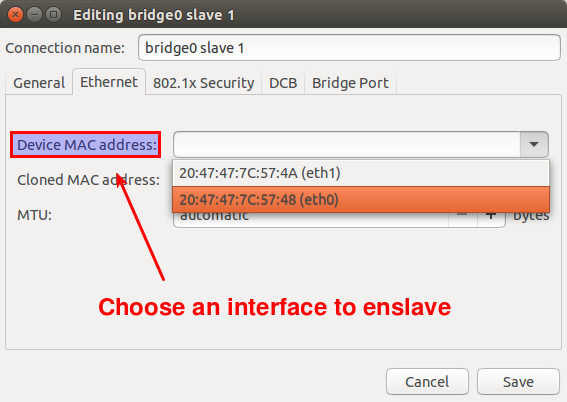
点击“常规”标签,并且选中两个复选框,分别是“当其可用时自动连接到该网络”和“所有用户都可以连接到该网络”。

切换到“IPv4 设置”标签,为网桥配置DHCP或者是静态IP地址。注意,你应该为从属的以太网卡接口eth0使用相同的IPv4设定。本例中,我们假设eth0是用过DHCP配置的。因此,此处选择“自动(DHCP)”。如果eth0被指定了一个静态IP地址,那么你也应该指定相同的IP地址给网桥。
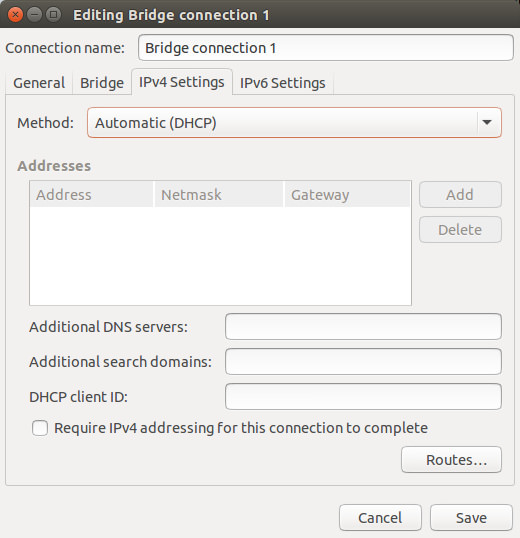
最后,保存网桥的设置。
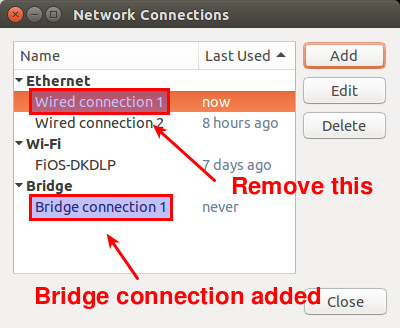
现在,你会看见一个新增的网桥连接被创建在“网络连接”窗口里。因为已经从属与网桥,以前配置好的有线连接 eth0 就不再需要了,所以去删除原来的有线连接吧。
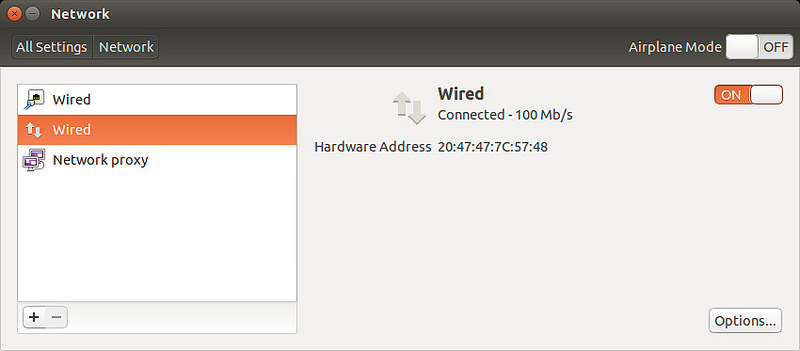
这时候,网桥连接会被自动激活。从指定给eth0的IP地址被网桥接管起,你将会暂时丢失一下连接。当IP地址赋给了网桥,你将会通过网桥连接回你的以太网卡接口。你可以通过“Network”设置确认一下。
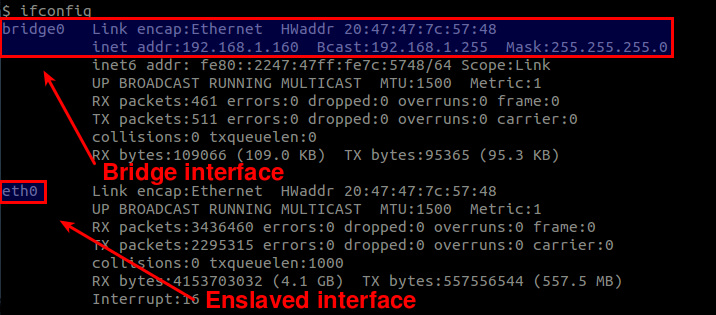
同时,检查可用的接口。提醒一下,网桥接口必须已经取代了任何你的以太网卡接口拥有的IP地址。
就这么多了,现在,网桥已经可以用了。
via: http://ask.xmodulo.com/configure-linux-bridge-network-manager-ubuntu.html
由于参照网上关于网卡桥接的配置,几乎所有的资料都说需要在 /etc/network/interfaces中br0的配置中有一行: bridge_stp off ,但是每次修改配置文件,重启网卡后,网络就会不通,有时还能通几秒,可以执行几条命令,但是随后又会断网
最后,查了不知多少资料,偶然在http://blog.csdn.net/cybertan/article/details/8160102中看到一个关于STP的说明:
建立bridge后的状态是让网络接口eth0进入混杂模式(promiscuous mode,接收网络中所有数据包),网桥br0进入转发状态(forwarding state),
而且br0和eth0有相同的MAC地址,一般也会得到和eth0相同的IP。“brctl stp br0 on”是打开br0的STP协议,STP是生成树协议(Spanning Tree Protocol),
它主要是为了避免在建有bridge的以太网LAN中出现桥回路(bridge loop)。如果不打开STP,则可能出现回路从而导致建有bridge的主机网络不畅通。
所以,瞬间明白为什么网络不通了:在服务器内部成环了!于是果断将:bridge_stp off 一行注释掉(后来发现应该改成:bridge_stp no),再重启网卡,瞬间网络就通了,但是我后面又在几台机器上测试了,貌似还是不行,重启系统后,桥接就没问题了。不过,后来又发现:貌似bridge_stp on/no,都对桥接影响不大,反正就是需要重启系统。被这个问题折腾了两三天,故在此备忘,也希望能帮助到遇到同样问题的同学。
http://smilejay.com/2012/08/kvm-bridge-networking/
查看tun模块是否加载,如下:
# lsmod | grep tun
tun 12197 2
如果tun模块没有加载,则运行“modprobe tun”命令来加载即可;当然,如果已经将tun编译到内核(可查看内核config文件(/boot/config-5.3.0-28-generic)中是否有“CONFIG_TUN=y”选项),则不需要加载了;
而如果内核完全没有配置TUN模块,则需要重新编译内核才行了。
Network bridge
A bridge is a piece of software used to unite two or more network segments. A bridge behaves like a virtual network switch, working transparently (the other machines do not need to know or care about its existence). Any real devices (e.g. eth0) and virtual devices (e.g. tap0) can be connected to it.
This article explains how to create a bridge that contains at least an ethernet device. This is useful for things like the bridge mode of QEMU, setting a software based access point, etc.
Creating a bridge
There are a number of ways to create a bridge.
With iproute2
This section describes the management of a network bridge using the ip tool from the iproute2 package, which is required by the base meta package.
Create a new bridge and change its state to up:
# ip link add name bridge_name type bridge
# ip link set bridge_name up
To add an interface (e.g. eth0) into the bridge, its state must be up:
# ip link set eth0 up
Adding the interface into the bridge is done by setting its master to bridge_name:
# ip link set eth0 master bridge_name
To show the existing bridges and associated interfaces, use the bridge utility (also part of iproute2). See bridge(8) for details.
# bridge link
This is how to remove an interface from a bridge:
# ip link set eth0 nomaster
The interface will still be up, so you may also want to bring it down:
# ip link set eth0 down
To delete a bridge issue the following command:
# ip link delete bridge_name type bridge
This will automatically remove all interfaces from the bridge. The slave interfaces will still be up, though, so you may also want to bring them down after.
With bridge-utils
This section describes the management of a network bridge using the legacy brctl tool from the bridge-utils package, which is available in the official repositories. See brctl(8) for full listing of options.
Create a new bridge:
# brctl addbr bridge_name
Add a device to a bridge, for example eth0:
# brctl addif bridge_name eth0
Show current bridges and what interfaces they are connected to:
$ brctl show
Set the bridge device up:
# ip link set dev bridge_name up
Delete a bridge, you need to first set it to down:
# ip link set dev bridge_name down
# brctl delbr bridge_name
With netctl
See Bridge with netctl.
With systemd-networkd
See systemd-networkd#Bridge interface.
With NetworkManager
GNOME's Network settings can create bridges, but currently will not auto-connect to them or slave/attached interfaces. Open Network Settings, add a new interface of type Bridge, add a new bridged connection, and select the MAC address of the device to attach to the bridge.
KDE's plasma-nm can create bridges. In order to view, create and modify bridge interfaces open the Connections window either by right clicking the Networks applet in the system tray and selecting Configure Network Connections... or from System Settings > Connections. Click the Configuration button in the lower left corner of the module and enable "Show virtual connections". A session restart will be necessary to use the enabled functionality.
nm-connection-editor can create bridges in the same manner as GNOME's Network settings.
nmcli from networkmanager can create bridges. Creating a bridge with STP disabled (to avoid the bridge being advertised on the network):
$ nmcli connection add type bridge ifname br0 stp no
Making interface enp30s0 a slave to the bridge:
$ nmcli connection add type bridge-slave ifname enp30s0 master br0
Setting the existing connection as down:
$ nmcli connection down Connection
Setting the new bridge as up:
$ nmcli connection up bridge-br0
If NetworkManager's default interface for the device you added to the bridge connects automatically, you may want to disable that by clicking the gear next to it in Network Settings, and unchecking "Connect automatically" under "Identity."
Assigning an IP address
When the bridge is fully set up, it can be assigned an IP address:
# ip addr add dev bridge_name 192.168.66.66/24
Tips and tricks
Wireless interface on a bridge
To add a wireless interface to a bridge, you first have to assign the wireless interface to an access point or start an access point with hostapd. Otherwise the wireless interface will not be added to the bridge.
See also Debian:BridgeNetworkConnections#Bridging with a wireless NIC.
Speeding up traffic destinated to the bridge itself
In some situations the bridge not only serves as a bridge box, but also talks to other hosts. Packets that arrive on a bridge port and that are destinated to the bridge box itself will by default enter the iptables INPUT chain with the logical bridge port as input device. These packets will be queued twice by the network code, the first time they are queued after they are received by the network device. The second time after the bridge code examined the destination MAC address and determined it was a locally destinated packet and therefore decided to pass the frame up to the higher protocol stack.[1]
The way to let locally destinated packets be queued only once is by brouting them in the BROUTING chain of the broute table. Suppose br0 has an IP address and that br0's bridge ports do not have an IP address. Using the following rule should make all locally directed traffic be queued only once:
# ebtables -t broute -A BROUTING -d $MAC_OF_BR0 -p ipv4 -j redirect --redirect-target DROP
The replies from the bridge will be sent out through the br0 device (assuming your routing table is correct and sends all traffic through br0), so everything keeps working neatly, without the performance loss caused by the packet being queued twice.
The redirect target is needed because the MAC address of the bridge port is not necessarily equal to the MAC address of the bridge device. The packets destinated to the bridge box will have a destination MAC address equal to that of the bridge br0, so that destination address must be changed to that of the bridge port.
Troubleshooting
No networking after bridge configuration
It may help to remove all IP addresses and routes from the interface (e.g. eth0) that was added to the bridge and configure these parameters for the bridge instead.
First of all, make sure there is no dhcpcd instance running for eth0, otherwise the deleted addresses may be reassigned.
Remove address and route from the eth0 interface:
# ip addr del address dev eth0
# ip route del address dev eth0
Now IP address and route for the earlier configured bridge must be set. This is usually done by starting a DHCP client for this interface. Otherwise, consult Network configuration for manual confi