CenterNet是在2019年论文Objects as points中提出,相比yolo,ssd,faster_rcnn依靠大量anchor的检测网络,CenterNet是一种anchor-free的目标检测网络,在速度和精度上都比较有优势,值得学习下。
对于CenterNet的理解主要在于四方面:网络结构,heatmap生成,数据增强,loss函数理解。
1. CenterNet网络结构
除了检测任务外,CenterNet还可以用于肢体识别或者3D目标检测等,因此CenterNet论文中提出了三种backbone的网络结构,分别是Resnet-18, DLA-34和Hourglass-104, 三种backbone准确度和速度如下:
-
Resnet-18 with up-convolutional layers : 28.1% coco and 142 FPS
-
DLA-34 : 37.4% COCOAP and 52 FPS
-
Hourglass-104 : 45.1% COCOAP and 1.4 FPS
实际工作中我主要用CenterNet进行目标检测,常用Resnet50作为backbone,这里主要介绍resnet50_center_net,其网络结构如下:

可以发现CenterNet网络比较简单,主要包括resnet50提取图片特征,然后是反卷积模块Deconv(三个反卷积)对特征图进行上采样,最后三个分支卷积网络用来预测heatmap, 目标的宽高和目标的中心点坐标。值得注意的是反卷积模块,其包括三个反卷积组,每个组都包括一个3*3的卷积和一个反卷积,每次反卷积都会将特征图尺寸放大一倍,有很多代码中会将反卷积前的3x3的卷积替换为DCNv2(Deformable ConvetNets V2)来提高模型拟合能力。
关于DCN(Deformable ConvetNets)参见:https://zhuanlan.zhihu.com/p/37578271, https://zhuanlan.zhihu.com/p/53127011
CenterNet的模型计算流程如下:
-
图片缩放到512x512尺寸(长边缩放到512,短边补0),随后将缩放后1x3x512x512的图片输入网络
-
图片经过resnet50提取特征得到feature1尺寸为1x2048x16x16
-
feature1经过反卷积模块Deconv,三次上采样得到feature2尺寸为1x64x128x128
-
将feature2分别送入三个分支进行预测,预测heatmap尺寸为1x80x128x128(表示80个类别),预测长宽尺寸为1x2x128x128(2表示长和宽),预测中心点偏移量尺寸为1x2x128x128(2表示x, y)
关于另外两种backbone没有尝试过,以后再写
DLA-34网络即Deep Layer Aggregation, 其理解参见:https://cloud.tencent.com/developer/article/1676834
Hourglass网络主要用于人体姿态估计,其理解参见:https://zhuanlan.zhihu.com/p/45002720
2. heatmap(热力图)理解和生成
2.1 heatmap生成
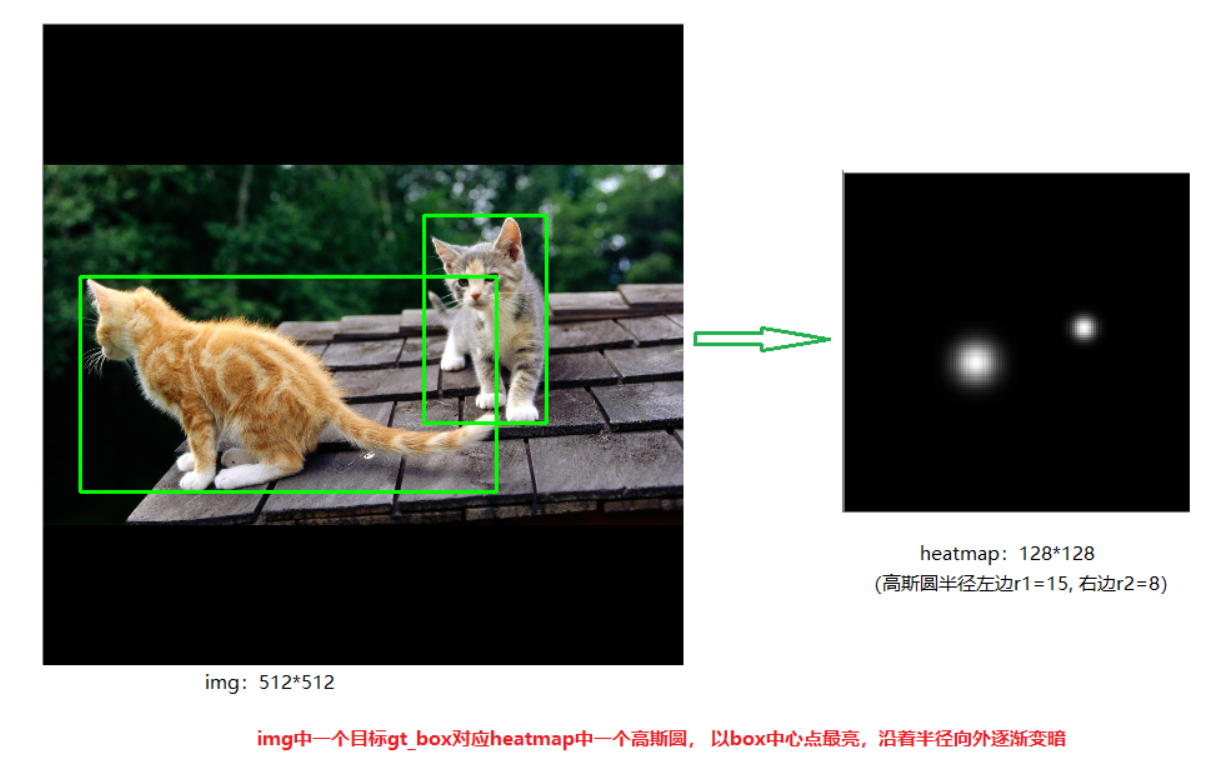
CenterNet将目标当成一个点来检测,即用目标box的中心点来表示这个目标,预测目标的中心点偏移量(offset),宽高(size)来得到物体实际box,而heatmap则是表示分类信息。每一个类别都有一张heatmap,每一张heatmap上,若某个坐标处有物体目标的中心点,即在该坐标处产生一个keypoint(用高斯圆表示),如下图所示:

产生heatmap的步骤解释如下:
如下图左边是缩放后送入网络的图片,尺寸为512x512,右边是生成的heatmap图,尺寸为128x128(网络最后预测的heatmap尺度为128x128。其步骤如下:
-
1.将目标的box缩放到128x128的尺度上,然后求box的中心点坐标并取整,设为point
-
2.根据目标box大小计算高斯圆的半径,设为R
-
3.在heatmap图上,以point为圆心,半径为R填充高斯函数计算值。(point点处为最大值,沿着半径向外按高斯函数递减)
(注意:由于两个目标都是猫,属于同一类别,所以在同一张heatmap上。若还有一只狗,则狗的keypoint在另外一张heatmap上)
2.2 heatmap高斯函数半径的确定
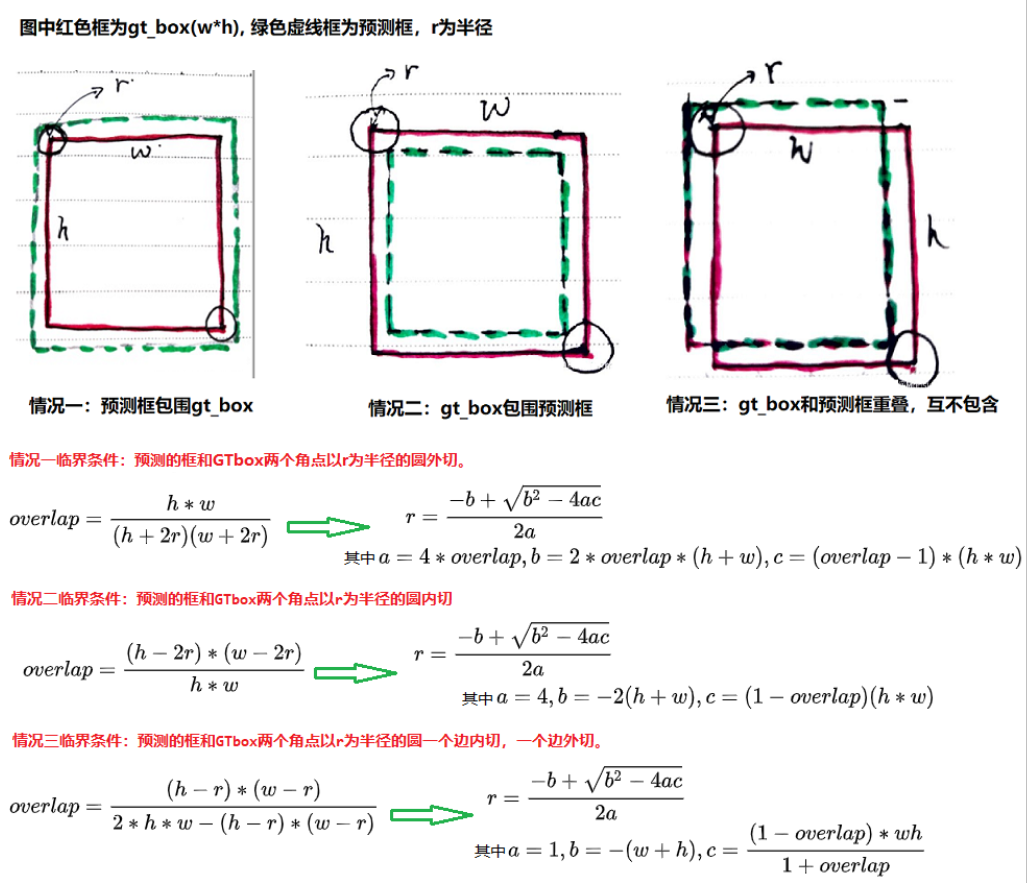
heatmap上的关键点之所以采用二维高斯核来表示,是由于对于在目标中心点附近的一些点,期预测出来的box和gt_box的IOU可能会大于0.7,不能直接对这些预测值进行惩罚,需要温和一点,所以采用高斯核。借用下大佬们的解释,如下图所示:

关于高斯圆的半径确定,主要还是依赖于目标box的宽高,其计算方法为下图所示。 实际情况中会取IOU=0.7,即下图中的overlap=0.7作为临界值,然后分别计算出三种情况的半径,取最小值作为高斯核的半径r
参考:https://zhuanlan.zhihu.com/p/96856635?utm_source=wechat_session
3. 数据增强
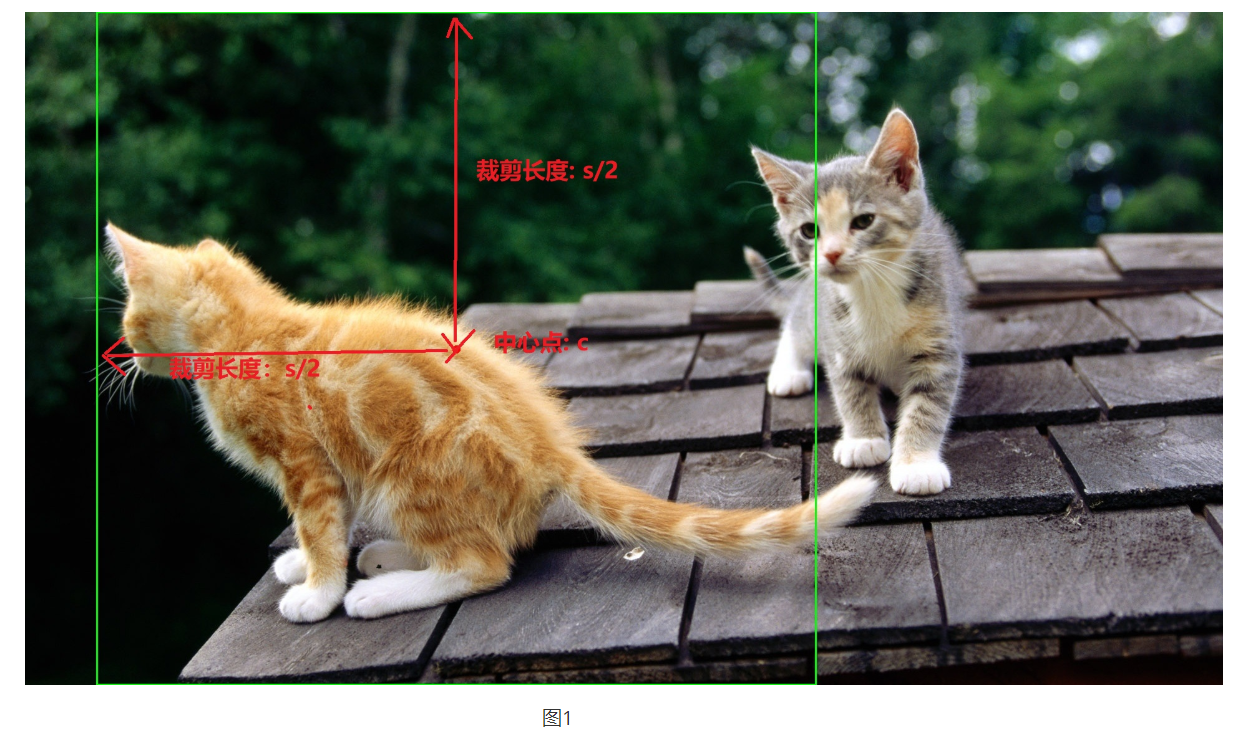
关于CenterNet还有一点值得注意的是其数据增强部分,采用了仿射变换warpAffine,其实就是对原图中进行裁剪,然后缩放到512x512的大小(长边缩放,短边补0)。实际过程中先确定一个中心点,和一个裁剪的长宽,然后进行仿射变换,如下图所示,绿色框住的图片会被裁剪出来,然后缩放到512x512(实际效果见图二中六个子图中第一个)
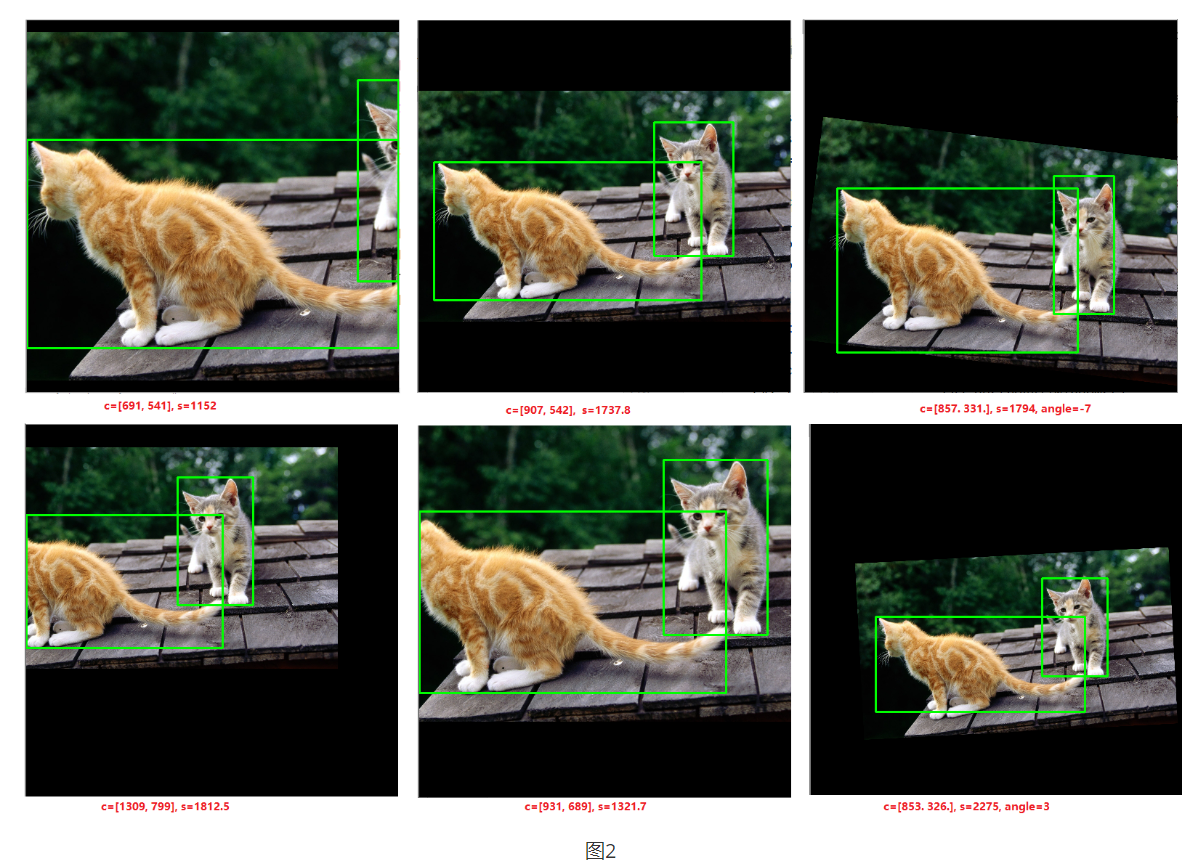
下面是上图选择不同中心点和长度进行仿射变换得到的样本。除了中心点,裁剪长度,仿射变换还可以设置角度,CenterNet中没有设置角度(代码中为0),是由于加上旋转角度后,gt_box会变的不是很准确,如最右边两个旋转样本
下面是摘抄的gluoncv中部分CenterNet源码,可以看到其前处理逻辑:


"""Transforms described in https://arxiv.org/abs/1904.07850."""
# pylint: disable=too-many-function-args
from __future__ import absolute_import
import numpy as np
import mxnet as mx
from gluoncv.data.transforms import bbox as tbbox
from gluoncv.data.transforms import image as timage
from gluoncv.data.transforms import experimental
from gluoncv.utils.filesystem import try_import_cv2
from mxnet import nd
from mxnet import gluon


class CenterNetTargetGenerator(gluon.Block):
    """Target generator for CenterNet.

    Parameters
    ----------
    num_class : int
        Number of categories.
    output_width : int
        Width of the network output.
    output_height : int
        Height of the network output.

    """
    def __init__(self, num_class, output_width, output_height):
        super(CenterNetTargetGenerator, self).__init__()
        self._num_class = num_class
        self._output_width = int(output_width)
        self._output_height = int(output_height)

    def forward(self, gt_boxes, gt_ids):
        """Target generation"""
        # pylint: disable=arguments-differ
        h_scale = 1.0  # already scaled in affinetransform
        w_scale = 1.0  # already scaled in affinetransform
        heatmap = np.zeros((self._num_class, self._output_height, self._output_width),
                           dtype=np.float32)
        wh_target = np.zeros((2, self._output_height, self._output_width), dtype=np.float32)
        wh_mask = np.zeros((2, self._output_height, self._output_width), dtype=np.float32)
        center_reg = np.zeros((2, self._output_height, self._output_width), dtype=np.float32)
        center_reg_mask = np.zeros((2, self._output_height, self._output_width), dtype=np.float32)
        for bbox, cid in zip(gt_boxes, gt_ids):
            cid = int(cid)
            box_h, box_w = bbox[3] - bbox[1], bbox[2] - bbox[0]
            if box_h > 0 and box_w > 0:
                radius = _gaussian_radius((np.ceil(box_h), np.ceil(box_w)))
                radius = max(0, int(radius))
                center = np.array(
                    [(bbox[0] + bbox[2]) / 2 * w_scale, (bbox[1] + bbox[3]) / 2 * h_scale],
                    dtype=np.float32)
                center_int = center.astype(np.int32)   #浮点数变为整数
                center_x, center_y = center_int
                assert center_x < self._output_width,
                    'center_x: {} > output_ {}'.format(center_x, self._output_width)
                assert center_y < self._output_height,
                    'center_y: {} > output_height: {}'.format(center_y, self._output_height)
                _draw_umich_gaussian(heatmap[cid], center_int, radius)
                print(radius)
                wh_target[0, center_y, center_x] = box_w * w_scale
                wh_target[1, center_y, center_x] = box_h * h_scale
                wh_mask[:, center_y, center_x] = 1.0
                center_reg[:, center_y, center_x] = center - center_int   #偏移量为浮点数相对于整数坐标的偏移量
                center_reg_mask[:, center_y, center_x] = 1.0
        return tuple([nd.array(x) for x in
            (heatmap, wh_target, wh_mask, center_reg, center_reg_mask)])


def _gaussian_radius(det_size, min_overlap=0.7):
    """Calculate gaussian radius for foreground objects.

    Parameters
    ----------
    det_size : tuple of int
        Object size (h, w).
    min_overlap : float
        Minimal overlap between objects.

    Returns
    -------
    float
        Gaussian radius.

    """
    height, width = det_size

    a1 = 1
    b1 = (height + width)
    c1 = width * height * (1 - min_overlap) / (1 + min_overlap)
    sq1 = np.sqrt(b1 ** 2 - 4 * a1 * c1)
    r1 = (b1 + sq1) / 2

    a2 = 4
    b2 = 2 * (height + width)
    c2 = (1 - min_overlap) * width * height
    sq2 = np.sqrt(b2 ** 2 - 4 * a2 * c2)
    r2 = (b2 + sq2) / 2

    a3 = 4 * min_overlap
    b3 = -2 * min_overlap * (height + width)
    c3 = (min_overlap - 1) * width * height
    sq3 = np.sqrt(b3 ** 2 - 4 * a3 * c3)
    r3 = (b3 + sq3) / 2
    return min(r1, r2, r3)

def _gaussian_2d(shape, sigma=1):
    """Generate 2d gaussian.

    Parameters
    ----------
    shape : tuple of int
        The shape of the gaussian.
    sigma : float
        Sigma for gaussian.

    Returns
    -------
    float
        2D gaussian kernel.

    """
    m, n = [(ss - 1.) / 2. for ss in shape]
    y, x = np.ogrid[-m:m+1, -n:n+1]

    h = np.exp(-(x * x + y * y) / (2 * sigma * sigma))
    h[h < np.finfo(h.dtype).eps * h.max()] = 0
    return h

def _draw_umich_gaussian(heatmap, center, radius, k=1):
    """Draw a 2D gaussian heatmap.

    Parameters
    ----------
    heatmap : numpy.ndarray
        Heatmap to be write inplace.
    center : tuple of int
        Center of object (h, w).
    radius : type
        The radius of gaussian.

    Returns
    -------
    numpy.ndarray
        Drawn gaussian heatmap.

    """
    diameter = 2 * radius + 1
    gaussian = _gaussian_2d((diameter, diameter), sigma=diameter / 6)

    x, y = int(center[0]), int(center[1])

    height, width = heatmap.shape[0:2]

    left, right = min(x, radius), min(width - x, radius + 1)
    top, bottom = min(y, radius), min(height - y, radius + 1)

    masked_heatmap = heatmap[y - top:y + bottom, x - left:x + right]
    masked_gaussian = gaussian[radius - top:radius + bottom, radius - left:radius + right]
    if min(masked_gaussian.shape) > 0 and min(masked_heatmap.shape) > 0:
        np.maximum(masked_heatmap, masked_gaussian * k, out=masked_heatmap)
    return heatmap


def transform_test(imgs, short, max_size=1024, mean=(0.485, 0.456, 0.406),
                   std=(0.229, 0.224, 0.225)):
    """A util function to transform all images to tensors as network input by applying
    normalizations. This function support 1 NDArray or iterable of NDArrays.

    Parameters
    ----------
    imgs : NDArray or iterable of NDArray
        Image(s) to be transformed.
    short : int
        Resize image short side to this `short` and keep aspect ratio.
    max_size : int, optional
        Maximum longer side length to fit image.
        This is to limit the input image shape. Aspect ratio is intact because we
        support arbitrary input size in our SSD implementation.
    mean : iterable of float
        Mean pixel values.
    std : iterable of float
        Standard deviations of pixel values.

    Returns
    -------
    (mxnet.NDArray, numpy.ndarray) or list of such tuple
        A (1, 3, H, W) mxnet NDArray as input to network, and a numpy ndarray as
        original un-normalized color image for display.
        If multiple image names are supplied, return two lists. You can use
        `zip()`` to collapse it.

    """
    if isinstance(imgs, mx.nd.NDArray):
        imgs = [imgs]
    for im in imgs:
        assert isinstance(im, mx.nd.NDArray), "Expect NDArray, got {}".format(type(im))

    tensors = []
    origs = []
    for img in imgs:
        img = timage.resize_short_within(img, short, max_size)
        orig_img = img.asnumpy().astype('uint8')
        img = mx.nd.image.to_tensor(img)
        img = mx.nd.image.normalize(img, mean=mean, std=std)
        tensors.append(img.expand_dims(0))
        origs.append(orig_img)
    if len(tensors) == 1:
        return tensors[0], origs[0]
    return tensors, origs

def load_test(filenames, short, max_size=1024, mean=(0.485, 0.456, 0.406),
              std=(0.229, 0.224, 0.225)):
    """A util function to load all images, transform them to tensor by applying
    normalizations. This function support 1 filename or iterable of filenames.

    Parameters
    ----------
    filenames : str or list of str
        Image filename(s) to be loaded.
    short : int
        Resize image short side to this `short` and keep aspect ratio.
    max_size : int, optional
        Maximum longer side length to fit image.
        This is to limit the input image shape. Aspect ratio is intact because we
        support arbitrary input size in our SSD implementation.
    mean : iterable of float
        Mean pixel values.
    std : iterable of float
        Standard deviations of pixel values.

    Returns
    -------
    (mxnet.NDArray, numpy.ndarray) or list of such tuple
        A (1, 3, H, W) mxnet NDArray as input to network, and a numpy ndarray as
        original un-normalized color image for display.
        If multiple image names are supplied, return two lists. You can use
        `zip()`` to collapse it.

    """
    if isinstance(filenames, str):
        filenames = [filenames]
    imgs = [mx.image.imread(f) for f in filenames]
    return transform_test(imgs, short, max_size, mean, std)


class CenterNetDefaultTrainTransform(object):
    """Default SSD training transform which includes tons of image augmentations.

    Parameters
    ----------
    width : int
        Image width.
    height : int
        Image height.
    num_class : int
        Number of categories
    scale_factor : int, default is 4
        The downsampling scale factor between input image and output heatmap
    mean : array-like of size 3
        Mean pixel values to be subtracted from image tensor. Default is [0.485, 0.456, 0.406].
    std : array-like of size 3
        Standard deviation to be divided from image. Default is [0.229, 0.224, 0.225].
    """
    def __init__(self, width, height, num_class, scale_factor=4, mean=(0.485, 0.456, 0.406),
                 std=(0.229, 0.224, 0.225), **kwargs):
        self._kwargs = kwargs
        self._width = width
        self._height = height
        self._num_class = num_class
        self._scale_factor = scale_factor
        self._mean = np.array(mean, dtype=np.float32).reshape(1, 1, 3)
        self._std = np.array(std, dtype=np.float32).reshape(1, 1, 3)
        self._data_rng = np.random.RandomState(123)
        self._eig_val = np.array([0.2141788, 0.01817699, 0.00341571],
                                 dtype=np.float32)
        self._eig_vec = np.array([
            [-0.58752847, -0.69563484, 0.41340352],
            [-0.5832747, 0.00994535, -0.81221408],
            [-0.56089297, 0.71832671, 0.41158938]
        ], dtype=np.float32)

        self._target_generator = CenterNetTargetGenerator(
            num_class, width // scale_factor, height // scale_factor)

    def __call__(self, src, label):
        """Apply transform to training image/label."""
        # random color jittering
        img = src
        bbox = label

        # random horizontal flip
        h, w, _ = img.shape
        # img, flips = timage.random_flip(img, px=0.5)
        # bbox = tbbox.flip(bbox, (w, h), flip_x=flips[0])

        cv2 = try_import_cv2()
        input_h, input_w = self._height, self._width
        s = max(h, w) * 1.0
        c = np.array([w / 2., h / 2.], dtype=np.float32)
        sf = 0.4
        w_border = _get_border(128, img.shape[1])
        h_border = _get_border(128, img.shape[0])
        c[0] = np.random.randint(low=w_border, high=img.shape[1] - w_border)  # 裁剪后目标的中心点
        c[1] = np.random.randint(low=h_border, high=img.shape[0] - h_border)
        s = s * np.clip(np.random.randn() * sf + 1, 1 - sf, 1 + sf)  # 裁剪后图片的长宽
        # a = random.randint(-10, 10)                                         #裁剪后图片的旋转角度
        # trans_input = tbbox.get_affine_transform(c, s, a, [input_w, input_h])
        trans_input = tbbox.get_affine_transform(c, s, 0, [input_w, input_h])  #根据中心点和长宽,计算变换矩阵
        inp = cv2.warpAffine(img.asnumpy(), trans_input, (input_w, input_h), flags=cv2.INTER_LINEAR) #对图片进行仿射变换(主要是裁剪和resize)

        output_w = input_w // self._scale_factor
        output_h = input_h // self._scale_factor
        trans_output = tbbox.get_affine_transform(c, s, 0, [output_w, output_h])
        for i in range(bbox.shape[0]):
            bbox[i, :2] = tbbox.affine_transform(bbox[i, :2], trans_output)
            bbox[i, 2:4] = tbbox.affine_transform(bbox[i, 2:4], trans_output)
        bbox[:, :2] = np.clip(bbox[:, :2], 0, output_w - 1)
        bbox[:, 2:4] = np.clip(bbox[:, 2:4], 0, output_h - 1)
        img = inp
        # to tensor
        img = img.astype(np.float32) / 255.
        experimental.image.np_random_color_distort(img, data_rng=self._data_rng)
        img = (img - self._mean) / self._std
        img = img.transpose(2, 0, 1).astype(np.float32)
        img = mx.nd.array(img)

        # generate training target so cpu workers can help reduce the workload on gpu
        gt_bboxes = bbox[:, :4]
        gt_ids = bbox[:, 4:5]
        heatmap, wh_target, wh_mask, center_reg, center_reg_mask = self._target_generator(
            gt_bboxes, gt_ids)

        return img, heatmap, wh_target, wh_mask, center_reg, center_reg_mask

        # img=cv2.cvtColor(inp, cv2.COLOR_RGB2BGR)
        # for i in range(bbox.shape[0]):
        #     bbox[i, :2] = tbbox.affine_transform(bbox[i, :2], trans_input)
        #     bbox[i, 2:4] = tbbox.affine_transform(bbox[i, 2:4], trans_input)
        # bbox[:, :2] = np.clip(bbox[:, :2], 0, input_w - 1)
        # bbox[:, 2:4] = np.clip(bbox[:, 2:4], 0, input_h - 1)
        # # print(bbox, c, s, a, img.shape)
        # for i in range(len(bbox)):
        #     cv2.rectangle(img, tuple(bbox[i][:2]), tuple(bbox[i][2:4]), (0, 255, 0), 2)
        # cv2.imshow("img", img)
        # cv2.waitKey(0)
        # cv2.destroyAllWindows()

def _get_border(border, size):
    """Get the border size of the image"""
    i = 1
    while size - border // i <= border // i:
        i *= 2
    return border // i


if __name__ == "__main__":
    img_path = r"E:	wo_cats.jpg"
    transform = CenterNetDefaultTrainTransform(
        512, 512, num_class=3, scale_factor=4)
    img = mx.image.imread(img_path)
    label = np.array([[112, 335, 1360, 980, 1], [1140, 151, 1509, 774, 1]]).reshape(-1, 5)
    transform(img, label)
4. loss函数理解
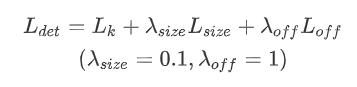
center_net的loss包括三部分,heatmap的loss,目标长宽预测loss,目标中心点偏移值loss。其中heatmap的LK采用改进的focal loss,长宽预测的Lsize和目标中心点偏移Loff都采用L1Loss, 而且Lsize加上了0.1的权重。
heatmap loss
heatmap loss的计算公式如下,对focal loss进行了改写,α和β是超参数,用来均衡难易样本和正负样本。N是图像的关键点数量(正样本个数),用于将所有的positive focal loss标准化为1,求和符号的下标xyc表示所有heatmap上的所有坐标点(c表示目标类别,每个类别一张heatmap),为预测值,Yxyc为标注真实值。
关于focal loss的理解参考:https://www.cnblogs.com/silence-cho/p/12987476.html , https://zhuanlan.zhihu.com/p/66048276

中心点偏移值损失
Loff损失函数公式如下, 其只对正样本的偏移值损失进行计算。其中 表示预测的偏移值,p为图片中目标中心点坐标,R为缩放尺度,
为缩放后中心点的近似整数坐标
假设图片实际中心点p为(125, 63),由于图片的尺寸为512*512,缩放尺度R=4,因此缩放后的128x128尺寸下中心点坐标为pR(31.25, 15.75), 相对于整数坐标(31, 15)的偏移值即为(0.25, 0.75), 即(p/R -
)

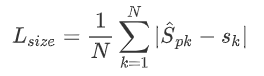
长宽预测损失值
损失函数公式如下,也是只对正样本的损失值计算,Spk为预测尺寸,Sk
参考:
https://zhuanlan.zhihu.com/p/96856635?utm_source=wechat_session
https://zhuanlan.zhihu.com/p/165313457?utm_source=wechat_session
https://zhuanlan.zhihu.com/p/66048276
https://zhuanlan.zhihu.com/p/73516696