推荐阅读:
Glide是一个快速高效的Android图片加载库,注重于平滑的滚动。Glide提供了易用的API,高性能、可扩展的图片解码管道,以及自动的资源池技术。为了让用户拥有良好的App使用体验,图片不仅要快速加载,而且还不能因为过多的主线程I/O或频繁的垃圾回收导致页面的闪烁和抖动现象。
Glide使用了多个步骤来确保在Android上加载图片尽可能的快速和平滑:
1.自动、智能地下采样(downsampling)和缓存(caching),以最小化存储开销和解码次数;
2.积极的资源重用,例如字节数组和Bitmap,以最小化昂贵的垃圾回收和堆碎片影响;
3.深度的生命周期集成,以确保仅优先处理活跃的Fragment和Activity的请求,并有利于应用在必要时释放资源以避免在后台时被杀掉。
本文将依次分析Glide如下问题:
1.Glide图片加载的大致加载流程
2.Glide图片加载的生命周期的集成
3.Glide的图片缓存机制
4.对象池优化,减少内存抖动
5.Bitmap的解码
6.网络栈的切换
1.Glide图片加载的大致加载流程
Glide使用简明的流式语法Api,大部分情况下一行代码搞定图片显示,比如:
Glide.with(activity).load(url).into(imageView)
就以上述调用简易分析图片加载流程,如下图:
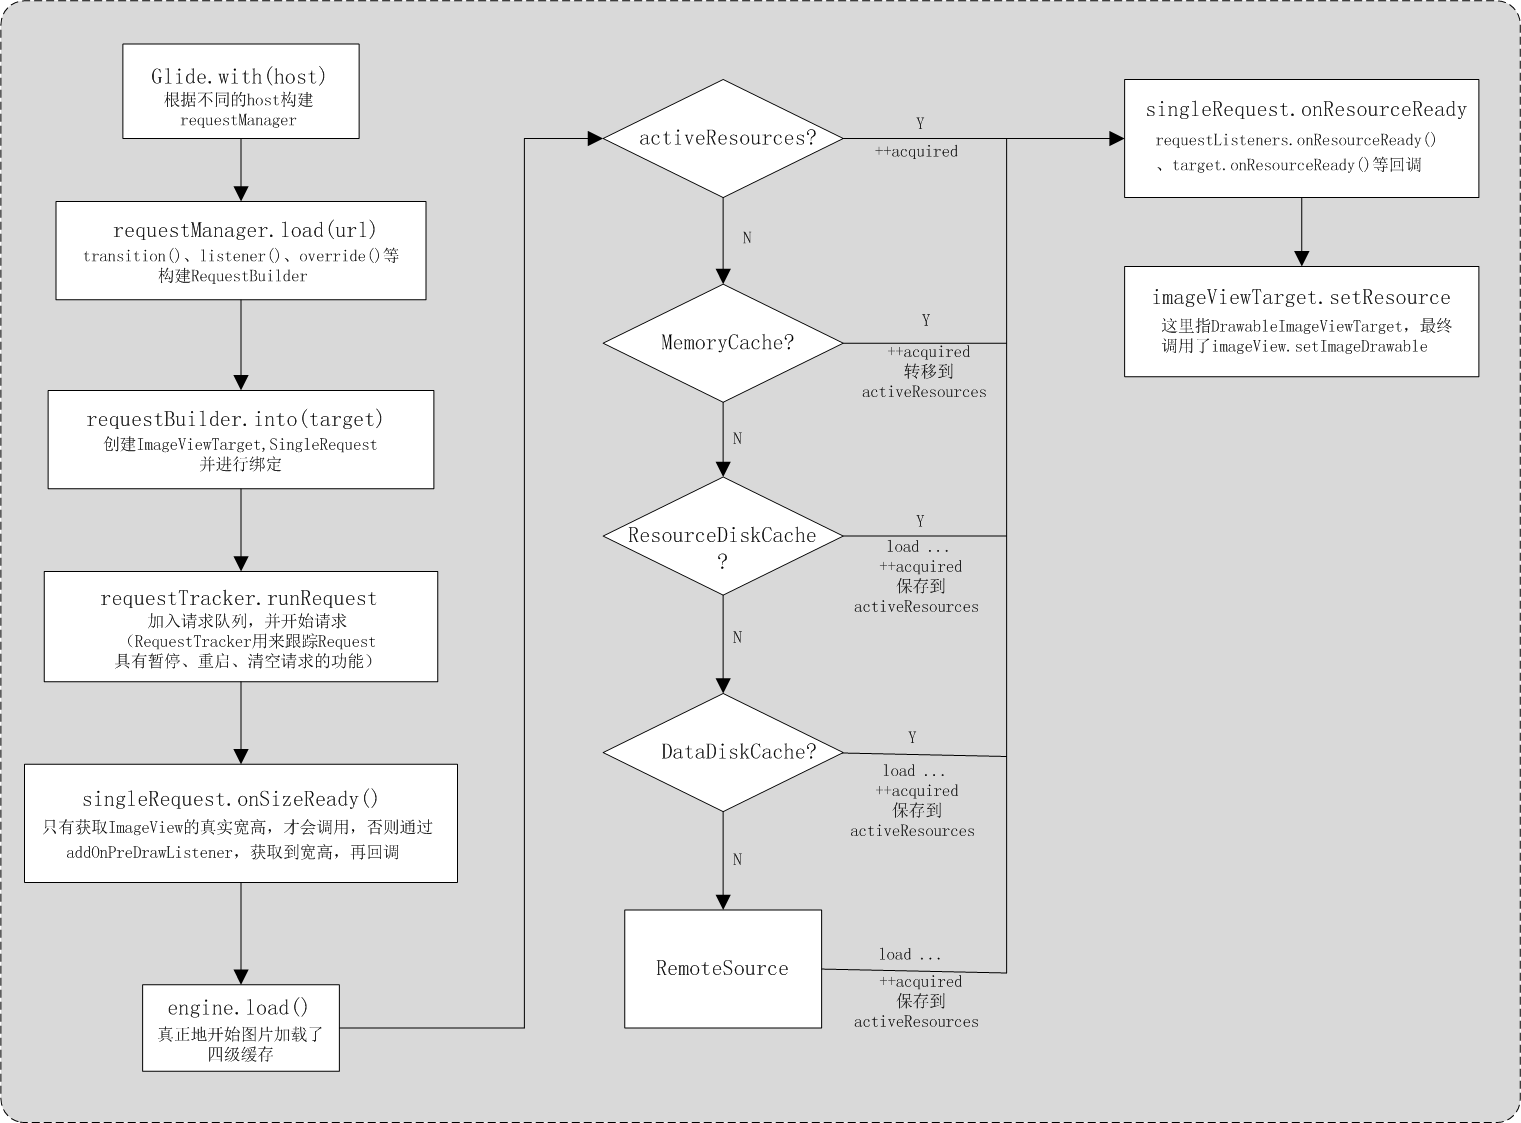
Glide图片加载流程图
ResourceDiskCache包含了降低采样、转换的图片资源,DataDiskCache为原始图片资源。RemoteSurce即从远端服务器拉取资源。从ResourceCache、RemoteSource 加载图片都涉及到ModelLoader、 解码与转码,以及多层回调才到显示图片,流程比较复杂,这里就不详述了。
2.Glide图片加载的生命周期的集成
从Glide.with(host)调用出发,跟踪创建RequestManager的过程,可以推断了解到RequestManager的实例化,最终由RequestManagerRetriever一系列重载函数get()完成,最终根据host不同类型(Application和非ui线程除外),由supportFragmentGet或fragmentGet方法构建,其实现如下:
@NonNull
private RequestManager supportFragmentGet(@NonNull Context context, @NonNull androidx.fragment.app.FragmentManager fm, @Nullable Fragment parentHint, boolean isParentVisible) {
     SupportRequestManagerFragment current = this.getSupportRequestManagerFragment(fm, parentHint, isParentVisible);
    RequestManager requestManager = current.getRequestManager();
     if (requestManager == null) {
          Glide glide = Glide.get(context);
          requestManager = this.factory.build(glide, current.getGlideLifecycle(), current.getRequestManagerTreeNode(), context);
          current.setRequestManager(requestManager);
     }

    return requestManager;
}

private RequestManager fragmentGet(@NonNull Context context, @NonNull FragmentManager fm, @Nullable android.app.Fragment parentHint, boolean isParentVisible) {
    RequestManagerFragment current = this.getRequestManagerFragment(fm, parentHint, isParentVisible);
    RequestManager requestManager = current.getRequestManager();
    if (requestManager == null) {
            Glide glide = Glide.get(context);
        requestManager = this.factory.build(glide, current.getGlideLifecycle(), current.getRequestManagerTreeNode(), context);
        current.setRequestManager(requestManager);
    }

    return requestManager;
}
都会创建并添加一个可不见的SupportRequestManagerFragment或者RequestManagerFragment,而这两个Fragment都有添加LifecycleListener的功能,在其生命周期函数中都会调用listener对应的生命周期函数,代码如下:
SupportRequestManagerFragmentRequestManagerFragment{
  //对LifecycleListener 进行了封装
  private final ActivityFragmentLifecycle lifecycle;
  @Override
  public void onStart() {
    super.onStart();
    lifecycle.onStart();
  }

  @Override
  public void onStop() {
    super.onStop();
    lifecycle.onStop();
  }

  @Override
  public void onDestroy() {
    super.onDestroy();
    lifecycle.onDestroy();
    unregisterFragmentWithRoot();
  }
}

class ActivityFragmentLifecycle implements Lifecycle {
   void onStart() {
    isStarted = true;
    for (LifecycleListener lifecycleListener : Util.getSnapshot(lifecycleListeners)) {
      lifecycleListener.onStart();
    }
  }

  void onStop() {
    isStarted = false;
    for (LifecycleListener lifecycleListener : Util.getSnapshot(lifecycleListeners)) {
      lifecycleListener.onStop();
    }
  }

  void onDestroy() {
    isDestroyed = true;
    for (LifecycleListener lifecycleListener : Util.getSnapshot(lifecycleListeners)) {
      lifecycleListener.onDestroy();
    }
  }
}
再查看RequestManager的相关代码实现,如下:
public class RequestManager implements LifecycleListener, ...{
  RequestManager(...,Lifecycle lifecycle,...) {
    ...
    this.lifecycle = lifecycle;
    ...
    // If we're the application level request manager, we may be created on a background thread.
    // In that case we cannot risk synchronously pausing or resuming requests, so we hack around the
    // issue by delaying adding ourselves as a lifecycle listener by posting to the main thread.
    // This should be entirely safe.
    if (Util.isOnBackgroundThread()) {
      mainHandler.post(addSelfToLifecycle);
    } else {
      lifecycle.addListener(this);
    }
    lifecycle.addListener(connectivityMonitor);


    ...
  }

@Override
  public synchronized void onStart() {
    resumeRequests();
    targetTracker.onStart();
  }

  /**
   * Lifecycle callback that unregisters for connectivity events (if the
   * android.permission.ACCESS_NETWORK_STATE permission is present) and pauses in progress loads.
   */
  @Override
  public synchronized void onStop() {
    pauseRequests();
    targetTracker.onStop();
  }

  /**
   * Lifecycle callback that cancels all in progress requests and clears and recycles resources for
   * all completed requests.
   */
  @Override
  public synchronized void onDestroy() {
    ...
    requestTracker.clearRequests();
    lifecycle.removeListener(this);
    lifecycle.removeListener(connectivityMonitor);
    ..
  }
}
RequestManager实现了LifecycleListener接口,并在构造器中给lifecycle添加listener,而这里lifecycle正好对应了RequestManagerFragment中的lifecycle,就这样RequestManager可以只能感知RequestManagerFragment的生命周期,也就感知其中host Activity或者Fragment的生命周期。
RequestManager管理所有的其对应host中所有的请求,requestTracker对跟踪Request的封装,具有暂停、重启、清空请求的功能。
至此就可以知道Glide图片加载可以智能感知Activity、Fragment的生命周期函数进行重启,暂停,清除。
3.Glide的图片缓存机制
在Glide图片加载流程图中,可以知道真正开始加载图片的地方从Engine.load(),大致代码如下:
public synchronized <R> LoadStatus load(...) {

    EngineKey key = keyFactory.buildKey(model, signature, width, height, transformations,
        resourceClass, transcodeClass, options);
    //活动资源
    EngineResource<?> active = loadFromActiveResources(key, isMemoryCacheable);
    if (active != null) {
      cb.onResourceReady(active, DataSource.MEMORY_CACHE);
      }
      return null;
    }

    //内存缓存
    EngineResource<?> cached = loadFromCache(key, isMemoryCacheable);
    if (cached != null) {
      cb.onResourceReady(cached, DataSource.MEMORY_CACHE);
      return null;
    }

    EngineJob<?> current = jobs.get(key, onlyRetrieveFromCache);
    if (current != null) {
      current.addCallback(cb, callbackExecutor);
      return new LoadStatus(cb, current);
    }

    EngineJob<R> engineJob = engineJobFactory.build(...);
    //解码工作任务 由线程池调度启动,ResourceDiskcache DataDiskCached都这里加载编码
    DecodeJob<R> decodeJob = decodeJobFactory.build(...);

    jobs.put(key, engineJob);

    engineJob.addCallback(cb, callbackExecutor);
    //开始DecodeJob,由线程池调度启动
    engineJob.start(decodeJob);

    return new LoadStatus(cb, engineJob);
  }
DecodeJob decode state有如下几种:
/**
   * Where we're trying to decode data from.
   */
//DecodeJob内部枚举类
private enum Stage {
    /** The initial stage. */
    INITIALIZE,
    /** Decode from a cached resource. */
    RESOURCE_CACHE,
    /** Decode from cached source data. */
    DATA_CACHE,
    /** Decode from retrieved source. */
    SOURCE,
    /** Encoding transformed resources after a successful load. */
    ENCODE,
    /** No more viable stages. */
    FINISHED,
  }
State.ENCODE代表成功从Source中加载数据后,把transformed的资源保存到DiskCache。
由此可以看出Glide分为四级缓存:
-
活动资源 (ActiveResources)
-
内存缓存 (MemoryCache)
-
资源类型(Resource DiskCache)
-
原始数据 (Data DiskCache)
活动资源:如果当前对应的图片资源正在使用,则这个图片会被Glide放入活动缓存。
内存缓存:如果图片最近被加载过,并且当前没有使用这个图片,则会被放入内存中 。
资源类型: 被解码后的图片写入磁盘文件中,解码的过程可能修改了图片的参数(如: inSampleSize、inPreferredConfig)。
原始数据: 图片原始数据在磁盘中的缓存(从网络、文件中直接获得的原始数据)。
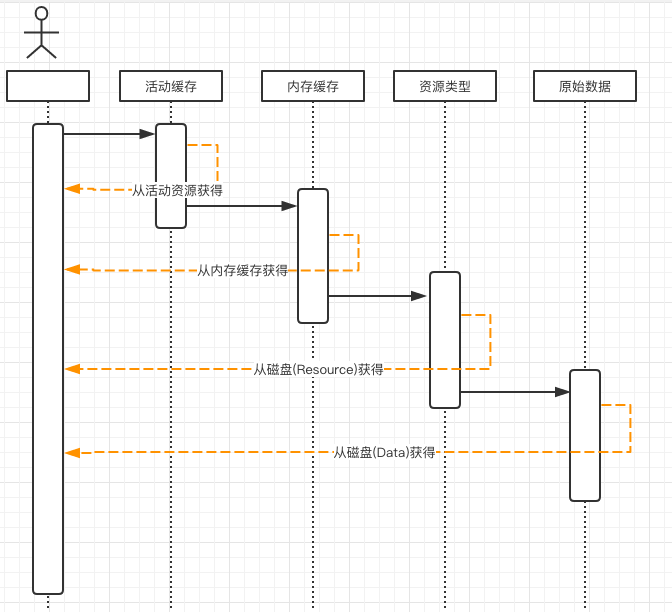
Glide加载图片依次从四级缓存中获取图片资源的时序图如下:
活动资源ActiveResources
ActiveResources维护着弱引用EngineResource map集合,当有垃圾回收时,弱引用关联的EngineResource 会被存放到ReferenceQueue中,ActiveResources在实例化时开启线程监控清理被回收的EngineResource 该EngineResource 又会转移到MemoryCache中去,具体代码如下:
final class ActiveResources {
 ...

  final Map<Key, ResourceWeakReference> activeEngineResources = new HashMap<>();
  private final ReferenceQueue<EngineResource<?>> resourceReferenceQueue = new ReferenceQueue<>();

  private ResourceListener listener;

  ...

  ActiveResources(
      boolean isActiveResourceRetentionAllowed, Executor monitorClearedResourcesExecutor) {
    this.isActiveResourceRetentionAllowed = isActiveResourceRetentionAllowed;
    this.monitorClearedResourcesExecutor = monitorClearedResourcesExecutor;

    monitorClearedResourcesExecutor.execute(
        new Runnable() {
          @Override
          public void run() {
            cleanReferenceQueue();
          }
    });
  }
}

void cleanupActiveReference(@NonNull ResourceWeakReference ref) {
    // Fixes a deadlock where we normally acquire the Engine lock and then the ActiveResources lock
    // but reverse that order in this one particular test. This is definitely a bit of a hack...
    synchronized (listener) {
      synchronized (this) {
        activeEngineResources.remove(ref.key);

        if (!ref.isCacheable || ref.resource == null) {
          return;
        }
        EngineResource<?> newResource =
            new EngineResource<>(ref.resource, /*isCacheable=*/ true, /*isRecyclable=*/ false);
        newResource.setResourceListener(ref.key, listener);
        //Engine实现了ResourceListener接口,最终会调用Resource.recycle()方法
        listener.onResourceReleased(ref.key, newResource);
      }
    }
 }

//Engine类
public synchronized void onResourceReleased(Key cacheKey, EngineResource<?> resource) {
    activeResources.deactivate(cacheKey);
    if (resource.isCacheable()) {
      cache.put(cacheKey, resource);
    } else {
      resourceRecycler.recycle(resource);
    }
 }
EngineResource是对Resource一种包装,新增了引用计数功能,每当一个地方获取该资源时,引用计数acquired就会加1,当EngineResource被release时引用计数acquired减1,当acquired==0也会回调EngineResource从ActiveResources回收到MemeryCache中去。
那引用计数在哪些情况下加1
情况一、 资源在ActiveResources中命中,acquired++,代码如下:
private EngineResource<?> loadFromActiveResources(Key key, boolean isMemoryCacheable) {
    if (!isMemoryCacheable) {
      return null;
    }
    EngineResource<?> active = activeResources.get(key);
    if (active != null) {
      active.acquire();//acquire++
    }

    return active;
  }
情况二、资源在MemoryCache中命中,资源从MemoryCach转移到ActiveResources,acquired++,代码如下:
private EngineResource<?> loadFromCache(Key key, boolean isMemoryCacheable) {
    if (!isMemoryCacheable) {
      return null;
    }
     EngineResource<?> cached = getEngineResourceFromCache(key);
    if (cached != null) {
      cached.acquire();
       //cached 转移到activeResources
      activeResources.activate(key, cached);
    }
    return cached;
  }
情况三、 资源从DiskCache、RemoteSource加载也会acquired++,拉取的资源也会加入到ActiveResources。通过DecodeJob加载的资源,最终都会回调DecodeJob的decodeFromRetrievedData()方法,最终辗转到EngineJob的notifyCallbacksOfResult()方法,其代码如下:
void notifyCallbacksOfResult() {

     ...
     //listener 为Engine,
    //EngineonEngineJobComplete方法中调用了activeResources.activate()
    listener.onEngineJobComplete(this, localKey, localResource);

    //CallResourceReady.run方法调用
    for (final ResourceCallbackAndExecutor entry : copy) {
      entry.executor.execute(new CallResourceReady(entry.cb));
    }
    decrementPendingCallbacks();
}

//Engine
public synchronized void onEngineJobComplete(
      EngineJob<?> engineJob, Key key, EngineResource<?> resource) {

    if (resource != null) {
      resource.setResourceListener(key, this);

      if (resource.isCacheable()) {
        //把加载的资源加入到activeResources中去
        activeResources.activate(key, resource);
      }
    }

    jobs.removeIfCurrent(key, engineJob);
  }


private class CallResourceReady implements Runnable {
    ...

    @Override
    public void run() {
      synchronized (EngineJob.this) {
        if (cbs.contains(cb)) {
          // Acquire for this particular callback.
          engineResource.acquire(); //acquire++
          callCallbackOnResourceReady(cb);
          removeCallback(cb);
        }
        decrementPendingCallbacks();
      }
    }
  }
引用计数减一情况
在Glide图片加载的生命周期的集成部分,已分析RequestManeger能感知Activity,Fragment生命周期函数,由RequetTracker跟踪Request,具有暂停、重启,清除Request的功能。
RequestManeger生命回调函数onStop、onDestory代码如下:
public synchronized void onStop() {
    pauseRequests();//暂停所有请求
    targetTracker.onStop();
  }

  /**
   * Lifecycle callback that cancels all in progress requests and clears and recycles resources for
   * all completed requests.
   */
  @Override
  public synchronized void onDestroy() {
    targetTracker.onDestroy();
    for (Target<?> target : targetTracker.getAll()) {
      clear(target);
    }
    targetTracker.clear();
    requestTracker.clearRequests();//清除所有请求
    lifecycle.removeListener(this);
    lifecycle.removeListener(connectivityMonitor);
    mainHandler.removeCallbacks(addSelfToLifecycle);
    glide.unregisterRequestManager(this);
  }
requestTracker的clearRequests()和pauseRequests()方法都调用了request.clear()方法,而真正的请求实例为SingleRequest,其clear方法代码如下:
public synchronized void clear() {
    ...
    cancel();
    // Resource must be released before canNotifyStatusChanged is called.
    if (resource != null) {
      releaseResource(resource);
    }
    ...
}

private void releaseResource(Resource<?> resource) {
    engine.release(resource);//EngineResoure.release
    this.resource = null;
}
调用了EngineResoure.release()方法,代码如下:
void release() {
    // To avoid deadlock, always acquire the listener lock before our lock so that the locking
    // scheme is consistent (Engine -> EngineResource). Violating this order leads to deadlock
    // (b/123646037).
    synchronized (listener) {
      synchronized (this) {
        if (acquired <= 0) {
          throw new IllegalStateException("Cannot release a recycled or not yet acquired resource");
        }
        if (--acquired == 0) {//减一操作
          //Engine.onResourceReleased
          listener.onResourceReleased(key, this);
        }
      }
    }
  }
当acquired == 0时会回调Engine. onResourceReleased方法,把资源从activeResources中移除,加入带MemoryCache中去,其代码如下:
public synchronized void onResourceReleased(Key cacheKey, EngineResource<?> resource) {
    //从activeResources 移除该资源
    activeResources.deactivate(cacheKey);
    if (resource.isCacheable()) {
      //放入MemoryCache中
      cache.put(cacheKey, resource);
    } else {
      resourceRecycler.recycle(resource);
    }
  }
内存缓存MemoryCache
Glide中MemoryCache默认情况下,为LruResourceCache,继承了LruCache,使用了最近最少算法管理内存资源,同时对外提供了trimMemory ,clearMemory接口,代码如下:
/**
 * An LRU in memory cache for {@link com.bumptech.glide.load.engine.Resource}s.
 */
public class LruResourceCache extends LruCache<Key, Resource<?>> implements MemoryCache {
  private ResourceRemovedListener listener;

  ...

  @Override
  public void setResourceRemovedListener(@NonNull ResourceRemovedListener listener) {
    this.listener = listener;
  }

  @Override
  protected void onItemEvicted(@NonNull Key key, @Nullable Resource<?> item) {
    if (listener != null && item != null) {
      listener.onResourceRemoved(item);
    }
  }

  @Override
  protected int getSize(@Nullable Resource<?> item) {
    if (item == null) {
      return super.getSize(null);
    } else {
      return item.getSize();
    }
  }

  @SuppressLint("InlinedApi")
  @Override
  public void trimMemory(int level) {
    if (level >= android.content.ComponentCallbacks2.TRIM_MEMORY_BACKGROUND) {
      // Entering list of cached background apps
      // Evict our entire bitmap cache
      clearMemory();
    } else if (level >= android.content.ComponentCallbacks2.TRIM_MEMORY_UI_HIDDEN
        || level == android.content.ComponentCallbacks2.TRIM_MEMORY_RUNNING_CRITICAL) {
      // The app's UI is no longer visible, or app is in the foreground but system is running
      // critically low on memory
      // Evict oldest half of our bitmap cache
      trimToSize(getMaxSize() / 2);
    }
  }
}
MemoryCache对外提供了资源删除监听接口,通过搜索可以知道Engine实现了ResourceRemovedListener接口,并设置给MemoryCache,Engine资源删除回调函数Engine.onResourceRemoved相关代码如下:
@Override
public void onResourceRemoved(@NonNull final Resource<?> resource) {
    resourceRecycler.recycle(resource);
}

//ResourceRecycler
synchronized void recycle(Resource<?> resource) {
    if (isRecycling) {
      // If a resource has sub-resources, releasing a sub resource can cause it's parent to be
      // synchronously evicted which leads to a recycle loop when the parent releases it's children.
      // Posting breaks this loop.
      handler.obtainMessage(ResourceRecyclerCallback.RECYCLE_RESOURCE, resource).sendToTarget();
    } else {
      isRecycling = true;
      resource.recycle();
      isRecycling = false;
    }
  }
onResourceRemoved回调函数对资源进行Recycle,MemoryCache的Resource实际上为EngineResource,最终对被包裹的资源进行Recycle,而Resource的实现类有如下图这些:
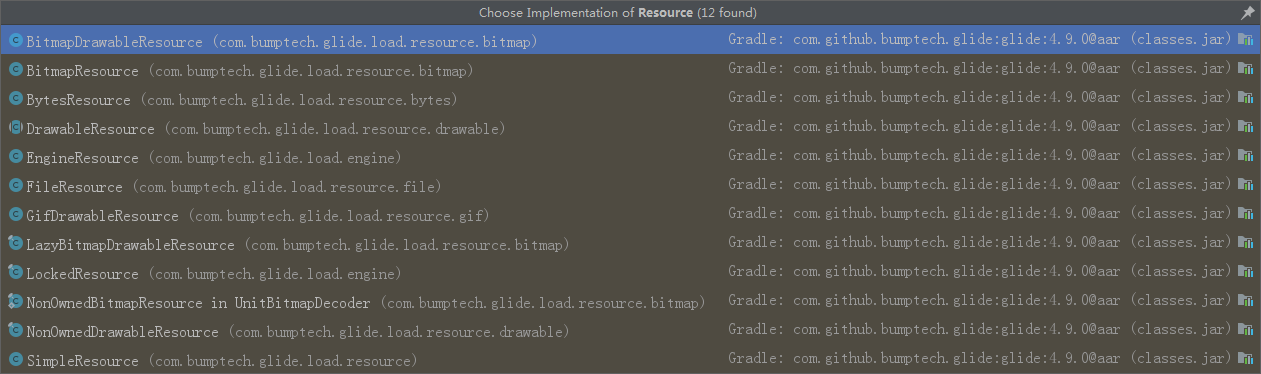
对跟Bitmap有关的BitmapResource,BitmapDrawableResource进行分析,其recycle方法实现如下:
//BitmapResource
public void recycle() {
    bitmapPool.put(bitmap);
}
//BitmapDrawableResource
public void recycle() {
    bitmapPool.put(drawable.getBitmap());
}
把从MemoryCache删除资源关联的bitmap回收到BitmapPool中,注意这里删除是指资源被MemoryCache被逐出,触发onItemEvicted回调了。
那么有些地方会触发了onItemEvicted动作了?
情况一、MemoryCache进行put操作时,old的资源被新的资源覆盖时,oldResource被逐出,和size超过了maxSize,会逐出最近最少使用的资源,都会触发onItemEvicted,最终资源关联的Bitmap回收到BitmapPool中。
情况二、Glide对面提供了trimMemory,clearMemory接口(通常会在Activity.trimMemory方法中调用),对最终MemoryCache资源进行清理,触发onItemEvicted回调,资源关联的Bitmap回收到BitmapPool中。
这里讲到MemoryCache资源被Evicted的情况,其他情况还没讲到,其实前文已经提到了,资源在MemoryCache中命中了,被remove,且转移到ActiveResources中;在资源请求被暂停、取消、删除以及ActiveResources自身资源清除监控线程进行清除时,也会是相关的资源从ActiveResources转移到MemoryCache。
4.对象池优化,减少内存抖动
Glide大量使用对象池Pools来对频繁需要创建和销毁的代码进行优化。
以下就是使用对象池的情况:
1.每次图片加载都会涉及到Request对象,可能涉及到EncodeJob,DecodeJob对象,在加载大量图片的加载情况下,这会频繁创建和销毁对象,造成内存抖动,至此使用FactoryPools(android support包 Pool)。
2.对MemoryCache的资源回收,使用BitmapPool池对资源关联的Bitmap回收;解码图片生成Bitmap(大对象)时,复用了BitmapPool池中的Bitmap。
3.解码图片生成Bitmap时,配置了inTempStorage,使用了ArrayPool技术复用了byte[](64kb)。
FactoryPools
FactoryPools是基于android support包中的对象池存取的辅助类Pools,先看Pools源码:
public final class Pools {

    /**
     * Interface for managing a pool of objects.
     *
     * @param <T> The pooled type.
     */
    public static interface Pool<T> {

        /**
         * @return An instance from the pool if such, null otherwise.
         */
        public T acquire();

        /**
         * Release an instance to the pool.
         *
         * @param instance The instance to release.
         * @return Whether the instance was put in the pool.
         *
         * @throws IllegalStateException If the instance is already in the pool.
         */
        public boolean release(T instance);
    }

    private Pools() {
        /* do nothing - hiding constructor */
    }

    /**
     * Simple (non-synchronized) pool of objects.
     *
     * @param <T> The pooled type.
     */
    public static class SimplePool<T> implements Pool<T> {
        private final Object[] mPool;

        private int mPoolSize;

        /**
         * Creates a new instance.
         *
         * @param maxPoolSize The max pool size.
         *
         * @throws IllegalArgumentException If the max pool size is less than zero.
         */
        public SimplePool(int maxPoolSize) {
            if (maxPoolSize <= 0) {
                throw new IllegalArgumentException("The max pool size must be > 0");
            }
            mPool = new Object[maxPoolSize];
        }

        @Override
        @SuppressWarnings("unchecked")
        public T acquire() {
            if (mPoolSize > 0) {
                final int lastPooledIndex = mPoolSize - 1;
                T instance = (T) mPool[lastPooledIndex];
                mPool[lastPooledIndex] = null;
                mPoolSize--;
                return instance;
            }
            return null;
        }

        @Override
        public boolean release(T instance) {
            if (isInPool(instance)) {
                throw new IllegalStateException("Already in the pool!");
            }
            if (mPoolSize < mPool.length) {
                mPool[mPoolSize] = instance;
                mPoolSize++;
                return true;
            }
            return false;
        }
        private boolean isInPool(T instance) {
            for (int i = 0; i < mPoolSize; i++) {
                if (mPool[i] == instance) {
                    return true;
                }
            }
            return false;
        }
    }
    /**
     * Synchronized) pool of objects.
     *
     * @param <T> The pooled type.
     */
    public static class SynchronizedPool<T> extends SimplePool<T> {
        private final Object mLock = new Object();

        /**
         * Creates a new instance.
         *
         * @param maxPoolSize The max pool size.
         *
         * @throws IllegalArgumentException If the max pool size is less than zero.
         */
        public SynchronizedPool(int maxPoolSize) {
            super(maxPoolSize);
        }

        @Override
        public T acquire() {
            synchronized (mLock) {
                return super.acquire();
            }
        }

        @Override
        public boolean release(T element) {
            synchronized (mLock) {
                return super.release(element);
            }
        }
    }
}

定义了Pool池接口类,包含两个方法acquire(从池中取出对象),release(回收对象,存入对象池),提供了两个实现简单实现类SimplePool,SynchronizedPool,SimplePool用数组维护这个对象池,有个缺点就是不能动态扩容,SynchronizedPool对SimplePool进行了同步。
FactoryPools类中定义了FactoryPool类,FactoryPool使用装饰者模式,对Pool扩展了对象工厂创建、回收对象重置功能;提供了一些创建Pool的静态方法。源码搜索FactoryPools,就看到哪些地方用FactoryPools了,如图:
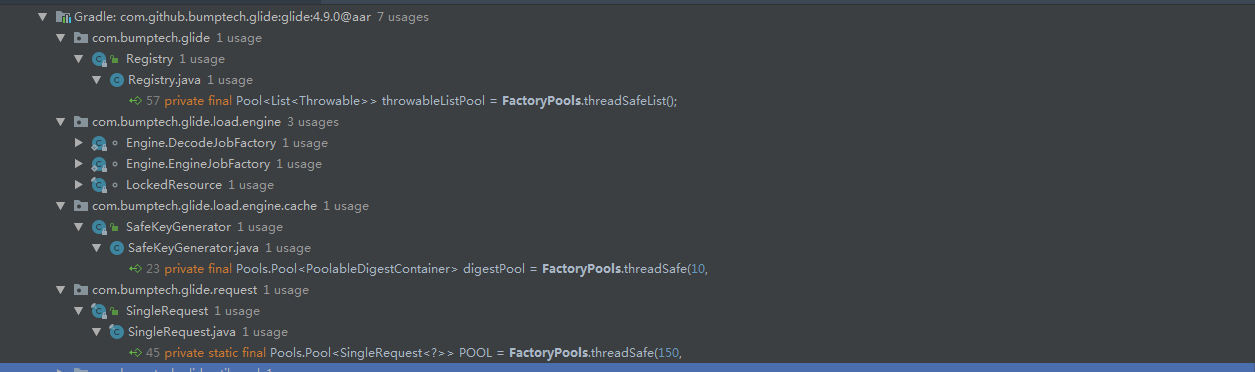
这里就不详细陈述EncodeJob、DecodeJob、SingRequest,是在什么时机,被回收到FactoryPool中了,基本上都在其release方法中进行回收操作。
BitmapPool
Bitmap的创建是申请内存昂贵的,大则占用十几M,使用进行BitmapPool回收复用,可以显著减少内存消耗和抖动。BitmapPool定义了如下接口:
public interface BitmapPool {

  long getMaxSize();

  void setSizeMultiplier(float sizeMultiplier);

  void put(Bitmap bitmap);

  Bitmap get(int width, int height, Bitmap.Config config);

  Bitmap getDirty(int width, int height, Bitmap.Config config);

  void clearMemory();

  void trimMemory(int level);
}
Glide的默认BitmapPool实现为LruBitmapPool,从GlideBuild.build方法可以看出,LruBitmapPool把Bitmap缓存的维护委托给LruPoolStrategy,大致代码如下:
public class LruBitmapPool implements BitmapPool {
  ...
  @Override
  public synchronized void put(Bitmap bitmap) {

    ...

    final int size = strategy.getSize(bitmap);
    strategy.put(bitmap);
    tracker.add(bitmap);

    puts++;
    currentSize += size;
    ...
    evict();
  }

  private void evict() {
    trimToSize(maxSize);
  }


  public Bitmap get(int width, int height, Bitmap.Config config) {
    Bitmap result = getDirtyOrNull(width, height, config);
    if (result != null) {
      result.eraseColor(Color.TRANSPARENT);
    } else {
      result = createBitmap(width, height, config);
    }

    return result;
  }

  public Bitmap getDirty(int width, int height, Bitmap.Config config) {
    Bitmap result = getDirtyOrNull(width, height, config);
    if (result == null) {
      result = createBitmap(width, height, config);
    }
    return result;
  }

  private synchronized Bitmap getDirtyOrNull(
      int width, int height, @Nullable Bitmap.Config config) {
    assertNotHardwareConfig(config);

    final Bitmap result = strategy.get(width, height, config != null  config : DEFAULT_CONFIG);
    if (result == null) {
      misses++;
    } else {
      hits++;
      currentSize -= strategy.getSize(result);
      tracker.remove(result);
      normalize(result);
    }

    dump();

    return result;
 }

  public void clearMemory() {
    ...
    trimToSize(0);
  }


  public void trimMemory(int level) {

    if (level >= android.content.ComponentCallbacks2.TRIM_MEMORY_BACKGROUND) {
      clearMemory();
    } else if (level >= android.content.ComponentCallbacks2.TRIM_MEMORY_UI_HIDDEN
        || level == android.content.ComponentCallbacks2.TRIM_MEMORY_RUNNING_CRITICAL) {
      trimToSize(getMaxSize() / 2);
    }
  }

  private synchronized void trimToSize(long size) {
    while (currentSize > size) {
      final Bitmap removed = strategy.removeLast();
      ...
      currentSize -= strategy.getSize(removed);
      evictions++;
      ...
      removed.recycle();
    }
  }
Bitmap缓存策略接口默认实现有AttributeStrategy和SizeConfigStrategy,前者在Api<19情况下使用,两者实现功能相同,只不过前者是严格要个图片的width、height、Bitmap.Config完全匹配,才算命中缓存,后者不严格要求图片的大小size和Config完全匹配,获取到的缓存Bitmap的size,可能会大于要求图片的size,再通过Bitmap.reconfigure()重新配置成符合要求的图片,其具体代码如下:
 public Bitmap get(int width, int height, Bitmap.Config config) {
    int size = Util.getBitmapByteSize(width, height, config);
    Key bestKey = findBestKey(size, config);

    Bitmap result = groupedMap.get(bestKey);
    if (result != null) {
      // Decrement must be called before reconfigure.
      decrementBitmapOfSize(bestKey.size, result);
      //重新配置成符合要求的图片
      result.reconfigure(width, height, config);
    }
    return result;
  }

  private Key findBestKey(int size, Bitmap.Config config) {
    Key result = keyPool.get(size, config);
    for (Bitmap.Config possibleConfig : getInConfigs(config)) {
      NavigableMap<Integer, Integer> sizesForPossibleConfig = getSizesForConfig(possibleConfig);
      //获取>= size的最小值
      Integer possibleSize = sizesForPossibleConfig.ceilingKey(size);
      if (possibleSize != null && possibleSize <= size * MAX_SIZE_MULTIPLE) {
        if (possibleSize != size
            || (possibleConfig == null ? config != null : !possibleConfig.equals(config))) {
          keyPool.offer(result);
          result = keyPool.get(possibleSize, possibleConfig);
        }
        break;
      }
    }
    return result;
  }
这两个缓存策略类都是使用GroupedLinkedMap来维护Bitmap缓存,GroupedLinkedMap内部使用了一个名为head的双向链表,链表的key是由bitmap size和config构成的Key,value是一个由bitmap构成的list。这样GroupedLinkedMap中的每个元素就相当于是一个组,这个组中的bitmap具有相同的size和config,同时,为了加快查找速度,添加了keyToEntry的Hashmap,将key和链表中的LinkedEntry对应起来。
GroupedLinkedMap进行get操作时,会把该组移动链头,返回并移除该组的最后一个元素;put操作会把该组移动链尾,添加到该组尾部;进行trimToSize操作,优先删除链尾的对应组的最后一个元素,当该组没有元素时,删除该组。这里与访问排序的LinkedHashMap有区别了,get和put操作都是把节点移至到链尾,LruCache trimToSize操作时优先删除链头。
ArrayPool
ArrayPool用于存储不同类型数组的数组池的接口,默认实现LruArrayPool只支持int[],byte[]池化,内部也是使用GroupedLinkedMap维护着,由size和class构成key,获取数组资源时,跟SizeConfigStrategy类似,获取到Array的size,可能会大于要求的size。在图片Bimtap解码的时候有使用到ArrayPool。
五、Bitmap的解码
先介绍下加载本地资源和远程资源的流程(从DecodeJob中算起)大致如下:
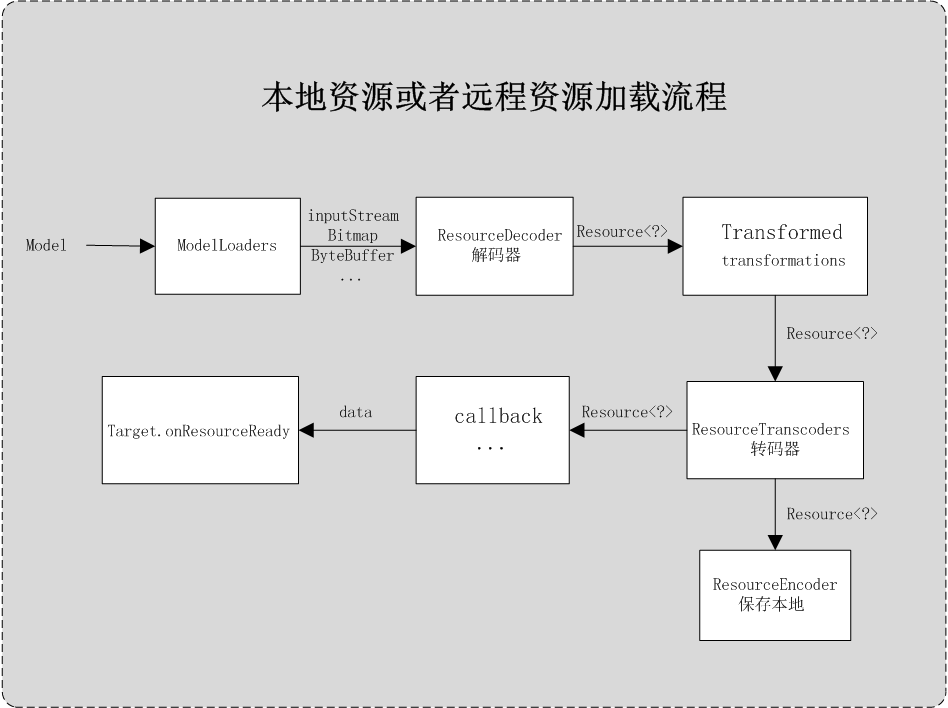
通常情况下,远程图片通过ModelLoaders拉取图片,返回inoutStream/ByteBuffer等,供后续对应的ResourceDecoder解码器、transformations、ResourceTranscoders转码器、ResourceEncoder编码器处理。
5.Bitmap的解码
图片加载不管源自网络、本地文件都会通过ResourceDecoder编码器对inputStream、ByteBuffer等进行下采样、解码工作,由Downsampler辅助ResourceDecoder完成,Downsampler相关的decode方法如下:
public Resource<Bitmap> decode(..) throws IOException {
    //从ArrayPool获取byte[]资源,设置给inTempStorage
    byte[] bytesForOptions = byteArrayPool.get(ArrayPool.STANDARD_BUFFER_SIZE_BYTES, byte[].class);
    BitmapFactory.Options bitmapFactoryOptions = getDefaultOptions();
    bitmapFactoryOptions.inTempStorage = bytesForOptions;

    ...

    try {
      Bitmap result = decodeFromWrappedStreams(is, bitmapFactoryOptions,
          downsampleStrategy, decodeFormat, isHardwareConfigAllowed, requestedWidth,
          requestedHeight, fixBitmapToRequestedDimensions, callbacks);
      return BitmapResource.obtain(result, bitmapPool);
    } finally {
      releaseOptions(bitmapFactoryOptions);
      //byte[]资源回收到ArrayPool
      byteArrayPool.put(bytesForOptions);
    }
  }

 private Bitmap decodeFromWrappedStreams(...) throws IOException {
     ...
     //获取原图片的宽高
     int[] sourceDimensions = getDimensions(is, options, callbacks, bitmapPool);

    //计算BitmapFactory.Options 缩放相关参数
    //比如 inSampleSize、inScaled、inDensity、inTargetDensity
    calculateScaling(...);

    //设置inPreferredConfig、inDither
    calculateConfig(...);

    boolean isKitKatOrGreater = Build.VERSION.SDK_INT >= Build.VERSION_CODES.KITKAT;

    if ((options.inSampleSize == 1 || isKitKatOrGreater) && shouldUsePool(imageType)) {

      if (expectedWidth > 0 && expectedHeight > 0) {
        //从bitmapPool获取bitmap资源,设置options.inBitmap
       //options.inBitmap = bitmapPool.getDirty(width, height, expectedConfig)
        setInBitmap(options, bitmapPool, expectedWidth, expectedHeight);
      }
    }
    Bitmap downsampled = decodeStream(is, options, callbacks, bitmapPool);
    callbacks.onDecodeComplete(bitmapPool, downsampled);

   ...

    Bitmap rotated = null;
    if (downsampled != null) {
      // If we scaled, the Bitmap density will be our inTargetDensity. Here we correct it back to
      // the expected density dpi. 对bitmap 设置Density
      downsampled.setDensity(displayMetrics.densityDpi);
      //对图片进行旋转
      rotated = TransformationUtils.rotateImageExif(bitmapPool, downsampled, orientation);
      if (!downsampled.equals(rotated)) {
        //rotated后的Bitmap不是原Bitmap,回收原Bitmap
        bitmapPool.put(downsampled);
      }
    }

    return rotated;
  }

private static Bitmap decodeStream(...) throws IOException {
    ...
    final Bitmap result;
    TransformationUtils.getBitmapDrawableLock().lock();
    try {
      result = BitmapFactory.decodeStream(is, null, options);
    } catch (IllegalArgumentException e) {
      IOException bitmapAssertionException =
          newIoExceptionForInBitmapAssertion(e, sourceWidth, sourceHeight, outMimeType, options);
      //重用已经存在的Bitmap,失败,在尝试不重用已经存在的bitmap,
      //且把该bitmap回收到bitmapPool
      if (options.inBitmap != null) {
        try {
          is.reset();
          bitmapPool.put(options.inBitmap);
          options.inBitmap = null;
          return decodeStream(is, options, callbacks, bitmapPool);
        } catch (IOException resetException) {
          throw bitmapAssertionException;
        }
      }
      throw bitmapAssertionException;
    } finally {
      TransformationUtils.getBitmapDrawableLock().unlock();
    }

    if (options.inJustDecodeBounds) {
      is.reset();

    }
    return result;
  }
对inputStream(ByteBuffer等也雷同)的decode过程分析如下:
1.给BitmapFactory.Options选项设置了inTempStorage
inTempStorage为Bitmap解码过程中需要缓存空间,就算我们没有配置这个,系统也会给我们配置,相关代码如下:
private static Bitmap decodeStreamInternal(@NonNull InputStream is,
            @Nullable Rect outPadding, @Nullable Options opts) {
       // ASSERT(is != null);
        byte [] tempStorage = null;
        if (opts != null) tempStorage = opts.inTempStorage;
        if (tempStorage == null) tempStorage = new byte[DECODE_BUFFER_SIZE];
        return nativeDecodeStream(is, tempStorage, outPadding, opts);
}
不过,这里每次decode过程,就会申请和释放DECODE_BUFFER_SIZE的内存空间,多次docode可能会造成频繁gc和内存抖动;而Glide却从ArrayPool获取,设置给inTempStorage,decode完成后,又会回收到ArrayPool中,可以减少内存抖动。
2.获取图片原始宽高
获取图片资源的原始宽高,设置参数inJustDecodeBounds为True即可,没什么特别的,然后对inputStream进行reset,以便后续的真正的decode动作。
3.计算缩放因子,配置Options的inSampleSize、inScaled、inDensity、inTargetDensity
4.配置Options的inPreferredConfig、inDither,首先判断是否允许设置硬件位图,允许则inPreferredConfig设置为HARDWARE,inMutable为false,否则再解析流中的ImageHeader数据,假如有透明通道,inPreferredConfig设置为ARGB_8888,没有则为RGB_565,同时inDither置为True。
注意HARDWARE的bitmap不能被回收到BitmapPool,具体查看LruBitmapPool的put方法;其相应的像素数据只存在于显存中,并对图片仅在屏幕上绘制的场景做了优化,具体详述查看Glide官方文档-硬件位图。
5.设置inBitmap,如果为硬件位图配置,则不设置inBitmap。其他情况,从BitmapPool获取Bitmap,设置给inBitmap。
6.配置完Options后,就真正调用BitmapFactory的decode方法,解码失败再尝试一次取消inBitmap进行解码,并对inBitmap回收BitmapPool。然后setDensity(绘制时缩放,decodedBtimap本身占用内存没有变化),decodedBtimap最后根据exifOrientation,旋转位图。
6、网络栈的切换
Glide最终使用的网络加载ModelLoader为HttpGlideUrlLoader,其对应的DataFetcher为HttpUrlFetcher,使用HttpURLConnection进行网络请求。
Glide可以自由定制加载器ModelLoader,资源解码器ResourceDecoder,资源编码器ResourceEncoder,这里想进行底层网络库切换,定制ModelLoader即可,教材可以参考Glide文档,官方提供了OkHttp和Volley 集成库。
定制的加载器,解码器,编码器自动注入到Glide的原理如下:
1.定制LibraryGlideModule类,通过其 registerComponents()方法的形参Registry登记所有定制的加载器ModelLoader,资源解码器Decoder,资源编码器Encoder,给定制的LibraryGlideModule类添加@GlideModule注解,编译期间自动在AndroidManifest.xml文件中添加该LibraryGlideModule相关的元数据。
2.在Glide初始化时,会从功能配置文件AndroidManifest.xml中获取相关GlideModule元数据,并通过反射实例化所有的GlideModule,再迭代所有定制的GlideModule调用registerComponents方法,这样那些定制的加载器ModelLoader,解码器Decoder,编码器Encoder就自动注入到Glide了。关键源码如下:
private static void initializeGlide(@NonNull Context context, @NonNull GlideBuilder builder) {
    Context applicationContext = context.getApplicationContext();
    GeneratedAppGlideModule annotationGeneratedModule = getAnnotationGeneratedGlideModules();
    List<com.bumptech.glide.module.GlideModule> manifestModules = Collections.emptyList();
    if (annotationGeneratedModule == null || annotationGeneratedModule.isManifestParsingEnabled()) {
      manifestModules = new ManifestParser(applicationContext).parse();
    }

   ...

    for (com.bumptech.glide.module.GlideModule module : manifestModules) {
      module.applyOptions(applicationContext, builder);
    }
    if (annotationGeneratedModule != null) {
      annotationGeneratedModule.applyOptions(applicationContext, builder);
    }
    Glide glide = builder.build(applicationContext);
    for (com.bumptech.glide.module.GlideModule module : manifestModules) {
      module.registerComponents(applicationContext, glide, glide.registry);
    }

    ...
}
至此,6个问题都解析完毕,相信能对Glide有更深刻的整体认识。
参考资料:
Glide v4 快速高效的Android图片加载库(官方)
[Glide4源码解析系列] — 3.Glide数据解码与转码
android.support.v4.util.Pools源码解析
Glide4.8源码拆解(四)Bitmap解析之"下采样"浅析
如果您对博主的更新内容持续感兴趣,请关注公众号!