用wait和notify来实现线程之间的通信,这两个方法是object方法,这两个方法必须要配合synchronized使用。wait方法释放锁,notify不释放锁。
原始线程通信方式


 1 import java.util.ArrayList;
 2 import java.util.List;
 3
 4 public class ListAdd1 {
 5
 6
 7     private volatile static List list = new ArrayList();
 8
 9     public void add(){
10         list.add("bjsxt");
11     }
12     public int size(){
13         return list.size();
14     }
15
16     public static void main(String[] args) {
17
18         final ListAdd1 list1 = new ListAdd1();
19
20         Thread t1 = new Thread(new Runnable() {
21             @Override
22             public void run() {
23                 try {
24                     for(int i = 0; i <10; i++){
25                         list1.add();
26                         System.out.println("当前线程:" + Thread.currentThread().getName() + "添加了一个元素..");
27                         Thread.sleep(500);
28                     }
29                 } catch (InterruptedException e) {
30                     e.printStackTrace();
31                 }
32             }
33         }, "t1");
34
35         Thread t2 = new Thread(new Runnable() {
36             @Override
37             public void run() {
38                 while(true){
39                     if(list1.size() == 5){
40                         System.out.println("当前线程收到通知:" + Thread.currentThread().getName() + " list size = 5 线程停止..");
41                         throw new RuntimeException();
42                     }
43                 }
44             }
45         }, "t2");
46
47         t1.start();
48         t2.start();
49     }
50
51
52 }
有一个死循环,这种方式很不好。
应该用以下方式替代(用wait),注意线程启动顺序:
 1 import java.util.ArrayList;
 2 import java.util.List;
 3 import java.util.Queue;
 4 import java.util.concurrent.CountDownLatch;
 5 import java.util.concurrent.LinkedBlockingDeque;
 6 import java.util.concurrent.LinkedBlockingQueue;
 7 /**
 8  * wait notfiy 方法,wait释放锁,notfiy不释放锁
 9  * @author alienware
10  *
11  */
12 public class ListAdd2 {
13     private volatile static List list = new ArrayList();
14
15     public void add(){
16         list.add("bjsxt");
17     }
18     public int size(){
19         return list.size();
20     }
21
22     public static void main(String[] args) {
23
24         final ListAdd2 list2 = new ListAdd2();
25
26         // 1 实例化出来一个 lock
27         // 当使用wait 和 notify 的时候 , 一定要配合着synchronized关键字去使用
28         //final Object lock = new Object();
29
30         final CountDownLatch countDownLatch = new CountDownLatch(1);
31
32         Thread t1 = new Thread(new Runnable() {
33             @Override
34             public void run() {
35                 try {
36                     //synchronized (lock) {
37                         for(int i = 0; i <10; i++){
38                             list2.add();
39                             System.out.println("当前线程:" + Thread.currentThread().getName() + "添加了一个元素..");
40                             Thread.sleep(500);
41                             if(list2.size() == 5){
42                                 System.out.println("已经发出通知..");
43                                 countDownLatch.countDown();
44                                 //lock.notify();
45                             }
46                         }
47                     //}
48                 } catch (InterruptedException e) {
49                     e.printStackTrace();
50                 }
51
52             }
53         }, "t1");
54
55         Thread t2 = new Thread(new Runnable() {
56             @Override
57             public void run() {
58                 //synchronized (lock) {
59                     if(list2.size() != 5){
60                         try {
61                             //System.out.println("t2进入...");
62                             //lock.wait();
63                             countDownLatch.await();
64                         } catch (InterruptedException e) {
65                             e.printStackTrace();
66                         }
67                     }
68                     System.out.println("当前线程:" + Thread.currentThread().getName() + "收到通知线程停止..");
69                     throw new RuntimeException();
70                 //}
71             }
72         }, "t2");
73
74         t2.start();
75         t1.start();
76
77     }
78
79 }
运行结果:
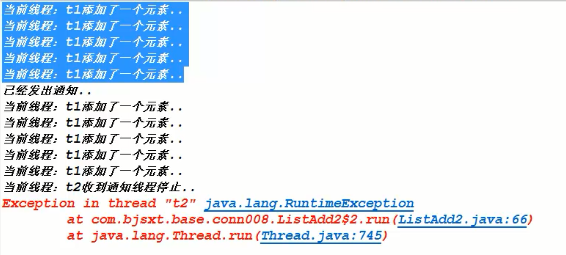
t2先执行,获得lock锁,发现size != 5就释放lock锁。t1线程启动,当size等于5的时候唤醒另一个线程t2,但是不释放lock锁。
如果让t1先执行的话执行结果就不通了。因为t1拿到了锁以后就不会释放,等t1十次循环后才释放锁,这时size已经是10 了,t2执行已经晚了。
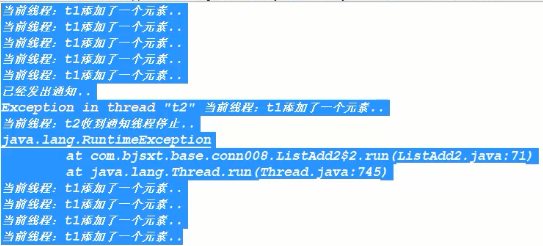
但是使用wait的话有一个问题,不实时,上面也提到了,必须要等一个线程执行完了另一线程才收到通知。
应该用上面没注释掉的代码CountDownLatch代替。可以理解成notify和wait的升级版
最终运行结果:
使用wait/notify模拟实现BlockingQueue
  1 import java.util.LinkedList;
  2 import java.util.concurrent.TimeUnit;
  3 import java.util.concurrent.atomic.AtomicInteger;
  4
  5 public class MyQueue {
  6
  7     //1 需要一个承装元素的集合
  8     private LinkedList<Object> list = new LinkedList<Object>();
  9
 10     //2 需要一个计数器
 11     private AtomicInteger count = new AtomicInteger(0);
 12
 13     //3 需要制定上限和下限
 14     private final int minSize = 0;
 15
 16     private final int maxSize ;
 17
 18     //4 构造方法
 19     public MyQueue(int size){
 20         this.maxSize = size;
 21     }
 22
 23     //5 初始化一个对象 用于加锁
 24     private final Object lock = new Object();
 25
 26
 27     //put(anObject): 把anObject加到BlockingQueue里,如果BlockQueue没有空间,则调用此方法的线程被阻断,直到BlockingQueue里面有空间再继续.
 28     public void put(Object obj){
 29         synchronized (lock) {
 30             while(count.get() == this.maxSize){
 31                 try {
 32                     lock.wait();
 33                 } catch (InterruptedException e) {
 34                     e.printStackTrace();
 35                 }
 36             }
 37             //1 加入元素
 38             list.add(obj);
 39             //2 计数器累加
 40             count.incrementAndGet();
 41             //3 通知另外一个线程(唤醒)
 42             lock.notify();
 43             System.out.println("新加入的元素为:" + obj);
 44         }
 45     }
 46
 47
 48     //take: 取走BlockingQueue里排在首位的对象,若BlockingQueue为空,阻断进入等待状态直到BlockingQueue有新的数据被加入.
 49     public Object take(){
 50         Object ret = null;
 51         synchronized (lock) {
 52             while(count.get() == this.minSize){
 53                 try {
 54                     lock.wait();
 55                 } catch (InterruptedException e) {
 56                     e.printStackTrace();
 57                 }
 58             }
 59             //1 做移除元素操作
 60             ret = list.removeFirst();
 61             //2 计数器递减
 62             count.decrementAndGet();
 63             //3 唤醒另外一个线程
 64             lock.notify();
 65         }
 66         return ret;
 67     }
 68
 69     public int getSize(){
 70         return this.count.get();
 71     }
 72
 73
 74     public static void main(String[] args) {
 75
 76         final MyQueue mq = new MyQueue(5);
 77         mq.put("a");
 78         mq.put("b");
 79         mq.put("c");
 80         mq.put("d");
 81         mq.put("e");
 82
 83         System.out.println("当前容器的长度:" + mq.getSize());
 84
 85         Thread t1 = new Thread(new Runnable() {
 86             @Override
 87             public void run() {
 88                 mq.put("f");
 89                 mq.put("g");
 90             }
 91         },"t1");
 92
 93         t1.start();
 94
 95
 96         Thread t2 = new Thread(new Runnable() {
 97             @Override
 98             public void run() {
 99                 Object o1 = mq.take();
100                 System.out.println("移除的元素为:" + o1);
101                 Object o2 = mq.take();
102                 System.out.println("移除的元素为:" + o2);
103             }
104         },"t2");
105
106
107         try {
108             TimeUnit.SECONDS.sleep(2);
109         } catch (InterruptedException e) {
110             e.printStackTrace();
111         }
112
113         t2.start();
114
115
116     }
117
118
119
120 }