redis是一款功能强大的缓存工具,支持丰富的数据结构,等等一些牛逼的特性暂且不表,今天重点说下主从,并通过指令,实践操作一下。
源码安装一下redis (版本3.2.8,官网下载)
将下载的文件,解压进行安装,安装很简单.
[root@localhost redis-3.2.8]# ll
总用量 256
-rw-rw-r--.  1 root root 85775 2月  12 23:14 00-RELEASENOTES
-rw-rw-r--.  1 root root    53 2月  12 23:14 BUGS
-rw-rw-r--.  1 root root  1805 2月  12 23:14 CONTRIBUTING
-rw-rw-r--.  1 root root  1487 2月  12 23:14 COPYING
drwxrwxr-x.  7 root root  4096 3月   1 10:28 deps
-rw-rw-r--.  1 root root    11 2月  12 23:14 INSTALL
-rw-rw-r--.  1 root root   151 2月  12 23:14 Makefile
-rw-rw-r--.  1 root root  4223 2月  12 23:14 MANIFESTO
-rw-rw-r--.  1 root root  6834 2月  12 23:14 README.md
-rw-rw-r--.  1 root root 46696 3月   1 10:52 redis.conf
-rw-r--r--.  1 root root 46695 3月   1 10:52 redis.conf-bk
-rwxrwxr-x.  1 root root   271 2月  12 23:14 runtest
-rwxrwxr-x.  1 root root   280 2月  12 23:14 runtest-cluster
-rwxrwxr-x.  1 root root   281 2月  12 23:14 runtest-sentinel
-rw-rw-r--.  1 root root  7606 2月  12 23:14 sentinel.conf
drwxrwxr-x.  2 root root  4096 3月   1 10:36 src
drwxrwxr-x. 10 root root  4096 2月  12 23:14 tests
drwxrwxr-x.  7 root root  4096 2月  12 23:14 utils
[root@localhost redis-3.2.8]# make
先执行make,然后再执行make install即可,安装后的指令在/usr/local/bin/下面。
[root@localhost redis-3.2.8]# whereis redis-server
redis-server: /usr/local/bin/redis-server
将源文件中的redis.conf文件拷贝到/etc/redis/目录下,若没有/etc/redis目录,可以自行创建之。并改名为6379.conf,可以是任意文件名,为了验证主从操作,将主服务器的端口设置为6379.
考虑到安全性,给配置文件中设置密码信息requirepass:
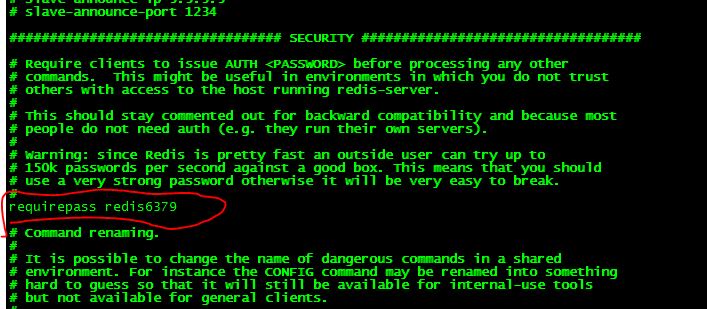
然后启动redis-server,用/etc/redis/6379.conf配置文件。
[root@localhost ~]# redis-server /etc/redis/6379.conf
[root@localhost ~]#
检查下,密码安全是否生效:
[root@localhost ~]#
[root@localhost ~]# redis-cli
127.0.0.1:6379>
127.0.0.1:6379> keys *
(error) NOAUTH Authentication required.
127.0.0.1:6379>
通过keys *命令查看是是否有数据,被告知没有授权,说明requirepass指令生效。那么我们输入密码,能否进去呢?
127.0.0.1:6379> auth redis6379
OK
127.0.0.1:6379> keys *
1) "hello"
127.0.0.1:6379>
说明安全问题,requirepass的设置已经是在正常工作了。
好了,单实例的redis服务器已经没有问题了,可以工作了。就开始本博文要讲的重点了,如何实现主从呢?按照redis的官方文档来说,其实也非常的简单,就是一个指令的事情slaveof host port。
那就再配置一个slave的服务器吧,配置文件命名为6380.conf,在6379.conf的基础上,主要修改一下port,以及requirepass,其他暂且都不变。在一个机器上运行两个redis服务器,仅仅是端口不同。
。。。。。。。。。
# Protected mode is a layer of security protection, in order to avoid that
# Redis instances left open on the internet are accessed and exploited.
#
# When protected mode is on and if:
#
# 1) The server is not binding explicitly to a set of addresses using the
#    "bind" directive.
# 2) No password is configured.
#
# The server only accepts connections from clients connecting from the
# IPv4 and IPv6 loopback addresses 127.0.0.1 and ::1, and from Unix domain
# sockets.
#
# By default protected mode is enabled. You should disable it only if
# you are sure you want clients from other hosts to connect to Redis
# even if no authentication is configured, nor a specific set of interfaces
# are explicitly listed using the "bind" directive.
protected-mode yes

# Accept connections on the specified port, default is 6379 (IANA #815344).
# If port 0 is specified Redis will not listen on a TCP socket.
port 6380
。。。。。。。。
################################## SECURITY ###################################

# Require clients to issue AUTH <PASSWORD> before processing any other
# commands.  This might be useful in environments in which you do not trust
# others with access to the host running redis-server.
#
# This should stay commented out for backward compatibility and because most
# people do not need auth (e.g. they run their own servers).
#
# Warning: since Redis is pretty fast an outside user can try up to
# 150k passwords per second against a good box. This means that you should
# use a very strong password otherwise it will be very easy to break.
#
requirepass redis6380
。。。。。。。。。
接下来,我们再启动这个6380的服务器:
[root@localhost redis]# redis-server /etc/redis/6380.conf
[root@localhost redis]#
[root@localhost redis]# redis-cli -h 127.0.0.1 -p 6380 -a redis6380
127.0.0.1:6380> keys *
(empty list or set)
127.0.0.1:6380>
从上面的操作日志中,可以看出,6380端口对应的服务已经启动,而且可以正常的连接上。redis-cli指定登录到那个host的那个port上,带上auth信息,本地是登录127.0.0.1机器的6380端口,密码信息为redis6380.
好了,我们开始给6379这个服务器设置slave,将6380的redis设置成从服务器。设置从服务器,需要在从服务器上指定主服务器的IP以及端口。slaveof <masterip> <masterport>
127.0.0.1:6380> slaveof 127.0.0.1 6379
OK
127.0.0.1:6380>
slaveof指令执行结束后,显示OK,应该是设置成功了吧。那我们检查一下是不是真的成功了,在6379这个服务器上用info指令或者info Replication查看一下主从复制信息:
127.0.0.1:6379>
127.0.0.1:6379> info Replication
# Replication
role:master
connected_slaves:0
master_repl_offset:533
repl_backlog_active:1
repl_backlog_size:1048576
repl_backlog_first_byte_offset:2
repl_backlog_histlen:532
127.0.0.1:6379>
怎么回事?connected_slaves:0,在6380上slaveof分明显示的是OK啊。那我在6379上再执行一下存储一个数据吧,看看6380从服务器上,是否将这个数据同步过来。
127.0.0.1:6379> set test "Hello world"
OK
127.0.0.1:6379> get test
"Hello world"
127.0.0.1:6379>
127.0.0.1:6380> get test
(nil)
127.0.0.1:6380>
从上面的数据来看,test的值只是在6379上有,在6380上没有,再一次证明slaveof执行后的OK不能说明6380真的成为了6379的slave。分析一下,我们这里,master是有密码要求的,是不是slaveof操作,master没有给予授权?查看下6380.conf的配置文件,找了下是否有这么一个配置从服务器授权的信息,还真找到了一个masterauth的字段。
# If the master is password protected (using the "requirepass" configuration
# directive below) it is possible to tell the slave to authenticate before
# starting the replication synchronization process, otherwise the master will
# refuse the slave request.
#
# masterauth <master-password>
于是乎,将这个masterauth字段配置上6379的密码redis6379. 再次启动6380的服务器,重复上面的验证操作,主要是slaveof的再次执行。
127.0.0.1:6379> info Replication
# Replication
role:master
connected_slaves:1
slave0:ip=127.0.0.1,port=6380,state=online,offset=1395,lag=0
master_repl_offset:1395
repl_backlog_active:1
repl_backlog_size:1048576
repl_backlog_first_byte_offset:2
repl_backlog_histlen:1394
127.0.0.1:6379>
这次,6379上的info指令对应的信息,就是符合需求的,到此,说明主从的基本配置完成,再看看从服务是否将之前的数据同步过来呢?
127.0.0.1:6380> get test
"Hello world"
127.0.0.1:6380>
这么看,数据也被同步到了从服务器6380上了。到此,基本的主从配置,就算结束了。
看看从服务器上,是否有什么特殊信息,关于主从配置的:
127.0.0.1:6380> info Replication
# Replication
role:slave
master_host:127.0.0.1
master_port:6379
master_link_status:up
master_last_io_seconds_ago:8
master_sync_in_progress:0
slave_repl_offset:1717
slave_priority:100
slave_read_only:1
connected_slaves:0
master_repl_offset:0
repl_backlog_active:0
repl_backlog_size:1048576
repl_backlog_first_byte_offset:0
repl_backlog_histlen:0
那解除6380作为6379的slave关系,如何做呢?也很简单,执行一个命令slaveof no one
127.0.0.1:6380> slaveof no one
OK
127.0.0.1:6380>
127.0.0.1:6380> info Replication
# Replication
role:master
connected_slaves:0
master_repl_offset:71
repl_backlog_active:0
repl_backlog_size:1048576
repl_backlog_first_byte_offset:0
repl_backlog_histlen:0
相应的,6379上,也就没有了这个slave
127.0.0.1:6379>
127.0.0.1:6379> info Replication
# Replication
role:master
connected_slaves:0
master_repl_offset:211
repl_backlog_active:1
repl_backlog_size:1048576
repl_backlog_first_byte_offset:2
repl_backlog_histlen:210
当要做主从切换的时候,其实,通过收到操作,还是有点麻烦的。例如,假设6379 shutdown了,为了保证服务能正常运行,必须立即将6380的salve这个role解除,就要执行slave no one指令,然后,让应用连接到6380上。这个过程,其实还是蛮费事的。因为,当6379好了后,要重新作为master,那在6380上运行的时间里产生的数据,需要重新同步到6379上,可以通过手动拷贝已经持久化后的数据去覆盖6379的文件,可以解决问题,但是毕竟容易出错,时间周期长。
此问题,可以通过keepalived软件,将两个redis配置成互为backup的主从关系(redis的配置文件中slave-read-only这个字段,必须是no),可以保证应用系统的高可用性,关于keepalived的相关工作原理,不描述,自己去Google吧。