EMQ版本V2, emqttd-centos7-v2.3.11-1.el7.centos.x86_64.rpm
下载地址:http://emqtt.com/downloads/2318/centos7-rpm
机器环境: Linux CentOS7.2
安装完成后,默认是匿名用户访问。emq本身不带发布定于工具或者命令,需要借助类似mosquitto_sub、mosquitto_pub或者自己写客户端进行连接测试。关于mosquitto的环境搭建,请参照mosquitto环境搭建
api的http监听端口:默认8080
默认的web界面URL:http://ip:18083
做些基本的配置,配置API的访问端口,改成9909,只有不出现冲突即可。
##--------------------------------------------------------------------
## HTTP Management API Listener

## The IP Address and Port that the EMQ HTTP API will bind.
##
## Value: IP:Port | Port
##
## Default: 0.0.0.0:8080
listener.api.mgmt = 0.0.0.0:9909
配置节点参数:
#Value: <name>@<host>
node.name = iotbus3@10.95.197.3
注意,这里格式要用上面的给定风格<name>@<host>,否则会出现启动失败。例如,配置成下面:
node.name = iotbus3
就会出现错误:
[root@ws3 emqttd]# systemctl start emqttd.service
Job for emqttd.service failed because the control process exited with error code. See "systemctl status emqttd.service" and "journalctl -xe" for details.

-- Unit emqttd.service has begun starting up.
12月 11 21:38:35 ws3 sh[12475]: 2018-12-11 21:38:35 Can't set long node name!
12月 11 21:38:35 ws3 sh[12475]: Please check your configuration
12月 11 21:38:35 ws3 sh[12475]: 2018-12-11 21:38:35 crash_report
12月 11 21:38:35 ws3 sh[12475]: initial_call:     pid:     registered_name:     error_info:     ancestors:     message_queue_len:     messages:     links:     dictionary:     trap_exit:     status:     heap_size:     stack_size:     red
12月 11 21:38:35 ws3 sh[12475]: supervisor:     errorContext:     reason:     offender: 2018-12-11 21:38:35 supervisor_report
12月 11 21:38:35 ws3 sh[12475]: supervisor:     errorContext:     reason:     offender: 2018-12-11 21:38:35 crash_report
12月 11 21:38:35 ws3 sh[12475]: initial_call:     pid:     registered_name:     error_info:     ancestors:     message_queue_len:     messages:     links:     dictionary:     trap_exit:     status:     heap_size:     stack_size:     red
12月 11 21:38:36 ws3 sh[12475]: application:     exited:     type: Kernel pid terminated (application_controller) ({application_start_failure,kernel,{{shutdown,{failed_to_start_child,net_sup,{shutdown,{failed_to_start_child,net_kernel,{
12月 11 21:38:36 ws3 sh[12475]: Crash dump is being written to: erl_crash.dump...done
12月 11 21:38:36 ws3 systemd[1]: emqttd.service: control process exited, code=exited status=1
12月 11 21:38:36 ws3 systemd[1]: Failed to start emqtt daemon.
-- Subject: Unit emqttd.service has failed
-- Defined-By: systemd
-- Support: http://lists.freedesktop.org/mailman/listinfo/systemd-devel
--
-- Unit emqttd.service has failed.
--
-- The result is failed.
修改正确后,启动,从/var/log/emqttd/erlang.log.1日志里面可以看到:
xec: /usr/lib64/emqttd/erts-9.0/bin/erlexec -boot /usr/lib64/emqttd/releases/2.3.11/emqttd -mode embedded -boot_var ERTS_LIB_DIR /usr/lib64/emqttd/erts-9.0/../lib -mnesia dir "/var/lib/emqttd/mnesia/iotbus3@10.95.197.3" -config /var/li
b/emqttd/configs/app.2018.12.11.21.42.27.config -args_file /var/lib/emqttd/configs/vm.2018.12.11.21.42.27.args -vm_args /var/lib/emqttd/configs/vm.2018.12.11.21.42.27.args -- console^M
Root: /usr/lib64/emqttd^M
/usr/lib64/emqttd^M
starting emqttd on node 'iotbus3@10.95.197.3'^M
emqttd ctl is starting...[ok]^M
emqttd hook is starting...[ok]^M
emqttd router is starting...[ok]^M
emqttd pubsub is starting...[ok]^M
emqttd stats is starting...[ok]^M
emqttd metrics is starting...[ok]^M
emqttd pooler is starting...[ok]^M
emqttd trace is starting...[ok]^M
emqttd client manager is starting...[ok]^M
emqttd session manager is starting...[ok]^M
emqttd session supervisor is starting...[ok]^M
emqttd wsclient supervisor is starting...[ok]^M
emqttd broker is starting...[ok]^M
emqttd alarm is starting...[ok]^M
emqttd mod supervisor is starting...[ok]^M
emqttd bridge supervisor is starting...[ok]^M
emqttd access control is starting...[ok]^M
emqttd system monitor is starting...[ok]^M
emqttd 2.3.11 is running now^M
Eshell V9.0  (abort with ^G)^M
(iotbus3@10.95.197.3)1> Load emq_mod_presence module successfully.^M
(iotbus3@10.95.197.3)1> dashboard:http listen on 0.0.0.0:18083 with 4 acceptors.^M
(iotbus3@10.95.197.3)1> mqtt:tcp listen on 127.0.0.1:11883 with 4 acceptors.^M
(iotbus3@10.95.197.3)1> mqtt:tcp listen on 0.0.0.0:1883 with 16 acceptors.^M
(iotbus3@10.95.197.3)1> mqtt:ws listen on 0.0.0.0:8083 with 4 acceptors.^M
(iotbus3@10.95.197.3)1> mqtt:ssl listen on 0.0.0.0:8883 with 16 acceptors.^M
(iotbus3@10.95.197.3)1> mqtt:wss listen on 0.0.0.0:8084 with 4 acceptors.^M
(iotbus3@10.95.197.3)1> mqtt:api listen on 0.0.0.0:9909 with 4 acceptors.^M
(iotbus3@10.95.197.3)1>
重点关注上面红色的部分,dashboard的访问模式,以及各种访问接口的端口和协议类型。
配置ACL,EMQ的ACL做的非常全面,由于这里只是研究,和mosquitto进行性能对比,也将其配置成单节点的username/password的访问方式。
修改/etc/emqtt/emq.conf
#默认这里是true
mqtt.allow_anonymous = false
#默认这里是allow
mqtt.acl_nomatch = deny
mqtt.acl_file = /etc/emqttd/acl.conf
接下来,配置/etc/emqttd/acl.conf
%%--------------------------------------------------------------------
%%
%% [ACL](https://github.com/emqtt/emqttd/wiki/ACL)
%%
%% -type who() :: all | binary() |
%%                {ipaddr, esockd_access:cidr()} |
%%                {client, binary()} |
%%                {user, binary()}.
%%
%% -type access() :: subscribe | publish | pubsub.
%%
%% -type topic() :: binary().
%%
%% -type rule() :: {allow, all} |
%%                 {allow, who(), access(), list(topic())} |
%%                 {deny, all} |
%%                 {deny, who(), access(), list(topic())}.
%%
%%--------------------------------------------------------------------

{allow, {user, "dashboard"}, subscribe, ["$SYS/#"]}.

{allow, {ipaddr, "127.0.0.1"}, pubsub, ["$SYS/#", "#"]}.

{deny, all, subscribe, ["$SYS/#", {eq, "#"}]}.
这是默认的acl.conf文件,在这里,添加一个ACL元素:
{allow, {user, "shihuc"}, pubsub, ["$SYS/#", "#"]}.
即最终这个配置好的acl.conf文件内容为:
{allow, {user, "dashboard"}, subscribe, ["$SYS/#"]}.
{allow, {ipaddr, "127.0.0.1"}, pubsub, ["$SYS/#", "#"]}.
{deny, all, subscribe, ["$SYS/#", {eq, "#"}]}.
{allow, {user, "shihuc"}, pubsub, ["$SYS/#", "#"]}.
加载username鉴权插件emq_auth_username:
[root@ws3 emqttd]# emqttd_ctl plugins load emq_auth_username
Start apps: [emq_auth_username]
Plugin emq_auth_username loaded successfully.
添加新的用户名和密码:
[root@ws3 emqttd]# emqttd_ctl users add shihuc shihuc
ok
测试:
[root@ws2 logs]# mosquitto_sub -t iotbus -u shihuc -P shihuc -h 10.95.197.3 -p 1883
Error: No route to host
两种解决方案:
1. 在10.95.197.3的机器上执行 iptables -F清除防火墙设置。
2. 在10.95.197.3的机器上执行firewall-cmd --add-port=1883/tcp添加一条防火墙规则。
依照第二条,配置好防火墙后,启动ws3上的emq服务,进行订阅没有问题。
基于username/password的方式(emq_auth_username插件)逻辑走通了。
接下来测试,发现一个问题:
[root@ws2 ~]# mosquitto_pub -t iotbus -h 10.95.197.3 -p 1883 -u shihuc -P shihuc -q 2 -m "ACL verification"
订阅程序启动没有问题,但是发布消息后,订阅端没有反应,说明消息被拒绝了。
分析:
1. 指令订阅和发布不存在鉴权错误,即没有提示用户名和密码错误(如下)。
Connection Refused: bad user name or password.
Error: The connection was refused.
2. 发消息后,接收端没有反应,说明acl里面对topic的匹配流程链路出现问题,再次细读EMQ文档:
ACL 访问控制规则定义:
允许(Allow)|拒绝(Deny) 谁(Who) 订阅(Subscribe)|发布(Publish) 主题列表(Topics)
MQTT 客户端发起订阅/发布请求时,EMQ 消息服务器的访问控制模块,会逐条匹配 ACL 规则,直到匹配成功为止:
          ---------              ---------              ---------
Client -> | Rule1 | --nomatch--> | Rule2 | --nomatch--> | Rule3 | --> Default
          ---------              ---------              ---------
              |                      |                      |
            match                  match                  match
             |/                    |/                    |/
        allow | deny           allow | deny           allow | deny
结合acl.conf的配置内容:
{allow, {user, "dashboard"}, subscribe, ["$SYS/#"]}.
{allow, {ipaddr, "127.0.0.1"}, pubsub, ["$SYS/#", "#"]}.
{deny, all, subscribe, ["$SYS/#", {eq, "#"}]}.
{allow, {user, "shihuc"}, pubsub, ["$SYS/#", "#"]}.
不难发现,新加的一条规则{allow, {user, "shihuc"}, pubsub, ["$SYS/#", "#"]}.被规则{deny, all, subscribe, ["$SYS/#", {eq, "#"}]}.deny掉了,所以出现上述订阅端没有反应的问题。将这两条规则调整一下先后顺序即可解决问题(最新的规则):
{allow, {user, "dashboard"}, subscribe, ["$SYS/#"]}.
{allow, {ipaddr, "127.0.0.1"}, pubsub, ["$SYS/#", "#"]}.
{allow, {user, "shihuc"}, pubsub, ["$SYS/#", "#"]}.
{deny, all, subscribe, ["$SYS/#", {eq, "#"}]}.
调整后,再次验证发布订阅逻辑,一切运行正常,到此,基本的环境构建完成。

补充研究:基于MySQL的认证和授权
1. 首先配置数据库信息 /etc/emqtt/plugins/emq_auth_mysql.conf
##--------------------------------------------------------------------
## MySQL Auth/ACL Plugin
##--------------------------------------------------------------------

## MySQL server address.
##
## Value: Port | IP:Port
##
## Examples: 3306, 127.0.0.1:3306, localhost:3306
auth.mysql.server = 10.95.197.10:3306

## MySQL pool size.
##
## Value: Number
auth.mysql.pool = 8

## MySQL username.
##
## Value: String
auth.mysql.username = iotbususer

## MySQL password.
##
## Value: String
auth.mysql.password = iotbus2018!

## MySQL database.
##
## Value: String
auth.mysql.database = mqtt

## Variables: %u = username, %c = clientid

## Authentication query.
##
## Note that column names should be 'password' and 'salt' (if used).
## In case column names differ in your DB - please use aliases,
## e.g. "my_column_name as password".
##
## Value: SQL
##
## Variables:
##  - %u: username
##  - %c: clientid
##
auth.mysql.auth_query = select password from mqtt_user where username = '%u' limit 1
## auth.mysql.auth_query = select password_hash as password from mqtt_user where username = '%u' limit 1

## Password hash.
##
## Value: plain | md5 | sha | sha256 | bcrypt
auth.mysql.password_hash = sha256

## sha256 with salt prefix
## auth.mysql.password_hash = salt,sha256

## bcrypt with salt only prefix
## auth.mysql.password_hash = salt,bcrypt

## sha256 with salt suffix
## auth.mysql.password_hash = sha256,salt

## pbkdf2 with macfun iterations dklen
## macfun: md4, md5, ripemd160, sha, sha224, sha256, sha384, sha512
## auth.mysql.password_hash = pbkdf2,sha256,1000,20


## Superuser query.
##
## Value: SQL
##
## Variables:
##  - %u: username
##  - %c: clientid
auth.mysql.super_query = select is_superuser from mqtt_user where username = '%u' limit 1

## ACL query.
##
## Value: SQL
##
## Variables:
##  - %a: ipaddr
##  - %u: username
##  - %c: clientid
auth.mysql.acl_query = select allow, ipaddr, username, clientid, access, topic from mqtt_acl where ipaddr = '%a' or username = '%u' or username = '$all' or clientid = '%c'
以上配置中,比较主要配置项是:
auth.mysql.server
auth.mysql.username
auth.mysql.password
auth.mysql.database
auth.mysql.password_hash
2. 创建mqtt所需的鉴权表
MQTT 用户表
CREATE TABLE `mqtt_user` (
  `id` int(11) unsigned NOT NULL AUTO_INCREMENT,
  `username` varchar(100) DEFAULT NULL,
  `password` varchar(100) DEFAULT NULL,
  `salt` varchar(35) DEFAULT NULL,
  `is_superuser` tinyint(1) DEFAULT 0,
  `created` datetime DEFAULT NULL,
  PRIMARY KEY (`id`),
  UNIQUE KEY `mqtt_username` (`username`)
) ENGINE=MyISAM DEFAULT CHARSET=utf8;
MQTT 访问控制表
CREATE TABLE `mqtt_acl` (
  `id` int(11) unsigned NOT NULL AUTO_INCREMENT,
  `allow` int(1) DEFAULT NULL COMMENT '0: deny, 1: allow',
  `ipaddr` varchar(60) DEFAULT NULL COMMENT 'IpAddress',
  `username` varchar(100) DEFAULT NULL COMMENT 'Username',
  `clientid` varchar(100) DEFAULT NULL COMMENT 'ClientId',
  `access` int(2) NOT NULL COMMENT '1: subscribe, 2: publish, 3: pubsub',
  `topic` varchar(100) NOT NULL DEFAULT '' COMMENT 'Topic Filter',
  PRIMARY KEY (`id`)
) ENGINE=InnoDB DEFAULT CHARSET=utf8;

INSERT INTO `mqtt_acl` (`id`, `allow`, `ipaddr`, `username`, `clientid`, `access`, `topic`)
VALUES
    (1,1,NULL,'$all',NULL,2,'#'),
    (2,0,NULL,'$all',NULL,1,'$SYS/#'),
    (3,0,NULL,'$all',NULL,1,'eq #'),
    (5,1,'127.0.0.1',NULL,NULL,2,'$SYS/#'),
    (6,1,'127.0.0.1',NULL,NULL,2,'#'),
    (7,1,NULL,'dashboard',NULL,1,'$SYS/#');
为了验证自己所加用户是否有权限,做个验证:
mysql> insert into mqtt_acl (allow, ipaddr, username, clientid, access, topic) values (1, NULL, "water", NULL, 1, "/taikang/#");
Query OK, 1 row affected (0.00 sec)
mysql> update mqtt_acl set access=3 where username="water";
Query OK, 1 row affected (0.01 sec)
Rows matched: 1  Changed: 1  Warnings: 0

mysql>
mysql> select * from mqtt_acl;
+----+-------+-----------+-----------+----------+--------+------------+
| id | allow | ipaddr    | username  | clientid | access | topic      |
+----+-------+-----------+-----------+----------+--------+------------+
|  1 |     1 | NULL      | $all      | NULL     |      2 | #          |
|  2 |     0 | NULL      | $all      | NULL     |      1 | $SYS/#     |
|  3 |     0 | NULL      | $all      | NULL     |      1 | eq #       |
|  5 |     1 | 127.0.0.1 | NULL      | NULL     |      2 | $SYS/#     |
|  6 |     1 | 127.0.0.1 | NULL      | NULL     |      2 | #          |
|  7 |     1 | NULL      | dashboard | NULL     |      1 | $SYS/#     |
|  8 |     1 | NULL      | shihuc    | NULL     |      3 | /taikang/# |
|  9 |     1 | NULL      | water     | NULL     |      3 | /taikang/# |
+----+-------+-----------+-----------+----------+--------+------------+
8 rows in set (0.00 sec)
注意:这里access是控制访问级别的:1是sub,2是pub,3是pubsub。
mysql> insert into mqtt_user(username, password) values("water", "0f4168490e38b8447e11ba4bd656aa11b925bd22af30bac464bc153fdb608501");
Query OK, 1 row affected (0.00 sec)

mysql> select * from mqtt_user;
+----+----------+------------------------------------------------------------------+------+--------------+---------+
| id | username | password                                                         | salt | is_superuser | created |
+----+----------+------------------------------------------------------------------+------+--------------+---------+
|  1 | water    | 0f4168490e38b8447e11ba4bd656aa11b925bd22af30bac464bc153fdb608501 | NULL |            0 | NULL    |
+----+----------+------------------------------------------------------------------+------+--------------+---------+
1 row in set (0.00 sec)
注意这里insert用户记录的时候,password字段的值是一个sha256加密算法的字符串,我这里是通过在线加密工具获取的密码http://www.ttmd5.com/hash.php?type=9。
3. 加载配置
[root@ws3 ~]# emqttd_ctl plugins load emq_auth_mysql
查看目前有多少加载的plugin:
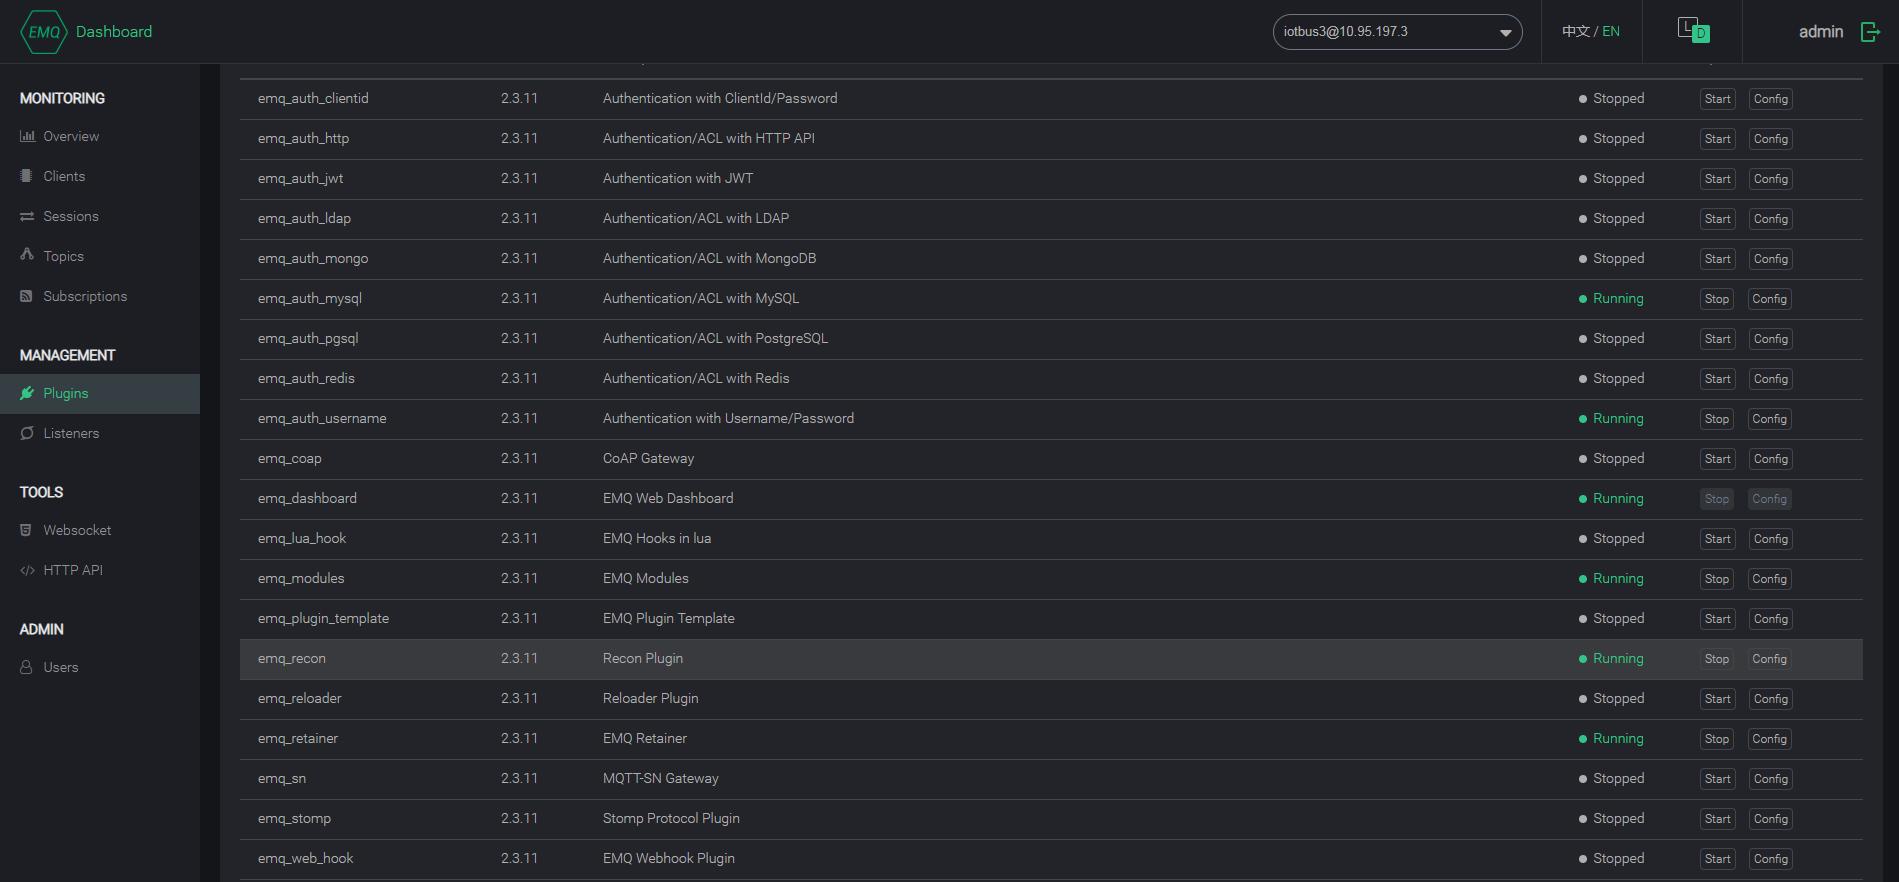
[root@ws3 ~]# emqttd_ctl plugins list
Plugin(emq_auth_clientid, version=2.3.11, description=Authentication with ClientId/Password, active=false)
Plugin(emq_auth_http, version=2.3.11, description=Authentication/ACL with HTTP API, active=false)
Plugin(emq_auth_jwt, version=2.3.11, description=Authentication with JWT, active=false)
Plugin(emq_auth_ldap, version=2.3.11, description=Authentication/ACL with LDAP, active=false)
Plugin(emq_auth_mongo, version=2.3.11, description=Authentication/ACL with MongoDB, active=false)
Plugin(emq_auth_mysql, version=2.3.11, description=Authentication/ACL with MySQL, active=true)
Plugin(emq_auth_pgsql, version=2.3.11, description=Authentication/ACL with PostgreSQL, active=false)
Plugin(emq_auth_redis, version=2.3.11, description=Authentication/ACL with Redis, active=false)
Plugin(emq_auth_username, version=2.3.11, description=Authentication with Username/Password, active=true)
Plugin(emq_coap, version=2.3.11, description=CoAP Gateway, active=false)
Plugin(emq_dashboard, version=2.3.11, description=EMQ Web Dashboard, active=true)
Plugin(emq_lua_hook, version=2.3.11, description=EMQ Hooks in lua, active=false)
Plugin(emq_modules, version=2.3.11, description=EMQ Modules, active=true)
Plugin(emq_plugin_template, version=2.3.11, description=EMQ Plugin Template, active=false)
Plugin(emq_recon, version=2.3.11, description=Recon Plugin, active=true)
Plugin(emq_reloader, version=2.3.11, description=Reloader Plugin, active=false)
Plugin(emq_retainer, version=2.3.11, description=EMQ Retainer, active=true)
Plugin(emq_sn, version=2.3.11, description=MQTT-SN Gateway, active=false)
Plugin(emq_stomp, version=2.3.11, description=Stomp Protocol Plugin, active=false)
Plugin(emq_web_hook, version=2.3.11, description=EMQ Webhook Plugin, active=false)
active是true的是加载运行了的,active是false的,表示未运行的,从下面的图也可以看。
最后,基于mosquitto_sub和mosquitto_pub进行验证:
[root@ws2 ~]# mosquitto_pub -t /taikang/iotbus -h 10.95.197.3 -p 1883 -u water -P water -q 2 -m "ACL verification xxxxxxxx"
[root@ws2 logs]# mosquitto_sub -t /taikang/iotbus -u water -P water -h 10.95.197.3 -p 1883
ACL verification xxxxxxxx
基于MySQL的认证和授权,操作非常灵活,具有很大的效用,物联网中物接入很值得借鉴这个能力。