Restful API规范
restful api是用于前端和后台进行通信的一套规范。使用这个规范可以让前后端开发变得更加轻松。
协议
采用http或者https
数据传输格式
数据之间传输的格式应该都使用json,而不是xml
url链接
url链接中,不能有动词,只能有名词。并且对于一些名词,如果出现复数,那么应该在后面加s
比如: 获取文章列表,应该使用/articles/, 而不应该使用/get_article/
HTTP请求方法
GET: 从服务器上获取资源 (常用)
POST:在服务器上新创建一个资源 (常用)
PUT:在服务器上更新资源。(客户端提供所有改变后的数据)
PATCH:在服务器上更新资源。(客户端只提供需要改变的属性)
DELETE: 从服务器上删除资源
状态码
| 状态码 | 原生描述 | 描述 |
| 200 | OK | 服务器成功响应客户端的请求 |
| 400 | INVALID REQUEST | 用户发出的请求有错误,服务器没有进行新建或修改数据的操作 |
| 401 | Unauthorized | 用户没有权限访问这个请求 |
| 403 | Forbidden | 因为某些原因禁止访问这个请求 |
| 404 | NOT FOUND | 用户发送的请求的url不存在 |
| 406 | NOT Accept | 用户请求不被服务器接收(比如服务器期望客户端发送某个字段,但没有发送) |
| 500 | Internal server error | 服务器内部错误,比如出现了bug |
Flask-Restful插件的基本使用
安装flask-restful插件
pip install flask-restful
定义Restful视图
如果使用flask-restful,那么定义视图函数的时候,就要继承自flask_restful.Resource类,然后再根据当前请求的method来定义相应的方法。比如期望客户端使用get方法发送请求,那么就定义一个get方法,期望客户端使用post方法发送请求,就定义一个post方法。类似于MethodView.

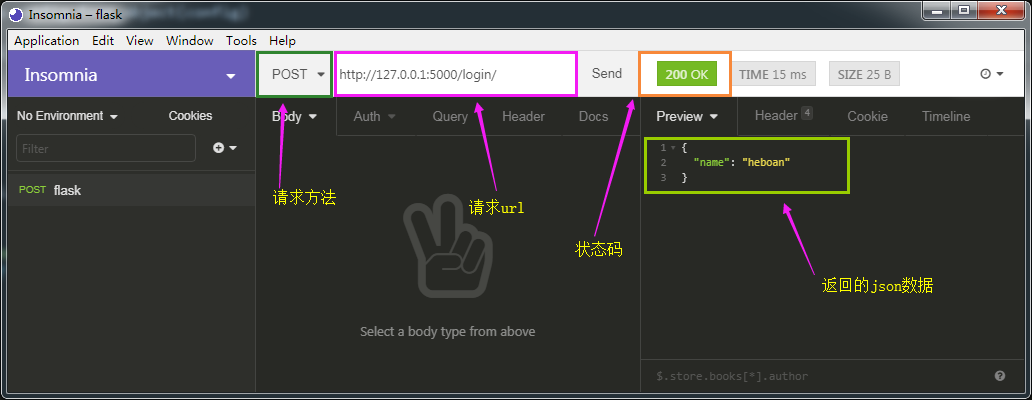
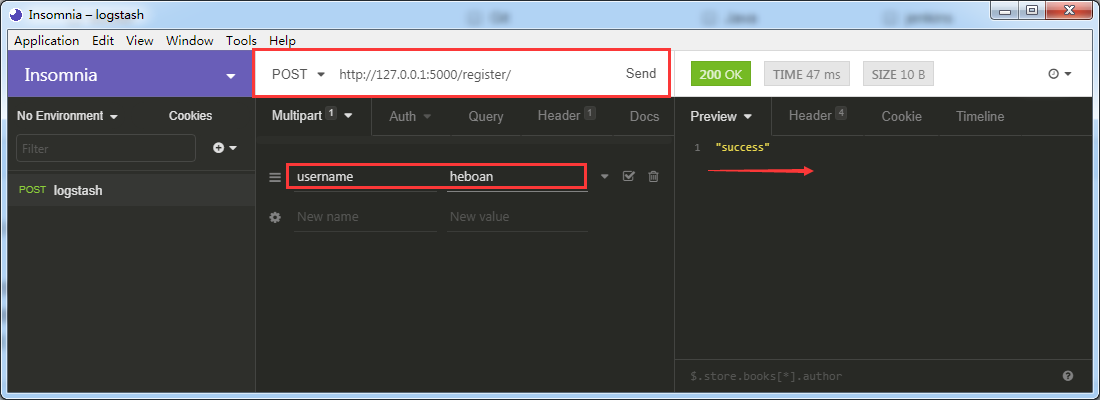
因为我们只定义了post方法,如果直接用浏览器去访问http://127.0.0.1:5000/login/(get方法),得不到我们想要的结果

这个时候我们就可以用一些测试工具,我这里使用的是Insomnia,同类的软件还有postman
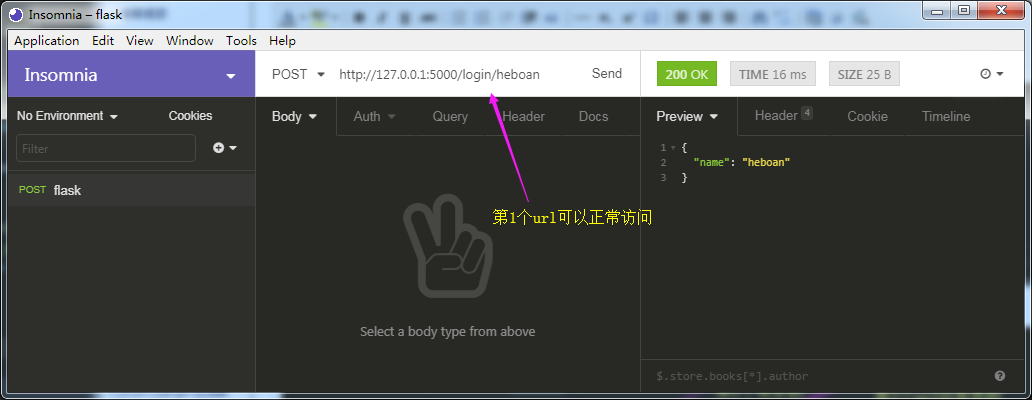
url中也可以传递参数


url也可以是多个


参数验证
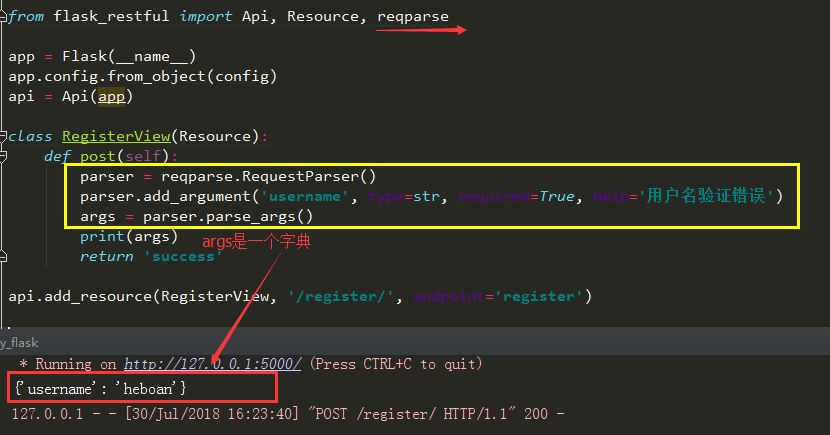
Flask-Restful插件提供了类似WTForm来验证提交的数据是否合法的包,叫做reqparse。以下是基本用法
parser = reqparse.RequestParser()
        parser.add_argument('username', type=str, required=True, help='用户名验证错误')
        args = parser.parse_args()
add_argument可以指定这个字段的名字,这个字段的数据类型等
default:默认值,如果这个参数没有值,那么将使用这个参数指定的值。
required:是否必须。默认为False,如果设置为True,那么这个参数就必须提交上来。
type:这个参数的数据类型,如果指定,那么将使用指定的数据类型来强制转换提交上来的值。
choices:选项。提交上来的值只有满足这个选项中的值才符合验证通过,否则验证不通过。
help:错误信息。如果验证失败后,将会使用这个参数指定的值作为错误信息。
trim:是否要去掉前后的空格。
其中的type,可以使用python自带的一些数据类型,也可以使用flask_restful.inputs下的一些特定的数据类型来强制转换。比如一些常用的:
url:会判断这个参数的值是否是一个url,如果不是,那么就会抛出异常。
regex:正则表达式。
date:将这个字符串转换为datetime.date数据类型。如果转换不成功,则会抛出一个异常。
操作演示
因为username字段添加了参数required=True,为必填项,因此如果客户端不传此字段,就会提示错误,这个错误提示就是我们自定的help--->"用户名验证错误"
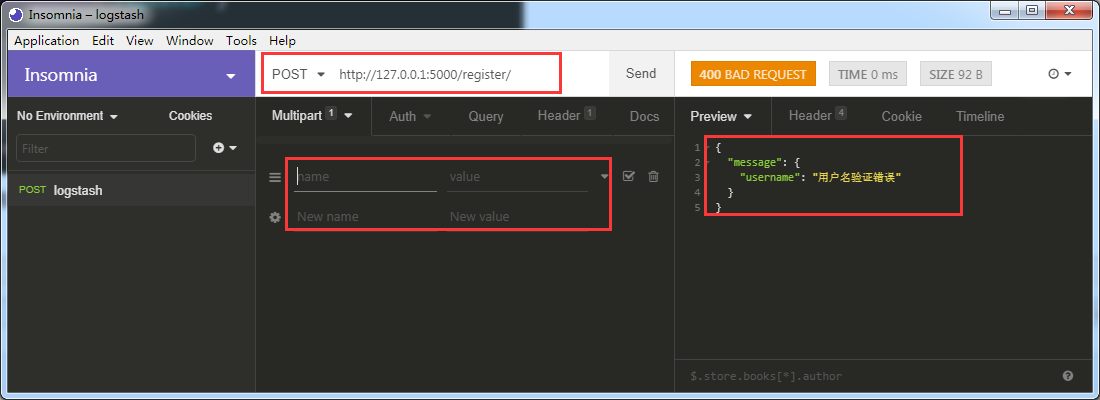
...
from flask_restful import Api, Resource, reqparse, inputs

app = Flask(__name__)
app.config.from_object(config)
api = Api(app)

class RegisterView(Resource):
    def post(self):
        parser = reqparse.RequestParser()
        parser.add_argument('username', type=str, required=True, help='用户名字段验证错误')
        parser.add_argument('birthday', type=inputs.date, required=True, help='生日字段验证错误')
        parser.add_argument('gender', type=str, choices=('male', 'female'), help='性别字段验证错误')
        parser.add_argument('money', type=int, trim=True, default=0, help='金额字段验证错误')
        parser.add_argument('phone', type=inputs.regex(r'1[3458]d{9}'), help='手机字段验证错误')
        parser.add_argument('blog', type=inputs.url, help='博客地址字段验证错误')
        args = parser.parse_args()
        print(args)
        return 'success'

api.add_resource(RegisterView, '/register/', endpoint='register')
...

Flask-Restful标准化返回参数
对于一个视图函数,我们可以指定好一些参数用于返回,在规范中要求:即使这个参数没有值也应该返回,返回一个None回去
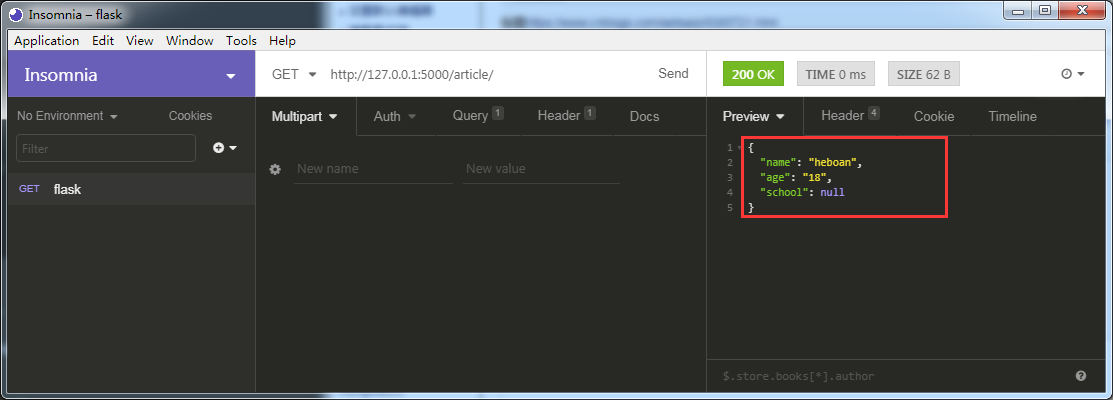
...
from flask_restful import Api, Resource, fields, marshal_with

api = Api(app)


class ArticleView(Resource):
    resource_field = {     #先定义好返回哪些参数
        'name': fields.String,     #参数的数据类型
        'age': fields.String,
        'school': fields.String
    }

    @marshal_with(resource_field)  #利用marshal_with装饰器传入定义好的返回参数
    def get(self):
        return {}   就算这里返回个空字典,也会把定义好的参数返回

api.add_resource(ArticleView, '/article/', endpoint='article')

...
class ArticleView(Resource):
    resource_field = {
        'name': fields.String,
        'age': fields.String,
        'school': fields.String
    }

    @marshal_with(resource_field)
    def get(self):
        return {'name': 'heboan', 'age': 18}

...
当使用ORM模型或者自定义的的模型的时候,它会自动的获取模型中相应的字段,生成json数据,然后返回给客户端
class ProfileView(Resource):
    resource_fields = {
        'username': fields.String,
        'age': fields.Integer,
        'school': fields.String
    }

    @marshal_with(resource_fields)
    def get(self,user_id):
        user = User.query.get(user_id)
        return user
在get方法中,返回user的时候,flask_restful会自动的读取user模型上的username, age以及school属性。组装成一个json格式的字符串返回给客户端
重名属性
如果我们想把面向公众的字段名称不用与内部的属性名。使用attribute可以配置这种属性,比如现在想要返回user.school中的值,但是在返回给外面的时候,想以education返回回去,那么可以这样写:
resource_fields = {
    'education': fields.String(attribute='school')
}
默认值
在返回一些字段的时候,有时候可能没有值,那么这时候可以在指定fields的时候给定一个默认值,示例代码如下:
resource_fields = {
    'age': fields.Integer(default=18)
}
复杂的结构
有时候想要在返回的数据格式中,形成比较复杂的结构。那么可以使用一些特殊的字段来实现。比如要在一个字段中放置一个列表,那么可以使用fields.List,比如在一个字段下面又是一个字典,那么可以使用fields.Nested。以下将讲解下复杂结构的用法:
定义数据库结构:
user表,article表,tag表, 因为article与tag是多对多的关系,因此需要一个中间表来关联article_tag


from exts import db

class User(db.Model):
    __tablename__ = 'user'
    id = db.Column(db.Integer, primary_key=True, autoincrement=True)
    username = db.Column(db.String(50), nullable=False)


class Article(db.Model):
    __tablename__ = 'article'
    id = db.Column(db.Integer, primary_key=True, autoincrement=True)
    title = db.Column(db.String(50), nullable=False)
    content = db.Column(db.Text, nullable=False)
    user_id = db.Column(db.Integer, db.ForeignKey('user.id'))

    author = db.relationship('User', backref='articles')
    tags = db.relationship('Tag', secondary='article_tag')


class Tag(db.Model):
    __tablename__ = 'tag'
    id = db.Column(db.Integer, primary_key=True, autoincrement=True)
    name = db.Column(db.String(50), nullable=False)


article_tag = db.Table(
    'article_tag',
    db.Column('article_id', db.Integer, db.ForeignKey('article.id')),
    db.Column('tag_id', db.Integer, db.ForeignKey('tag.id'))
)
插入测试数据
...
from models import User, Article, Tag

@app.route('/')
def index():
    user = User(username='heboan')
    tag_1 = Tag(name='Linux')
    tag_2 = Tag(name='Python')
    article = Article(title='python自动化运维', content='Life is short, I use python...')

    article.tags.append(tag_1)
    article.tags.append(tag_2)
    article.author = user

    db.session.add(article)
    db.session.commit()
    return '数据插入成功!'
当我们全部使用field.String
class ArticleView(Resource):
    resource_fields = {
        'title':fields.String,
        'content': fields.String,
        'author':fields.String,
        'tags':fields.String
    }

    @marshal_with(resource_fields)
    def get(self):
        article = db.session.query(Article).get(1)
        return article

api.add_resource(ArticleView, '/article/', endpoint='article')

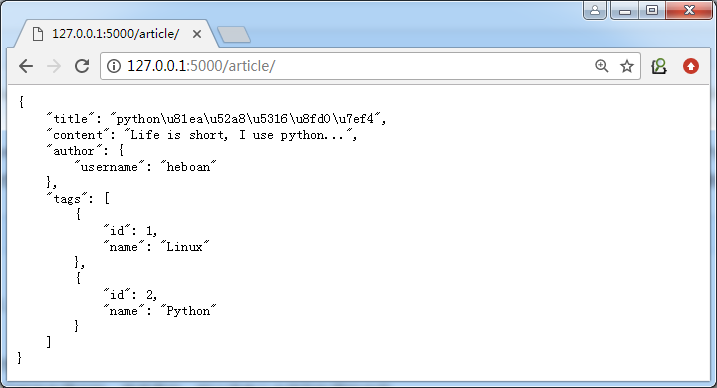
使用field.Nested、field.List
class ArticleView(Resource):
    resource_fields = {
        'title':fields.String,
        'content': fields.String,
        'author':fields.Nested({   #字典里面嵌套字典使用field.Nested
           'username': fields.String
        }),
        'tags':fields.List(fields.Nested({  #tags是列表,使用field_List类型然后嵌套field.Nested
            'id': fields.Integer,
            'name': fields.String
        }))
    }

    @marshal_with(resource_fields)
    def get(self):
        article = db.session.query(Article).get(1)
        print(article.title)
        return article

api.add_resource(ArticleView, '/article/', endpoint='article')
在蓝图使用使用Flask-Restful
新建一个articles.py
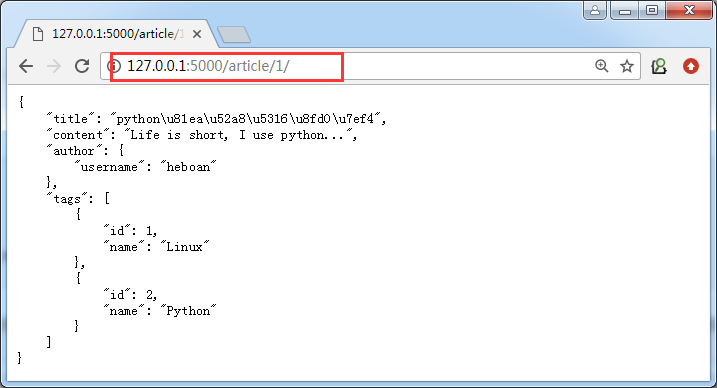
from flask import Blueprint
from flask_restful import Api, Resource, fields, marshal_with
from exts import db
from models import Article

article_bp = Blueprint('article', __name__, url_prefix='/article')
api = Api(article_bp)   #这里使用article_bp了


class ArticleView(Resource):
    resource_fields = {
        'title':fields.String,
        'content': fields.String,
        'author':fields.Nested({
           'username': fields.String
        }),
        'tags':fields.List(fields.Nested({
            'id': fields.Integer,
            'name': fields.String
        }))
    }

    @marshal_with(resource_fields)
    def get(self):
        article = db.session.query(Article).get(1)
        print(article.title)
        return article

api.add_resource(ArticleView, '/1/', endpoint='article')
主程序注册此蓝图
from article import article_bp
...

app.register_blueprint(article_bp)
Flask-Restful渲染模板
先看看直接渲染模板是什么效果
class HelloView(Resource):
    def get(self):
        return render_template('hello.html')

api.add_resource(HelloView, '/hello/', endpoint='hello')
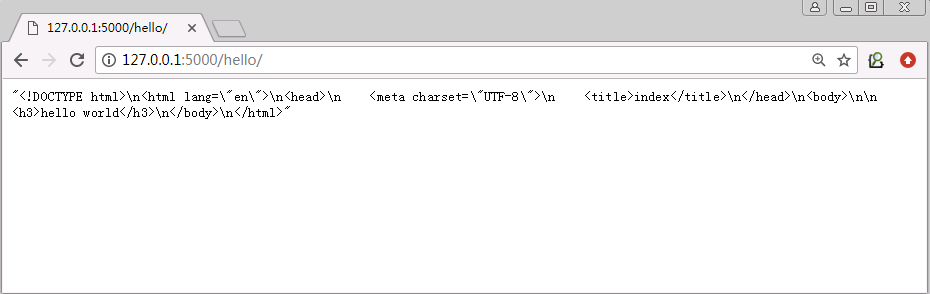
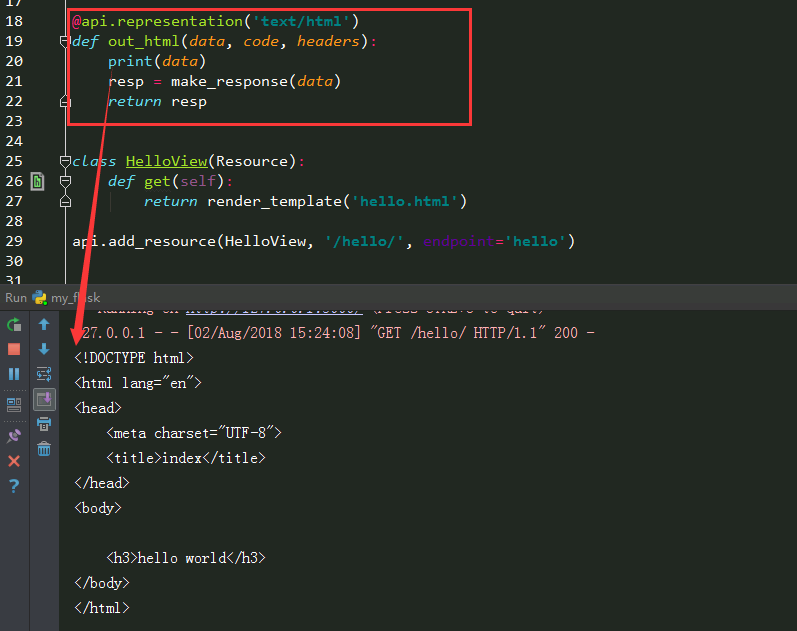
可以发现这样渲染出来的页面并不是我们想要的。要想使用Flask-Restful渲染页面还需要定义一个out_html函数
@api.representation('text/html')
def out_html(data, code, headers):
    resp = make_response(data)
    return resp


class HelloView(Resource):
    def get(self):
        return render_template('hello.html')

api.add_resource(HelloView, '/hello/', endpoint='hello')
其中那个data就是页面的内容