编译安装说明
主要参考Ubuntu 16.04下编译ffmpeg支持CUDA下的cuvid vnenc和NPP的内容。建议编译安装前熟练阅读参考资料中的重要链接。
ffmpeg的configure命令:
PKG_CONFIG_PATH="$HOME/local/lib/pkgconfig" ./configure --prefix="$HOME/local" --pkg-config-flags="--static" --extra-cflags="-I$HOME/local/include" --extra-ldflags="-L$HOME/local/lib" --extra-libs=-lpthread --extra-libs=-lm --bindir="$HOME/local/bin" --enable-gpl --enable-libfdk_aac --enable-libmp3lame --enable-libx264 --enable-nonfree --enable-gpl --enable-cuda --enable-cuvid --enable-nvdec --enable-nvenc --enable-libnpp --extra-cflags=-I/usr/local/cuda/include --extra-ldflags=-L/usr/local/cuda/lib64
命令行测试:
ffmpeg -vsync 0 -hwaccel cuda -hwaccel_output_format cuda -i test.mp4 -c:a copy -vf scale_npp=1280:720 -c:v h264_nvenc -b:v 5M output/re5.mp4
可能遇到的编译错误:
bugfix:[h264_nvenc @ 0x32c2080] Driver does not support the required nvenc API version. Required: 10.0 Found: 9.0
https://blog.csdn.net/qq_23282479/article/details/107579032
https://forums.developer.nvidia.com/t/ffmpeg-nvenc-issue-driver-does-not-support-the-required-nvenc-api-version-required-9-1-found-9-0/109348
nv-codec-headers里的README记录了最低要求的驱动版本号(可以到github里面去看https://github.com/FFmpeg/nv-codec-headers)
在nv-codec-headers目录下执行git checkout sdk/9.0,切换回旧版本后,make clean之后重新编译ffmpeg即可。
NVIDIA Encoding and Decoding Hardware
NVIDIA GPUs ship with an on-chip hardware encoder and decoder unit often referred to as NVENC and NVDEC. Separate from the CUDA cores, NVENC/NVDEC run encoding or decoding workloads without slowing the execution of graphics or CUDA workloads running at the same time.
NVENC and NVDEC support the many important codecs for encoding and decoding. Figure 1 lists many of the codecs, format and features supported with current NVIDIA hardware. Actual support depends on the GPU that is used. An up-to-date support matrix can be found at the Video Encode and Decode Support Matrix page.
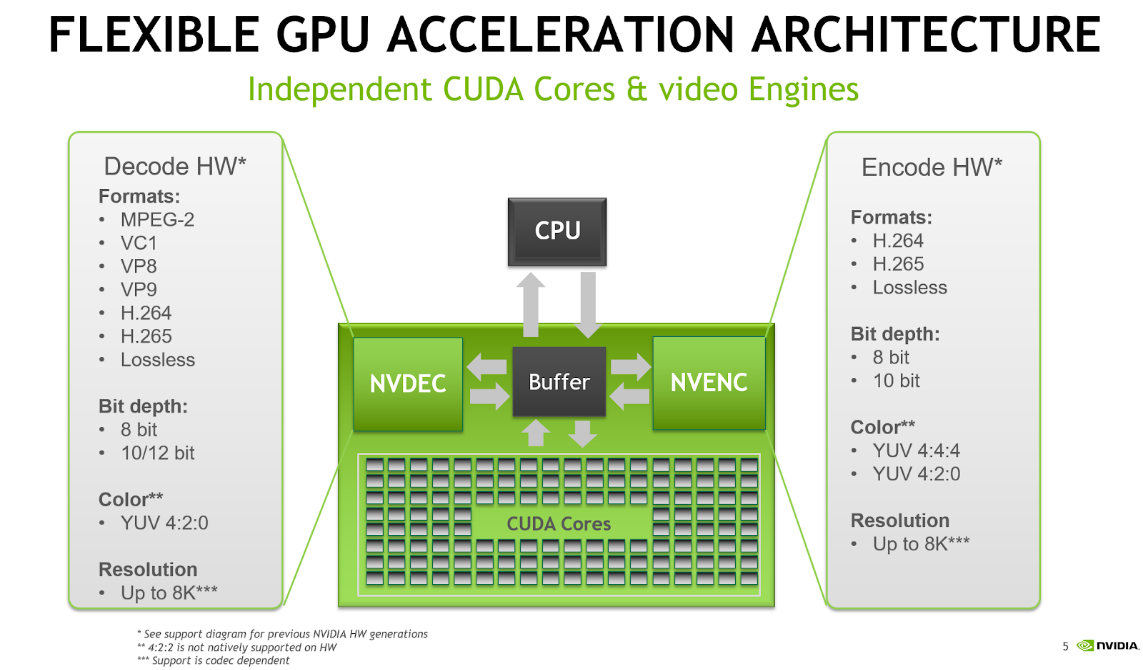
Figure 1: GPU hardware capabilities
Hardware accelerated transcoding with FFmpeg
Separate from the CUDA cores, NVENC/NVDEC run encoding or decoding workloads without slowing the execution of graphics or CUDA workloads running at the same time.
Using the FFmpeg library is common practice when transcoding video data. Hardware acceleration dramatically improves the performance of the workflow. Figure 2 shows the different elements of the transcoding process with FFmpeg.

Figure 2: Transcoding pipeline with FFmpeg using NVIDIA hardware acceleration
FFmpeg supports hardware accelerated decoding and encoding via the hwaccel cuda, h264_cuvid, hevc_cuvid and h264_nvenc, hevc_nvenc modules. Activating support for hardware acceleration when building from source requires some extra steps:
- Clone the FFmpeg git repository https://git.ffmpeg.org/ffmpeg.git
- Download and install a compatible driver from the NVIDIA web site
- Download and install the CUDA toolkit
- Clone the nv-codec-headers repository and install using this repository as header-only: make install
- Configure FFmpeg using the following command (use correct CUDA library path):
./configure --enable-cuda --enable-cuvid --enable-nvdec --enable-nvenc --enable-nonfree --enable-libnpp --extra-cflags=-I/usr/local/cuda/include --extra-ldflags=-L/usr/local/cuda/lib64
- Build with multiple processes to increase build speed and suppress excessive output: make -j -s
Using FFmpeg to do software 1:1 transcode is simple:
ffmpeg -i input.mp4 -c:a copy -c:v h264 -b:v 5M output.mp4
But this is going to be slow slow since it only uses the CPU-based software encoder and decoder. Using the hardware encoder NVENC and decoder NVDEC requires adding some more parameters to tell ffmpeg which encoder and decoders to use.
Maximizing the transcoding speed also means making sure that the decoded image is kept in GPU memory so the encoder can efficiently access it.
ffmpeg -hwaccel cuda -hwaccel_output_format cuda -i input.mp4 -c:v h264_nvenc -b:v 5M output.mp4
|
-hwaccel cuda |
chooses appropriate hw accelerator |
|
-hwaccel_output_format cuda |
keeps the decoded frames in GPU memory |
|
-c:v h264_nvenc |
selects the NVIDIA hardware accelerated H.264 encoder |
Without the -hwaccel cuda -hwaccel_output_format cuda option, the decoded raw frames would be copied back to system memory via the PCIe bus, shown in figure 3. Later, the same image would be copied back to GPU memory via PCIe to encode on the GPU. These two additional transfers create latency due to the transfer time and will increase PCIe bandwidth occupancy.
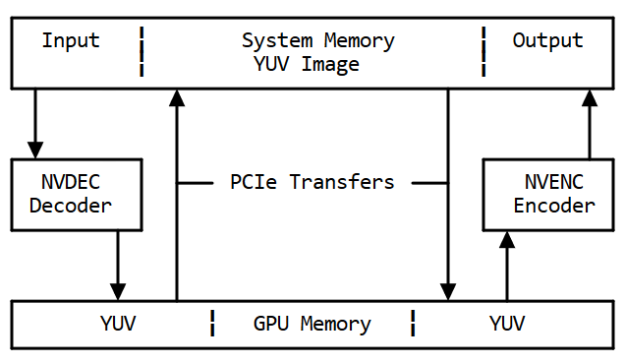
Figure 3: Memory flow without hwaccel
Adding the -hwaccel cuvid option means the raw decoded frames will not be copied and the transcoding will be faster and use less system resources, as shown in figure 4.
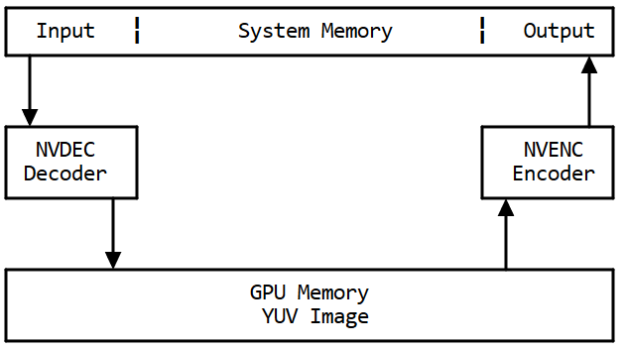
Figure 4: Memory flow with hwaccel
Given PCIe bandwidth limits, copying uncompressed image data would quickly saturate the PCIe bus. Prevent unnecessary copies between system and GPU memory, using -hwaccel cuda -hwaccel_output_format cuda result in up to 2x the throughput compared to the unoptimized call not using -hwaccel cuvid.
Processing filters
Transcoding often involves not only changing format or bitrate of the input stream, but also resizing it. Two options exist for resizing on the GPU: using the npp_scale filter or the nvcuvid resize option. The nvcuvid resize option can be used when transcoding from one input to one output stream with different resolution (1:1 transcode). See the next line for an example.
ffmpeg -vsync 0 –hwaccel cuvid -c:v h264_cuvid –resize 1280x720 -i input.mp4 -c:a copy -c:v h264_nvenc -b:v 5M output.mp4
If multiple output resolutions are needed (1:N transcode), the scale_npp filter can resize decoded frames on the GPU. This way we can generate multiple output streams with multiple different resolutions but only using one resize step for all streams. See the next line for an example of 1:2 transcode.
ffmpeg -vsync 0 -hwaccel cuda -hwaccel_output_format cuda -i input.mp4 -c:a copy –vf scale_npp=1280:720 -c:v h264_nvenc -b:v 5M output_720.mp4 -c:a copy -vf scale_npp=640:320 -c:v h264_nvenc -b:v 3M output_360.mp4
Using -vf "scale_npp=1280:720" will set scale_npp as filter for the decoded images
The interpolation algorithm can be defined for scale_npp as an additional argument. Cubic interpolation is used by default but other algorithms might give better results depending on scale factor and images. Using the super-sampling algorithm is recommended for best quality when downscaling. See below for an example:
ffmpeg -vsync 0 -hwaccel cuda -hwaccel_output_format cuda -i input.mp4 -c:a copy –vf scale_npp=1280:720:interp_algo=super -c:v h264_nvenc -b:v 5M output_720.mp4
Mixing CPU and GPU processing
Sometimes it might be necessary to mix CPU and GPU processing. For example you may need to decode on the CPU, because the format is unsupported on the GPU decoder, or because a filter is not available on the GPU. In those cases, you can’t use the -hwaccel cuvid or -hwaccel cuda flag. Instead, you need to manage uploading the data from system to GPU memory using the hwupload_cuda filter. In the example below, an H.264 stream is decoded on the GPU and downloaded to system memory since -hwaccel cuvid is not set. The fade filter is applied in system memory and the processed image uploaded to GPU memory using the hwupload_cuda filter. Finally, the image is scaled using scale_npp and encoded on the GPU.
ffmpeg -vsync 0 -c:v h264_cuvid -i input.264 -vf "fade,hwupload_cuda,scale_npp=1280:720" -c:v h264_nvenc output.264
npp_scale
The NVIDIA Performance Primitives (NPP) library provides GPU-accelerated image, video, and signal processing functions that perform up to 30x faster than CPU-only implementations. With over 5000 primitives for image and signal processing, you can easily perform tasks such as color conversion, image compression, filtering, thresholding and image manipulation.
The NPP library optimizes the use of available computing resources so that your application achieves maximum performance across the data center, workstation and embedded platforms. Today, NPP is widely used by engineers, scientists and researchers working on images processing, signals processing and computer vision applications in autonomous vehicles, medical imaging, robotics and HPC.
scale_npp: This is a scaling filter implemented in NVIDIA's Performance Primitives. It's primary dependency is the CUDA SDK, and it must be explicitly enabled by passing --enable-libnpp, --enable-cuda-nvcc and --enable-nonfree flags to ./configure at compile time when building FFmpeg from source. Use this filter in place of scale_cuda wherever possible.
npp像素格式转换的命令示例:
ffmpeg -vsync 0 -hwaccel_device 2 -hwaccel cuda -hwaccel_output_format cuda -i ~/vedio/drone1.flv -vf "scale_npp=format=yuv420p,hwdownload,format=yuv420p" ff22cuda2.yuv
CUDA Driver
Running a CUDA application requires the system with at least one CUDA capable GPU and a driver that is compatible with the CUDA Toolkit. See Table 3. For more information various GPU products that are CUDA capable, visit https://developer.nvidia.com/cuda-gpus.
Each release of the CUDA Toolkit requires a minimum version of the CUDA driver. The CUDA driver is backward compatible, meaning that applications compiled against a particular version of the CUDA will continue to work on subsequent (later) driver releases.
More information on compatibility can be found at https://docs.nvidia.com/cuda/cuda-c-best-practices-guide/index.html#cuda-runtime-and-driver-api-version.
Note: Starting with CUDA 11.0, the toolkit components are individually versioned, and the toolkit itself is versioned as shown in the table below.
The minimum required driver version for CUDA enhanced compatibility is shown below. CUDA Enhanced Compatibility is described in detail in https://docs.nvidia.com/deploy/cuda-compatibility/index.html
Table 2. CUDA Toolkit and Minimum Required Driver Version for CUDA Enhanced Compatibility
| CUDA Toolkit | Minimum Required Driver Version for CUDA Enhanced Compatibility | |
|---|---|---|
| Linux x86_64 Driver Version | Windows x86_64 Driver Version | |
| CUDA 11.0 to CUDA 11.3.1 Update 1 | >=450.80.02 | >=456.38 |
CUDA Toolkit and Corresponding Driver Versions
The version of the development NVIDIA GPU Driver packaged in each CUDA Toolkit release is shown below.
Table 3. CUDA Toolkit and Corresponding Driver Versions
| CUDA Toolkit | Toolkit Driver Version | |
|---|---|---|
| Linux x86_64 Driver Version | Windows x86_64 Driver Version | |
| CUDA 11.3.1 Update 1 | >=465.19.01 | >=465.89 |
| CUDA 11.3.0 GA | >=465.19.01 | >=465.89 |
| CUDA 11.2.2 Update 2 | >=460.32.03 | >=461.33 |
| CUDA 11.2.1 Update 1 | >=460.32.03 | >=461.09 |
| CUDA 11.2.0 GA | >=460.27.03 | >=460.82 |
| CUDA 11.1.1 Update 1 | >=455.32 | >=456.81 |
| CUDA 11.1 GA | >=455.23 | >=456.38 |
| CUDA 11.0.3 Update 1 | >= 450.51.06 | >= 451.82 |
| CUDA 11.0.2 GA | >= 450.51.05 | >= 451.48 |
| CUDA 11.0.1 RC | >= 450.36.06 | >= 451.22 |
| CUDA 10.2.89 | >= 440.33 | >= 441.22 |
| CUDA 10.1 (10.1.105 general release, and updates) | >= 418.39 | >= 418.96 |
| CUDA 10.0.130 | >= 410.48 | >= 411.31 |
| CUDA 9.2 (9.2.148 Update 1) | >= 396.37 | >= 398.26 |
| CUDA 9.2 (9.2.88) | >= 396.26 | >= 397.44 |
| CUDA 9.1 (9.1.85) | >= 390.46 | >= 391.29 |
| CUDA 9.0 (9.0.76) | >= 384.81 | >= 385.54 |
| CUDA 8.0 (8.0.61 GA2) | >= 375.26 | >= 376.51 |
| CUDA 8.0 (8.0.44) | >= 367.48 | >= 369.30 |
| CUDA 7.5 (7.5.16) | >= 352.31 | >= 353.66 |
| CUDA 7.0 (7.0.28) | >= 346.46 | >= 347.62 |
参考资料
重要:Ubuntu 16.04下编译ffmpeg支持CUDA下的cuvid vnenc和NPP
重要:Using FFmpeg with NVIDIA GPU Hardware Acceleration-nvidia官网
非常重要:NVIDIA FFmpeg Transcoding Guide-nvidia官网
Using GPU hardware to speed up FFmpeg video transcoding and pit draining
HWAccelIntro-ffmpeg官网