背景:
最近在学习uboot,其中有一步很重要的任务就是需要实现uboot 的验证,没有办法验证uboot是不是自己做的,那么整个开发就会收到阻碍。另外,从公司现在开发的板子来看,uboot从sd卡启动是一个很常用的手法。苦于身边的开发板没有提供这个手段,这里也要吐槽一下供应商连这么简单的手段都不公开出来。
好在最近参考了有关的文档,实现了出来。
平台 :Ubuntu 18.04
arm-gcc :4.8
arm-gcc :4.8
$ ./arm-eabi-gcc --version
arm-eabi-gcc (GCC) 4.8
Copyright (C) 2013 Free Software Foundation, Inc.
This is free software; see the source for copying conditions. There is NO
warranty; not even for MERCHANTABILITY or FITNESS FOR A PARTICULAR PURPOSE.
准备:
编译好的 uboot (具体的uboot是从 供应商手上提供的uboot编译而来的)
一张sd卡,读卡器
Linux制作sd启动卡:
安装以下工具
sudo apt-get install gparted
确定sd卡插入的设备节点
*为了确保万无一失,可以 检查插入sd前后 cat /proc/partitions 的区别,有新增的设备就是sd卡所在的设备节点。*
$ cat /proc/partitions
major minor  #blocks  name

7        7       2300 loop7
   8        0  104857600 sda
8       16   15298560 sdb
   8       17   15036416 sdb1
显然,这里是 sdb ,我们也可以看到有 /dev/sdb 设备存在。
删除sd卡原有的分区
* 如果想删除sd卡原有的隐藏分区也可以通过这一部实现 *
$ sudo fdisk /dev/sdb
  Welcome to fdisk (util-linux 2.31.1).
  Changes will remain in memory only, until you decide to write them.
  Be careful before using the write command.
输入d 按下回车 :删除所有分区
  Command (m for help): d
  Selected partition 1
  Partition 1 has been deleted.
再输入w 按下回车:保存修改
  Command (m for help): w
  The partition table has been altered.
  Calling ioctl() to re-read partition table.
  Syncing disks.
此时,如果再使用 cat /proc/partitions 会发现 sdb1 消失
给sd卡分区
输入:
sudo gparted /dev/sdb
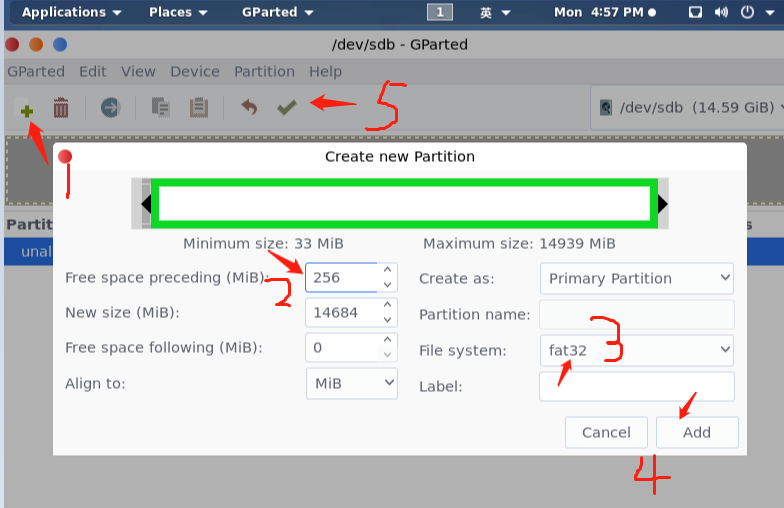
根据界面上面的指示进行操作:(共5步)
1: 添加分区
2:输入分区大小
3:选择fat32格式
4:确定添加
5:点击打勾以保存修改
至此,sd卡制作完毕。
制作烧写脚本
#!/bin/sh
# s5p6818 irom sd/mmc boot fusing tool.
# Author: Jianjun Jiang <8192542@qq.com>


# display usage message
USAGE()
{
  echo Usage: $(basename "$0") '<device> <bootloader>'
  echo '       device     = disk device name for SD card.'
  echo '       bootloader = /path/to/uboot.bin'
  echo 'e.g. '$(basename "$0")' /dev/sdc uboot.bin'
}

#[ `id -u` == 0 ] || { echo "you must be root user"; exit 1; }
[ -z "$1" -o -z "$2" ] && { USAGE; exit 1; }

dev="$1"
xboot="$2"

# validate parameters
[ -b "${dev}" ] || { echo "${dev} is not a valid block device"; exit 1; }
[ X"${dev}" = X"${dev%%[0-9]}" ] || { echo "${dev} is a partition, please use device, perhaps ${dev%%[0-9]}"; exit 1; }
[ -f ${xboot} ] || { echo "${xboot} is not a bootloader binary file."; exit 1; }

# copy the full bootloader image to block device
dd if="${xboot}" of="${dev}" bs=512 seek=1 conv=sync

sync;

echo "OK"
执行脚本
sudo ./6818-sdmmc.sh /dev/sdb uboot.bin
插入支持sd卡启动的开发板上,即可完成从sd卡启动uboot
以下是改动后的uboot的效果。
