一、Navicat
    在生产环境中操作MySQL数据库还是推荐使用命令行工具mysql,但在我们自己开发测试时,
    可以使用可视化工具Navicat,以图形界面的形式操作MySQL数据库

    官网下载:https://www.navicat.com/en/products/navicat-for-mysql
    网盘下载:https://pan.baidu.com/s/1bpo5mqj
    链接:https://pan.baidu.com/s/1Hu-x0mPuSW3g9CxNFlnAng 密码:pqe5

      # 打开 双击:
      # D:
avicatformysqlNavicat for MySQL
avicat

    需要掌握的基本操作
    掌握:
        #1. 测试+链接数据库
        #2. 新建库
        #3. 新建表,新增字段+类型+约束
        #4. 设计表:外键
        #5. 新建查询
        #6. 备份库/表

    注意:
        批量加注释:ctrl+?键
        批量去注释:ctrl+shift+?键

二、pymysql
    介绍:
        在python程序中操作数据库呢?这就用到了pymysql模块,
        该模块本质就是一个套接字客户端软件,使用前需要事先安装
        pip3 install pymysql
    前提:
        授权加创建
        grant all on *.* to 'root'@'%' identified by '123';
        flush privileges;

        端口:3306
        ip: 192.168.1.102
        mysql -uroot -p123 -h 192.168.1.102

    1.pymysql基本使用


 1 # -*- coding:utf-8 -*-
 2 """
 3 端口:3306
 4 ip: localhost
 5 mysql -uroot -p123 -h localhost
 6
 7 """
 8 import pymysql
 9
10 name = input('user>>>:').strip()           # mm
11 password = input('password>>>:').strip()  # 123
12
13 # 建连接
14 conn = pymysql.connect(
15     host = 'localhost',
16     port = 3306,
17     user = 'root',
18     password = '123',
19     db = 'db6',
20     charset = 'utf8'
21 )
22
23 # 拿游标
24 cursor = conn.cursor()
25
26 # 执行sql语句
27 sql = 'select * from userinfo where name= "%s" and password = "%s"'%(name,password)
28 rows = cursor.execute(sql)
29 print(rows)
30
31 # 关闭
32 cursor.close()
33 conn.close()
34
35 # 进行判断
36 if rows:
37     print('登录成功')
38 else:
39     print('登录失败')
40
41 基本使用
2.sql注入
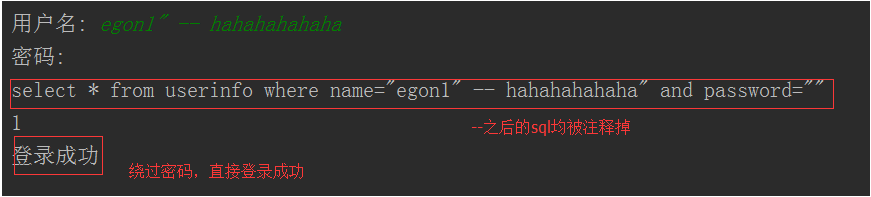
注意:符号--会注释掉它之后的sql,正确的语法:--后至少有一个任意字符
1、sql注入之:用户存在,绕过密码
egon' -- 任意字符
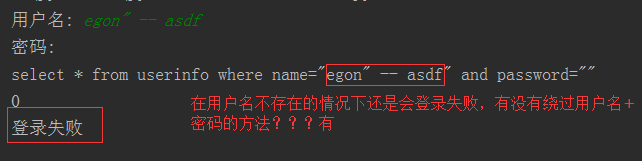
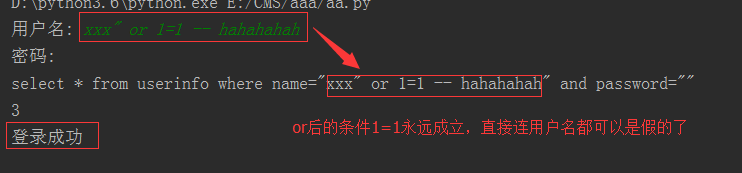
2、sql注入之:用户不存在,绕过用户与密码
xxx' or 1=1 -- 任意字符
        解决办法:
            # 原来是我们对sql进行字符串拼接
            # sql="select * from userinfo where name='%s' and password='%s'" %(user,pwd)
            # print(sql)
            # res=cursor.execute(sql)

            #改写为(execute帮我们做字符串拼接,我们无需且一定不能再为%s加引号了)
            sql="select * from userinfo where name=%s and password=%s" #!!!注意%s需要去掉引号,因为pymysql会自动为我们加上
            res=cursor.execute(sql,[user,pwd]) #pymysql模块自动帮我们解决sql注入的问题,只要我们按照pymysql的规矩来。
 1 # -*- coding:utf-8 -*-
 2 import pymysql
 3
 4 name = input('name>>>:').strip()
 5 password = input('password>>>:').strip()
 6 conn = pymysql.connect(
 7     host = 'localhost',
 8     port = 3306,
 9     user = 'root',
10     password = '123',
11     db = 'db6',
12     charset = 'utf8'
13 )
14 cursor = conn.cursor()
15 # sql = 'select * from userinfo where name = "%s" and password = "%s"'%(name,password)
16 # rows = cursor.execute(sql)
17 sql = 'select * from userinfo where name=%s and password = %s'
18 rows = cursor.execute(sql,(name,password))   #执行sql语句,返回sql影响成功的行数
19 print(sql)
20 print(rows)
21 cursor.close()
22 conn.close()
23 if rows:
24     print('登录成功')
25 else:
26     print('登录失败')
27
28 """
29 name>>>:mm" -- x          #需要帐号,sql注入 -- 表示 注释掉 只需要判断user 不需要判断password
30 password>>>:
31 select * from userinfo where name = "mm" -- x" and password = ""
32 1
33 登录成功
34 """
35 """
36 name>>>:xxx" or 1=1 -- xxx   #不需要帐号密码,sql注入 太恐怖!!
37 password>>>:
38 select * from userinfo where name = "xxx" or 1=1 -- xxx" and password = ""
39 3
40 登录成功
41 """
42 """
43 解决办法:
44     sql = 'select * from userinfo where name=%s and password = %s'
45     rows = cursor.execute(sql,(name,password))
46 """
3.pymysql模块之增删改查
增:
sql = 'insert into userinfo(name,password) values(%s,%s)'
rows = cursor.execute(sql,('lily','123'))
conn.commit() # 注意只有执行了commit() 才会更新到数据库中
批量:
rows = cursor.executemany(sql,[('alice4','123'),('alice5','123'),('alice6','123')])
print(cursor.lastrowid) # 显示插入数据前的id 走到哪
删:
sql = 'delete from userinfo where name = %s'
rows = cursor.execute(sql,('alice5'))
conn.commit()
改:
sql = 'update userinfo set name = %s where id = %s '
rows = cursor.execute(sql,('abcd',2))
conn.commit()
查:
# 元祖形式
cursor = conn.cursor()
rows = cursor.execute(sql)
print(cursor.fetchone())
print(cursor.fetchmany(3))
print(cursor.fetchall())
print(cursor.fetchone()) # None 没有数据了!
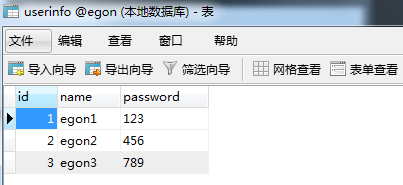
((1, 'aaabbb', '123'), (2, 'abcd', '456'), (3, 'egon3', '789'))
# 字典形式
cursor = conn.cursor(pymysql.cursors.DictCursor)
cursor.fetchone() cursor.fetchmany(2) cursor.fetchall()
[{'id': 3, 'name': 'egon3', 'password': '789'}, {'id': 6, 'name': 'alice', 'password': '123'}]
# 相对 绝对 移动游标
print(cursor.fetchone())
cursor.scroll(5,'absolute')
# cursor.scroll(5,'relative')
print(cursor.fetchmany(2))
 1 """增删改"""
 2 import pymysql
 3 conn = pymysql.connect(
 4     host = 'localhost',
 5     port = 3306,
 6     user = 'root',
 7     password = '123',
 8     db = 'db6',
 9     charset = 'utf8'
10 )
11 cursor = conn.cursor()
12 # sql = 'insert into userinfo(name,password) values(%s,%s)'
13 # rows =cursor.execute(sql,('lily','123'))
14 # rows = cursor.executemany(sql,[('alice4','123'),('alice5','123'),('alice6','123')])
15 # print(cursor.lastrowid)
16
17 # sql = 'delete from userinfo where name = %s'
18 # rows = cursor.execute(sql,('alice6'))
19
20 sql = 'update userinfo set name = %s where id = %s '
21 rows = cursor.execute(sql,('abcd',2))
22 print(rows)
23
24 conn.commit()
25
26 cursor.close()
27 conn.close()
28
29 if rows:
30     print('操作成功')
31 else:
32     print('失败')
33
34
35 """查"""
36 import pymysql
37 conn = pymysql.connect(
38     host = 'localhost',
39     port = 3306,
40     user = "root",
41     password = '123',
42     db = 'db6',
43     charset = 'utf8'
44 )
45 cursor = conn.cursor()
46 # cursor = conn.cursor(pymysql.cursors.DictCursor)
47 sql = 'select * from userinfo'
48 rows = cursor.execute(sql)  #执行sql语句,返回sql影响成功的行数rows,将结果放入一个集合,等待被查询
49 print(rows)
50 # print(cursor.fetchone())
51 # print(cursor.fetchone())
52 # print(cursor.fetchmany(2))
53 # print(cursor.fetchall())
54 # print(cursor.fetchone())  # None
55
56 print(cursor.fetchone())
57 cursor.scroll(5,'absolute')
58 # cursor.scroll(5,'relative')
59 print(cursor.fetchmany(2))
60
61 cursor.close()
62 conn.close()
63
64 if rows:
65     print('操作成功')
66 else:
67     print('失败')