本篇博客我们主要讲述J.U.C包下的atomic包,在上篇博客“并发模拟”的最后,我们模拟高并发的情形时出现了线程安全问题,怎么解决呢?其实解决的办法有很多中,如直接在add()方法上加synchronized关键字,还有一种就是用atomic包下的类来解决这个问题,这也是现在比较推荐的一种写法,下面我们给出完整代码:
@Slf4j
public class CountExample2 {

    //请求总数
    public static int clientTotal = 5000;
    //同时并发执行的线程数
    public static int threadTotal = 200;

    public static AtomicInteger count = new AtomicInteger(0);

    private  static void add() {
        count.incrementAndGet();
//        count.getAndIncrement();
    }

    public static void main(String[] args)throws Exception {

        //定义线程池
        ExecutorService executorService = Executors.newCachedThreadPool();
        //定义信号量
        final Semaphore semaphore = new Semaphore(threadTotal);
        //定义计数器闭锁
        final CountDownLatch countDownLatch = new CountDownLatch(clientTotal);

        for (int i = 0; i < clientTotal; i++) {
            executorService.execute(()->{
                try {
                    semaphore.acquire();
                    add();
                    semaphore.release();
                } catch (Exception e) {
                    log.error("exception",e);
                }
                countDownLatch.countDown();
            });
        }
        countDownLatch.await();
        executorService.shutdown();
        log.info("count:{}",count.get());
    }
}
输出结果如下:

由输出结果可知,我们已经保证了线程安全(如果对此demo有不解的地方可参考“并发编程(三)”),在这个demo中就是AtomicInteger发挥了作用,下面我们来系统的了解一下atomic包下的类。
atomic包
java8中,在atomic包中一共有17个类,其中有12个类是jdk1.5提供atomic时就有的,5个类是jdk1.8新加的。在原有的12个类中包含四种原子更新方式,分别是原子更新基本类型,原子更新数组,原子更新引用,原子更新字段(下面我会在每种类型中,选择某个类为代表以代码进行演示)

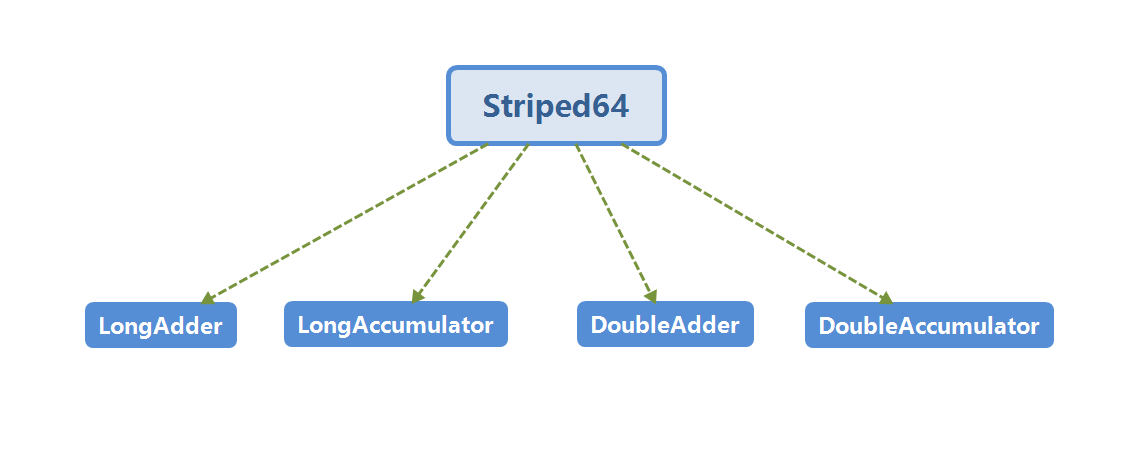
java8新增的5个类分别是Striped64,LongAdder,LongAccumulator,DoubleAdder,DoubleAccumulator,Sriped64作为父类,其余四个类继承此类,分别是long和double的具体实现
原子更新基本类型
通过原子的方式更新基本类型。以AtomicInteger为代表进行演示
AtomicInteger的常用方法如下:
int addAndGet(int delta):以原子的方式将输入的数值与实例中的值相加,并返回结果
boolean compareAndSet(int expect,int update):如果输入的数值等于预期值,则以原子方式将该值设置为输入的值
int getAndIncrement():以原子方式将当前值加1,并返回自增前的值
void lazySet(int newValue):最终设置为newValue,使用lazySet设置后,可能导致其他线程在一小段时间内还是可以读到旧的值
int getAndSet(int newValue):以原子的方式设置为newValue的值,并返回旧值
本篇博客开始的demo就是运用AtomicInteger的例子
import java.util.concurrent.atomic.AtomicInteger;

public class AtomicIntegerTest {

    static AtomicInteger ai = new AtomicInteger(1);

    public static void main(String[] args) {
        System.out.println(ai.getAndIncrement());
        System.out.println(ai.get());
    }

}
输出分别为1,2
AtomicLong-demo
@Slf4j
public class AtomicExample2 {

    //请求总数
    public static int clientTotal = 5000;
    //同时并发执行的线程数
    public static int threadTotal = 200;

    public static AtomicLong count = new AtomicLong(0);

    private  static void add() {
        //主要为此方法(看源码)
        count.incrementAndGet();
//        count.getAndIncrement();
    }

    public static void main(String[] args)throws Exception {

        //定义线程池
        ExecutorService executorService = Executors.newCachedThreadPool();
        //定义信号量
        final Semaphore semaphore = new Semaphore(threadTotal);
        //定义计数器闭锁
        final CountDownLatch countDownLatch = new CountDownLatch(clientTotal);

        for (int i = 0; i < clientTotal; i++) {
            executorService.execute(()->{
                try {
                    semaphore.acquire();
                    add();
                    semaphore.release();
                } catch (Exception e) {
                    log.error("exception",e);
                }
                countDownLatch.countDown();
            });
        }
        countDownLatch.await();
        executorService.shutdown();
        log.info("count:{}",count.get());
    }
}
输出为5000,用法与AtomicInteger类似
AtomicBoolean-demo
@Slf4j
public class AtomicExample6 {

    private static AtomicBoolean isHappened = new AtomicBoolean(false);
    //请求总数
    public static int clientTotal = 5000;
    //同时并发执行的线程数
    public static int threadTotal = 200;

    public static void main(String[] args) throws Exception{

        //定义线程池
        ExecutorService executorService = Executors.newCachedThreadPool();
        //定义信号量
        final Semaphore semaphore = new Semaphore(threadTotal);
        //定义计数器闭锁
        final CountDownLatch countDownLatch = new CountDownLatch(clientTotal);

        for (int i = 0; i < clientTotal; i++) {
            executorService.execute(()->{
                try {
                    semaphore.acquire();
                    test();
                    semaphore.release();
                } catch (Exception e) {
                    log.error("exception",e);
                }
                countDownLatch.countDown();
            });
        }
        countDownLatch.await();
        executorService.shutdown();
        log.info("isHappened:{}",isHappened.get());
    }

    private static void test() {

        //原子性操作,从false变为true只会执行一次
        if (isHappened.compareAndSet(false, true)) {
            log.info("execute");
        }
    }
}
test()方法中将isHappened从false变为true只会执行一次。
原子更新数组类
通过原子的方式更新数组里的某个元素。我们以AtomicIntegerArray(提供原子的方式更新数组里的整型)为例进行演示,其常用方法如下:
int addAndGet(int i,int delta):以原子的方式将输入值与数组中索引i的元素相加
boolean compareAndSet(int i,int expect,int update):如果当前值等于预期值,则以原子方式将数组位置i的元素设置成update值
AtomicIntegerArray-demo
public class AtomicIntegerArrayTest {

    static int[] value = new int[] { 1, 2 };

    static AtomicIntegerArray ai = new AtomicIntegerArray(value);

    public static void main(String[] args) {
        ai.getAndSet(0, 3);
        System.out.println(ai.get(0));
                System.out.println(value[0]);
    }

}
输出结果分别为3,1 ,为什么value[0]的值为1呢?因为数组value通过构造方法传递进去之后,AtomicIntegerArray会将此数组复制一份,所以当AtomicIntegerArray对内部数组元素进行修改时不会影响传入的数组。
原子更新引用类型
AtomicReference:原子更新引用类型
AtomicReferenceFieldUpdater:原子更新引用类型的字段
AtomicMarkableReference:原子更新带有标记位的引用类型,可以原子的更新一个布尔类型的标记位和引用类型。
AtomicReference-demo1
class AtomicReferenceTest {

    public static AtomicReference<User> atomicUserRef = new AtomicReference<User>();

    public static void main(String[] args) {

        User user = new User("conan", 15);
        atomicUserRef.set(user);
        User updateUser = new User("xiaoming", 18);
        atomicUserRef.compareAndSet(user, updateUser);
        System.out.println(atomicUserRef.get().getName());
        System.out.println(atomicUserRef.get().getOld());
    }

    static class User {
        private String name;
        private int old;

        public User(String name, int old) {
            this.name = name;
            this.old = old;
        }

        public String getName() {
            return name;
        }

        public int getOld() {
            return old;
        }
    }
}
输出为:“xiaoming”,18 我们可以结合上篇博客“并发模拟”中,模拟高并发环境,观察原子更新引用类型与非原子更新的区别
AtomicReference-demo2
@Slf4j
public class AtomicExample4 {

    private static AtomicReference<Integer> count = new AtomicReference<>(0);

    public static void main(String[] args) {

        count.compareAndSet(0, 2); //2
        count.compareAndSet(0, 1); //no
        count.compareAndSet(1, 3); //no
        count.compareAndSet(2, 4); //4
        count.compareAndSet(3, 5);  //no

        log.info("count:{}", count.get());
    }
}
上述代码输出结果为4,因为只有第一句和第二句代码得到执行,具体原因可参考下篇博客cas相关的内容
原子更新字段类
AtomicIntegerFiledUpdater:原子更新整型的字段的更新器
AtomicLongFiledUpdater:原子更新长整型字段的更新器
AtomicStampedReference:原子更新带有版本号的引用类型,该类将整数值与引用关联起来,可原子的更数据和数据的版本号,可以解决使用cas进行原子更新时,可能出现的aba问题,原子更新字段类都是抽象类,每次使用都必须使用静态方法newUpdater创建一个更新器,原子更新类的字段必须使用public volatile修饰,我们以AtomicIntergerFieldUpdater为例进行演示
AtomicIntergerFieldUpdater-demo1
public class AtomicIntegerFieldUpdaterTest {

    private static AtomicIntegerFieldUpdater<User> a = AtomicIntegerFieldUpdater
            .newUpdater(User.class, "old");

    public static void main(String[] args) {
        User conan = new User("conan", 10);
        System.out.println(a.getAndIncrement(conan));
        System.out.println(a.get(conan));
    }

    public static class User {
        private String name;
        public volatile int old;

        public User(String name, int old) {
            this.name = name;
            this.old = old;
        }

        public String getName() {
            return name;
        }

        public int getOld() {
            return old;
        }
    }
}
输出为10,11
AtomicIntergerFieldUpdater-demo2
@Slf4j
public class AtomicExample5 {

    //更新某个类的某一字段的值
    private static AtomicIntegerFieldUpdater<AtomicExample5> updater = AtomicIntegerFieldUpdater.newUpdater(AtomicExample5.class, "count");

    //这个字段必须要用volatile修饰,并且是非static字段才可以
    @Getter
    public volatile int count = 100;

    private static AtomicExample5 example5 = new AtomicExample5();

    public static void main(String[] args) {
        if (updater.compareAndSet(example5,100,120)) {
            log.info("update success 1,{}", example5.getCount());
        }
        if (updater.compareAndSet(example5, 100, 120)) {
            log.info("update success 2,{}", example5.getCount());
        } else {
            log.info("update failed,{}", example5.getCount());
        }
    }
}
输出如下:

我们同样可以发现,“update success 2”没有执行,这也涉及到了cas的基本原理,我会在下篇博客具体介绍
下面我们看一下在atomic包中新增的5个类:
Striped64
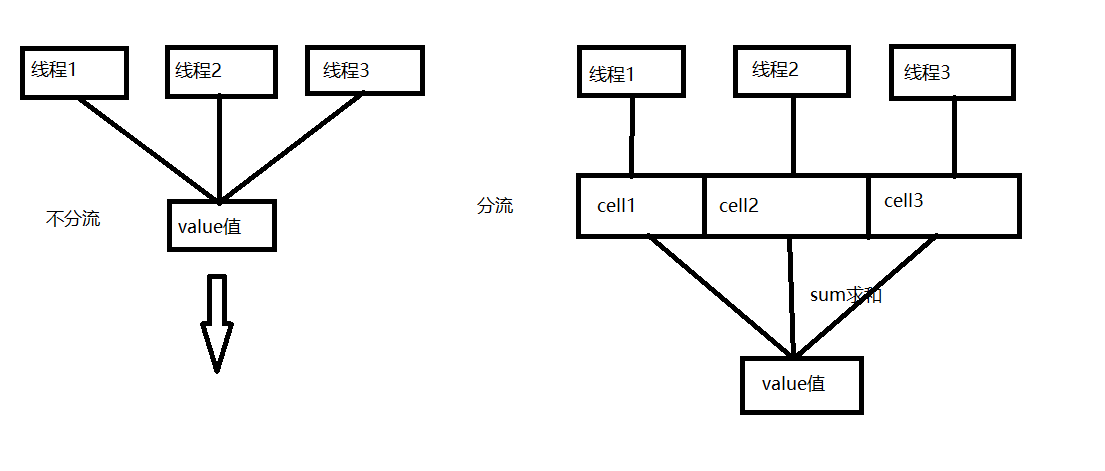
Striped64里面维持一个volatile的base,还有一个cell数据,cell数组主要存储线程需要增加或减少的值,它能够将竞争的线程分散到自己内部的私有cell数组里面,所以当并发量很大的时候,线程会被部分分发去访问内部的cell数组。Striped64里面有两个主要的方法longAccumulate和doubleAccumulate,两个方法非常相似。实现的主要思路是如果能通过cas修改base成功,那么直接退出(并发量不大的时候),否则去cells里面占一个非空的空(并发量大的时候),并把要操作的值赋值保存在一个cell里面,这样在并发特别高的时候可能将热点分离
LongAdder
当并发量不高时,LongAdder和AtomicLong性能差不多,但是当并发超过一定限度,cas会频繁失败,对于AtomicLong没有其他解决办法,对于LongAdder则可以通过cells数组来进行部分分流操作。LongAdder使用的思想是热点分离,就是将value值分离成一个数组,当多线程访问时通过hash算法映射到其中一个数字进行计数,最终的结果就是这些数组的求和累加,这样一来减小了锁的粒度。LongAdder一开始不会直接使用cell []存储,而是先使用long类型的base存储,当casBase()出现失败时,则会创建cell[],如果在单个cell上面出现了cell更新冲突,则会尝试创建新的cell或将cell[]扩容为2倍。 LongAdder中的方法如下:
void add(long x):增加x
void increment():自增1
void decrement():自减1
long sum():求和
void reset():重置cell数组
long sumThenReset():求和并重置
LongAdder-demo1
@Slf4j
@ThreadSafe
public class AtomicExample3 {

    //请求总数
    public static int clientTotal = 5000;
    //同时并发执行的线程数
    public static int threadTotal = 200;

    //与AtomicLong的区别是,可以将热点分离,在并发特别高的时候可能提高性能,在并发不是特别高的时候可以用atomiclong(序列化生成,全局唯一也可以用这个)(再去查)
    public static LongAdder count = new LongAdder();

    private  static void add() {
        count.increment();
//        count.getAndIncrement();
    }

    public static void main(String[] args)throws Exception {

        //定义线程池
        ExecutorService executorService = Executors.newCachedThreadPool();
        //定义信号量
        final Semaphore semaphore = new Semaphore(threadTotal);
        //定义计数器闭锁
        final CountDownLatch countDownLatch = new CountDownLatch(clientTotal);

        for (int i = 0; i < clientTotal; i++) {
            executorService.execute(()->{
                try {
                    semaphore.acquire();
                    add();
                    semaphore.release();
                } catch (Exception e) {
                    log.error("exception",e);
                }
                countDownLatch.countDown();
            });
        }
        countDownLatch.await();
        executorService.shutdown();
        log.info("count:{}",count);

    }
}
输出为5000,没有出现线程安全问题
LongAccumulator
LongAccumulator是LongAdder的功能增强版,LongAdd的api只是对数值的加减,而LongAccumulator提供了自定义的函数操作
LongAccumulator-demo
public class LongAccumulatorDemo {

    public static void main(String[] args)throws InterruptedException {

        LongAccumulator accumulator = new LongAccumulator(Long::max, Long.MIN_VALUE);
        Thread[] ts = new Thread[1000];
        for (int i = 0; i < 1000; i++) {
            ts[i] = new Thread(() ->{
                Random random = new Random();
                long value = random.nextLong();
                //比较value和上一次的比较值,存储较大值
                accumulator.accumulate(value);
            });
            ts[i].start();
        }
        //使用join方法,等到所有的线程结束后再执行下面的代码
        for (int i = 0; i < 1000; i++) {
            ts[i].join();
        }
        System.out.println(accumulator.longValue());
    }
}
上述代码作用为accumulate(value)传入的值会与上一次比较值对比,保留较大者
DoubleAdder与DoubleAccumulator
这两个类的实现思路与long类型的实现一致,只是将double转为long类型后运算的。