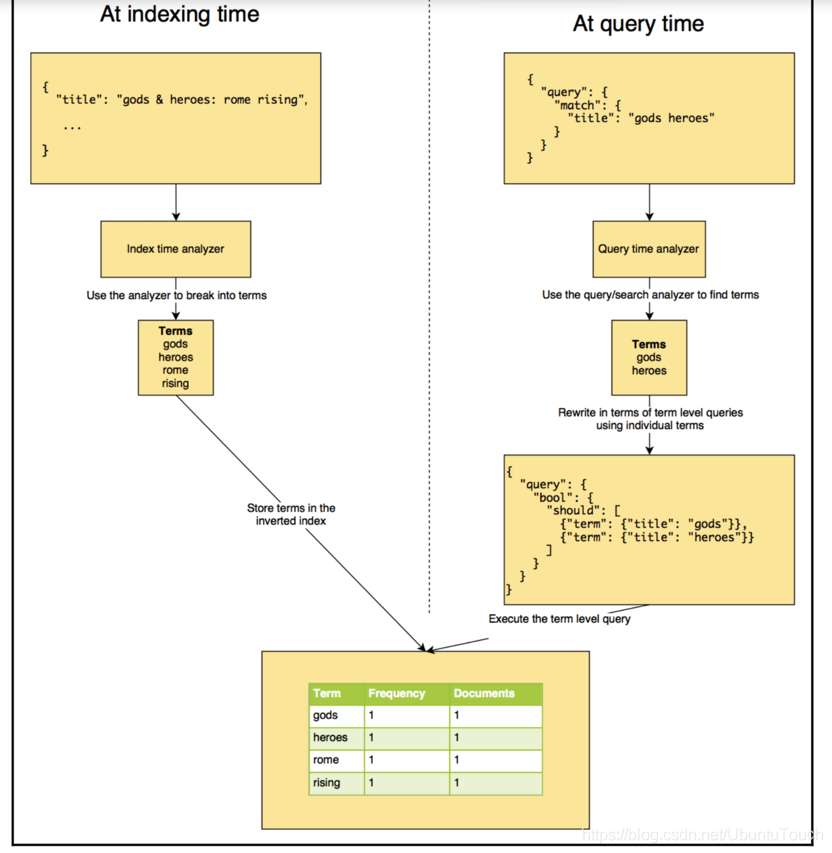
在今天的文章中,我们来进一步了解analyzer。 analyzer执行将输入字符流分解为token的过程,它一般发生在两个场合:
- 在indexing的时候,也即在建立索引的时候
- 在searching的时候,也即在搜索时,分析需要搜索的词语
什么是analysis?
分析是Elasticsearch在文档发送之前对文档正文执行的过程,以添加到反向索引中(inverted index)。 在将文档添加到索引之前,Elasticsearch会为每个分析的字段执行许多步骤:
- Character filtering (字符过滤器): 使用字符过滤器转换字符
- Breaking text into tokens (把文字转化为标记): 将文本分成一组一个或多个标记
- Token filtering:使用标记过滤器转换每个标记
- Token indexing:把这些标记存于index中
接下来我们将更详细地讨论每个步骤,但首先让我们看一下图表中总结的整个过程。 图5.1显示了“share your experience with NoSql & big data technologies"为分析的标记:share, your, experience, with, nosql, big, data,tools,及 technologies。
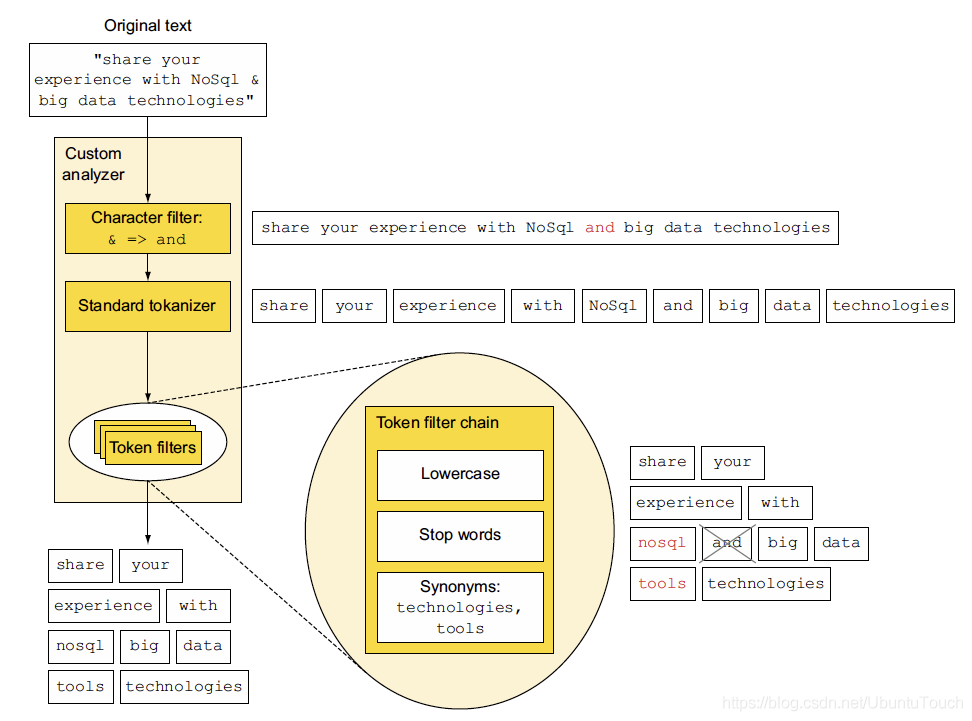
上面所展示的是一个由character过滤器,标准的tokenizer及Token filter组成的定制analyzer。上面的这个图非常好,它很简洁地描述一个analyzer的基本组成部分,以及每个部分所需要表述的东西。
每当一个文档被ingest节点纳入,它需要经历如下的步骤,才能最终把文档写入到Elasticsearch的数据库中:
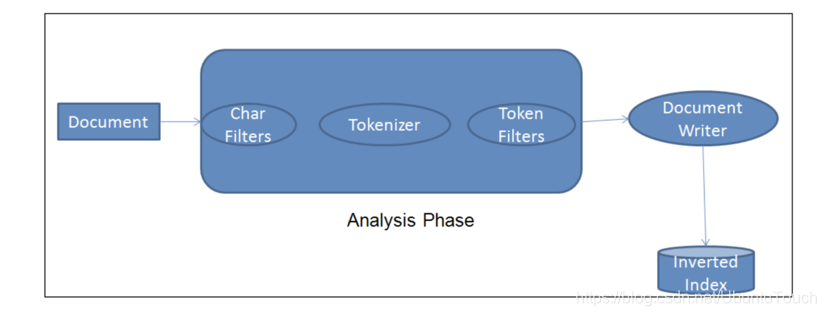
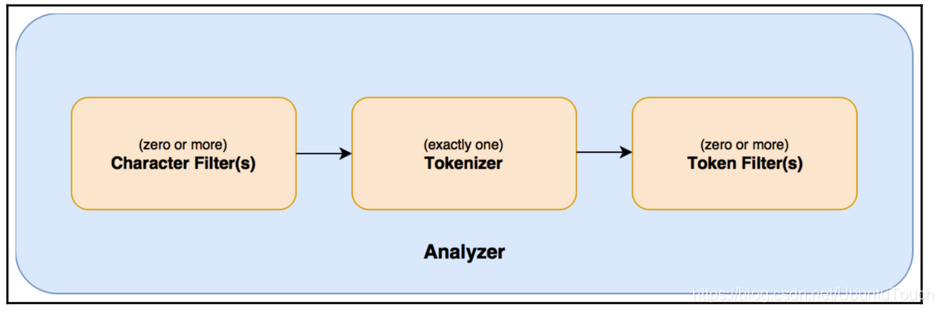
上面中间的那部分就叫做analyzer,即分析器。它有三个部分组成:Char Filters, Tokenizer及 Token Filter。它们的作用分别如下:
- Char Filter: 字符过滤器的工作是执行清除任务,例如剥离HTML标记,还有上面的把“&”转换为“and”字符串
- Tokenizer: 下一步是将文本拆分为称为标记的术语。 这是由tokenizer完成的。 可以基于任何规则(例如空格)来完成拆分。 有关tokennizer的更多详细信息,请访问以下URL:https://www.elastic.co/guide/en/elasticsearch/reference/current/analysis-tokenizers.html。
- Token filter: 一旦创建了token,它们就会被传递给token filter,这些过滤器会对token进行规范化。 Token filter可以更改token,删除术语或向token添加术语。
Elasticsearch已经提供了比较丰富的开箱即用analyzer。我们可以自己创建自己的token analyzer,甚至可以利用已经有的char filter,tokenizer及token filter来重新组合成一个新的analyzer,并可以对文档中的每一个字段分别定义自己的analyzer。如果大家对analyzer比较感兴趣的话,请参阅我们的网址https://www.elastic.co/guide/en/elasticsearch/reference/current/analysis-analyzers.html。
在默认的情况下,standard analyzer是Elasticsearch的缺省分析器(https://www.elastic.co/guide/en/elasticsearch/reference/current/analysis-standard-analyzer.html):
- 没有 Char Filter
- 使用standard tokonizer
- 把字符串变为小写,同时有选择地删除一些stop words等。默认的情况下stop words为_none_,也即不过滤任何stop words。

总体说来一个analyzer可以分为如下的几个部分:
- 0个或1个以上的character filter
- 1个tokenizer
- 0个或1个以上的token filter
Analyze API
GET /_analyze
POST /_analyze
GET /<index>/_analyze
POST /<index>/_analyze
使用_analyze API来测试analyzer如何解析我们的字符串的,比如:
    GET /_analyze
    {
      "analyzer": "standard",
      "text": "Quick Brown Foxes!"
    }
返回结果:
      "tokens" : [
        {
          "token" : "quick",
          "start_offset" : 0,
          "end_offset" : 5,
          "type" : "<ALPHANUM>",
          "position" : 0
        },
        {
          "token" : "brown",
          "start_offset" : 6,
          "end_offset" : 11,
          "type" : "<ALPHANUM>",
          "position" : 1
        },
        {
          "token" : "foxes",
          "start_offset" : 12,
          "end_offset" : 17,
          "type" : "<ALPHANUM>",
          "position" : 2
        }
      ]
    }
在这里我们使用了standard分析器,它把我们的字符串分解为三个token,并显示它们分别的位置信息。
Multi-field字符字段
我们可以针对这个使用多个不同的anaylzer来提高我们的搜索:使用不同的分析器来分析同样的一个字符串,用不同的方式。我们可以使用现有的分析器俩设置一个定制的分析器。比如我们定义如下的一个mapping:
    PUT multifield
    {
      "mappings": {
        "properties": {
          "content": {
            "type": "text",
            "analyzer": "standard",
            "fields": {
              "english": {
                "type": "text",
                "analyzer": "english"
              }
            }
          }
        }
      }
    }
在这里我们定义了一个叫做multifield的index,我们可以对这个index进行分析。我们对整个field定义了一个standard分析器,同时为叫做english的字段定义了一个english的分析器,这样有利于我们删除一些stop words及运用一些同根词。我们首先来为multifield来建立一个文档:
    PUT multifield/_doc/1
    {
      "content": "We are excited to introduce the world to X-Pack"
    }
那么我们可以通过如下的方法来进行搜索:
    GET /multifield/_search
    {
      "query": {
        "match": {
          "content": "the"
        }
      }
    }
我们可以看到搜索的结果:
    {
      "took" : 0,
      "timed_out" : false,
      "_shards" : {
        "total" : 1,
        "successful" : 1,
        "skipped" : 0,
        "failed" : 0
      },
      "hits" : {
        "total" : {
          "value" : 1,
          "relation" : "eq"
        },
        "max_score" : 0.2876821,
        "hits" : [
          {
            "_index" : "multifield",
            "_type" : "_doc",
            "_id" : "1",
            "_score" : 0.2876821,
            "_source" : {
              "content" : "We are excited to introduce the world to X-Pack"
            }
          }
        ]
      }
    }
我们可以看到搜寻的结果,但是如果我们使用如下的方法:
    GET /multifield/_search
    {
      "query": {
        "match": {
          "content.english": "the"
        }
      }
    }
我们啥也看不到,这是因为“the”在english analyzer里“the”被认为是stop word,而被忽略。
如何定义一个定制的分析器
在这里我们主要运用现有的plugin来完成定制的分析器。对于需要开发自己的plugin的需求,不在这篇文章的范围。
假如我们有一下的一个句子:
    GET _analyze
    {
      "text": "I am so excited to go to the x-school",
      "analyzer": "standard"
    }
我们可以看到这样的结果:
        {
          "token" : "x",
          "start_offset" : 29,
          "end_offset" : 30,
          "type" : "<ALPHANUM>",
          "position" : 8
        },
        {
          "token" : "school",
          "start_offset" : 31,
          "end_offset" : 37,
          "type" : "<ALPHANUM>",
          "position" : 9
        }
x-school在这里被分为两个token:x 及 school。如果我们想把x-school当做一个该怎么办呢?我们可以通过设置特有的mapping来实现,比如我们有一个叫做blog的index:
    PUT blogs
    {
      "settings": {
        "analysis": {
          "char_filter": {
            "xschool_filter": {
              "type": "mapping",
              "mappings": [
                "X-School => XSchool"
              ]
            }
          },
          "analyzer": {
            "my_content_analyzer": {
              "type": "custom",
              "char_filter": [
                "xschool_filter"
              ],
              "tokenizer": "standard",
              "filter": [
                "lowercase"
              ]
            }
          }
        }
      },
      "mappings": {
        "properties": {
          "content": {
            "type": "text",
            "analyzer": "my_content_analyzer"
          }
        }
      }
    }
大家请注意在settings里的“analysis”部分,我们定义了一个称之为xschool_filter的char_filter,它可以帮我们把“x-school”转化为“XSchool”。紧接着,我们利用xschool_filter定义了一个叫做“my_content_analyzer”。它是一个定制的类型。我们定义它的char_filter, tokenizer及filter。现在我们可以利用我们刚才定义my_content_analyzer来分析我们的字符串。我们在mappings里可以看到:
      "mappings": {
        "properties": {
          "content": {
            "type": "text",
            "analyzer": "my_content_analyzer"
          }
        }
      }
在这里,我们使用了我们刚才在analysis里定义的my_content_analyzer分析器。我们可以通过如下的方法来测试它是否工作:
    POST blogs/_analyze
    {
      "text": "I am so excited to go to the X-School",
      "analyzer": "my_content_analyzer"
    }
我们可以看到如下的结果:
    {
      "tokens" : [
        {
          "token" : "i",
          "start_offset" : 0,
          "end_offset" : 1,
          "type" : "<ALPHANUM>",
          "position" : 0
        },
        {
          "token" : "am",
          "start_offset" : 2,
          "end_offset" : 4,
          "type" : "<ALPHANUM>",
          "position" : 1
        },
        {
          "token" : "so",
          "start_offset" : 5,
          "end_offset" : 7,
          "type" : "<ALPHANUM>",
          "position" : 2
        },
        {
          "token" : "excited",
          "start_offset" : 8,
          "end_offset" : 15,
          "type" : "<ALPHANUM>",
          "position" : 3
        },
        {
          "token" : "to",
          "start_offset" : 16,
          "end_offset" : 18,
          "type" : "<ALPHANUM>",
          "position" : 4
        },
        {
          "token" : "go",
          "start_offset" : 19,
          "end_offset" : 21,
          "type" : "<ALPHANUM>",
          "position" : 5
        },
        {
          "token" : "to",
          "start_offset" : 22,
          "end_offset" : 24,
          "type" : "<ALPHANUM>",
          "position" : 6
        },
        {
          "token" : "the",
          "start_offset" : 25,
          "end_offset" : 28,
          "type" : "<ALPHANUM>",
          "position" : 7
        },
        {
          "token" : "xschool",
          "start_offset" : 29,
          "end_offset" : 37,
          "type" : "<ALPHANUM>",
          "position" : 8
        }
      ]
    }
在这里,我们可以看到“xschool”这个token。
从上面的返回的结果来看,我们还是可以看到“the”,“to”这样的token。如果我们想去掉这些token的话,我们可以做做如下的设置:
    DELETE blogs

    PUT blogs
    {
      "settings": {
        "analysis": {
          "char_filter": {
            "xschool_filter": {
              "type": "mapping",
              "mappings": [
                "X-School => XSchool"
              ]
            }
          },
          "analyzer": {
            "my_content_analyzer": {
              "type": "custom",
              "char_filter": [
                "xschool_filter"
              ],
              "tokenizer": "standard",
              "filter": [
                "lowercase",
                "my_stop"
              ]
            }
          },
          "filter": {
            "my_stop": {
              "type": "stop",
              "stopwords": ["so", "to", "the"]
            }
          }
        }
      },
      "mappings": {
        "properties": {
          "content": {
            "type": "text",
            "analyzer": "my_content_analyzer"
          }
        }
      }
    }
在这里,我们重新加入了一个叫做my_stop的过滤器:
          "filter": {
            "my_stop": {
              "type": "stop",
              "stopwords": ["so", "to", "the"]
            }
          }
我们在我们自己定制的分析器中也加入了my_stop。重新运行我们的分析:
    POST blogs/_analyze
    {
      "text": "I am so excited to go to the X-School",
      "analyzer": "my_content_analyzer"
    }
在上面我们把so, to及the作为stop words去掉了。重新运行我们的分析:
    POST blogs/_analyze
    {
      "text": "I am so excited to go to the X-School",
      "analyzer": "my_content_analyzer"
    }
显示的结果为:
    {
      "tokens" : [
        {
          "token" : "i",
          "start_offset" : 0,
          "end_offset" : 1,
          "type" : "<ALPHANUM>",
          "position" : 0
        },
        {
          "token" : "am",
          "start_offset" : 2,
          "end_offset" : 4,
          "type" : "<ALPHANUM>",
          "position" : 1
        },
        {
          "token" : "excited",
          "start_offset" : 8,
          "end_offset" : 15,
          "type" : "<ALPHANUM>",
          "position" : 3
        },
        {
          "token" : "go",
          "start_offset" : 19,
          "end_offset" : 21,
          "type" : "<ALPHANUM>",
          "position" : 5
        },
        {
          "token" : "xschool",
          "start_offset" : 29,
          "end_offset" : 37,
          "type" : "<ALPHANUM>",
          "position" : 8
        }
      ]
    }
我们可以看到so, the及to都被过滤掉了。
Filter的顺序也很重要
我们来试一下下面的一个例子:
    GET _analyze
    {
      "tokenizer": "whitespace",
      "filter": [
        "lowercase",
        "stop"
      ],
      "text": "To Be Or Not To Be"
    }
在这里我们先进行lowercase的过滤器,先变成小写字母,再进行stop过滤器,那么返回的结果是[],也即没有。
相反,如果我们使用如下的顺序:
    GET _analyze
    {
      "tokenizer": "whitespace",
      "filter": [
        "stop",
        "lowercase"
      ],
      "text": "To Be Or Not To Be"
    }
这里先进行stop过滤器,因为这里的词有些是大写字母,所以不被认为是stop词,那么没有被过滤掉。之后进行lowercase,显示的结果是to, be, or, not, to, be这些token。
search_analyzer
也许大家已经看出来了,每当一个文档在被录入到Elasticsearch中时,需要一个叫做index的过程。在Index的过程中,它会为该字符串进行分词,并最终形成一个一个的token,并存于数据库。但是,每当我们搜索一个字符串时,在搜索时,我们同样也要对该字符串进行分词,也会建立token。当然这些token不会被存放于数据库中。
比如:
    GET /chinese/_search
    {
      "query": {
        "match": {
          "content": "Happy a birthday"
        }
      }
    }
对于这个搜索来说,我们在默认的情况下,会把"Happy a birthday"使用同样的analyzer进行分词。如果我们的analyzer里含有stop过滤器,它极有可能把字母“a”过滤掉,那么直剩下“happy”及“birthday”这两个词,而“a”将不进入搜索之中。
在实际的使用中,我们也可以通过如下的方法对搜索进行制定具体的search_analyzer。
    PUT blogs
    {
      "settings": {
        "analysis": {
          "char_filter": {
            "xschool_filter": {
              "type": "mapping",
              "mappings": [
                "X-School => XSchool"
              ]
            }
          },
          "analyzer": {
            "my_content_analyzer": {
              "type": "custom",
              "char_filter": [
                "xschool_filter"
              ],
              "tokenizer": "standard",
              "filter": [
                "lowercase",
                "my_stop"
              ]
            }
          },
          "filter": {
            "my_stop": {
              "type": "stop",
              "stopwords": ["so", "to", "the"]
            }
          }
        }
      },
      "mappings": {
        "properties": {
          "content": {
            "type": "text",
            "analyzer": "my_content_analyzer",
            "search_analyzer": "standard"
          }
        }
      }
    }
在上面,我们可以看到,我们分别定义了不用的analyzer:在录入文档时,我们使用了my_content_analyzer分析器,而在搜索时,我们使用了standard分析器。