来源:https://mp.weixin.qq.com/s/WiRyQEoDfuowT3LNfZ-NSw
三、基本流程分析
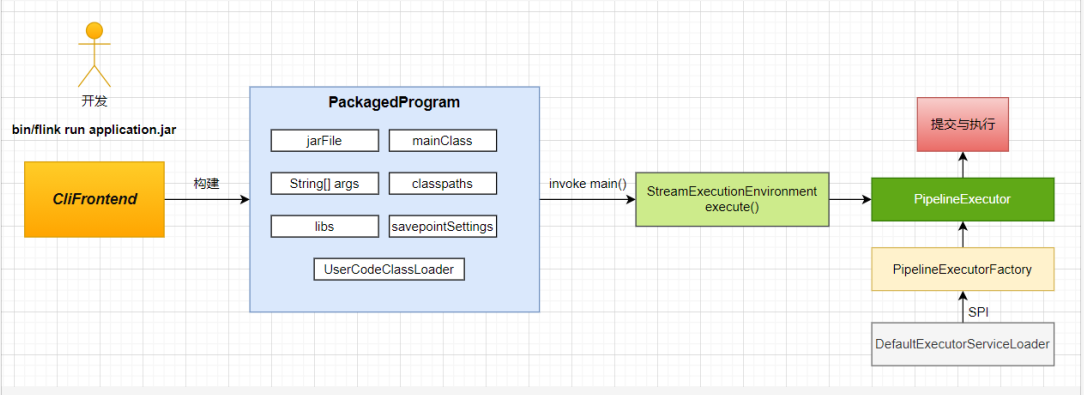
刚刚相信你感性的认识了一把在 IDEA 里提交 Flink 任务的过程了,其实这个过程不算太复杂,我画了一个图如下
1. 浏览一下 main 方法
就四个大步骤,主要逻辑在最后的运行方法中
public static void main(final String[] args) {
  EnvironmentInformation.logEnvironmentInfo(LOG, "Command Line Client", args);

  // 1. 从环境变量中寻找配置文件目录,就是在运行配置那里配置的目录
  final String configurationDirectory = getConfigurationDirectoryFromEnv();

  // 2. 读取配置文件的配置
  final Configuration configuration = GlobalConfiguration.loadConfiguration(configurationDirectory);

  // 3. 加载自定义的命令行(GenericCLI,xxxCli,DefaultCLI),没弄懂这个有什么用
  final List<CustomCommandLine> customCommandLines = loadCustomCommandLines(
   configuration,
   configurationDirectory);

  try {
   final CliFrontend cli = new CliFrontend(
    configuration,
    customCommandLines);

   SecurityUtils.install(new SecurityConfiguration(cli.configuration));
            // 4. 执行
   int retCode = SecurityUtils.getInstalledContext()
     .runSecured(() -> cli.parseAndRun(args));
   System.exit(retCode);
  }
  catch (Throwable t) {
   ...
  }
 }
简单解释一下:
(1)
从系统环境中( 环境变量或者当前目录的 conf 或者 ../conf 目录)获取配置文件( flink-conf.yaml )位置
final String configurationDirectory = getConfigurationDirectoryFromEnv();
(2)解析 flink-conf.yaml 文件,把属性放到 Configuration 里面
final Configuration configuration = GlobalConfiguration.loadConfiguration(configurationDirectory);
(3)(疑问的地方,这三个 CLI 是干嘛的?)初始化自定义的命令行参数:会依次把下面的三个 Cli 放到 List 中
org.apache.flink.client.cli.GenericCLI
org.apache.flink.yarn.cli.FlinkYarnSessionCli
org.apache.flink.client.cli.DefaultCLI
final List<CustomCommandLine> customCommandLines = loadCustomCommandLines(
   configuration,
   configurationDirectory);
(4)初始化 CliFronted ,使用构造函数,把 CliFrontend 类的一些属性赋值,给后续执行时提供属性
final CliFrontend cli = new CliFrontend(
    configuration,
    customCommandLines);
主要是在构造函数里面初始化了这个类的一些对象
 public CliFrontend(
   Configuration configuration,
   ClusterClientServiceLoader clusterClientServiceLoader,
   List<CustomCommandLine> customCommandLines) {
        // 初始化了配置,就是 flink-conf.yaml 的属性
  this.configuration = checkNotNull(configuration);
        // 初始化了自定义的命令行参数
  this.customCommandLines = checkNotNull(customCommandLines);
        // 初始化了 clusterClientServiceLoader,使用 SPI 加载了 org.apache.flink.client.deployment.StandaloneClientFactory 类
  this.clusterClientServiceLoader = checkNotNull(clusterClientServiceLoader);

  FileSystem.initialize(configuration, PluginUtils.createPluginManagerFromRootFolder(configuration));

  this.customCommandLineOptions = new Options();

  for (CustomCommandLine customCommandLine : customCommandLines) {
   customCommandLine.addGeneralOptions(customCommandLineOptions);
   customCommandLine.addRunOptions(customCommandLineOptions);
  }

        // 初始化了客户端超时时间
  this.clientTimeout = configuration.get(ClientOptions.CLIENT_TIMEOUT);
        // 初始化了默认的并行度
  this.defaultParallelism = configuration.getInteger(CoreOptions.DEFAULT_PARALLELISM);
 }
注意这里有一个上次发文讲到的 SPI 技术,加载了 flink-clients 工程下 src/main/resource/META-INF.services/org.apache.flink.client.deployment.ClusterClientFactory 里面配置的类
org.apache.flink.client.deployment.StandaloneClientFactory
(5)调用 parseAndRun 方法来执行任务
这就是 main 方法的主流程
2. 开始攻克 parseAndRun 方法
parseAndRun 方法里有一个 switch case,根据命令行不同的动作类型,执行不同的动作,这里我们重点看执行的 run 方法

3. run 方法
run 方法中,用两个对象,ProgramOptions(执行程序选项)和 Configuration (配置),来构建一个 PackagedProgram,去执行程序。
(1)ProgramOptions 中主要有以下几个属性:
-
private String jarFilePath; // 用户上传的 jar 包路径
-
protected String entryPointClass; // main 方法所在的类
-
private final Listclasspaths; // 类路径
-
private final String[] programArgs; // 程序参数
-
private final int parallelism; // 默认并行度
-
private final boolean detachedMode; // 是否在后台运行
-
private final boolean shutdownOnAttachedExit; // 如果是前台的方式提交,当客户端中断,集群执行的job任务也会shutdown
-
private final SavepointRestoreSettings savepointSettings; // savepoint 配置
这些参数描述了,Flink 在执行一个程序时,需要的所有基本信息
(2)Configuration 配置
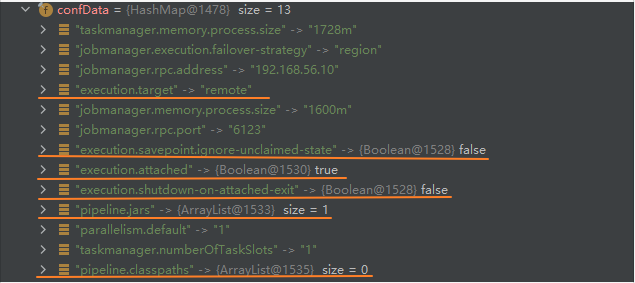
橙线是运行时加的参数,非橙线是 flink-conf.yml 里配置的参数;
(3)PackagedProgram
字面意思是:打包的程序,就是把所有必要的信息,包括运行时参数和程序配置打包到一个对象里面。
构建过程很简单,就把属性赋值给 PackageProgram 里面即可。
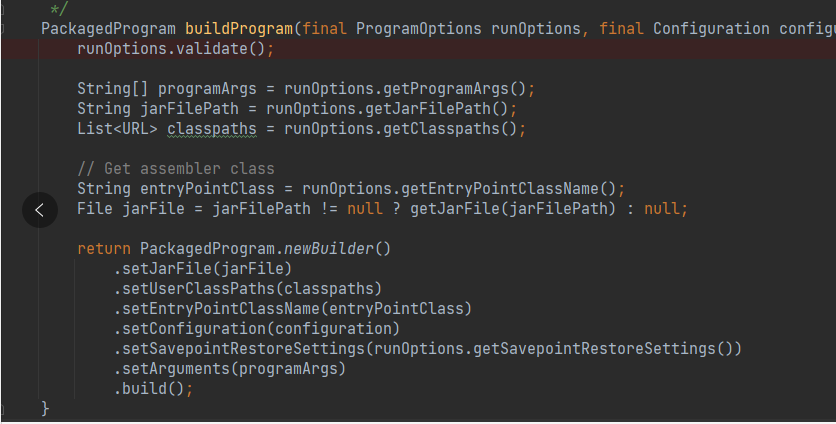
PackagedProgram 的主要属性有:
-
private final URL jarFile; // jar 包路径
-
private final String[] args; // 程序参数
-
private final Class<?> mainClass; // 运行的主类
-
private final ListextractedTempLibraries; // jar 包里面 lib 目录下的包,解压到本地的临时目录
-
private final Listclasspaths; // 所有执行的类路径
-
private final ClassLoader userCodeClassLoader; // 用户代码类加载器
-
private final SavepointRestoreSettings savepointSettings; // Savepoint 配置
-
private final boolean isPython; // 是否是 python 作业
有了这些熟悉,一个程序就可以运行了。
(4)用户类加载器 UserCodeClassLoader
使用默认类加载机制带来的问题
这里我们想要表达的是,Flink 的类加载机制和 Java 虚拟机默认提供的类加载机制是不同的。
Java 虚拟机提供的默认类加载机制,我们可以再复习一下,(双亲委派),如果一个类加载器收到了类加载请求,自己默认不加载,而是把这个请求委派给父类加载器去加载,一直传递到顶层的 BootStrap ClassLoader 中。父加载器加载不到才让下面的类加载器加载。
如果 Flink 使用这种类加载机制,可能会带来的问题是:Flink 集群运行着 Flink 框架的代码,这些代码包括了 Flink 的各种依赖。而用户编写的复杂的应用程序,可能也会包含很多复杂的依赖。其中必然有类全限定名同名的类。
那么在加载用户的类时,一看已经被父类加载器加载了,就不会再加载了,那用户的程序必然就会报错了。
Flink 的类加载机制
Flink 可以在 flink-conf.yml 中配置不同的类加载机制(默认就是 child-first):
classloader.resolve-order: parent-first
classloader.resolve-order: child-first
我们直接看一下这个 ChildFirstClassLoader 类的 loadClassWithoutExceptionHandling 方法:
 @Override
 protected Class<?> loadClassWithoutExceptionHandling(String name, boolean resolve) throws ClassNotFoundException {

  // 首先,检查这个类是否已经被加载过
  Class<?> c = findLoadedClass(name);

  if (c == null) {
   // alwaysParentFirstPatterns 中配置的类,要在父类中优先加载
   for (String alwaysParentFirstPattern : alwaysParentFirstPatterns) {
    if (name.startsWith(alwaysParentFirstPattern)) {
     return super.loadClassWithoutExceptionHandling(name, resolve);
    }
   }

   try {
    // 用户的类,不让父类加载器加载,而是自己直接加载
    c = findClass(name);
   } catch (ClassNotFoundException e) {
    // let URLClassLoader do it, which will eventually call the parent
    c = super.loadClassWithoutExceptionHandling(name, resolve);
   }
  } else if (resolve) {
   resolveClass(c);
  }

  return c;
 }
简单描述一下如下:
-
调用 findLoadedClass() 方法检查全限定名对应的类是否已经加载过,若没有加载过,再继续往下执行;
-
检查要加载的类是否以 alwaysParentFirstPatterns 集合中的前缀开头。如果是,则调用父类的对应方法,以 parent-first 的方式来加载它;
-
如果类不符合 alwaysParentFirstPatterns 集合的条件,就调用 findClass() 方法在用户代码中查找并获取该类的定义(该方法在URLClassLoader中有默认实现)。如果找不到,再fallback到父加载器来加载。
那这样就说完了 Flink 的类加载机制了。
(5)PackagedProgram 构建完后,开始执行用户代码
// --------------------------------------------------------------------------------------------
//  Interaction with programs and JobManager
// --------------------------------------------------------------------------------------------
protected void executeProgram(final Configuration configuration, final PackagedProgram program) throws ProgramInvocationException {
  ClientUtils.executeProgram(new DefaultExecutorServiceLoader(), configuration, program, false, false);
 }
我们看 ClientUtils.executeProgram() 方法
这里有一个相当经典的 ContextClassLoader 的使用方式
try {
     Thread.currentThread().setContextClassLoader(userCodeClassLoader);
     program.invokeInteractiveModeForExecution();
    }
    finally {
     Thread.currentThread().setContextClassLoader(contextClassLoader);
 }
先把 ContextClassLoader 切换为 UserCodeClassLoader,使用这个类加载器来加载 main 方法的代码;
执行完了之后,再把上下文类加载器切换回去。
不知大家能不能理解其中的意思了,程序在执行代码的时候,当需要执行每个类时,ClassLoader 就会去加载这个类,可以通过 Debug ClassLoader 类的 loadClass() 方法看出来。
由于我们是从 CliFrontend 类开始 debug 的,这个类的类加载器就是默认的 AppClassLoader。而从上文介绍来看,用户的代码是需要由 Child-First 策略开始加载的,也就是需要用 UserCodeClassLoader 为类加载器,所以,在执行用户代码之前,把 ContextClassLoader 设置为 UserCodeClassLoader ,就可以实现此效果了。
四、总结
好了,可能今天就讲到这了,我们在文章开始留了一个问题,就是用户的代码如何变成 DAG 的,这个问题我们需要再下一次讲。
下一次我们开始分析 program.invokeInteractiveModeForExecution(),这个反射调用 main 方法,到底做了什么事情。
然后结束之前,还想总结一下今天的知识点:
-
如何封装一个执行程序,需要哪些属性,怎么封装比较优雅(PackagedProgram);
-
Flink 如何加载用户代码,保证和自己框架代码不冲突(UserCodeClassLoader);
-
ContextClassLoader 经典用法是什么。