Okhttp3源码解析(3)-Call分析(整体流程)
### 前言
前面我们讲了
[Okhttp的基本用法](https://www.jianshu.com/p/8e404d9c160f)
[Okhttp3源码解析(1)-OkHttpClient分析](https://www.jianshu.com/p/bf1d01b79ce7)
[Okhttp3源码解析(2)-Request分析](https://www.jianshu.com/p/5a85345c8ea7)
### newCall分析
##### Call初始化
我们首先看一下在哪用到了Call:
```
final Call call = okHttpClient.newCall(request);
```
想起来了吧?无论是get还是post请求 都要生成call对象,在上面我们发现call实例需要一个`okHttpClient`与`request`实例 ,我们先点进Call类去看看:
```
public interface Call extends Cloneable {
//请求
Request request();
//同步
Response execute() throws IOException;
//异步
void enqueue(Callback responseCallback);
//取消请求
void cancel();
//是否在请求过程中
boolean isExecuted();
//是否取消
boolean isCanceled();
Call clone();
//工厂接口
interface Factory {
Call newCall(Request request);
}
}
```
我们发现Call是个接口, 并定义了一些方方法(方法含义在注释上)。
我们继续看`newCal()`方法
```
@Override public Call newCall(Request request) {
return RealCall.newRealCall(this, request, false /* for web socket */);
}
```
继续点击`newRealCall()`去:
```
private RealCall(OkHttpClient client, Request originalRequest, boolean forWebSocket) {
this.client = client;
this.originalRequest = originalRequest;
this.forWebSocket = forWebSocket;
this.retryAndFollowUpInterceptor = new RetryAndFollowUpInterceptor(client, forWebSocket);
}
static RealCall newRealCall(OkHttpClient client, Request originalRequest, boolean forWebSocket) {
// Safely publish the Call instance to the EventListener.
RealCall call = new RealCall(client, originalRequest, forWebSocket);
call.eventListener = client.eventListenerFactory().create(call);
return call;
}
```
从代码中我们发现在`newRealCall()`中初始化了`RealCall`,`RealCall`中初始化了`retryAndFollowUpInterceptor` :
- client: OkHttpClient 实例
- originalRequest : 最初的Request
- forWebSocket :是否支持websocket通信
- retryAndFollowUpInterceptor 从字面意思来说, 是重试和重定向拦截器 ,至于它有什么作用我们继续往下看
### 同步请求分析
```
Response response = call.execute();
```
我们点进`execute()`中查看:
```
@Override public Response execute() throws IOException {
synchronized (this) {
if (executed) throw new IllegalStateException("Already Executed");
executed = true;
}
captureCallStackTrace();
eventListener.callStart(this);
try {
client.dispatcher().executed(this);
Response result = getResponseWithInterceptorChain();
if (result == null) throw new IOException("Canceled");
return result;
} catch (IOException e) {
eventListener.callFailed(this, e);
throw e;
} finally {
client.dispatcher().finished(this);
}
}
```
从上面代码得知步骤:
(1).通过 ` synchronized ` 保证线程同步,判断是否已经执行过 ,如果是直接抛异常
(2). `captureCallStackTrace();` 字面意思:捕获调用堆栈跟踪,我们通过源码发现里面涉及到了`retryAndFollowUpInterceptor`
(3). ` eventListener` 回调` CallStart()`
(4). `client.dispatcher().executed(this);` 看到了`dispatcher`是不是很熟悉?之前在分析`okhttpClient`初始化的时候遇到了,我们点击`executed()`方法进去:
```
synchronized void executed(RealCall call) {
runningSyncCalls.add(call);
}
```
发现把我们传进来的`realcall`放到了`runningSyncCalls`队列中,从字面意思来说就是正在运行的同步的调用队列中,为什么说是队列呢? :
```
private final Deque runningSyncCalls = new ArrayDeque<>();
```
> Deque即双端队列。是一种具有队列和栈的性质的数据结构。双端队列中的元素可以从两端弹出,相比list增加[]运算符重载。
(5).我们回到`execute()`继续往下分析,剩下的代码我们提取出三行代码:
- `equesr result = getResponseWithInterceptorChain();` 生成一个Response 实例
- `eventListener.callFailed(this, e);` :eventListener的callFailed回调
- `client.dispatcher().finished(this);` :dispatcher实例的finished方法
不难看出,**`getResponseWithInterceptorChain()`**一定是此方法中的**核心**,字面意思是获取拦截器链的响应,这就明白了,就是**通过拦截器链处理后返回Response**

###### getResponseWithInterceptorChain() 分析
```
Response getResponseWithInterceptorChain() throws IOException {
// Build a full stack of interceptors.
List interceptors = new ArrayList<>();
interceptors.addAll(client.interceptors()); //自定义
interceptors.add(retryAndFollowUpInterceptor); //错误与跟踪拦截器
interceptors.add(new BridgeInterceptor(client.cookieJar())); //桥拦截器
interceptors.add(new CacheInterceptor(client.internalCache())); //缓存拦截器
interceptors.add(new ConnectInterceptor(client)); //连接拦截器
if (!forWebSocket) {
interceptors.addAll(client.networkInterceptors()); //网络拦截器
}
interceptors.add(new CallServerInterceptor(forWebSocket)); //调用服务器拦截器
Interceptor.Chain chain = new RealInterceptorChain(interceptors, null, null, null, 0,
originalRequest, this, eventListener, client.connectTimeoutMillis(),
client.readTimeoutMillis(), client.writeTimeoutMillis());
return chain.proceed(originalRequest);
}
```
从上面代码不难看出, 对最初的request做了层层拦截,每个拦截器的原理我们放在以后的章节去讲, 这里就不展开了!
这里需要强调的一下 ` interceptors.addAll(client.interceptors()); ` ,` client.interceptors()` 是我们自定义的拦截器 它是在哪定义的?如何添加?我们去OkHttpClient类中发现:
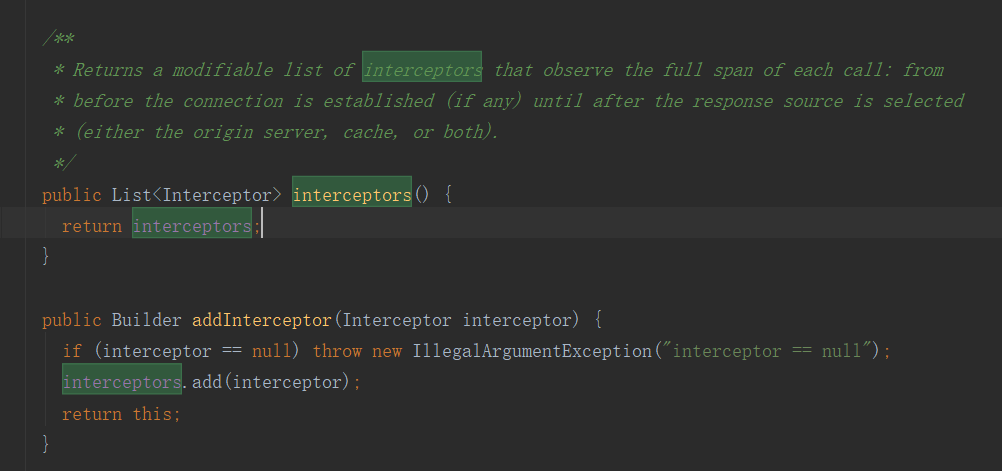
可以通过初始化`okHttpClient`实例 ` .addInterceptor`的形式 添加。
### 异步请求分析
```
call.enqueue(new Callback() {
@Override
public void onFailure(Call call, IOException e) {
Log.d("okhttp_error",e.getMessage());
}
@Override
public void onResponse(Call call, Response response) throws IOException {
Gson gson=new Gson();
Log.d("okhttp_success",response.body().string());
}
});
```
点击`enqueue()`查看:
```
@Override public void enqueue(Callback responseCallback) {
synchronized (this) {
if (executed) throw new IllegalStateException("Already Executed");
executed = true;
}
captureCallStackTrace();
eventListener.callStart(this);
client.dispatcher().enqueue(new AsyncCall(responseCallback));
}
```
(1).通过 ` synchronized ` 保证线程同步,判断是否已经执行过 ,如果是直接抛异常
(2). `captureCallStackTrace();` 字面意思:捕获调用堆栈跟踪,我们通过源码发现里面涉及到了`retryAndFollowUpInterceptor`
(3). ` eventListener` 回调` CallStart()`
(4). `client.dispatcher().enqueue(new AsyncCall(responseCallback));` 调用了`Dispatcher.enqueue()`并传入了一个**`new AsyncCall(responseCallback)`**实例,点击**AsyncCall**查看:
**AsyncCall 是RealCall的内部类!**
```
final class AsyncCall extends NamedRunnable {
private final Callback responseCallback;
AsyncCall(Callback responseCallback) {
super("OkHttp %s", redactedUrl());
this.responseCallback = responseCallback;
}
String host() {
return originalRequest.url().host();
}
Request request() {
return originalRequest;
}
RealCall get() {
return RealCall.this;
}
@Override protected void execute() {
boolean signalledCallback = false;
try {
Response response = getResponseWithInterceptorChain();
if (retryAndFollowUpInterceptor.isCanceled()) {
signalledCallback = true;
responseCallback.onFailure(RealCall.this, new IOException("Canceled"));
} else {
signalledCallback = true;
responseCallback.onResponse(RealCall.this, response);
}
} catch (IOException e) {
if (signalledCallback) {
// Do not signal the callback twice!
Platform.get().log(INFO, "Callback failure for " + toLoggableString(), e);
} else {
eventListener.callFailed(RealCall.this, e);
responseCallback.onFailure(RealCall.this, e);
}
} finally {
client.dispatcher().finished(this);
}
}
}
```
`AsyncCall`继承了`NamedRunnable` ,我们看下`NamedRunnable`是什么:
```
public abstract class NamedRunnable implements Runnable {
protected final String name;
public NamedRunnable(String format, Object... args) {
this.name = Util.format(format, args);
}
@Override public final void run() {
String oldName = Thread.currentThread().getName();
Thread.currentThread().setName(name);
try {
execute();
} finally {
Thread.currentThread().setName(oldName);
}
}
protected abstract void execute();
}
```
原来`NamedRunnable` 实现了`Runnable` 接口 是个线程类,在`run()`中 添加了抽象的`execute();`方法,看到这里 我们应该有一个反应,那就是**AsyncCall中具体的execute()应该在子线程执行**
我们继续分析,`client.dispatcher().enqueue(new AsyncCall(responseCallback));` 点击进入enqueue():
```
synchronized void enqueue(AsyncCall call) {
if (runningAsyncCalls.size() < maxRequests && runningCallsForHost(call) < maxRequestsPerHost) {
runningAsyncCalls.add(call);
executorService().execute(call);
} else {
readyAsyncCalls.add(call);
}
}
```
- `runningAsyncCalls` 正在运行的异步请求的队列
- `maxRequests` 最大的请求数 64
- `maxRequestsPerHost` host最大请求数 5 (可以通过Get与Set方式自定义设置)
如果正在运行的异步请求的队列大小低于64并且 正在请求的host数量低于5,就会执行(满足条件)
```
runningAsyncCalls.add(call);
executorService().execute(call);
```
这里把 `AsyncCall `实例添加到 `runningAsyncCalls `中。
`ExecutorService` 表示线程池 继续看 `executorService()`:
```
public synchronized ExecutorService executorService() {
if (executorService == null) {
executorService = new ThreadPoolExecutor(0, Integer.MAX_VALUE, 60, TimeUnit.SECONDS,
new SynchronousQueue(), Util.threadFactory("OkHttp Dispatcher", false));
}
return executorService;
}
```
其实就是生成了executorService 实例,这就明白了,`AsyncCall `实例放入线程池中执行了!
如果不满足上面的请求数等条件:
```
readyAsyncCalls.add(call);
```
就会被添加到一个等待就绪的异步请求队列中,目的是什么呢??? 当然是等待时机再次添加到runningAsyncCalls中并放入线程池中执行,这块逻辑在 `AsyncCall `类中的 `execute() ` 至于原因我们继续往下看!

刚才我们说了,如果条件满足, `AsyncCall `实例就会在线程池中执行(.start),那我们直接去看run()中的 `execute() ` :
```
@Override protected void execute() {
boolean signalledCallback = false;
try {
Response response = getResponseWithInterceptorChain();
if (retryAndFollowUpInterceptor.isCanceled()) {
signalledCallback = true;
responseCallback.onFailure(RealCall.this, new IOException("Canceled"));
} else {
signalledCallback = true;
responseCallback.onResponse(RealCall.this, response);
}
} catch (IOException e) {
if (signalledCallback) {
// Do not signal the callback twice!
Platform.get().log(INFO, "Callback failure for " + toLoggableString(), e);
} else {
eventListener.callFailed(RealCall.this, e);
responseCallback.onFailure(RealCall.this, e);
}
} finally {
client.dispatcher().finished(this);
}
}
```
上面代码中得知, 首先通过层层拦截器链处理生成了`response`;然后通过一系列的判断,`responseCallback`进行`onResponse`与`onFailure`回调,最后调用的`Dispatcher.finifshed()`
这里需要注意的是 **这里的`Dispatcher.finifshed(this)`与同步中的`Dispatcher.finifshed(this)`不一样** 参数不同。
```
/** Used by {@code AsyncCall#run} to signal completion. */
void finished(AsyncCall call) {
finished(runningAsyncCalls, call, true);
}
```
我们继续看具体的finifshed()方法:
```
private void finished(Deque calls, T call, boolean promoteCalls) {
int runningCallsCount;
Runnable idleCallback;
synchronized (this) {
if (!calls.remove(call)) throw new AssertionError("Call wasn't in-flight!");
if (promoteCalls) promoteCalls();
runningCallsCount = runningCallsCount();
idleCallback = this.idleCallback;
}
if (runningCallsCount == 0 && idleCallback != null) {
idleCallback.run();
}
}
```
在线程同步的情况下 执行了`promoteCalls();`:
```
private void promoteCalls() {
if (runningAsyncCalls.size() >= maxRequests) return; // Already running max capacity.
if (readyAsyncCalls.isEmpty()) return; // No ready calls to promote.
for (Iterator i = readyAsyncCalls.iterator(); i.hasNext(); ) {
AsyncCall call = i.next();
if (runningCallsForHost(call) < maxRequestsPerHost) {
i.remove();
runningAsyncCalls.add(call);
executorService().execute(call);
}
if (runningAsyncCalls.size() >= maxRequests) return; // Reached max capacity.
}
}
```
经过一系列的判断, 对等待就绪的异步队列进行遍历,生成对应的`AsyncCall `实例,并添加到runningAsyncCalls中,最后放入到线程池中执行! 这里就是我们上面说到的等待就绪的异步队列如何与runningAsyncCalls对接的逻辑。
### 总结
##### 同步请求流程:
- 生成`call`实例realcall
- `Dispatcher.executed()`中的`runningSyncCalls` 添加realcall到此队列中
- 通过 `getResponseWithInterceptorChain()` 对request层层拦截,生成Response
- 通过`Dispatcher.finished()`,把call实例从队列中移除,返回最终的response
##### 异步请求流程:
- 生成一个`AsyncCall(responseCallback)`实例(实现了Runnable)
- `AsyncCall`实例放入了`Dispatcher.enqueue()`中,并判断`maxRequests` (最大请求数)`maxRequestsPerHost`(最大host请求数)是否满足条件,如果满足就把`AsyncCall`添加到`runningAsyncCalls`中,并放入线程池中执行;如果条件不满足,就添加到等待就绪的异步队列,当那些满足的条件的执行时 ,在`Dispatcher.finifshed(this)`中的`promoteCalls();`方法中 对等待就绪的异步队列进行遍历,生成对应的`AsyncCall `实例,并添加到`runningAsyncCalls`中,最后放入到线程池中执行,一直到所有请求都结束。
至此OKhttp整体流程就分析完了, 下一篇会分块去分析,希望对大家有所帮助...

大家可以关注我的微信公众号:「秦子帅」一个有质量、有态度的公众号!