一、内容概要
1、图标
2、目录规划
3、a标签中的img标签在浏览器中的适应性
4、后台管理系统设置
5、边缘提示框
6、登录页面图标
7、静态对话框
8、加减框
补充知识:
line-height是行高,也可以定义行间距 用法: 如果想让一段方案垂直居中,可以这么写 html代码: <p>testtesttesttesttest</p> css代码: p{ font-size:12px; 100px; height:40px; line-height:40px;} 这样p标签的内容就垂直居中了 当行高和所在标签的高度相当那么标签中的内容会垂直居中 PS:在表单中用line-height的值最好不要用百分比表示,要用具体数值,不然在IE6中会和其它浏览器出现偏差
二、图标
关于图标的三种方式
i. 扣图片
ii. css拼接
iii. 自己画( )
下载font-Awesome
1、 把软件包插入到目录中
2、 直接引用
 1 3、    <!DOCTYPE html>
 2 <html lang="en">
 3 <head>
 4     <meta charset="UTF-8">
 5     <title></title>
 6     <link rel="stylesheet" href="font-awesome-3.2.1/css/font-awesome.css" />
 7 </head>
 8 <body>
 9     <span class="icon-caret-down"></span>
10 </body>
11 </html>
图标如下:

三、目录规划


 1 project
 2 -app(写软件的目录)
 3     -s1.html
 4     -s2.html
 5 -css (写css的目录)
 6     - comons.css
 7 -script(js脚本目录)
 8     -commons.js
 9 -plugin (应用别人的插件的目录)
10     -bootstrap
11     -bxslider
四 、a标签问题
如果要写上img标签,如果默认放着是没事,如果放在a标签中,在ie浏览器中打开,那么图片就会显示蓝色。造成这样的原因是图片本身有一个边框,解决办法是定义一个选择器,让图片的边框设置为0
a标签如果有内容,那么会有蓝色
<!DOCTYPE html>
<html lang="en">
<head>
    <meta charset="UTF-8">
    <title></title>
</head>
    <style>
        .aa a img{
            border: 0;
        }
    </style>
<body>
<div class="aa">
    <a href="http://www.cnblogs.com/pyrene/"><img src="13.png" style="height: 100px; 100px;"></a>
</div>

</body>
</html>
五、后台管理系统设置
 1 简单的后台管理
 2 左边是索引菜单,右边是内容
 3 如何让其适应页面,设计思想:
 4 让索引菜单靠近左边的距离设置为0,然后距离为假如100,让内容靠近左边设置为101以上,然后让内容靠近右边的距离设置为0
 5
 6 遇到问题
 7 1、如果内容很多但是菜单很少,这个时候考虑怎么把菜单占满页面?bottom直接设置为0,但是要注意top的值要和头部的高度一致
 8
 9 优化后的后台管理
10 设计思想问题,让左边菜单和上面的头部固定不动,而内容会有个滚动条不断的滚动?
11 利用overflow:scroll或者auto都可以
12
13 overflow:auto  这个内容如果超过设置的高度,那么内容会以滚轮的情况出现
 1 <!DOCTYPE html>
 2 <html lang="en">
 3 <head>
 4     <meta charset="UTF-8">
 5     <title></title>
 6     <style>
 7         body{
 8             margin: 0;
 9         }
10         .pg-header{
11             height: 48px;
12             background-color: paleturquoise;
13         }
14         .pg-body .body-menu{
15             position: absolute;
16             background-color: inherit;
17             top: 48px;
18              180px;
19             left: 0;
20             bottom: 0;
21         }
22         .pg-body .body-content{
23             position: absolute;
24             top: 48px;
25             left: 182px;
26             right: 0;
27             background-color: aquamarine;
28             bottom: 0;
29             overflow: auto;
30         }
31     </style>
32 </head>
33 <body>
34     <div class="pg-header"></div>
35     <div class="pg-body">
36         <div class="body-menu">
37             <ul>
38                 <li>111</li>
39                 <li>111</li>
40                 <li>111</li>
41                 <li>111</li>
42                 <li>111</li>
43                 <li>111</li>
44             </ul>
45         </div>
46         <div class="body-content">
            <ul>

                <h1>aa</h1><h1>aa</h1><h1>aa</h1><h1>aa</h1><h1>aa</h1><h1>aa</h1><h1>aa</h1><h1>aa</h1><h1>aa</h1><h1>aa</h1><h1>aa</h1><h1>aa</h1><h1>aa</h1><h1>aa</h1><h1>aa</h1><h1>aa</h1>

                <h1>aa</h1><h1>aa</h1><h1>aa</h1><h1>aa</h1>

                <h1>aa</h1><h1>aa</h1><h1>aa</h1>

                <h1>aa</h1><h1>aa</h1><h1>aa</h1>

                <h1>aa</h1><h1>aa</h1><h1>aa</h1>

            </ul>

        </div>

    </div>
图示:

六、边缘提示框
1、如何写提示框:即写一个td,在td里面嵌套div标签
2、写边缘标签的时候就可以用relative,absolute
只要关于固定的都可以用relative和absolute
<!DOCTYPE html>
<html lang="en">
<head>
    <meta charset="UTF-8">
    <title></title>
</head>
<body>
    <table>
        <tr>
            <td>第一</td>
            <td>第二</td>
            <td>
                <div style="position: relative;">
                    <a>删除</a>
                    <div style="position:absolute;left: 32px;top: -16px;">
                        <input type="button" value="确定">
                        <input type="button" value="取消">
                    </div>
                </div>
            </td>
        </tr>
        <tr>
            <td>第一</td>
            <td>第二</td>
            <td>删除</td>
        </tr>
        <tr>
            <td>第一</td>
            <td>第二</td>
            <td>删除</td>
        </tr>
    </table>
</body>
</html>
图示:

七、登录页面input和图标
这里设置的user 由于没有限制长度所以 中的div的标签宽度是屏幕那么长,所以要把R 从左开始向右飘,并且要让R相对于user固定,设置外边距防止输入的内容把R覆盖 padding-right
<!DOCTYPE html>
<html lang="en">
<head>
    <meta charset="UTF-8">
    <title></title>
    <style>
        .user{
            position: relative;

        }
        .user input{
            height: 20px;
             200px;
            padding-right: 50px;
        }
        .user .ren{
            position: absolute;
            top: 0;
            left: 230px;

        }
    </style>
</head>
<body>
<div class="user">
    <input type="text"/>
    <span class="ren">R</span>
</div>

</body>
图示

实际图示:
 旁边的小人
旁边的小人
八、静态对话框
让图片永远放在屏幕的正中央

这里面分为了3层
1、    最底层
2、    中间的遮罩层的实现
a)    用position:fixed
b)    top:0 left:0 right:0 bottom:0
3、    最中间的加载层 要放入到遮罩层上面
问题点一、
中间的遮罩层和最上面的层,怎么分别哪个在最上面?这里用z-index

top和left等都支持百分比
margin-left默认负值向左边移动。正值向右移动
margin-top 默认负值向上移动
<!DOCTYPE html>
<html lang="en">
<head>
    <meta charset="UTF-8">
    <title></title>
    <style>
        body{
            margin: 0;
        }
        .model{
            position: fixed;
            top: 0;
            left: 0;
            right: 0;
            bottom: 0;
            background: rgba(0,0,0,.5);
            z-index: 1;
        }
        .content{
            height: 300px;
             400px;
            background-color: white;
            position: fixed;
            top: 50%;
            left: 50%;
            z-index: 2;
            margin-left: -200px ;
            margin-top: -150px;
        }
    </style>
</head>
<body style="height: 2000px;background-color: red">
    <div>
        <h1>aaaa</h1>
    </div>
    <div class="model"></div>
    <div class="content"></div>

</body>
</html>
图示:

九、加减框
要求实现下面红色里面的加减框
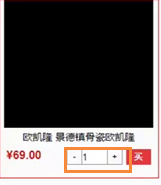
 1 这里分为三部分
 2 1、在整个div里面定义三个div也就是- + 和input内容
 3 然后都让他们往左飘
 4 2、让+和-号里面定高度,并且都要让他们居中显示,用到line-height.
 5 还要让文字居中显示,所以用到text-align:center;
 6 3、定义input选择器的时候因为有个内边距,所以要让padding:0  边框为
 7 0,并且还要设置左边框,和有边框,并且让宽度减去这个边框的值
 8
 9 4、    加减框的实现:
10 点击plus的时候
11 找到text
12 修改text的value
13 alert 显示提示框 ,这个可以用来制作简单的病毒
14 5、    cursor:pointer鼠标放到标签上面会显示一个小手
7、    <!DOCTYPE html>
<html lang="en">
<head>
    <meta charset="UTF-8">
    <title></title>
    <style>
        .left{
            float: left;
        }
        .wrap{
            height: 22px;
             150px;
            background-color: chartreuse;
            border: 1px solid red;
        }
        .minus{
            height: 22px;
             22px;
            line-height: 22px;
            text-align: center;
            cursor: pointer;
        }
        .plus{
            height: 22px;
             22px;
            line-height: 22px;
            text-align: center;
            cursor: pointer;

        }
        .wrap .count input{
            padding: 0;
            border: 0;
             104px;
            height: 22px;
            border-right: 1px solid red;
            border-left: 1px solid red;
        }
    </style>
</head>
<body>
    <div class="wrap">
        <div class="minus left" onclick="minus()">-</div>
        <div class="count left">
            <input id="count" type="text" value="0"/>
        </div>
        <div class="plus left" onclick="plus();">+</div>
    </div>
    <script>
        function plus(){
            var old_str = document.getElementById("count").value;
            var old_int = parseInt(old_str);
            var new_int = old_int + 1;
            document.getElementById("count").value = new_int;
        }
        function minus(){
            var old_str=document.getElementById("count").value;
            var old_int=parseInt(old_str);
            var new_int=old_int-1;
            document.getElementById("count").value=new_int;
        }
    </script>
</body>
</html>
完成图示:鼠标放到加减号上面会变成一个小手,点击会加减
