一.环境
spring boot+spring security+idea+maven+mybatis
主要是spring security
二.依赖
    <dependency>
            <groupId>org.springframework.security.oauth</groupId>
            <artifactId>spring-security-oauth2</artifactId>
        </dependency>


        <dependency>
            <groupId>org.springframework.boot</groupId>
            <artifactId>spring-boot-starter-security</artifactId>
        </dependency>
不需要版本号,spring boot的pom中已经声明了合适的版本号
三.springsecurity登录配置
package com.haitian.security;

import com.haitian.service.security.CustomUserService;
import com.haitian.utils.PathUtils;
import org.springframework.beans.factory.annotation.Autowired;
import org.springframework.context.MessageSource;
import org.springframework.context.annotation.Bean;
import org.springframework.context.annotation.Configuration;
import org.springframework.context.support.ReloadableResourceBundleMessageSource;
import org.springframework.security.authentication.dao.DaoAuthenticationProvider;
import org.springframework.security.authentication.encoding.BasePasswordEncoder;
import org.springframework.security.authentication.encoding.Md5PasswordEncoder;
import org.springframework.security.config.annotation.web.builders.HttpSecurity;
import org.springframework.security.config.annotation.web.configuration.EnableWebSecurity;
import org.springframework.security.config.annotation.web.configuration.WebSecurityConfigurerAdapter;
import org.springframework.security.core.userdetails.UserDetailsService;
import org.springframework.security.crypto.bcrypt.BCryptPasswordEncoder;
import org.springframework.security.crypto.password.PasswordEncoder;
import org.springframework.security.web.authentication.AuthenticationFailureHandler;
import org.springframework.security.web.authentication.AuthenticationSuccessHandler;
import org.springframework.security.web.authentication.SimpleUrlAuthenticationFailureHandler;
import org.springframework.security.web.authentication.UsernamePasswordAuthenticationFilter;

import java.util.Locale;

/**
 * User:zhangweixiao
 * Description:
 */
@Configuration
@EnableWebSecurity
public class WebSecurityConfig extends WebSecurityConfigurerAdapter {


    @Autowired
    private AuthenticationFailureHandler authenticationFailureHandler;
    @Autowired
    private AuthenticationSuccessHandler authenticationSuccessHandler;

    @Autowired
    private  UserDetailsService userDetailsService;

    @Bean
    public BasePasswordEncoder getPasswordEncoder()
    {
        return new Md5PasswordEncoder();
    }

   @Bean
    public DaoAuthenticationProvider authProvider() {
        DaoAuthenticationProvider authProvider = new DaoAuthenticationProvider();
        authProvider.setPasswordEncoder(getPasswordEncoder());
        authProvider.setUserDetailsService(userDetailsService);
        return authProvider;
    }

    @Override
    protected void configure(HttpSecurity http) throws Exception {

        ValidateCodeFilter validateCodeFilter=new ValidateCodeFilter();
        validateCodeFilter.setAuthenticationFailureHandler(authenticationFailureHandler);

        http
                .authorizeRequests()
                .antMatchers("/**").permitAll()
                .and()
                .addFilterBefore(validateCodeFilter, UsernamePasswordAuthenticationFilter.class)
                .formLogin().loginPage("/login").loginProcessingUrl("/zshop_login")
                .failureHandler(authenticationFailureHandler)
                .successHandler(authenticationSuccessHandler)
                .and()
                .csrf().disable();
    }

}
/**
 * 前台登录的数据库桥梁
 */
@Service
public class CustomUserService implements UserDetailsService{

    @Autowired
    private UserService userService;

    /**
     * @param username
     * @return
     * @throws UsernameNotFoundException
     * @throws DataAccessException
     */
    public UserDetails loadUserByUsername(String username) throws UsernameNotFoundException, DataAccessException {

        User user = this.userService.getUserByUserName(username);
        if (user == null) {
            throw new UsernameNotFoundException("用户名不存在");
        }
        Set authorities = new HashSet();
        for (Role role : user.getRoles()) {
            GrantedAuthority grantedAuthority = new SimpleGrantedAuthority(role.getRoleCode());
            authorities.add(grantedAuthority);
        }
        user.setAuthorities(authorities);
        return user;
    }

}
数据库中User表对应的User类继承了UserDetails,这里就不发了.
加密算法最好用bcrypt,因为数据库存的是md5的,所以先用md5了.
了解加密:http://www.cnblogs.com/ptqueen/p/8448396.html
配置完成之后要保证能登录成功.
四.配置认证服务器
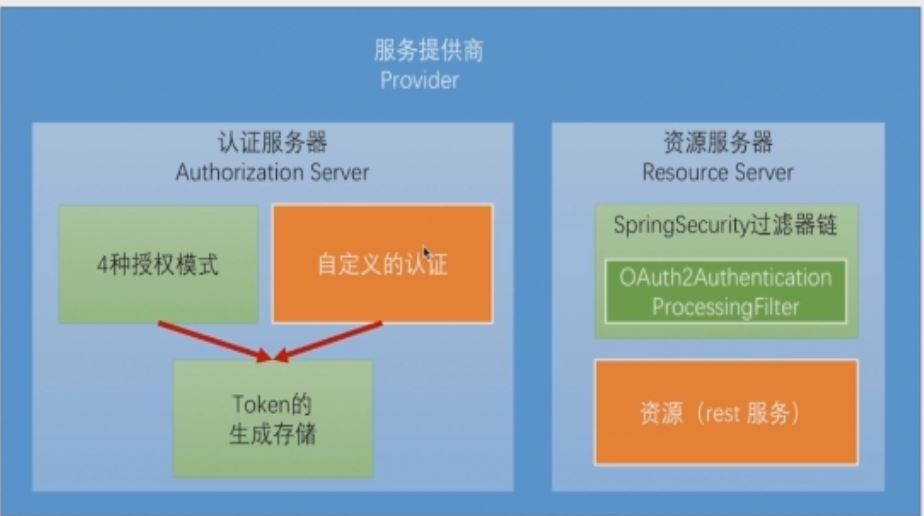
1.配置注解提供认证服务器
@Configuration
@EnableAuthorizationServer
public class AuthorizationServerConfig {
}
2配置client-id和secret.
security:
  oauth2:
    client:
      client-id: zshop
      client-secret: zshop_secret
client-id就是第三方申请认证的id,前后端分离中前端也就相当于第三方.
你的认证服务器就好比QQ的认证服务器,你的前端就好比需要QQ第三方登录的网站.
3启动当前模块
可以看到控制台中oath2包的为我们做的mapping
 Mapped "{[/oauth/authorize]}" onto public org.springframework.web.servlet.ModelAndView org.springframework.security.oauth2.provider.endpoint.AuthorizationEndpoint.authorize(java.util.Map<java.lang.String, java.lang.Object>,java.util.Map<java.lang.String, java.lang.String>,org.springframework.web.bind.support.SessionStatus,java.

 Mapped "{[/oauth/authorize],methods=[POST],params=[user_oauth_approval]}" onto public org.springframework.web.servlet.View org.springframework.security.oauth2.provider.endpoint.AuthorizationEndpoint.approveOrDeny(java.util.Map<java.lang.String, java.lang.String>,java.util.Map<java.lang.String, ?>,org.springframework.web.bind.support.SessionStatus,java.security.Principal)
4.用rest client插件测试
关于插件简单介绍请看:
http://www.cnblogs.com/ptqueen/p/8449046.html
关于oath2文档
https://tools.ietf.org/html/rfc6749#page-24
上面是oath2文档中需要认证的参数信息
先这样测试,http://localhost:8082/oauth/authorize?response_type=code&client_id=zshop&redirect_uri=https://cnblogs.com&scope=all
五.获取授权码code

关于授权码模式的流程请看:
http://www.cnblogs.com/ptqueen/p/8449150.html
成功的话会跳转到登录页面,这个登录页面相当于从某个论坛QQ登录跳转出来的登陆窗口
登录成功后出现这样一个
OAuth Approval
Do you authorize 'zshop' to access your protected resources?
如果是自己的前端登录成功之后应该会直接拿到所有权限,不显示此页面,然后继续换取令牌,
第三方QQ登录的 approval是和登录页面一起的.后面看看怎么配置.
同意授权之后会跳转到https://cnblogs.com,同时会携带一个code,这个code就是授权码.下一步需要通过授权码来换取令牌.
https://www.cnblogs.com/?code=D120US
六.发送授权码到认证服务器换取令牌
参照oauth2文档
https://tools.ietf.org/html/rfc6749#page-29
post的参数有
grant_tpye,值必须为authorization_code
code,第一篇中获得的授权码
redirect_uri,必须和第一篇相同
client_id,配置文件中定义的client_id
scope,获取授权码时定义的scope
请求的header中需要包含client-id和client-secret.

七.获得令牌
成功之后即可获取,令牌是有有效期的,必须在有效期之前进行刷新
{"access_token": "f035137f-def1-4bae-9adc-718a26e6c141","token_type": "bearer","refresh_token": "e7f65ace-6c5d-44a6-94fb-e7ca65ff12fd","expires_in": 43199,"scope": "all"}