作者|Andrea Ialenti
编译|VK
来源|Towards Datas Science

正如在我几乎所有关于这个工具的文章中都写到,Spark和SQL一样非常容易使用。但不管我花多少时间写代码,我只是无法在我的大脑中永久性地存储Spark API(有人会说我的记忆就像RAM一样,小而易失)。
无论你是想快速入门介绍sparksql,还是急于编写你的程序,还是像我一样需要一份备忘单,我相信你会发现这篇文章很有用。
这篇文章的目的是介绍sparksql的所有主要函数/特性,在片段中,你将始终看到原始的SQL查询及其在PySpark中的翻译。
我将在这个数据集上执行我的代码:https://drive.google.com/file/d/1kCXnIeoPT6p9kS_ANJ0mmpxlfDwK1yio/view
在几个月前,我为另一篇文章创建了这个数据集,它由三个简单的表组成:

基础知识
Apache Spark是一个用于大规模并行数据处理的引擎。这个框架的一个令人惊奇的特性是它以多种语言公开api:我通常使用Scala与它交互,但是也可以使用SQL、Python甚至Java和R。
当我们编写Spark程序时,首先要知道的是,当我们执行代码时,我们不一定要对数据执行任何操作。实际上,该工具有两种类型的API调用:转换和操作。
Spark转换背后的范例被称为“延后计算”,这意味着实际的数据计算在我们要求采取行动之前不会开始。
为了理解这一概念,设想一下你需要对一个列执行SELECT和重命名的情况:如果不调用某个操作(例如collect或count),那么你的代码只不过是定义了所谓的Spark执行计划。
Spark以有向无环图(非常著名的DAG)组织执行计划。此结构描述将要执行的确切操作,并使调度器能够决定在给定时间执行哪个任务。
正如Miyagi先生告诉我们的:
-
上蜡:定义DAG(变换)
-
脱蜡:执行DAG(动作)
与Spark交互
太好了,我们从哪里开始交互?使用Spark有多种方法:
-
使用IDE:我建议使用IntelliJ或PyCharm,但我想你可以选择任何你想要的东西。查看附录中的PyCharm快速入门(在本地运行查询)。我认为可以从你的本地环境使用远程Spark executor,但说实话,我从来没有进行过这种配置。
-
Jupyter Notebooks+Sparkmagic:Sparkmagic是一组工具,用于通过Spark REST服务器Livy与远程Spark集群交互工作[1]。这是在AWS、Azure或googlecloud等云系统上工作时使用Spark的主要方式。大多数云提供商都有一项服务,可以在大约10分钟内配置集群和notebooks 。
-
通过使用spark shell的终端:有时你不希望在你和数据之间有任何东西(例如,对一个表进行超级快速的检查);在这种情况下,你只需打开一个终端并启动spark shell。
文章的代码主要用于IDE。
在编写任何查询之前,我们需要导入一些库并启动一个Spark会话(使用Dataset和DataFrame 的API编程)。下面的PySpark和Scala代码段将加载你需要的所有内容(假设你已经配置了系统)。之后,为了简单起见,我们将只看到PySpark代码。除了一些细微差别外,scalaapi基本相同。
PySpark
# 导入Spark
import pyspark
from pyspark.sql import SparkSession
from pyspark.sql.functions import *

# 初始化Spark会话
spark = SparkSession.builder
    .master("local")
    .appName("SparkLikeABoss")
    .getOrCreate()
Scala
//  导入Spark
import org.apache.spark.sql._
import org.apache.spark.sql.functions._

//  初始化Spark会话
val spark = SparkSession.builder.
      master("local")
      .appName("spark session example")
      .getOrCreate()
解释数据集、数据帧和RDD之间的差异篇幅将过长,所以我跳过这一部分,假装它不存在。
基本操作
你能写的最简单的查询可能是你所用过的最重要的查询。让我们看看如何使用Sales表进行基本操作。
简单的Select语句和显示数据
#  以Parquet格式读取源表
sales_table = spark.read.parquet("./data/sales_parquet")

'''
SELECT *
FROM sales_table
'''
#   执行计划
sales_table_execution_plan = sales_table.select(col("*"))
#   Show (Action) - 显示5行,列宽不受限制
sales_table_execution_plan.show(5, True)
#  以Parquet格式读取源表
sales_table = spark.read.parquet("./data/sales_parquet")

'''
SELECT order_id AS the_order_id,
       seller_id AS the_seller_id,
       num_pieces_sold AS the_number_of_pieces_sold
FROM sales_table
'''
#  以一行代码执行计划和显示出来
sales_table_execution_plan = sales_table.select(
    col("order_id").alias("the_order_id"),
    col("seller_id").alias("the_seller_id"),
    col("num_pieces_sold").alias("the_number_of_pieces_sold")
).show(5, True)
我们在代码片段中所做的第一件事是定义执行计划;只有当我们获得show操作时,才会执行该计划。
我们可以在Spark计划中调用的其他操作示例包括:
-
collect()—返回整个数据集
-
count()—返回行数
-
take(n)-从数据集中返回n行
-
show(n,truncate=False)-显示n行。你可以决定截断结果或显示字段的所有长度
另一个值得注意的有趣的事情是列是由col对象标识的。在本例中,我们让Spark推断这些列属于哪个数据帧。
我们可以使用语法execution_plan_variable[“column_name”]来指定列来自哪个执行计划。使用此替代语法,我们可以得到:
#   以Parquet格式读取源表
sales_table = spark.read.parquet("./data/sales_parquet")

'''
SELECT order_id AS the_order_id,
       seller_id AS the_seller_id,
       num_pieces_sold AS the_number_of_pieces_sold
FROM sales_table
'''
#  以一行代码执行计划和显示出来
sales_table_execution_plan = sales_table.select(
    sales_table["order_id"].alias("the_order_id"),
    sales_table["seller_id"].alias("the_seller_id"),
    sales_table["num_pieces_sold"].alias("the_number_of_pieces_sold")
).show(5, True)
在处理连接时,限定字段的源表尤为重要(例如,两个表可能有两个同名字段,因此仅使用col对象不足以消除歧义)。Scala中的语法略有不同:
// Qualify the source execution plan in Scala
sales_table.col("order_id")
重命名和添加列
有时我们只想重命名一个列,或者我们想添加一个新的列并进行一些计算(例如,在以下情况下):
#   以Parquet格式读取源表
sales_table = spark.read.parquet("./data/sales_parquet")

'''
SELECT order_id,
       product_id,
       seller_id,
       date,
       num_pieces_sold AS pieces,
       bill_raw_text
FROM sales_table a
'''
sales_table_execution_plan = sales_table.
    withColumnRenamed("num_pieces_sold", "pieces")

sales_table_execution_plan.show()
#   以Parquet格式读取源表
sales_table = spark.read.parquet("./data/sales_parquet")

'''
SELECT order_id,
       product_id,
       seller_id,
       date,
       num_pieces_sold,
       bill_raw_text,
       num_pieces_sold % 2 AS num_pieces_sold_is_even
FROM sales_table a
'''
sales_table_execution_plan = sales_table.
    withColumn("num_pieces_sold_is_even", col("num_pieces_sold")%2)

sales_table_execution_plan.show()
简单聚合
Spark支持所有主要的聚合函数。以下示例仅指“简单”的示例(例如平均值、总和、计数等)。稍后将介绍数组的聚合。
#   以Parquet格式读取源表
sales_table = spark.read.parquet("./data/sales_parquet")

'''
SELECT product_id,
       SUM(num_pieces_sold) AS total_pieces_sold,
       AVG(num_pieces_sold) AS average_pieces_sold,
       MAX(num_pieces_sold) AS max_pieces_sold_of_product_in_orders,
       MIN(num_pieces_sold) AS min_pieces_sold_of_product_in_orders,
       COUNT(num_pieces_sold) AS num_times_product_sold
FROM sales_table
GROUP BY product_id
'''
sales_table_execution_plan = sales_table.groupBy(
    col("product_id")
).agg(
    sum("num_pieces_sold").alias("total_pieces_sold"),
    avg("num_pieces_sold").alias("average_pieces_sold"),
    max("num_pieces_sold").alias("max_pieces_sold_of_product_in_orders"),
    min("num_pieces_sold").alias("min_pieces_sold_of_product_in_orders"),
    count("num_pieces_sold").alias("num_times_product_sold")
)

sales_table_execution_plan.show()
显示架构
显示命令的“table”有点误导人;更精确的定义是“显示执行计划”。使用Spark API,我们可以一个接一个地传递多个操作;使用printSchema API,如果在磁盘上写入执行计划的结果,我们将输出最终表的样子。
在下面的示例中,我们重命名一些列,进行聚合,然后添加另一列。
#   以Parquet格式读取源表
sales_table = spark.read.parquet("./data/sales_parquet")

'''
-- 创建一个临时表,进行一些重命名
CREATE TABLE temp_1 AS
SELECT seller_id AS the_seller,
       num_pieces_sold AS pieces,
       product_id
FROM sales_table;
--对新表进行聚合
CREATE TABLE temp_2 AS
SELECT product_id,
       SUM(pieces) AS total_pieces
FROM temp_1
GROUP BY product_id;
-- 添加列
SELECT a.*,
       1 AS fake_column
FROM temp2 a;
'''
sales_table_execution_plan = sales_table.
    withColumnRenamed("seller_id", "the_seller").
    withColumnRenamed("num_pieces_sold", "pieces").
groupBy(
    col("product_id")
).agg(
    sum("pieces").alias("total_pieces")
).withColumn("fake_column", lit(1))

#   输出 Schema
sales_table_execution_plan.printSchema()
printSchema的输出是:
root
 |-- product_id: string (nullable = true)
 |-- total_pieces: double (nullable = true)
 |-- fake_column: integer (nullable = false)
请注意,printSchema不会触发操作;相反,Spark会评估执行计划,以了解DAG在输出列中的位置。由于这个原因,这个操作比show快得多,show会触发DAG的执行。
解释执行计划
可以通过explain API获得有关触发操作时引擎将执行的操作的更详细的说明。在这种情况下,我们将获得Spark将执行的操作的详细说明。让我们对上一个查询调用explain:
#   输出 Schema
sales_table_execution_plan.printSchema()
== Physical Plan ==
*(2) HashAggregate(keys=[product_id#361], functions=[sum(cast(pieces#379 as double))])
+- Exchange hashpartitioning(product_id#361, 200)
   +- *(1) HashAggregate(keys=[product_id#361], functions=[partial_sum(cast(pieces#379 as double))])
      +- *(1) Project [product_id#361, num_pieces_sold#364 AS pieces#379]
         +- *(1) FileScan parquet [product_id#361,num_pieces_sold#364] Batched: true, Format: Parquet, Location: InMemoryFileIndex[file:<PATH_TO_FILE>/sales_parquet], PartitionFilters: [], PushedFilters: [], ReadSchema: struct<product_id:string,num_pieces_sold:string>
老实说,我从来没有发现explain API太有用,尤其是当DAG开始变得庞大和复杂时。在Spark UI中可以找到一个更好的视图,它公开了相同信息的图形表示。
Select Distinct
#   以Parquet格式读取源表
sales_table = spark.read.parquet("./data/sales_parquet")

'''
SELECT DISTINCT seller_id,
       date
FROM sales_table
'''
sales_table_execution_plan = sales_table.select(
    col("seller_id"), col("date")
).distinct()

#   输出 Schema
sales_table_execution_plan.show()
Case When
在Spark中很好地实现了该操作(不需要特殊的udf);让我们简单地用sales_table将每一行插入到不同的bucket中,具体取决于num_pieces_selled:
#   以Parquet格式读取源表
sales_table = spark.read.parquet("./data/sales_parquet")

'''
SELECT seller_id,
       CASE WHEN num_pieces_sold < 30 THEN 'Lower than 30',
            WHEN num_pieces_sold < 60 THEN 'Between 31 and 60'
            WHEN num_pieces_sold < 90 THEN 'Between 61 and 90'
            ELSE 'More than 91' AS sales_bucket
FROM sales_table
'''
sales_table_execution_plan = sales_table.select(
    col("seller_id"),
    when(col("num_pieces_sold") < 30, "Lower than 30").
    when(col("num_pieces_sold") < 60, "Between 31 and 60").
    when(col("num_pieces_sold") < 90, "Between 61 and 90").
    otherwise("More than 91").alias("sales_bucket")
)

sales_table_execution_plan.show()
Union All
有时我们需要将流分成多个部分,然后将所有内容合并到一个表中;在SQL中,这是用UNION ALL表示的。在spark2.1中,在执行union all操作之前必须对列进行排序。
幸运的是,spark2.3使用列名来对齐合并的执行计划。在下面的示例中,我们首先将表拆分为两部分,然后将这些部分合并在一起(完全没有必要,但它将演示如何使用API):
#   以Parquet格式读取源表
sales_table = spark.read.parquet("./data/sales_parquet")

'''
CREATE TABLE part_1 AS
SELECT *
FROM sales_table
WHERE num_pieces_sold > 50;
CREATE TABLE part_2 AS
SELECT *
FROM sales_table
WHERE num_pieces_sold <= 50;
SELECT *
FROM part_1
 UNION ALL
SELECT *
FROM part_2
'''
#   分离part1
sales_table_execution_plan_part_1 = sales_table.where(col("num_pieces_sold") > 50)

#   分离part2
sales_table_execution_plan_part_2 = sales_table.where(col("num_pieces_sold") <= 50)

#   合并
sales_table_execution_plan = sales_table_execution_plan_part_1.unionByName(sales_table_execution_plan_part_2)

sales_table_execution_plan.explain()
让我们看看解释,看看幕后发生了什么:
Union
:- *(1) Project [order_id#483, product_id#484, seller_id#485, date#486, num_pieces_sold#487, bill_raw_text#488]
:  +- *(1) Filter (isnotnull(num_pieces_sold#487) && (cast(num_pieces_sold#487 as int) > 50))
:     +- *(1) FileScan parquet [order_id#483,product_id#484,seller_id#485,date#486,num_pieces_sold#487,bill_raw_text#488] Batched: true, Format: Parquet, Location: InMemoryFileIndex[file:<FILE_PATH>/sales_parquet], PartitionFilters: [], PushedFilters: [IsNotNull(num_pieces_sold)], ReadSchema: struct<order_id:string,product_id:string,seller_id:string,date:string,num_pieces_sold:string,bill...
+- *(2) Project [order_id#483, product_id#484, seller_id#485, date#486, num_pieces_sold#487, bill_raw_text#488]
   +- *(2) Filter (isnotnull(num_pieces_sold#487) && (cast(num_pieces_sold#487 as int) <= 50))
      +- *(2) FileScan parquet [order_id#483,product_id#484,seller_id#485,date#486,num_pieces_sold#487,bill_raw_text#488] Batched: true, Format: Parquet, Location: InMemoryFileIndex[file:<FILE_PATH>/sales_parquet], PartitionFilters: [], PushedFilters: [IsNotNull(num_pieces_sold)], ReadSchema: struct<order_id:string,product_id:string,seller_id:string,date:string,num_pieces_sold:string,bill...
表正在合并。
Spark的Join
当代码出现性能问题时,连接通常是我们首先要查看的地方。Spark引擎在并行化非连接操作方面相当出色,但在连接任务时可能需要进行调整。
我写了一整篇关于这个主题的文章,所以我不会再深入讨论这个问题:如果你想知道更多,或者你遇到了一些连接性能问题,我建议你看看:https://towardsdatascience.com/the-art-of-joining-in-spark-dcbd33d693c
同时,这里是连接的语法。在示例中,我们将连接Sales和Sellers表。
#   以Parquet格式读取源表
sales_table = spark.read.parquet("./data/sales_parquet")
sellers_table = spark.read.parquet("./data/sellers_parquet")

'''
SELECT a.*,
       b.*
FROM sales_table a
    LEFT JOIN sellers_table b
        ON a.seller_id = b.seller_id
'''
#   左连接
left_join_execution_plan = sales_table.join(sellers_table,
                   on=sales_table["seller_id"] == sellers_table["seller_id"],
                   how="left")

#   内连接
inner_join_execution_plan = sales_table.join(sellers_table,
                   on=sales_table["seller_id"] == sellers_table["seller_id"],
                   how="inner")

#   右连接
right_join_execution_plan = sales_table.join(sellers_table,
                   on=sales_table["seller_id"] == sellers_table["seller_id"],
                   how="right")

#  全外连接
full_outer_join_execution_plan = sales_table.join(sellers_table,
                   on=sales_table["seller_id"] == sellers_table["seller_id"],
                   how="full_outer")
除了传统的连接类型(左、右、内、交叉等),Spark还支持半连接和反连接;这两个基本上是在Spark中表示操作和不表示操作的一种方式:
#   以Parquet格式读取源表
sales_table = spark.read.parquet("./data/sales_parquet")
sellers_table = spark.read.parquet("./data/sellers_parquet")


'''
SELECT *
FROM sales_table
WHERE seller_id IN (SELECT seller_id FROM sellers_table)
'''
# 左半连接是在SQL中表示IN操作的一种方式
semi_join_execution_plan = sales_table.join(sellers_table,
                on=sales_table["seller_id"] == sellers_table["seller_id"],
                how="left_semi")

semi_join_execution_plan.show()
#   以Parquet格式读取源表
sales_table = spark.read.parquet("./data/sales_parquet")
sellers_table = spark.read.parquet("./data/sellers_parquet")

'''
SELECT *
FROM sales_table
WHERE seller_id NOT IN (SELECT seller_id FROM sellers_table)
'''
# 左反连接是在SQL中表示NOT IN操作的一种方式
anti_join_execution_plan = sales_table.join(sellers_table,
                on=sales_table["seller_id"] == sellers_table["seller_id"],
                how="left_anti")

anti_join_execution_plan.show()
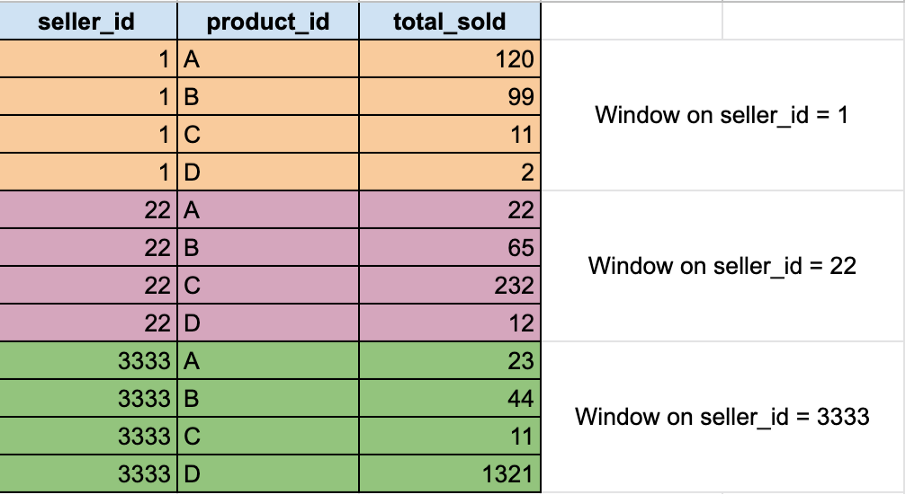
Window函数
window函数对定义为frame或window的特定行子集执行计算。典型的例子是子群的排序。在我们的玩具数据集中,假设我们想知道,对于每个卖家来说,什么是销售最多的产品。要提取这些信息,我们需要:
-
定义我们将应用排序函数的“分区”:我们需要对每个卖家的产品执行一次排序操作
-
应用我们的首选排序函数:dense_rank
, ``rank,row_number。下面是Spark中的窗口函数列表。
下图是我们希望如何分区数据的示例:
#   导入 Window
from pyspark.sql.window import Window

#   以Parquet格式读取源表
sales_table = spark.read.parquet("./data/sales_parquet")

'''
SELECT seller_id,
       product_id,
       total_pieces,
       dense_rank() OVER (PARTITION BY seller_id ORDER BY total_pieces DESC) as rank
FROM (
    SELECT seller_id,
           product_id,
           SUM(total_pieces_sold) AS total_pieces
    FROM sales_table
    GROUP BY seller_id,
           product_id
)
'''

sales_table_agg = sales_table.groupBy(col("seller_id"), col("product_id")).agg(sum("num_pieces_sold").alias("total_pieces"))

#  定义窗口:在卖方ID上对表进行分区,并根据销售的总块对每个组进行排序
window_specifications = Window.partitionBy(col("seller_id")).orderBy(col("total_pieces").asc())

# 应用dense_rank函数,根据上面的规范创建窗口
sales_table_agg.withColumn('dense_rank', dense_rank().over(window_specifications)).show()
字符串
数据科学家在处理数据时面临的另一组非常常见的操作,包括从字符串中提取信息。当然,有很多Spark API可以对文本数据进行几乎任何(基本)操作。
让我们先从简单的LIKE运算符开始,然后再讨论正则表达式的用法。对于API的完整列表,我将参考文档;下面是可能使用最多的API。
Like
在下面的示例中,我们希望使用sales表来选择bill_raw_text类似于“ab%cd%”的所有字符串(即,以字符串ab开头,中间有一个字符串cd。
#   以Parquet格式读取源表
sales_table = spark.read.parquet("./data/sales_parquet")

'''
SELECT *
WHERE bill_raw_text LIKE 'ab%cd%'
'''
sales_table_execution_plan = sales_table.where(
    col('bill_raw_text').like("ab%cd%")
)

sales_table_execution_plan.show()
有时我们想要找到的模式更复杂,无法用简单的通配符来表达。在这种情况下,我们需要使用正则表达式。让我们深入研究几个函数。在下面的示例中,我们将始终应用相同的正则表达式。
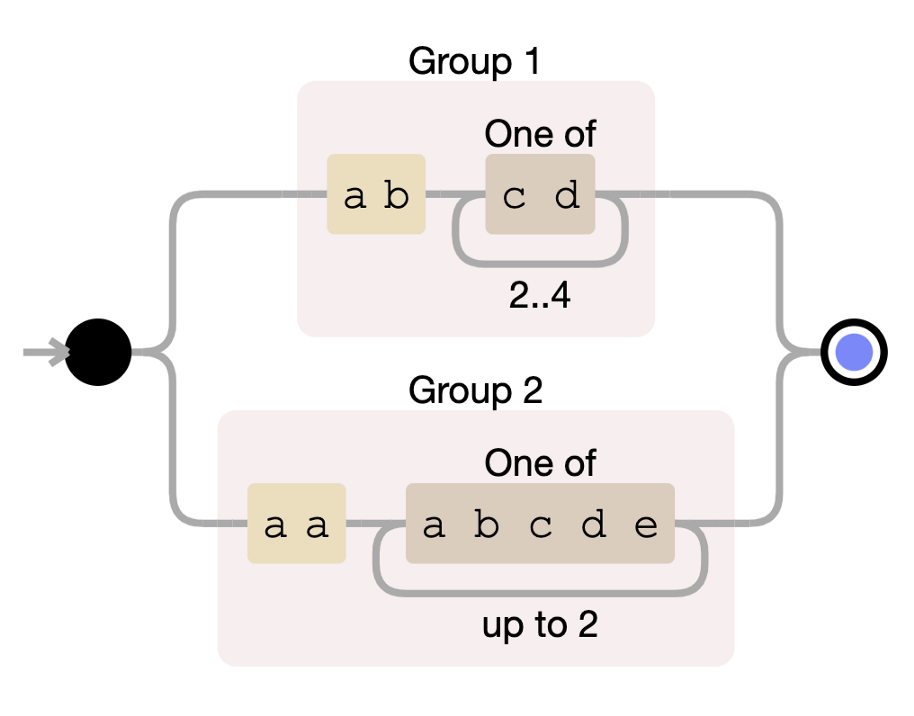
(ab[cd]{2,4})|(aa[abcde]{1,2})
Like的正则表达式(Regex)
#   以Parquet格式读取源表
sales_table = spark.read.parquet("./data/sales_parquet")

'''
SELECT *
FROM sales_table
WHERE bill_raw_text RLIKE '(ab[cd]{2,4})|(aa[abcde]{1,2})'
'''
sales_table_execution_plan = sales_table.where(
    col('bill_raw_text').rlike("(ab[cd]{2,4})|(aa[abcde]{1,2})")
)

sales_table_execution_plan.show()
用正则表达式提取模式
#   以Parquet格式读取源表
sales_table = spark.read.parquet("./data/sales_parquet")

'''
SELECT DISTINCT REGEXP_EXTRACT(bill_raw_text, '(ab[cd]{2,4})|(aa[abcde]{1,2})') AS extracted_pattern
WHERE REGEXP_EXTRACT(bill_raw_text, '(ab[cd]{2,4})|(aa[abcde]{1,2})') <> "
FROM sales_table
'''
sales_table_execution_plan = sales_table.select(
    #  最后一个整数表示要提取哪一组
    regexp_extract(col('bill_raw_text'), "(ab[cd]{2,4})|(aa[abcde]{1,2})", 0).alias("extracted_pattern")
).where(col("extracted_pattern") != "").distinct()

sales_table_execution_plan.show(100,False)
数组操作
数组是一种数据类型,。Spark实现了很多函数来操作数组(准确地说,从2.4版开始就是这样)。让我们深入了解基本情况。
数组聚合
将列转换为数组与调用聚合函数一样简单。Spark 2.3有两种主要的数组聚合函数collect_set和collect_list:第一种只包含唯一的元素,而后一种只是将组转换为列表。
#   以Parquet格式读取源表
sales_table = spark.read.parquet("./data/sales_parquet")

'''
SELECT COLLECT_SET(num_pieces_sold) AS num_pieces_sold_set,
       COLLECT_LIST(num_pieces_list) AS num_pieces_sold_list,
       seller_id
FROM sales_table
GROUP BY seller_id
'''
sales_table_execution_plan = sales_table.groupBy(col("seller_id")).agg(
    collect_set(col("num_pieces_sold")).alias("num_pieces_sold_set"),
    collect_list(col("num_pieces_sold")).alias("num_pieces_sold_list"),

)

sales_table_execution_plan.show(10, True)
分解阵列
聚合的逆操作是“数组分解”,即从水平数组生成“垂直”列。为此,我们可以使用explode函数。
#   以Parquet格式读取源表
sales_table = spark.read.parquet("./data/sales_parquet")

'''
CREATE TABLE sales_table_aggregated AS
SELECT COLLECT_SET(num_pieces_sold) AS num_pieces_sold_set,
       seller_id
FROM sales_table
GROUP BY seller_id;
SELECT EXPLODE(num_pieces_sold_set) AS exploded_num_pieces_set
FROM sales_table_aggregated;
'''
sales_table_execution_aggregated = sales_table.groupBy(col("seller_id")).agg(
    collect_set(col("num_pieces_sold")).alias("num_pieces_sold_set")
)

sales_table_execution_exploded = sales_table_execution_aggregated.select(
    explode(col("num_pieces_sold_set")).alias("exploded_num_pieces_set")
)

sales_table_execution_exploded.show(10, True)
其他使用数组的操作(从Spark 2.4开始)
不幸的是,Spark 2.3不支持对数组执行太多操作。幸运的是,Spark 2.4可以!Spark 2.4之后提供的一些功能包括:
-
array_except(array1,array2)-返回array1中的元素数组,而不是array2中的元素,没有重复项。
-
array_intersect(array1,array2)-返回array1和array2相交的元素数组,不包含重复项。
-
array_join(array,delimiter[,nullReplacement])-使用分隔符和可选字符串连接给定数组的元素。
-
array_max(array)-返回数组中的最大值。跳过空元素。
-
array_min(array)-返回数组中的最小值。跳过空元素。
-
array_sort(array)-按升序对输入数组进行排序。输入数组的元素必须是可排序的。空元素将放在返回数组的末尾。
等等。以上定义直接取自参考文献。我建议你查一下,以便有更多的细节!
UDFs
最后,用户定义函数。当我们在默认的api中找不到转换时,udf就是一种方法。
UDF是一个定制函数,程序员可以像我们目前看到的所有api一样定义并应用于列。它们提供了最大的灵活性(我们几乎可以在其中编写任何代码);缺点是Spark将它们视为黑匣子,因此内部的Spark引擎优化器(Catalyst)无法进行任何优化:udf可能会减慢我们的代码速度。
作为一个示例,让我们实现一个UDF,它模拟函数array_repeat(element,count),该函数返回一个包含元素count次的数组。
from pyspark.sql.functions import udf
from pyspark.sql.types import ArrayType, StringType

#  创建将在UDF中使用的函数
def array_repeat_custom(element, count):
  list = ["{}".format(element) for x in range(0, count)]
  return list

#   将函数转换为UDF。指出UDF的返回类型是一种很好的做法
#   在本例中,返回类型是字符串数组
array_repeat_custom_udf = udf(array_repeat_custom,  ArrayType(StringType()))

#   以Parquet格式读取源表
sales_table = spark.read.parquet("./data/sales_parquet")

#   调用UDF
sales_table_execution_plan = sales_table.select(
    array_repeat_custom_udf(col("num_pieces_sold"), lit(3)).alias("sample_array")
)

sales_table_execution_plan.show()
除了UDF的语法之外,我建议你关注上面使用的lit函数。有些Spark函数只接受列作为输入:如果需要使用常量,则可能需要将该常量转换为“列”。lit函数会创建一列文字值。
下一步
我希望我能够证明Spark并不比SQL更难,他们基本上是一样的。
你可以想象,这篇文章的标题有点夸张:实际上精通这个工具需要15分钟以上的时间;但我相信以上是一个很好的快速入门!
我的建议是开始使用上面的api,因为它们将覆盖70%的用例。当你对基础知识有信心时,我建议你写下面两篇文章,那是一位值得信赖的作者(lol)几个月前写的。第一个问题将挑战你在使用此工具进行开发时遇到的一些经典问题,而第二个问题是对Spark Joins的深入研究。
https://towardsdatascience.com/the-art-of-joining-in-spark-dcbd33d693c
https://towardsdatascience.com/six-spark-exercises-to-rule-them-all-242445b24565
附录-配置PyCharm
在本地(非分布式)环境中安装Spark是一项非常简单的任务。在本附录中,我将向你展示PyCharm Community Edition的基本配置,以便使用Python运行Spark。有五个简单步骤:
-
下载PyCharm社区版
-
下载Spark
-
安装PySpark
-
配置PyCharm以执行正确的Spark executor
-
测试是否一切正常
两个注意事项:
-
我假设你的系统中正确安装了Java。
-
在Windows上,需要安装Winutils,这是运行Hadoop所需的一组二进制文件。查看此Git repo了解更多信息:https://github.com/steveloughran/winutils。
下载PyCharm社区版
幸运的是,JetBrains有一个PyCharm的开源版本。我们可以简单地从他们的网站下载最新版本。安装很简单。
下载Spark
我们只需要从Spark官方网站下载一个压缩文件。在我写作时,有两个主要版本可用:3.0.1和2.4.7。对于文章的范围,我们可以选择其中之一。
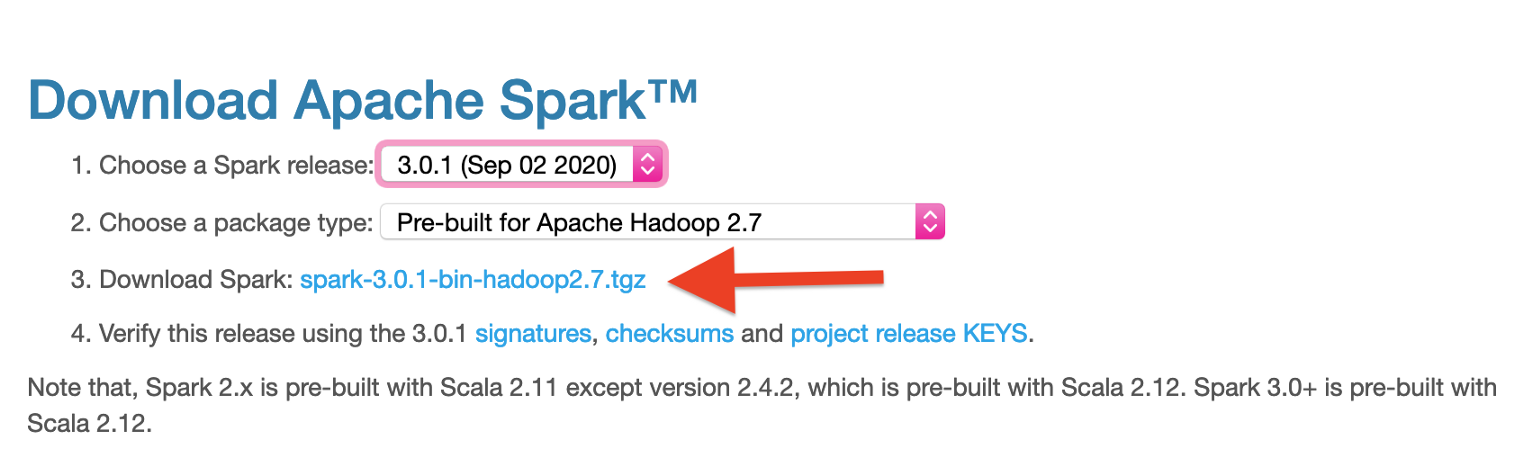
一旦下载完成,我们只需要在一个合适的位置解压包。
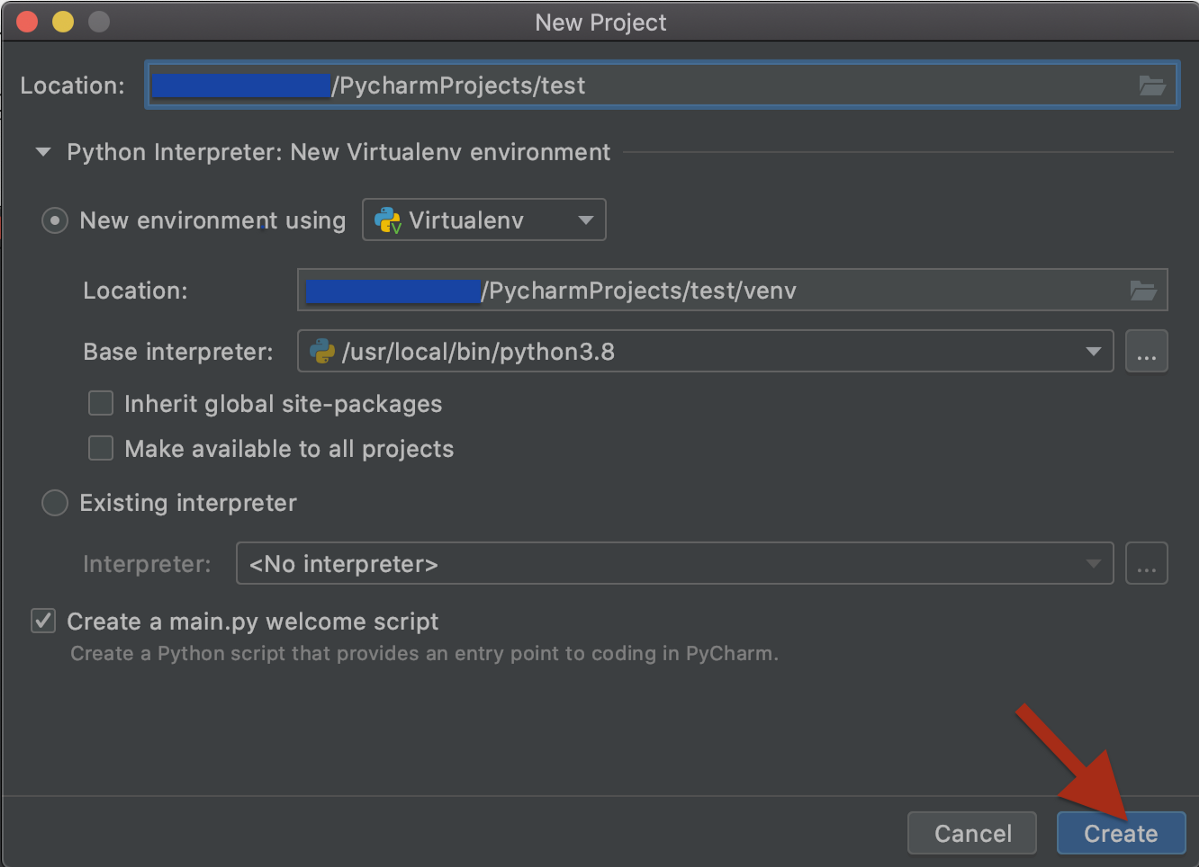
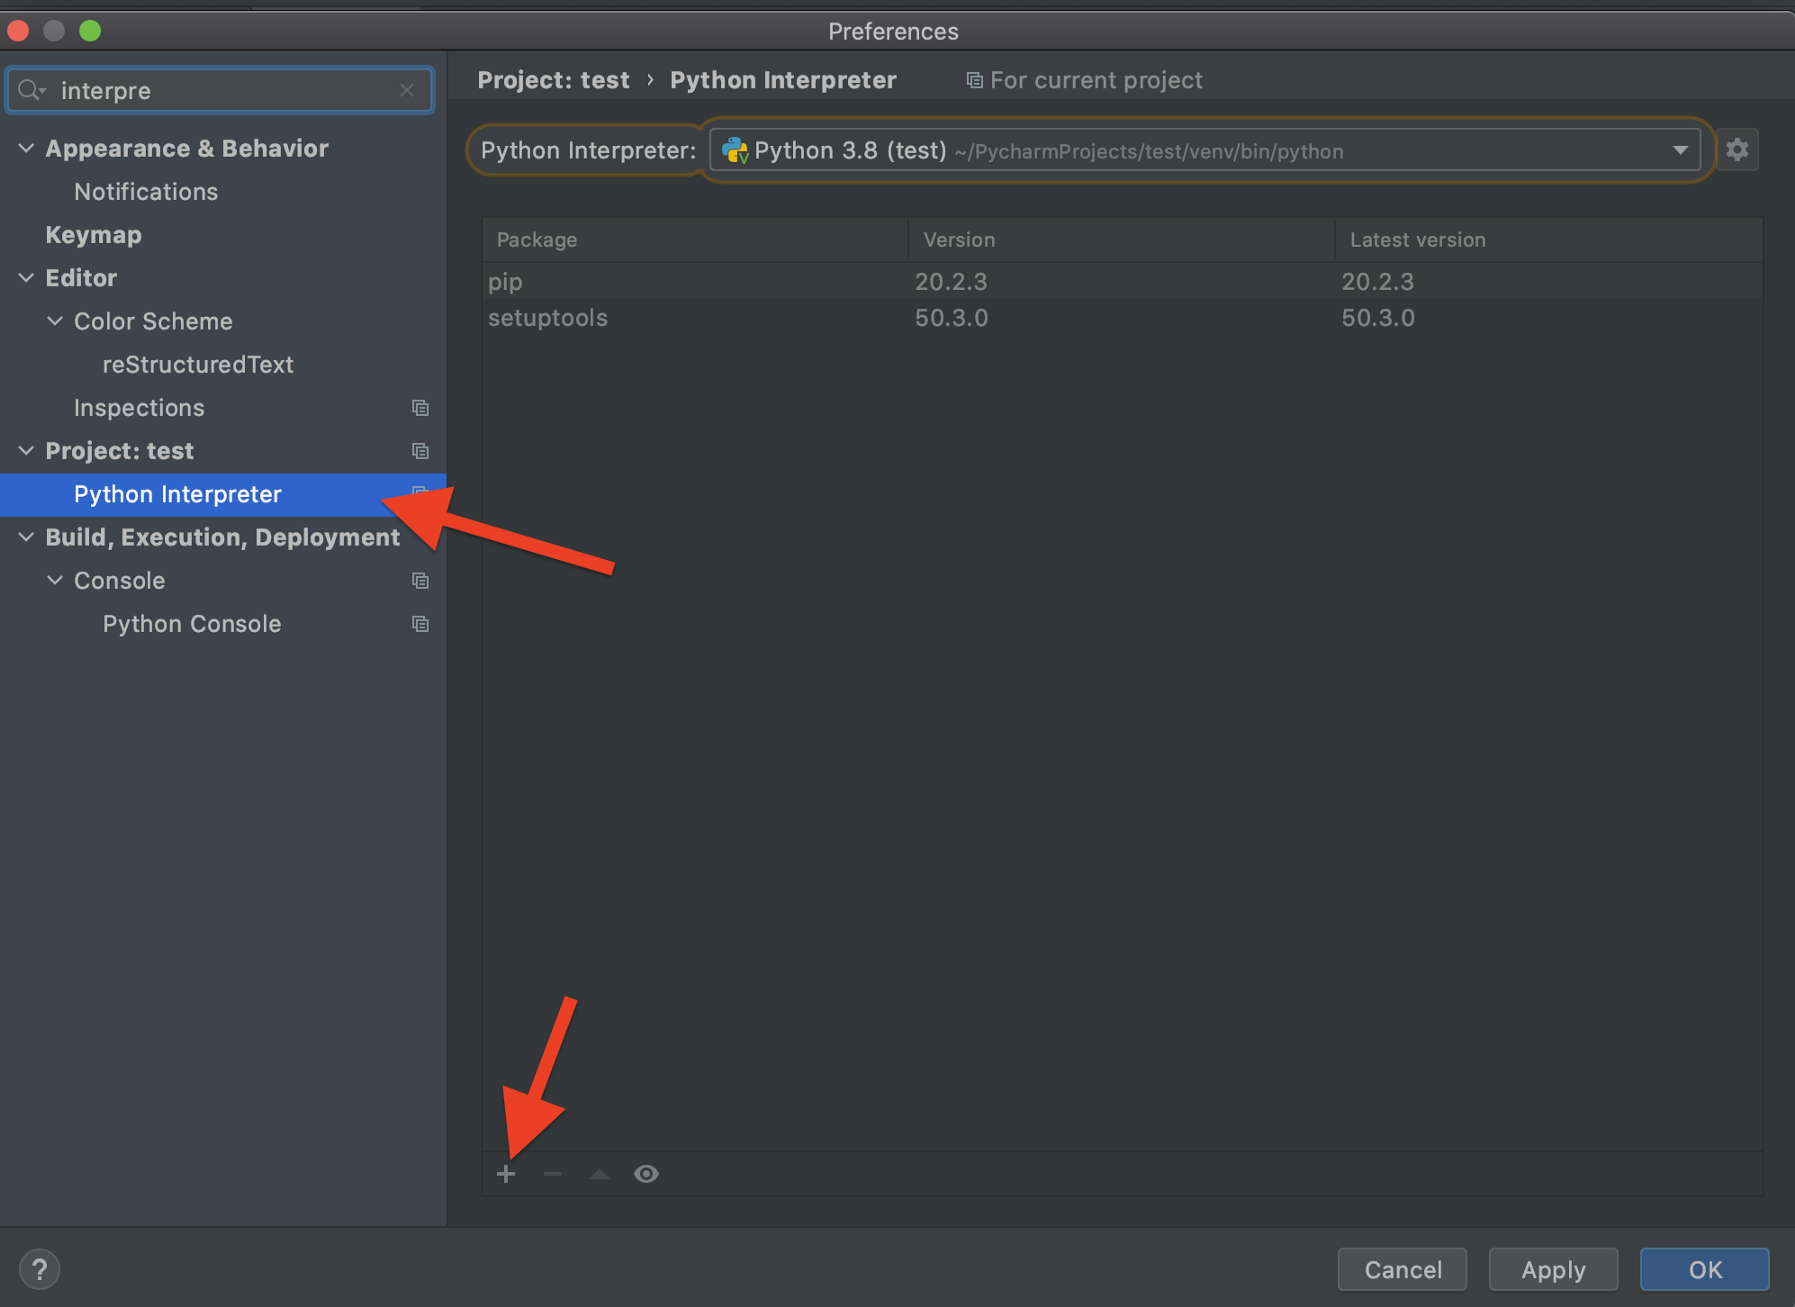
安装PySpark
现在是运行PyCharm并安装所需的所有软件包的时候了。首先,让我们打开PyCharm,创建一个新项目和一个新的虚拟环境。

最后,直接从PyCharm安装PySpark:

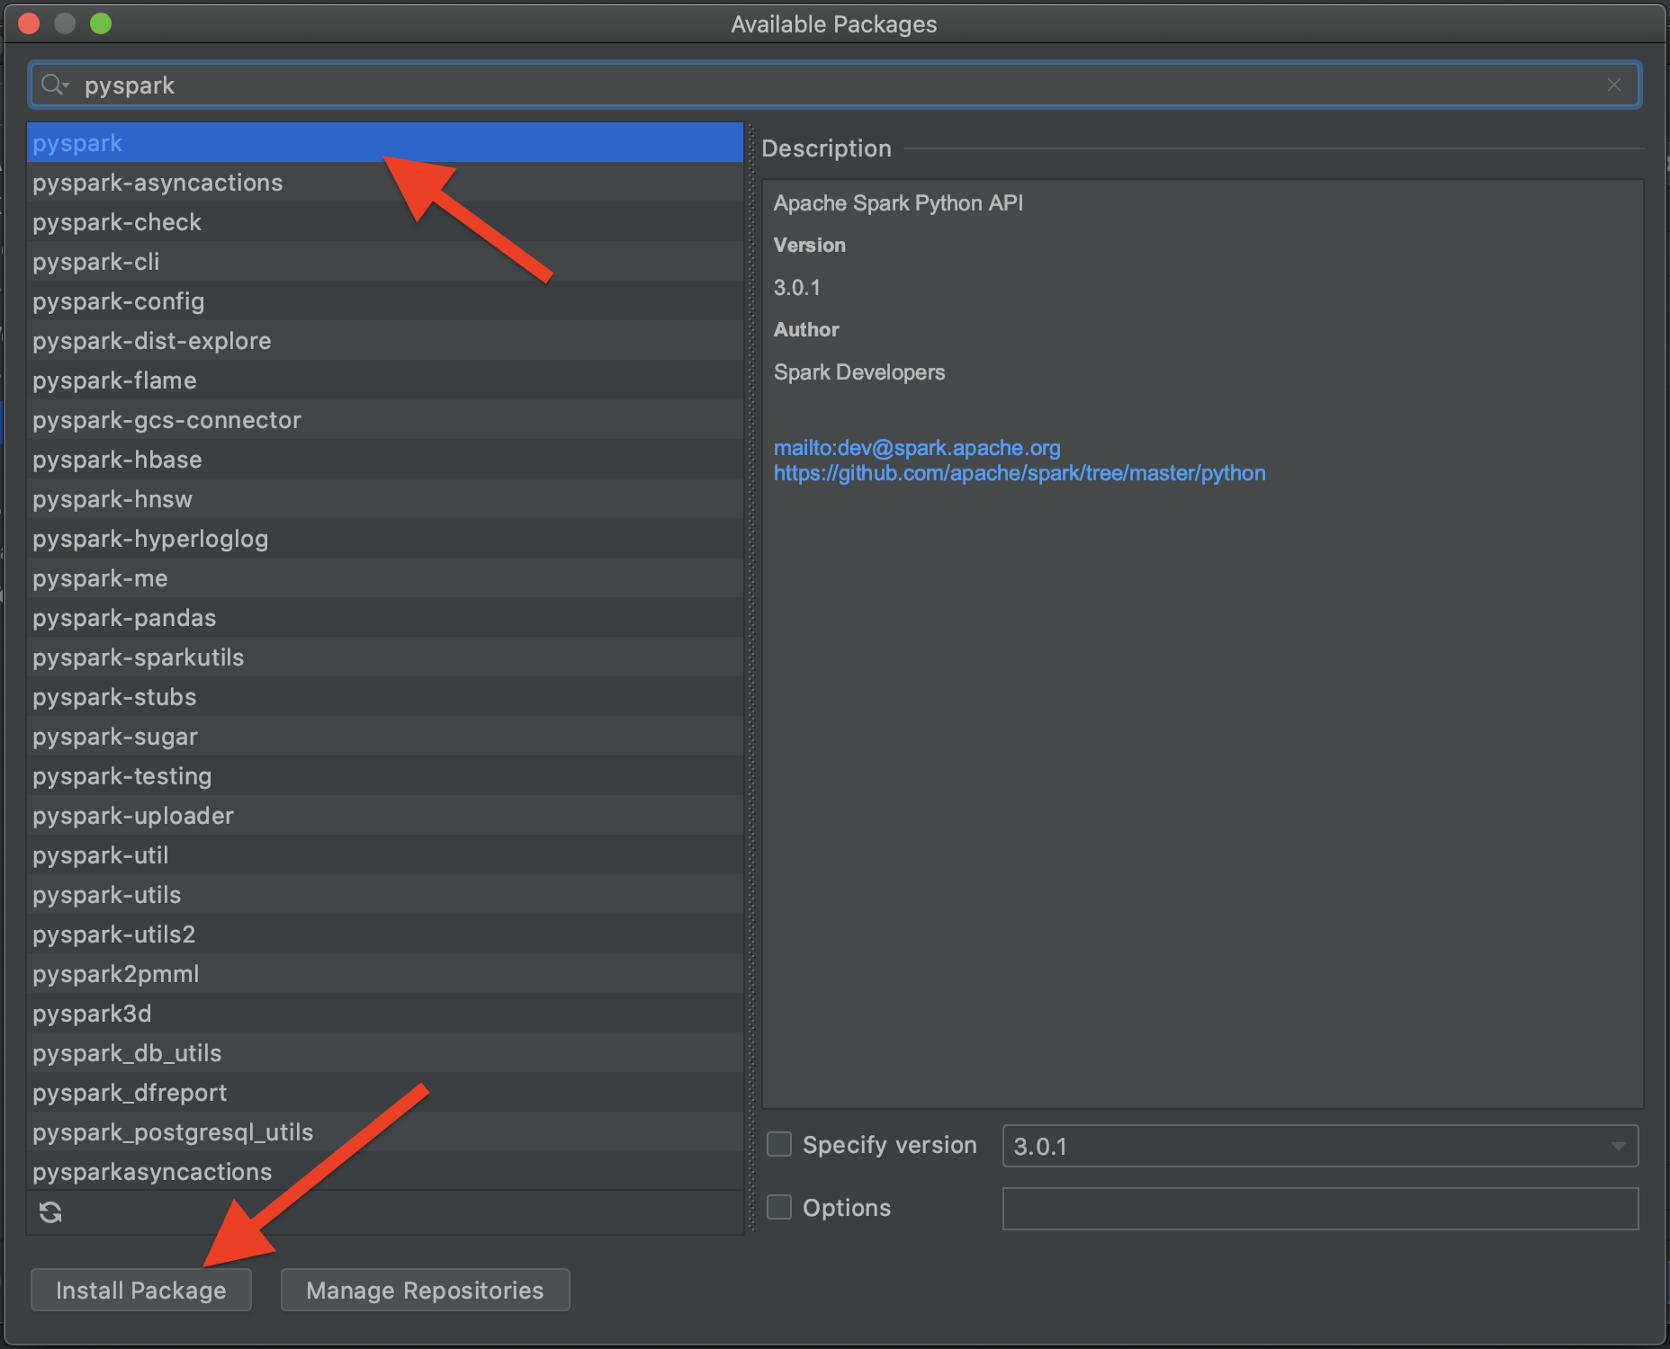
注意,为了启用提示,我们还应该安装pyspark-stubs包。
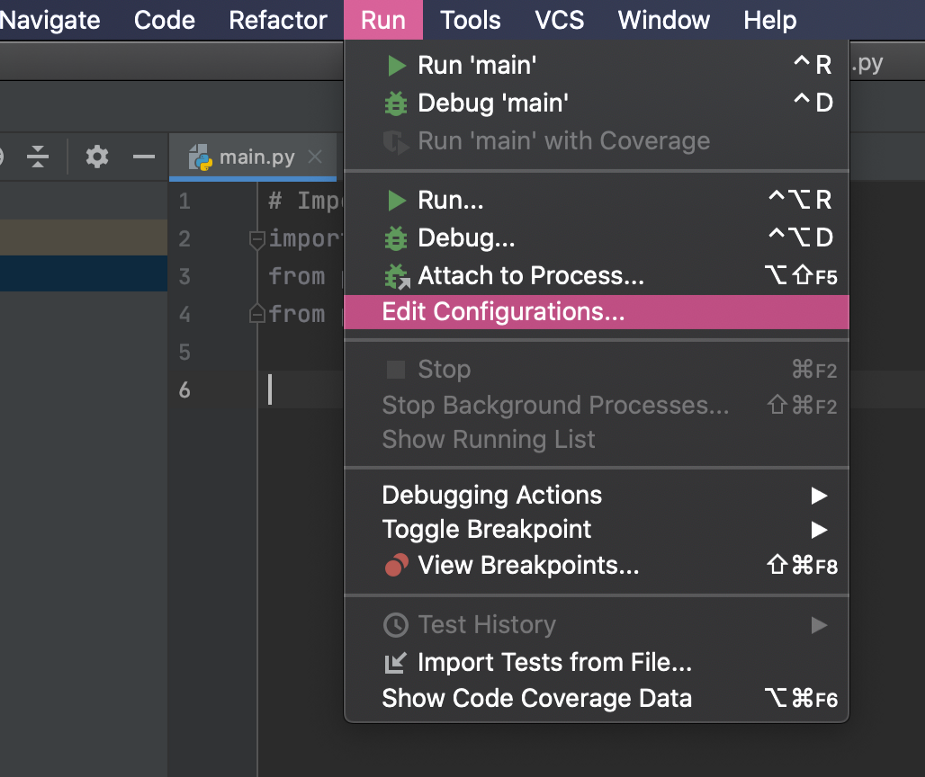
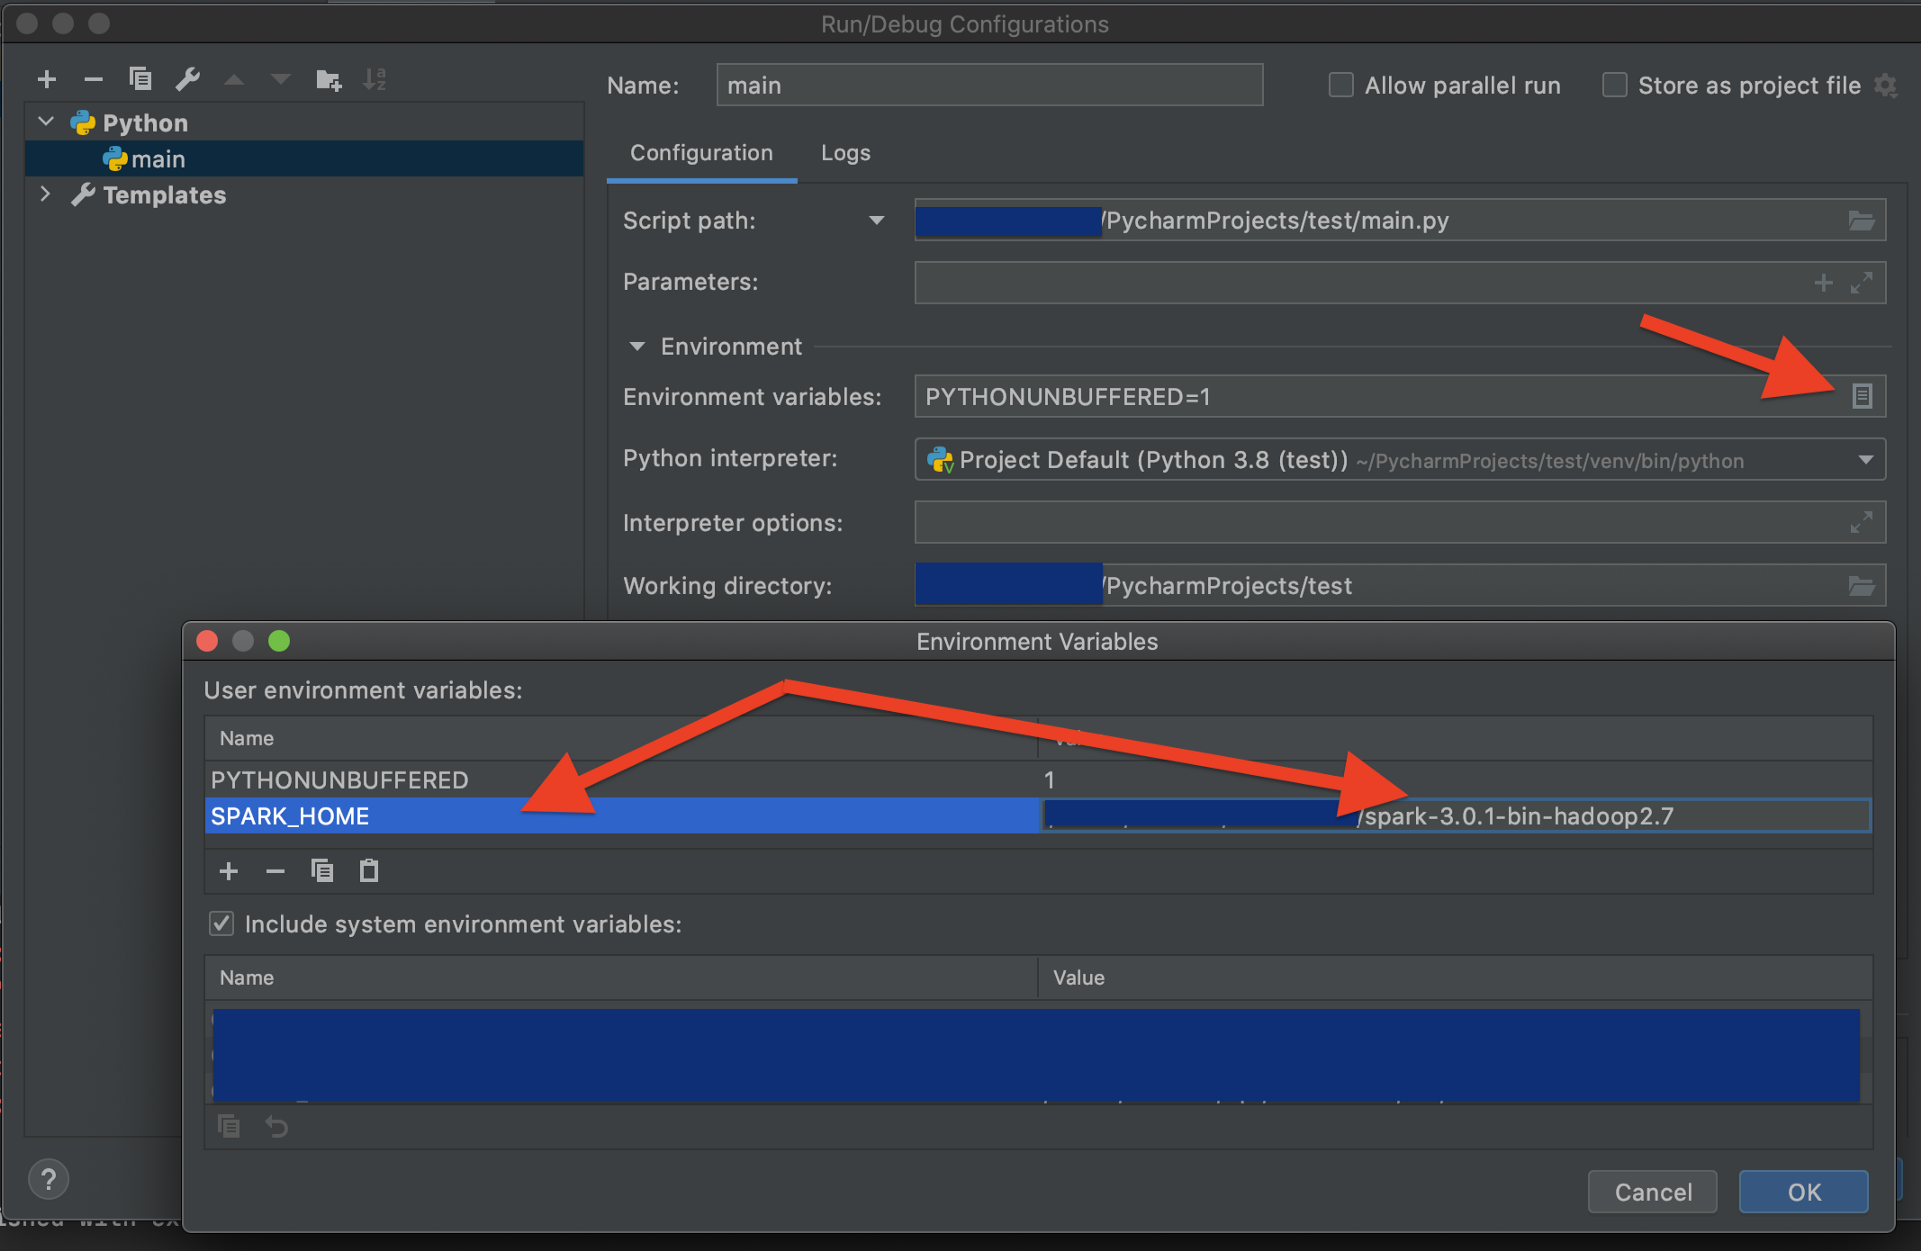
配置PyCharm以执行正确的Spark executor
希望我们没有出现任何错误,所以我们只需要指示PyCharm运行正确的Spark执行器。它位于我们解压缩Spark本身的文件夹中。让我们为PyCharm项目创建一个运行配置。
测试是否一切正常
要测试Spark是否正常工作,只需运行以下代码片段
# 导入库
import pyspark
from pyspark.sql import SparkSession
from pyspark.sql.functions import *

# 初始化Spark会话
spark = SparkSession.builder
    .master("local")
    .appName("SparkLikeABoss")
    .getOrCreate()

print(spark.version)
原文链接:https://towardsdatascience.com/15-minutes-to-spark-89cca49993f0
欢迎关注磐创AI博客站:
http://panchuang.net/
sklearn机器学习中文官方文档:
http://sklearn123.com/
欢迎关注磐创博客资源汇总站:
http://docs.panchuang.net/