前言:Openfire +Spark 是实时的基于XMPP协议的开源即时消息传输平台,是原来的Jive Messenger,其灵活的插件开发架构深受开发者的喜爱。
问题:Spark只有单一组,没有多级组织架构的分组,实际企业应用中,只要是稍微有些人数,就难以应对了,特别是需要和域进行同步的情况,为此,我们首先要在服务器端构建同步AD域组织架构的数据库,并且是确保有版本控制功能(方便批次同步),客户端同步最新的版本,获取组织架构和用户的改变,形成树形的组织架构,类似下图:
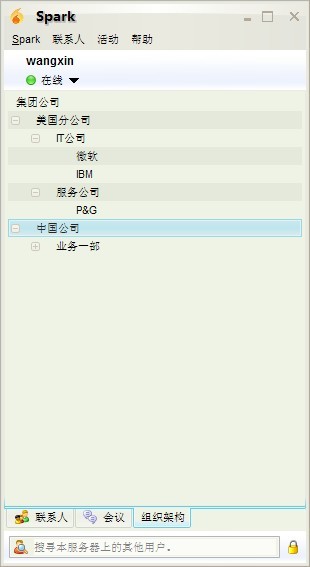
为此,我们需要开发Spark插件来实现这一功能。通过其自身的工厂类可以非常容易实现。
Spark的工厂类和监听类,抄自官网:
- Managers - Managers allow for better (lazy) loading of particular areas within the Spark client as well as providing access points to the system. Some of the more relevant managers are:
- SparkManager -- Acts as the central manager for all of Spark. You use this manager to get instances of ChatManager, SessionManager, SoundManager, and UserManager.
- ChatManager -- Handles registration of most chat listeners and filters, as well as creation and retrieval of chat rooms. It is also used to retrieve the UI of the ChatFrame.
- SessionManager -- Contains the information about the current session, such as the server connected to, the handling of connection errors and notification of personal presence changes.
- SoundManager -- Used to play sounds.
- Event Handlers -- Spark contains numerous listeners and handlers to allow more pluggability into the Spark client. Some of the more common listeners and handlers are:
- ChatRoomListener (and ChatRoomListenerAdapter) -- Allows the plugin to listen for chat rooms being opened, closed and activated. You would generally use this to customize individual chat rooms.
- MessageListener -- Allows for notification when a message has been received or sent.
- ContactGroupListener -- Allows for notification of changes to a Contact Group.
- ContactListListener -- Allows for notification of changes to the Contact List.
- FileTransferListener -- Allows you to intercept File transfers.
- ContextMenuListener -- Allows for the addition or removal of actions or menu items to right-click (context menu) popups.
- PresenceListener -- Allows for notification when Spark presence changes.
- ContactItemHandler -- Allows the plugin to control the effects of presence changes within a ContactItem and the associated invoke call.
- Components -- Spark contains many Swing components that will regularly be used during the creation of your plugin. Some of the more commonly used components are :
- MainWindow -- The frame containing the Contact List. You use MainWindow to add new tabs, menu items, or force focus.
- ChatRoom -- The base abstract class of all chat rooms within Spark. Known implementations are ChatRoomImpl and GroupChatRoom.
- ChatArea -- The base chat viewer for both the TranscriptWindow and ChatInputEditor.
- ContactList -- The ContactList UI in Spark.
- ChatRoomButton -- The button that should be used to conform to the look and feel of other buttons within a ChatRoom.
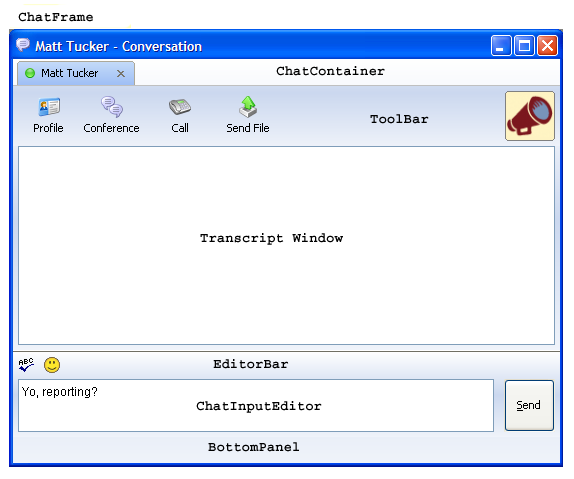
第一步,先要了解Spark的面板结构,如果我们要在下方加页签,位于WorkspacePane,那么我们就必须通过SparkManager工厂类获取Workspace,然后使用Add方法。

第二步,开始写代码,首先我们应该在工程的plugins目录建立以下的结构:
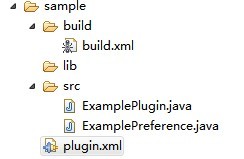
代码放置在src,然后先配置plugin.xml。注意,class节非常关键,必须正确填写!
<!-- Define your plugin -->
<plugin>
<name>Organizational Plugin</name>
<version>1.0</version>
<author>WangXin</author>
<homePage></homePage>
<email>WangXin@XYZ.com</email>
<description></description>
<class>com.jivesoftware.spark.plugin.ExamplePlugin</class>
<minSparkVersion>2.0.0</minSparkVersion>
</plugin>
然后新建ExamplePlugin.java文件,增加一些必要的引用:
package com.jivesoftware.spark.plugin;
import javax.swing.JButton;
import javax.swing.JOptionPane;
import javax.swing.JTabbedPane;
import java.awt.*;
import javax.swing.*;
import javax.swing.tree.*;
import org.jivesoftware.spark.SparkManager;
import org.jivesoftware.spark.Workspace;
import org.jivesoftware.spark.component.tabbedPane.SparkTabbedPane;
import org.jivesoftware.spark.plugin.Plugin;
然后,开始编写插件类,最重要的事情就是重写initialize方法,我们可以做很多事情,比如控件生成、数据库连接、IO处理,等等,
在这里简单的例子里,我们定义了一个JTree,然后放置在由工厂生成的SparkTabbedPane容器里。
public class ExamplePlugin implements Plugin{

    @Override
    public void initialize() {

    ExamplePreference mypreference = new ExamplePreference();
    SparkManager.getPreferenceManager().addPreference(mypreference);

    JOptionPane.showMessageDialog(null, "Plugin has been successfully loaded");

    // 通过SparkManager获取Workspace
   Workspace workspace = SparkManager.getWorkspace();

   // 获取父容器,并添加Tree
   SparkTabbedPane tabbedPane = workspace.getWorkspacePane();
   tabbedPane.addTab("\u7EC4\u7EC7\u67B6\u6784", null, InitTree());
    }


   public JTree InitTree()
   {

      // 定义Tree节点对象

          DefaultMutableTreeNode root = new DefaultMutableTreeNode("\u96C6\u56E2\u516C\u53F8");
          DefaultMutableTreeNode country = new DefaultMutableTreeNode("\u7F8E\u56FD\u5206\u516C\u53F8");
          root.add(country);
          DefaultMutableTreeNode state = new DefaultMutableTreeNode("IT\u516C\u53F8");
          country.add(state);
          DefaultMutableTreeNode city = new DefaultMutableTreeNode("\u5FAE\u8F6F");
          state.add(city);
          city = new DefaultMutableTreeNode("IBM");
          state.add(city);
          state = new DefaultMutableTreeNode("\u670D\u52A1\u516C\u53F8");
          country.add(state);
          city = new DefaultMutableTreeNode("P&G");
          state.add(city);
          country = new DefaultMutableTreeNode("\u4E2D\u56FD\u516C\u53F8");
          root.add(country);
          state = new DefaultMutableTreeNode("\u4E1A\u52A1\u4E00\u90E8");
          country.add(state);
          city = new DefaultMutableTreeNode("\u4E1A\u52A1\u4E8C\u90E8");
          state.add(city);

      // 构建树形架构

      JTree tree = new JTree(root);


      return tree;
   }


    @Override
    public void shutdown() {
    JOptionPane.showMessageDialog(null, "Plugin has been shutdown");
    }

    @Override
    public boolean canShutDown() {

    return false;
    }

    @Override
    public void uninstall() {

    JOptionPane.showMessageDialog(null, "Plugin has been uninstalled");

    }

}
其中,用到了一个接口实现类ExamplePreference,实现了Preference接口,用于系统配置。
package com.jivesoftware.spark.plugin;

import javax.swing.Icon;
import javax.swing.JButton;
import javax.swing.JComponent;
import javax.swing.JPanel;

import org.jivesoftware.spark.preference.Preference;

public class ExamplePreference implements Preference{

    @Override
    public String getTitle() {
    return "Example";
    }

    @Override
    public Icon getIcon() {
    return null;
    }

    @Override
    public String getTooltip() {
    return "tooltip of my preference";
    }

    @Override
    public String getListName() {
    return "Example";
    }

    @Override
    public String getNamespace() {
    return "EXAMPLE";
    }

    @Override
    public JComponent getGUI() {

    JPanel panel = new JPanel();
    panel.add(new JButton("Welcome to my Preferences"));
    return panel;
    // you would need to add your own JComponent class here
    }

    @Override
    public void load() {
    //initizialize the gui maybe
    // or load saved preferences

    }

    @Override
    public void commit() {
    // save changes in the preference gui
    }

    @Override
    public boolean isDataValid() {
    return false;
    }

    @Override
    public String getErrorMessage() {
    return "EEERROOOOORRR";
    }

    @Override
    public Object getData() {
    return null;
    }

    @Override
    public void shutdown() {
    // do something
    }

}
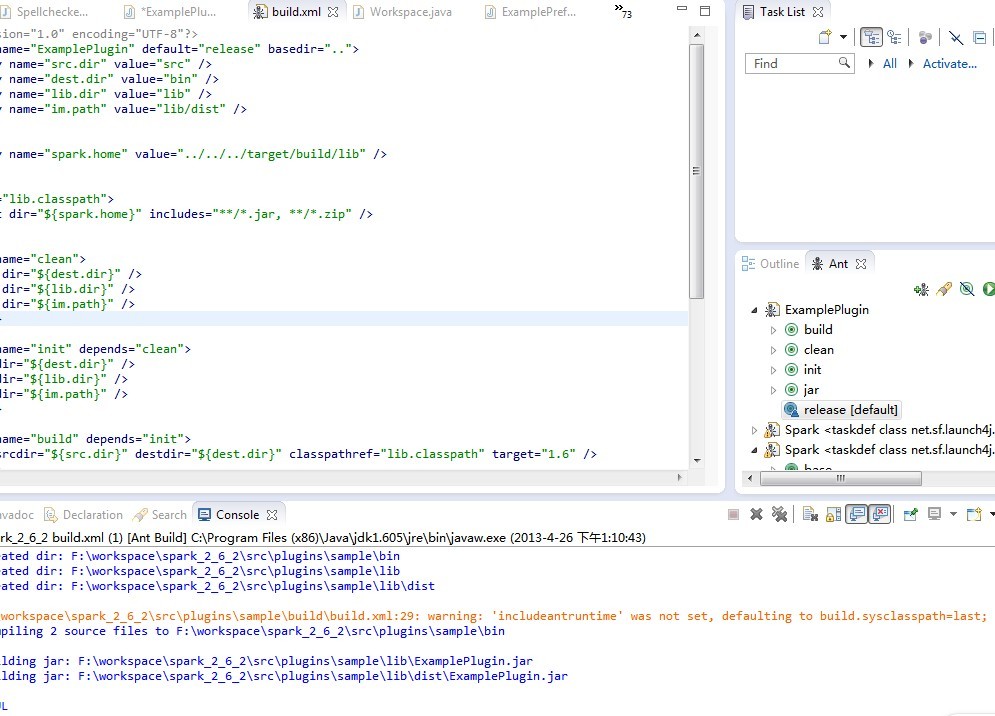
然后,还需要写好build.xml,以方便Ant生成jar包,都进入敏捷时代了,我们必须要用先进生产工具。
<?xml version="1.0" encoding="UTF-8"?>
<project name="ExamplePlugin" default="release" basedir="..">
 <property name="src.dir" value="src" />
 <property name="dest.dir" value="bin" />
 <property name="lib.dir" value="lib" />
 <property name="im.path" value="lib/dist" />


 <property name="spark.home" value="http://www.cnblogs.com/../target/build/lib" />


 <path id="lib.classpath">
  <fileset dir="${spark.home}" includes="**/*.jar, **/*.zip" />
 </path>

 <target name="clean">
  <delete dir="${dest.dir}" />
  <delete dir="${lib.dir}" />
  <delete dir="${im.path}" />
 </target>

 <target name="init" depends="clean">
  <mkdir dir="${dest.dir}" />
  <mkdir dir="${lib.dir}" />
  <mkdir dir="${im.path}" />
 </target>

 <target name="build" depends="init">
  <javac srcdir="${src.dir}" destdir="${dest.dir}" classpathref="lib.classpath" target="1.6" />
 </target>

 <!-- 最重要的是这里,打两次包 -->
 <target name="jar" depends="build">
  <jar jarfile="${lib.dir}/ExamplePlugin.jar" basedir="${dest.dir}" />
  <jar jarfile="${im.path}/ExamplePlugin.jar">
   <fileset dir=".">
    <include name="lib/*.jar" />
   </fileset>
   <fileset dir=".">
    <include name="plugin.xml" />
   </fileset>
  </jar>
 </target>
 <target name="release" depends="jar">

 </target>
</project>
接下来,使用Ant生成Jar包,双击release自动完成,Jar包目录在X:\workspace\spark_2_6_XX\src\plugins\sample\lib\dist。
最后,将jar包保存进Spark的安装目录的plugins目录里,Spark在每次启动的时候就能自动认出插件了。
是不是很简单?