编译安装HTTPD 2.4.9版本
服务脚本:/etc/rc.d/init.d/httpd
脚本配置文件路径:/etc/sysconfig/httpd
运行目录:/etc/httpd
配置文件:
主配置:/etc/httpd/conf/httpd.conf
扩展配置:/etc/httpd/conf.d/*.conf
监听的Socket: tcp的80, 443是https/tcp的监听端口
在内核中使用小于1023的端口的只有管理员
文档根目录:/var/www/html
CGI目录:/var/www/cgi-bin/
依赖于更高版本的apr和apr-util。apr全称为apache portable runtime(apache运行时移植工具)、是让apache跨平台的工具、是个底层库。
这里的安装不做过多的详细解释了、可以参考之前写过的文章、安装都是大同小异:
实战步骤:
===============================================================================
1 2 3 4 5 6 7 8 9 10 11 12 13 14 15 16 17 18 19 20 21 22 23 24 25 26 27 28 29 30 31 32 33 | (1) 解决依赖关系 prel兼容的正则表达式库 # yum -y install pcre-devel # yum -y groupinstall "Server Platform Development" # yum -y groupinstall "Development tools" (2) 编译安装apr-1.5.0 # tar xf apr-1.5.0.tar.bz2 # cd apr-1.5.0 # ./configure --prefix=/usr/local/apr # make && make install (3) 编译安装apr-util-1.5.3 # tar xf apr-util-1.5.3.tar.bz2 # cd apr-util-1.5.3 # ./configure --prefix=/usr/local/apr-util --with-apr=/usr/local/apr/ # make && make install
(4) httpd编译安装 # tar xf httpd-2.4.9.tar.bz2 # cd httpd-2.4.9 # ./configure --prefix=/usr/local/apache --sysconfdir=/etc/httpd24 --enable-so --enable-ssl --enable-cgi --enable-rewrite --with-zlib --with-pcre --with-apr=/usr/local/apr --with-apr-util=/usr/local/apr-util/ --enable-modules=most --enable-mpms-shared=all --with-mpm=event # make && make install --prefix=/usr/local/apache:指定安装路径、不使用默认路径 --sysconfdir=/etc/httpd24:指定配置文件的路径、24表示版本、为了不跟我本机上的2.2的重复 --enable-so:表示基于DSO动态加载模块的 --enable-ssl:这项是支持https协议的 --enable-cgi:支持CGI机制的 --enable-rewrite:支持URL重写的 --with-zlib:zlib是一个网络上发送数据报文时的一个通用压缩库的API --with-pcre:通常支持Perl所用到的一个库 --with-apr=/usr/local/apr:指定新的apr的路径 --with-apr-util=/usr/local/apr-util/:指定新的apr-util的路径 --enable-modules=most:most表示启用大多数常用的模块 --enable-mpms-shared=all:所有的MPM模块都编译 --with-mpm=event:明确指定启用event模块 |
后续的配置:
1) 修改服务脚本 先把 # cp /etc/rc.d/init.d/httpd /etc/rc.d/init.d/httpd 24
修改下apache自己的服务脚本 vim /etc/rc.d/init.d/httpd 24 // 修改的部分我会要红色注释
#!/bin/bash
#
# httpd Startup script for the Apache HTTP Server
#
# chkconfig: - 85 15
# description: The Apache HTTP Server is an efficient and extensible
# server implementing the current HTTP standards.
# processname: httpd
# config: /etc/httpd/conf/httpd.conf
# config: /etc/sysconfig/httpd
# pidfile: /var/run/httpd/httpd.pid
#
### BEGIN INIT INFO
# Provides: httpd
# Required-Start: $local_fs $remote_fs $network $named
# Required-Stop: $local_fs $remote_fs $network
# Should-Start: distcache
# Short-Description: start and stop Apache HTTP Server
# Description: The Apache HTTP Server is an extensible server
# implementing the current HTTP standards.
### END INIT INFO
# Source function library.
#. /etc/rc.d/init.d/functions //这几行需要注释掉
#if [ -f /etc/sysconfig/httpd ]; then
. /etc/sysconfig/httpd
#fi
# Start httpd in the C locale by default.
HTTPD_LANG=${HTTPD_LANG-"C"}
# This will prevent initlog from swallowing up a pass-phrase prompt if
# mod_ssl needs a pass-phrase from the user.
INITLOG_ARGS=""
# Set HTTPD=/usr/sbin/httpd.worker in /etc/sysconfig/httpd to use a server
# with the thread-based "worker" MPM; BE WARNED that some modules may not
# work correctly with a thread-based MPM; notably PHP will refuse to start.
# Path to the apachectl script, server binary, and short-form for messages.
apachectl=/usr/local/bin/apachectl //这两行改下路径, 了解你的apachectl安装在哪个路径下 我的是装在 /usr/local/apache/bin
httpd=${HTTPD-/usr/local/bin/httpd}
prog=httpd
pidfile=${PIDFILE-/var/run/httpd/httpd.pid}
lockfile=${LOCKFILE-/var/lock/subsys/httpd}
RETVAL=0
STOP_TIMEOUT=${STOP_TIMEOUT-10}
# The semantics of these two functions differ from the way apachectl does
# things -- attempting to start while running is a failure, and shutdown
# when not running is also a failure. So we just do it the way init scripts
# are expected to behave here.
start() {
echo -n $"Starting $prog: "
LANG=$HTTPD_LANG daemon --pidfile=${pidfile} $httpd $OPTIONS
RETVAL=$?
echo
[ $RETVAL = 0 ] && touch ${lockfile}
return $RETVAL
}
# When stopping httpd, a delay (of default 10 second) is required
# before SIGKILLing the httpd parent; this gives enough time for the
# httpd parent to SIGKILL any errant children.
stop() {
echo -n $"Stopping $prog: "
killproc -p ${pidfile} -d ${STOP_TIMEOUT} $httpd
RETVAL=$?
echo
[ $RETVAL = 0 ] && rm -f ${lockfile} ${pidfile}
}
reload() {
echo -n $"Reloading $prog: "
if ! LANG=$HTTPD_LANG $httpd $OPTIONS -t >&/dev/null; then
RETVAL=6
echo $"not reloading due to configuration syntax error"
failure $"not reloading $httpd due to configuration syntax error"
else
# Force LSB behaviour from killproc
LSB=1 killproc -p ${pidfile} $httpd -HUP
RETVAL=$?
if [ $RETVAL -eq 7 ]; then
failure $"httpd shutdown"
fi
fi
echo
}
# See how we were called.
case "$1" in
start)
start
;;
stop)
stop
;;
status)
status -p ${pidfile} $httpd
RETVAL=$?
;;
restart)
stop
start
;;
condrestart|try-restart)
if status -p ${pidfile} $httpd >&/dev/null; then
stop
start
fi
;;
force-reload|reload)
reload
;;
graceful|help|configtest|fullstatus)
$apachectl $@
RETVAL=$?
;;
*)
echo $"Usage: $prog {start|stop|restart|condrestart|try-restart|force-reload|reload|status|fullstatus|graceful|help|configtest}"
RETVAL=2
esac
exit $RETVAL
2) 输出二进制程序
# vim /etc/profile.d/httpd24.sh
export PATH=/usr/local/apache/bin:$PATH
3) 修改 apache下的 vim /etc/httpd24/httpd.conf
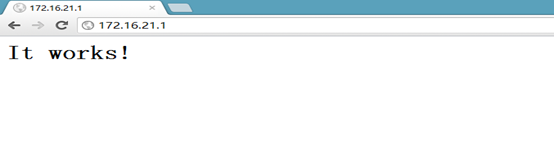
开启 ServerName 172.16.21.1:80 // 172.16.21.1 这是我的本机ip地址
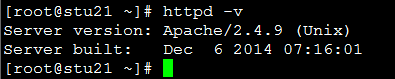
安装配置好之后我们查看一下刚安装好的HTTPD版本:
# httpd -v
最后可以启动了、再查看一下端口是否在监听状态了、当然你还可以给他提供一个服务脚本:
# apachectl star
# ss -tnl
===============================================================================