相关包导入
import torch
import numpy as np
import pandas as pd
import matplotlib.pyplot as plt
import torch.nn as nn
import torch.nn.functional as F
import torchvision
from torchvision import datasets, transforms
import os
import shutil
%matplotlib inline
数据集预处理思路
四种天气数据集的所有图像放在同一个文件夹下,并以天气类型和图像序号为文件名
四种天气分别是:cloudy、rain、shine、sunrise
ImageFolder可以处理train和test分别一个文件夹,然后每一类再各自一个文件夹的数据集
因此,我们首先需要做的就是建立文件夹,然后将相应的图像拷贝进去
这里用到的两个包是os和shutil,不用安装,是自带的
数据分区
首先我们需要做的是另外建立一个新的文件夹,这个文件夹下面有两个文件夹,分别是train和test,代码如下:
base_dir = r"E:/datasets2/29-42/29-42/dataset2/4weather"
if not os.path.isdir(base_dir):
    os.mkdir(base_dir)
    train_dir = os.path.join(base_dir, 'train')
    test_dir = os.path.join(base_dir, 'test')
    os.mkdir(train_dir)
    os.mkdir(test_dir)
然后,在train和test文件夹中分别建立以四种天气类型命名的文件夹,代码如下:
species = ['cloudy', 'rain', 'shine', 'sunrise']
for train_or_test in ['train', 'test']:
    for spec in species:
        os.mkdir(os.path.join(base_dir, train_or_test, spec))
最后,我们需要将原文件夹中的图像拷贝到对应的文件夹下。
为了实现这一点,我们可以看看原来图片的命名,通过命名确定分类
这里需要人为确定训练集和测试集,比如说能被5整除的就是测试集,其他是训练集
image_dir = r'E:datasets229-4229-42dataset2dataset2'
for i, img in enumerate(os.listdir(image_dir)):
    for spec in species:
        if spec in img:
            s = os.path.join(image_dir, img)
            if i % 5 == 0:
                d = os.path.join(base_dir, 'test', spec, img)
            else:
                d = os.path.join(base_dir, 'train', spec, img)
            shutil.copy(s, d)
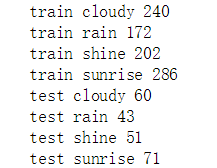
操作完之后,我们可以查看一下各个文件夹中各有多少数据
for train_or_test in ['train', 'test']:
    for spec in species:
        print(train_or_test, spec, len(os.listdir(os.path.join(base_dir, train_or_test, spec))))
运行结果:
加载数据及数据预处理
transformation = transforms.Compose([
    transforms.Resize((96, 96)), # 改变图像大小
    transforms.ToTensor(),
    transforms.Normalize(mean = [0.5, 0.5, 0.5], std = [0.5, 0.5, 0.5]) # 标准化
])

train_ds = datasets.ImageFolder(
    train_dir,
    transform = transformation
)

test_ds = datasets.ImageFolder(
    test_dir,
    transform = transformation
)

train_dl = torch.utils.data.DataLoader(train_ds, batch_size = 16, shuffle = True)
test_dl = torch.utils.data.DataLoader(test_ds, batch_size = 16)
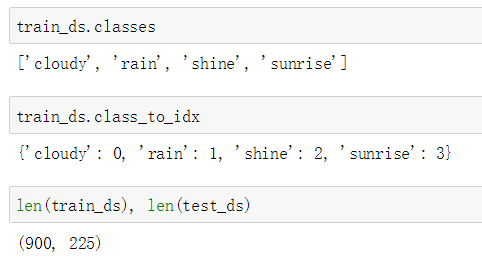
这里注意一点是,数据的标签ImageFolder已经自动处理了,如下图所示:
模型定义与训练
在这里新增加了两个层,分别是Dropout层和BN层
Dropout层在训练过程中,随机使部分神经元失效。其作用: 1.取平均 2.减少神经元之间的共适应关系 3.类似于性别在生物进化中的角色
准化和归一化;
归一化:映射到(0, 1)区间
标准化:将数据减去其平均值使其中心为 0,然后将数据除以其标准差使其标准差为 1
批标准化:不仅在将数据输入模型之前对数据做标准化,在网络的每一次变换之后都应该考虑数据标准化
批标准化解决的问题是梯度消失与梯度爆炸,是一种训练优化方法。
批标准化好处:具有正则化的效果、提高模型的泛化能力、允许更高的学习效率从而加速收敛
批标准化实现过程:1.求每一个训练批次数据的均值 2.求每一个训练批次数据的方程 3.数据进行标准化 4.训练参数γ,β 5.输出y通过γ和β的线性变换得到原来的数值
模型定义代码如下:
class Model(nn.Module):
    def __init__(self):
        super().__init__()
        self.conv1 = nn.Conv2d(3, 16, 3)
        self.bn1 = nn.BatchNorm2d(16)
        self.pool = nn.MaxPool2d((2, 2))
        self.conv2 = nn.Conv2d(16, 32, 3)
        self.bn2 = nn.BatchNorm2d(32)
        self.conv3 = nn.Conv2d(32, 64, 3)
        self.bn3 = nn.BatchNorm2d(64)
        self.drop = nn.Dropout(0.5)
        self.linear_1 = nn.Linear(64 * 10 * 10, 1024)
        self.bn_l1 = nn.BatchNorm1d(1024)
        self.linear_2 = nn.Linear(1024, 256)
        self.bn_l2 = nn.BatchNorm1d(256)
        self.linear_3 = nn.Linear(256, 4)
    def forward(self, input):
        x = F.relu(self.conv1(input))
        x = self.pool(x)
        x = self.bn1(x)
        x = F.relu(self.conv2(x))
        x = self.pool(x)
        x = self.bn2(x)
        x = F.relu(self.conv3(x))
        x = self.pool(x)
        x = self.bn3(x)
        # print(x.size())
        x = x.view(-1, 64 * 10 * 10)
        x = F.relu(self.linear_1(x))
        x = self.bn_l1(x)
        x = self.drop(x)
        x = F.relu(self.linear_2(x))
        x = self.bn_l2(x)
        x = self.drop(x)
        x = self.linear_3(x)
        return x
这里需要注意的是各个层的位置,BN层放在池化层后面,以激活层和Dropout层之间
模型训练
loss_func = torch.nn.CrossEntropyLoss()
device = torch.device("cuda:0" if torch.cuda.is_available() else "cpu")
def fit(epoch, model, trainloader, testloader):
    correct = 0
    total = 0
    running_loss = 0

    model.train()  # 训练阶段
    for x, y in trainloader:
        x, y = x.to(device), y.to(device)
        y_pred = model(x)
        loss = loss_func(y_pred, y)
        optimizer.zero_grad()
        loss.backward()
        optimizer.step()
        with torch.no_grad():
            y_pred = torch.argmax(y_pred, dim = 1)
            correct += (y_pred == y).sum().item()
            total += y.size(0)
            running_loss += loss.item()

    epoch_acc = correct / total
    epoch_loss = running_loss / len(trainloader.dataset)

    test_correct = 0
    test_total = 0
    test_running_loss = 0

    model.eval() # 评价阶段,一般在有dropout层和BN层的时候使用
    with torch.no_grad():
        for x, y in testloader:
            x, y = x.to(device), y.to(device)
            y_pred = model(x)
            loss = loss_func(y_pred, y)
            y_pred = torch.argmax(y_pred, dim = 1)
            test_correct += (y_pred == y).sum().item()
            test_total += y.size(0)
            test_running_loss += loss.item()
    epoch_test_acc = test_correct / test_total
    epoch_test_loss = test_running_loss / len(testloader.dataset)

    print('epoch: ', epoch,
          'loss: ', round(epoch_loss, 3),
          'accuracy: ', round(epoch_acc, 3),
          'test_loss: ', round(epoch_test_loss, 3),
          'test_accuracy: ', round(epoch_test_acc, 3))

    return epoch_loss, epoch_acc, epoch_test_loss, epoch_test_acc
这里需要注意的是,要区分训练阶段和评价阶段,一般在有Dropout层和BN层的时候使用
model = Model()
model.to(device)
optimizer = torch.optim.Adam(model.parameters(), lr = 0.001)
epochs = 30
train_loss = []
train_acc = []
test_loss = []
test_acc = []
for epoch in range(epochs):
    epoch_loss, epoch_acc, epoch_test_loss, epoch_test_acc = fit(epoch, model, train_dl, test_dl)
    train_loss.append(epoch_loss)
    train_acc.append(epoch_acc)
    test_loss.append(epoch_test_loss)
    test_acc.append(epoch_test_acc)
训练结果
