1、项目概况
该项目文件列表如下:

其AndroidManifest.xml文件内容为:
- <?xml version="1.0" encoding="utf-8"?>
- <manifest xmlns:android="http://schemas.android.com/apk/res/android"
- package="cn.com.hh.view"
- android:versionCode="1"
- android:versionName="1.0">
- <application android:icon="@drawable/icon" android:label="@string/app_name"
- android:theme="@android:style/Theme.NoTitleBar.Fullscreen">
- <!-- 主Activity -->
- <activity android:name="cn.com.hh.view.MyBlogActivity"
- android:label="@string/app_name">
- <intent-filter>
- <action android:name="android.intent.action.MAIN" />
- <category android:name="android.intent.category.LAUNCHER" />
- </intent-filter>
- </activity>
- <!-- 注册 授权登录Activity -->
- <activity android:name="cn.com.hh.view.AuthorizeActivity" android:launchMode="singleTask">
- <intent-filter>
- <action android:name="android.intent.action.VIEW" />
- <category android:name="android.intent.category.DEFAULT" />
- <category android:name="android.intent.category.BROWSABLE" />
- <data android:scheme="myapp" android:host="AuthorizeActivity" />
- </intent-filter>
- </activity>
- <!-- 注册登录Activity -->
- <activity android:name="cn.com.hh.view.LoginActivity" >
- <!-- <intent-filter>-->
- <!-- <action android:name="android.intent.action.VIEW" />-->
- <!-- <category android:name="android.intent.category.DEFAULT" />-->
- <!-- <category android:name="android.intent.category.BROWSABLE" />-->
- <!-- <data android:scheme="myapp" android:host="AuthorizeActivity" />-->
- <!-- </intent-filter>-->
- </activity>
- <!-- 注册登录Activity -->
- <activity android:name="cn.com.hh.view.HomeActivity" >
- </activity>
- <!-- 注册登录Activity -->
- <activity android:name="cn.com.hh.view.ViewActivity" >
- </activity>
- </application>
- <uses-permission android:name="android.permission.INTERNET" />
- </manifest>
2、oauth2认证
说说关于OAuth授权认证的事情,新浪开放api都必须在这个基础上才能调用,所以有必要专门来讲讲,前面的文章中已经提到过关于新浪微博提供了OAuth和Base OAuth两种认证方式,并且本项目采用OAuth认证方式,至于为什么采用这个OAuth认证而不采用Base OAuth认证原因很简单,自从Twitter只支持OAuth认证方式以来,各大应用都纷纷转向OAuth认证方式,而新浪微博的开放平台也将在近日停止Base OAuth的认证方式。
OAuth的基本概念,OAUTH协议为用户资源的授权提供了一个安全的、开放而又简易的标准。与以往的授权方式不同之处是OAUTH的授权不会使第三方触及到用户的帐号信息(如用户名与密码),即第三方无需使用用户的用户名与密码就可以申请获得该用户资源的授权,因此OAUTH是安全的。同样新浪微博提供OAuth认证也是为了保证用户账号和密码的安全,在这里通过OAuth建立普通新浪微博用户、客户端程序(我们正在开发的这个Android客户端程序)、新浪微博三者之间的相互信任关系,让客户端程序(我们正在开发的这个android客户端程序)不需要知道用户的账号和密码也能浏览、发布微博,这样有效的保护了用户账号的安全性不需要把账号密码透露给客户端程序又达到了通过客户端程序写微博看微博目的。这个是OAuth的作用。
结合新浪微博的OAuth认证来说说具体的功能实现,首先罗列一下关键字组,下面四组关键字跟我们接下来OAuth认证有非常大的关系。
第一组:(App Key和App Secret),这组参数就是本系列文本第一篇提到的建一个新的应用获取App Key和App Secret。
第二组:(Request Token和Request Secret)
第三组:(oauth_verifier)
第四组:(user_id、Access Token和Access Secret)
新浪微博的OAuth认证过程,当用户第一次使用本客户端软件时,客户端程序用第一组作为参数向新浪微博发起请求,然后新浪微博经过验证后返回第二组参数给客户端软件同时表示新浪微博信任本客户端软件,当客户端软件获取第二组参数时作为参数引导用户浏览器跳至新浪微博的授权页面,然后用户在新浪的这个授权页面里输入自己的微博账号和密码进行授权,完成授权后根据客户端设定的回调地址把第三组参数返回给客户端软件并表示用户也信任本客户端软件,接下客户端软件把第二组参数和第三组参数作为参数再次向新浪微博发起请求,然后新浪微博返回第四组参数给客户端软件,第四组参数需要好好的保存起来这个就是用来代替用户的新浪账号和密码用的,在后面调用api时都需要。从这个过程来看用户只是在新浪微博的认证网页输入过账户和密码并没有在客户端软件里输入过账户和密码,客户端软件只保存了第四组数据并没有保存用户的账户和密码,这样有效的避免了账户和密码透露给新浪微博之外的第三方应用程序,保证
了安全性。
本项目用为了方便开发采用了oauth-signpost开源项目进行OAuth认证开发,新建OAuth.java类文件对OA进行简单的封装,OAuth类主要有RequestAccessToken、GetAccessToken、SignRequest三个方法,第一个方法RequestAccessToken就是上面过程中用来获取第三组参数用的,GetAccessToken方法是用来获取第四组参数用,SignRequest方法是用来调用api用。由于采用了oauth-signpost开源项目简单了很多。具体代码如下:
- public class OAuth {
- private CommonsHttpOAuthConsumer httpOauthConsumer;
- private OAuthProvider httpOauthprovider;
- public String consumerKey;
- public String consumerSecret;
- public OAuth()
- {
- // 第一组:(App Key和App Secret)
- // 这组参数就是本系列文本第一篇提到的建一个新的应用获取App Key和App Secret。
- this("3315495489","e2731e7grf592c0fd7fea32406f86e1b");
- }
- public OAuth(String consumerKey,String consumerSecret)
- {
- this.consumerKey=consumerKey;
- this.consumerSecret=consumerSecret;
- }
- public Boolean RequestAccessToken(Activity activity,String callBackUrl){
- Boolean ret=false;
- try{
- httpOauthConsumer = new CommonsHttpOAuthConsumer(consumerKey,consumerSecret);
- httpOauthprovider = new DefaultOAuthProvider("http://api.t.sina.com.cn/oauth/request_token","http://api.t.sina.com.cn/oauth/access_token","http://api.t.sina.com.cn/oauth/authorize");
- String authUrl = httpOauthprovider.retrieveRequestToken(httpOauthConsumer, callBackUrl);
- activity.startActivity(new Intent(Intent.ACTION_VIEW, Uri.parse(authUrl)));
- ret=true;
- }catch(Exception e){
- }
- return ret;
- }
- public UserInfo GetAccessToken(Intent intent){
- UserInfo user=null;
- Uri uri = intent.getData();
- String verifier = uri.getQueryParameter(oauth.signpost.OAuth.OAUTH_VERIFIER);
- try {
- httpOauthprovider.setOAuth10a(true);
- httpOauthprovider.retrieveAccessToken(httpOauthConsumer,verifier);
- } catch (OAuthMessageSignerException ex) {
- ex.printStackTrace();
- } catch (OAuthNotAuthorizedException ex) {
- ex.printStackTrace();
- } catch (OAuthExpectationFailedException ex) {
- ex.printStackTrace();
- } catch (OAuthCommunicationException ex) {
- ex.printStackTrace();
- }
- SortedSet<String> user_id= httpOauthprovider.getResponseParameters().get("user_id");
- String userId=user_id.first();
- String userKey = httpOauthConsumer.getToken();
- String userSecret = httpOauthConsumer.getTokenSecret();
- user=new UserInfo();
- user.setUserId(userId);
- user.setToken(userKey);
- user.setTokenSecret(userSecret);
- return user;
- }
- public HttpResponse SignRequest(String token,String tokenSecret,String url,List params)
- {
- HttpPost post = new HttpPost(url);
- //HttpClient httpClient = null;
- try{
- post.setEntity(new UrlEncodedFormEntity(params,HTTP.UTF_8));
- } catch (UnsupportedEncodingException e) {
- e.printStackTrace();
- }
- //关闭Expect:100-Continue握手
- //100-Continue握手需谨慎使用,因为遇到不支持HTTP/1.1协议的服务器或者代理时会引起问题
- post.getParams().setBooleanParameter(CoreProtocolPNames.USE_EXPECT_CONTINUE, false);
- return SignRequest(token,tokenSecret,post);
- }
- public HttpResponse SignRequest(String token,String tokenSecret,HttpPost post){
- httpOauthConsumer = new CommonsHttpOAuthConsumer(consumerKey,consumerSecret);
- httpOauthConsumer.setTokenWithSecret(token,tokenSecret);
- HttpResponse response = null;
- try {
- httpOauthConsumer.sign(post);
- } catch (OAuthMessageSignerException e) {
- e.printStackTrace();
- } catch (OAuthExpectationFailedException e) {
- e.printStackTrace();
- } catch (OAuthCommunicationException e) {
- e.printStackTrace();
- }
- //取得HTTP response
- try {
- response = new DefaultHttpClient().execute(post);
- } catch (ClientProtocolException e) {
- e.printStackTrace();
- } catch (IOException e) {
- e.printStackTrace();
- }
- return response;
- }
- }
根据上文的介绍,我们知道,需要获得用户的授权才可以获得对该用户新浪微博的操作权限,在项目中对此是这样处理的。其界面如下:
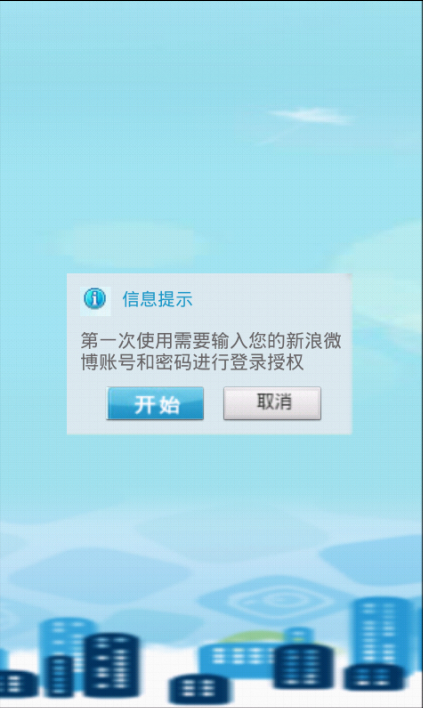
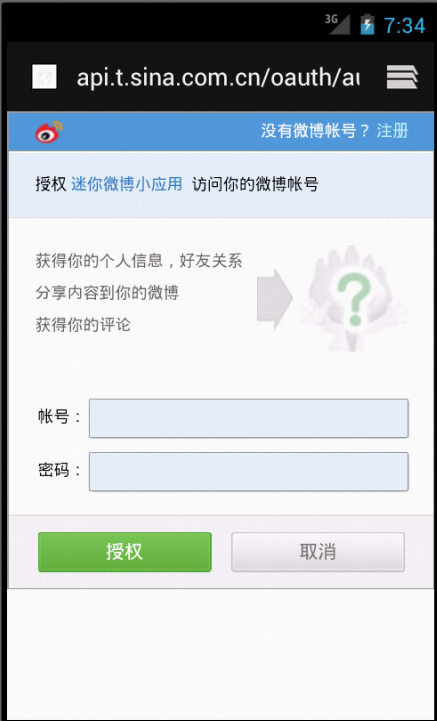
用户进入应用以后,会转到是否对新浪微博进行授权界面,点击“开始”后启动浏览器进入新浪微博授权界面,该界面是新浪制作的,与本应用无关。用户输入账号和密码以后,点击“授权”,进行授权操作。该界面源码如下:
- public class AuthorizeActivity extends Activity {
- private Dialog dialog;
- private OAuth auth;
- private static final String CallBackUrl = "myapp://AuthorizeActivity";
- @Override
- protected void onCreate(Bundle savedInstanceState) {
- super.onCreate(savedInstanceState);
- setContentView(R.layout.authorize);
- View diaView=View.inflate(this, R.layout.dialog, null);
- dialog = new Dialog(AuthorizeActivity.this,R.style.dialog);
- dialog.setContentView(diaView);
- dialog.show();
- ImageButton stratBtn=(ImageButton)diaView.findViewById(R.id.btn_start);
- stratBtn.setOnClickListener(new OnClickListener(){
- public void onClick(View arg0) {
- auth=new OAuth("30632531","f539cb169860ed99cf8c1861c5da34f6");
- auth.RequestAccessToken(AuthorizeActivity.this, CallBackUrl);
- }
- });
- }
- @Override
- protected void onNewIntent(Intent intent) {
- super.onNewIntent(intent);
- //在这里处理获取返回的oauth_verifier参数
- UserInfo user= auth.GetAccessToken(intent);
- if(user!=null){
- DataHelper helper=new DataHelper(this);
- String uid=user.getUserId();
- if(helper.HaveUserInfo(uid))
- {
- helper.UpdateUserInfo(user);
- Log.e("UserInfo", "update");
- }else
- {
- helper.SaveUserInfo(user);
- Log.e("UserInfo", "add");
- }
- }
- }
- }
这里有个地方需要注意,授权成功后重新进入AuthorizeActivity界面,执行onNewIntent函数后并不会自动跳转到其他界面。这里需要添加新的跳转代码。
3、onNewIntent调用时机
这一部分介绍一下onNewIntent的调用时机。
在IntentActivity中重写下列方法:onCreate onStart onRestart onResume onPause onStop onDestroy onNewIntent
3.1、其他应用发Intent,执行下列方法:
I/@@@philn(12410): onCreate
I/@@@philn(12410): onStart
I/@@@philn(12410): onResume
发Intent的方法:
Uri uri = Uri.parse("philn://blog.163.com");
Intent it = new Intent(Intent.ACTION_VIEW, uri);
startActivity(it);
3.2、接收Intent声明:
- <activity android:name="cn.com.hh.view.AuthorizeActivity" android:launchMode="singleTask">
- <intent-filter>
- <action android:name="android.intent.action.VIEW" />
- <category android:name="android.intent.category.DEFAULT" />
- <category android:name="android.intent.category.BROWSABLE" />
- <data android:scheme="myapp" android:host="AuthorizeActivity" />
- </intent-filter>
- </activity>
I/@@@philn(12410): onPause
I/@@@philn(12410): onStop 状态的话
其他应用再发送Intent的话,执行顺序为:
I/@@@philn(12410): onNewIntent
I/@@@philn(12410): onRestart
I/@@@philn(12410): onStart
I/@@@philn(12410): onResume
在Android应用程序开发的时候,从一个Activity启动另一个Activity并传递一些数据到新的Activity上非常简单,但是当您需要让后台运行的Activity回到前台并传递一些数据可能就会存在一点点小问题。
首先,在默认情况下,当您通过Intent启到一个Activity的时候,就算已经存在一个相同的正在运行的Activity,系统都会创建一个新的Activity实例并显示出来。为了不让Activity实例化多次,我们需要通过在AndroidManifest.xml配置activity的加载方式(launchMode)以实现单任务模式,如下所示:
- <activity android:label="@string/app_name" android:launchmode="singleTask"android:name="Activity1">
- </activity>
- protected void onNewIntent(Intent intent) {
- super.onNewIntent(intent);
- setIntent(intent);//must store the new intent unless getIntent() will return the old one
- processExtraData();
- }
- public void onCreate(Bundle savedInstanceState) {
- super.onCreate(savedInstanceState);
- setContentView(R.layout.main);
- processExtraData();
- }
- protected void onNewIntent(Intent intent) {
- super.onNewIntent(intent);
- setIntent(intent);//must store the new intent unless getIntent() will return the old one
- processExtraData()
- }
- private void processExtraData(){
- Intent intent = getIntent();
- //use the data received here
- }
4、获得微博数据
获得用户认证后,就可以获得第四组参数,就可以依次获得用户数据了。
在项目中这一步是在HomeActivity界面中完成的,其中获得微博数据部分函数的源码如下:
- private void loadList(){
- if(ConfigHelper.nowUser==null)
- {
- }
- else
- {
- user=ConfigHelper.nowUser;
- //显示当前用户名称
- TextView showName=(TextView)findViewById(R.id.showName);
- showName.setText(user.getUserName());
- OAuth auth=new OAuth();
- String url = "http://api.t.sina.com.cn/statuses/friends_timeline.json";
- // String url = "http://api.t.sina.com.cn/statuses/public_timeline.json";
- List<BasicNameValuePair> params=new ArrayList<BasicNameValuePair>();
- params.add(new BasicNameValuePair("source", auth.consumerKey));
- HttpResponse response = auth.SignRequest(user.getToken(), user.getTokenSecret(), url, params);
- if (200 == response.getStatusLine().getStatusCode()){
- try {
- InputStream is = response.getEntity().getContent();
- Reader reader = new BufferedReader(new InputStreamReader(is), 4000);
- StringBuilder buffer = new StringBuilder((int) response.getEntity().getContentLength());
- try {
- char[] tmp = new char[1024];
- int l;
- while ((l = reader.read(tmp)) != -1) {
- buffer.append(tmp, 0, l);
- }
- } finally {
- reader.close();
- }
- String string = buffer.toString();
- //Log.e("json", "rs:" + string);
- ((org.apache.http.HttpResponse) response).getEntity().consumeContent();
- JSONArray data=new JSONArray(string);
- for(int i=0;i<data.length();i++)
- {
- JSONObject d=data.getJSONObject(i);
- //Log.e("json", "rs:" + d.getString("created_at"));
- if(d!=null){
- JSONObject u=d.getJSONObject("user");
- if(d.has("retweeted_status")){
- JSONObject r=d.getJSONObject("retweeted_status");
- }
- //微博id
- String id=d.getString("id");
- String userId=u.getString("id");
- String userName=u.getString("screen_name");
- String userIcon=u.getString("profile_image_url");
- // Log.e("userIcon", userIcon);
- String time=d.getString("created_at");
- String text=d.getString("text");
- Boolean haveImg=false;
- if(d.has("thumbnail_pic")){
- haveImg=true;
- //String thumbnail_pic=d.getString("thumbnail_pic");
- //Log.e("thumbnail_pic", thumbnail_pic);
- }
- Date startDate=new Date(time);
- Date nowDate = Calendar.getInstance().getTime();
- time=new DateUtilsDef().twoDateDistance(startDate,nowDate);
- if(wbList==null){
- wbList=new ArrayList<WeiBoInfo>();
- }
- WeiBoInfo w=new WeiBoInfo();
- w.setId(id);
- w.setUserId(userId);
- w.setUserName(userName);
- w.setTime(time +" 前");
- w.setText(text);
- w.setHaveImage(haveImg);
- w.setUserIcon(userIcon);
- wbList.add(w);
- }
- }
- }catch (IllegalStateException e) {
- e.printStackTrace();
- } catch (IOException e) {
- e.printStackTrace();
- } catch (JSONException e) {
- e.printStackTrace();
- }
- }
- if(wbList!=null)
- {
- WeiBoAdapater adapater = new WeiBoAdapater();
- ListView Msglist=(ListView)findViewById(R.id.Msglist);
- Msglist.setOnItemClickListener(new OnItemClickListener(){
- public void onItemClick(AdapterView<?> arg0, View view,int arg2, long arg3) {
- Object obj=view.getTag();
- if(obj!=null){
- String id=obj.toString();
- Intent intent = new Intent(HomeActivity.this,ViewActivity.class);
- Bundle b=new Bundle();
- b.putString("key", id);
- intent.putExtras(b);
- startActivity(intent);
- }
- }
- });
- Msglist.setAdapter(adapater);
- }
- }
- loadingLayout.setVisibility(View.GONE);
- }
参考文献:
http://www.cnblogs.com/hll2008/archive/2011/01/03/1923674.html