今天学到了怎么做一个小三角形,进而结合其他属性把类似微信对话框的图形做出来了。
先做出如下形状:
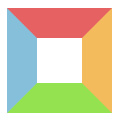
.arrow {
    width: 30px;
    height:30px;
    border-width:20px;
    border-style:solid;
    border-color:#e66161 #f3bb5b #94e24f #85bfda;
}
将width,height重置成0,就有了:

调整颜色,有了下图:

以下代码可以实现上图:
<style>
.test {
        width: 0;
        height: 0;
        border: 10px solid transparent;
        border-top: 10px solid black; // border-top控制三角形尖朝下,可改变

    }
  </style>
  <div class="test"></div>

//注:IE6下把边框设置成 transparent 时会出现黑影,并不会透明,把 border-style 设置成 dashed 可以解决。
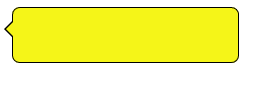
然后我们再做一个没有突出三角形的对话框出来:

<style>

    .test-div{
        position: relative;
        width:150px;
        height: 36px;
        border:1px solid black;
        border-radius:5px;
        background: rgba(245,245,24,1)
    }


</style>
    <div class="test-div"></div>
下一步,我们可以把刚才做好的那个三角形放在对话框旁边(使用绝对定位)让它突出来,利用伪类:before实现:
.test-div{
        position: relative;  /*日常相对定位*/
        150px;
        height: 36px;
        border:1px solid black;
        border-radius:5px;
        background: rgba(245,245,24,1);
}
.test-div:before {
        content: "";
        display: block;
        position: absolute;
        0;
        height: 0;
        border: 6px solid transparent;
        border-right-color: rgba(245,245,24,1);
        left: -12px;
        top: 8px;
}
可以看到,左侧有一个凸起的三角尖了。三角尖的位置由绝对定位决定。
但问题是这个三角形没有边框,怎么给它加上呢?可以再用:after伪类叠加一个大小相同的三角尖,但位置稍稍错开,再隐藏:before形成的三角尖,效果就像给原来的三角尖加了边框一样。
.test-div:before,.test-div:after {
        content: "";
        display: block;
        position: absolute;
        width:0;
        height: 0;
        border: 6px solid transparent;
        border-right-color: rgba(245,245,24,1);
        left: -11px;
        top: 8px;
        z-index:1;
}

.test-div:after {
    left: -12px;
    border-right-color: black;
    z-index:0;
}
z-index控制层叠元素的叠加顺序,它的值越大,那一层就越在上面。这个例子中我们让:before的三角尖在上面,隐藏了:after三角尖的一部分,只留出了:after边框,效果就像:before的三角尖有边框一样。效果如下: