Spring Boot入门
目录
1. Spring Boot概述 4
1.1. Spring Boot是什么 4
1.2. Spring Boot框架出现的背景 4
1.3. Spring Boot的作用是什么 5
1.4. Spring Boot的特点 5
1.5. Spring Boot学习的前提 5
1.6. Spring Boot准备工具 6
1.7. 参考资料 6
2. Spring Boot的入门 6
2.1. 简单配置入门 6
2.1.1. 配置流程 6
2.1.2. 注意事项 13
2.2. 使用@SpringBootApplication注解配置 13
2.2.1. 配置流程 14
2.2.2. 注意事项 16
2.3. 热启动 17
3. SpringBoot常见基础包说明 17
4. 常用API说明 18
4.1. SpringApplication类 18
4.1.1. 说明 18
4.1.2. 示例代码 18
4.2. @EnableAutoConfiguration注解 18
4.2.1. 注解的声明 18
4.2.2. 作用 19
4.2.3. 属性说明 19
4.3. @SpringBootApplication注解 20
4.3.1. 注解声明 20
4.3.2. 属性说明 20
4.4. @AutoConfigureBefore注解 21
4.4.1. 注解说明 21
4.4.2. 示例代码 21
4.5. @AutoConfigureAfter注解 24
4.6. @SpringBootTest注解 24
4.6.1. 注解说明 24
4.6.2. 示例代码 24
5. SpringBoot配置流程(重点) 25
5.1. 概述 25
5.2. 配置流程说明 25
5.3. 配置流程图 27
6. 配置文件 28
6.1. application.propertie配置文件 28
6.1.1. application.propertie说明 28
6.1.2. application.propertie多配置文件支持 28
6.2. application.yml配置文件 29
6.2.1. application.yml说明 29
6.2.2. application.yml多配置文件支持 30
6.3. 配置示例-Spring数据源配置 30
6.4. 获得自定义application.properties声明的属性值 33
7. Spring Boot视图 35
7.1. 视图概述 35
7.2. FreeMarker模板引擎的配置 36
7.2.1. 配置流程 36
7.2.2. 注意事项 37
7.3. Thymeleaf模板引擎的配置 39
7.3.1. 配置流程 39
7.3.2. 注意事项 40
7.4. JSP视图配置(极不推荐) 40
7.4.1. 配置流程 40
7.4.2. 注意事项 41
7.5. 默认读取的静态资源路径 41
8. SpringBoot整合 42
8.1. 使用的数据库SQL 42
8.2. SpringBoot整合Mybatis 42
8.2.1. 整合说明 42
8.2.2. 配置流程 43
8.3. Spring Boot整合Spring-Data-JPA 49
8.3.1. 配置步骤 49
8.3.2. 注意事项 56
9. 打包部署 57
9.1. 使用jar发布应用 57
9.1.1. 配置步骤 57
9.1.2. 修改内嵌Tomcat的参数 59
9.2. 使用war发布应用 59
9.2.1. 配置流程 59
9.2.2. 注意事项 62
1. Spring Boot概述
1.1. Spring Boot是什么
Spring Boot是一套基于Spring框架的微服务框架。
1.2. Spring Boot框架出现的背景
由于Spring是一个轻量级的企业开发框架,主要的功能就是用于整合和管理其他框架。
但随着整合的框架越来越多,Spring的整合配置也日益繁琐。在这个情况下,Spring团体有了一个想法:就是将平时主流使用到的框架的整合配置预先写好,然后通过简单的几个参数就可以实现框架的快速整合。
这个想法催生Spring boot框架。
我们将这个实现了各种主流框架与Spring的自动整合的框架。
1.3. Spring Boot的作用是什么
就是大大减少了Spring与其他框架整合的代码,也实现了Spring开发的Web应用的快速部署。(使用jar发布web应用)
1.4. Spring Boot的特点
1.实现了各种主流的框架的快速整合
2.实现了Spring的应用的快速部署,使用Spring Boot的Web应用可以以Jar的方式部署。
Spring是如何实现使用jar发布web 应用的呢?
答:就是通过直接将tomcat服务器打包到我们的web应用里面实现了。
1.5. Spring Boot学习的前提
1.由于Spring Boot的最小配置都是基于SpringMVC框架的,所以学习Spring Boot先要有Spring和SpringMVC框架的基础。
2.SpringBoot默认不推荐使用JSP视图,官方推荐使用Thymeleaf或者Freemarker模板引擎。本文档没有对这两个模板引擎作详细介绍。
3.SpringBoot使用了Maven 或者Gradle管理需要的jar包,没有提供zip压缩包的发布形式,所以学习SpringBoot必须要学习Maven或者Gradle构建工具,现在主流使用的是Maven,所以学习Maven就可以了。
4.Spring Boot中可以使用Spring框架的所有注解。如果没有学过纯注解Spring框架配置,需要先学习Spring纯注解的配置。
所谓的纯注解:就是一个Spring配置文件都没有的配置。
涉及Spring框架的纯注解配置类常用注解如下:
|
注解名 |
说明 |
|
@Configuration |
声明一个配置类,配置类的功能等同spring的配置文件(重点) |
|
@Bean |
将没有声明 @Component/@Controller/@Serivce/@Repository的类加入到Spring容器 等同于Spring配置文件的<bean>标签 |
|
@PropertySource |
在Spring的配置里读取,增加的这个注解,可以使用@Value注解获得properties文件的内容 |
|
@Value |
获得上下文中,Properties文件的内容 等同与Spring配置文件的 ${key} |
|
@ComponentScan |
用于扫描类,创建对象到Spring容器中 等同Spring配置文件 <context:component-scan> |
|
@ConditionalOnMissingBean(Spring Boot) |
表示如果Spring容器已经有该类的对象就不执行创建对象的方法再创建一次了。 |
1.6. Spring Boot准备工具
学习Spring Boot建议使用Eclipse安装STS插件或者直接使用STS开发工具。
下载官网:https://spring.io/tools/sts
1.7. 参考资料
本文档编写参考了
1.Spring官方的示例代码,地址如下:
https://github.com/spring-projects/spring-boot/tree/master/spring-boot-samples
2.SpringBoot官方参考文档,地址如下:
https://docs.spring.io/spring-boot/docs/current-SNAPSHOT/reference/htmlsingle/#getting-started
3.spring boot自动配置的框架,路径如下:
https://github.com/spring-projects/spring-boot/tree/master/spring-boot-starters
2. Spring Boot的入门
2.1. 简单配置入门
2.1.1. 配置流程
1.新建一个maven项目
|
|

2.填写创建项目的信息,注意使用jar的方式创建项目就可以
|
|

--编写项目信息
|
|

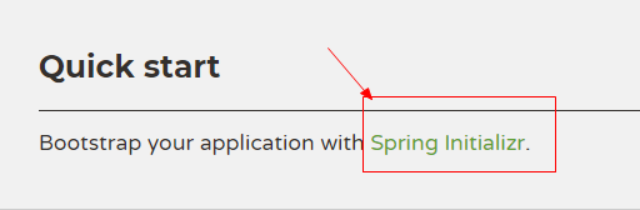
3.到spring boot官方复制pom的依赖到pom.xml文件
网站地址为:http://projects.spring.io/spring-boot/
|
|
--选择参数
|
|

pom.xml文件内容如下:
|
<project xmlns="http://maven.apache.org/POM/4.0.0" xmlns:xsi="http://www.w3.org/2001/XMLSchema-instance" xsi:schemaLocation="http://maven.apache.org/POM/4.0.0 http://maven.apache.org/xsd/maven-4.0.0.xsd"> <modelVersion>4.0.0</modelVersion> <groupId>cn.gzsxt</groupId> <artifactId>spring-boot-demo-01</artifactId> <version>1.0</version> <parent> <groupId>org.springframework.boot</groupId> <artifactId>spring-boot-starter-parent</artifactId> <version>1.5.4.RELEASE</version> </parent> <dependencies> <dependency> <groupId>org.springframework.boot</groupId> <artifactId>spring-boot-starter-web</artifactId> </dependency> </dependencies> </project> |
注意:如果复制spring boot依赖到pom.xml报以下错误
|
|
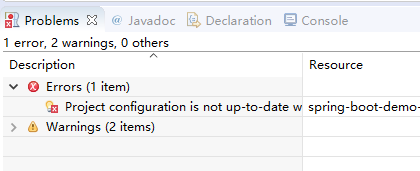
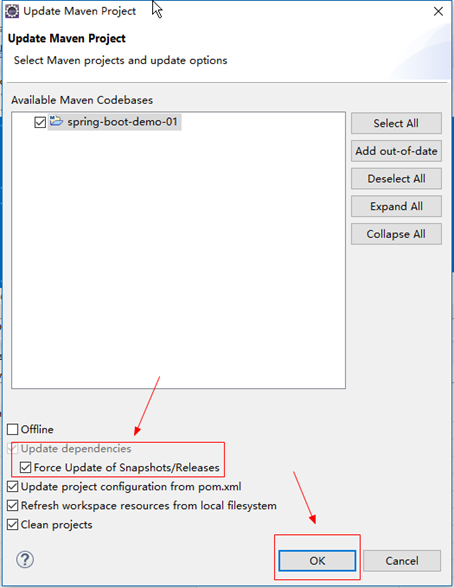
更新一下项目即可.如下图
|
|
4.编写一个简单的Java类
|
package hello; import org.springframework.boot.*; import org.springframework.boot.autoconfigure.*; import org.springframework.stereotype.*; import org.springframework.web.bind.annotation.*; //声明@Controller存储类型注解,表示SampleController类启动是,对象会加载到Spring容器 @Controller //声明@EnableAutoConfiguration,表示程序使用Springboot默认的配置 @EnableAutoConfiguration public class SampleController { /** * 表示如果访问路径/,返回字符串Hello World! */ @RequestMapping("/") @ResponseBody String home() { return "Hello World!"; } public static void main(String[] args) throws Exception { //启动Spring Boot程序 SpringApplication.run(SampleController.class, args); } } |
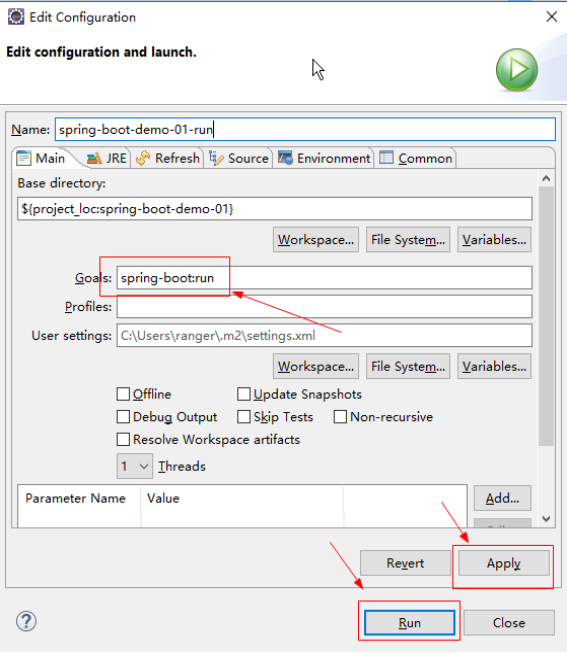
5.启动Spring Boot程序
|
|
6.启动成功,控制台提示我们使用8080端口访问
|
|
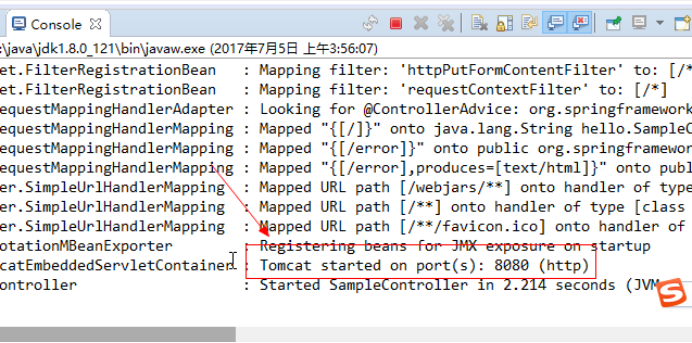
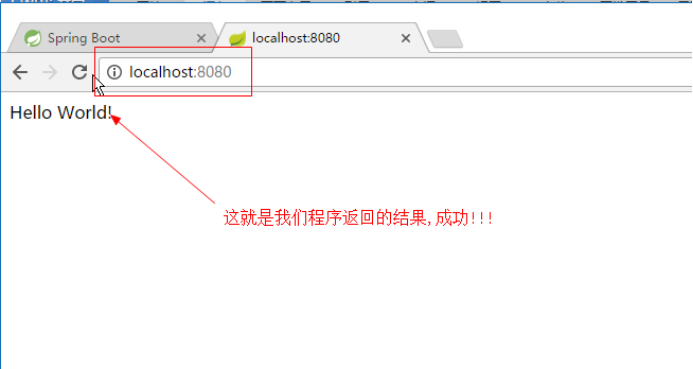
7.使用浏览器访问8080端口
|
|
2.1.2. 注意事项
maven是需要联网下载的jar包的。注意一下网络是否畅通。
因为SpringBoot是通过jar发布的。而jar的程序的入口是main方法。所以SpringBoot必须要提供一个类,可以从main方法启动项目。这个类就是SpringApplication
SpringBoot框架是基于Spring框架的。我们知道Spring框架是通过加载配置类或者配置文件,创建容器,在将创建的对象放在容器里面。意味着SpringBoot也是必须需要配置类的。只是配置类已经内置实现了!!使用SpringApplication类启动程序,需要通过@EnableAutoConfiguration,表示自动加载默认的配置类。。
2.2. 使用@SpringBootApplication注解配置
上面的示例有一个问题,一个Controller需要手工配置一次,代码如下:
|
SpringApplication.run(SampleController.class, args); |
问题:启动的Controller只有一个,如果一个项目需要将多个类扫描到Spring的容器中如何解决呢?
答:使用@SpringBootApplication注解来配置。
入口类使用@SpringBootApplication注解,启动项目时,SpringBoot框架会扫描入口类的加了@SpringBootApplication注解的入口类的同级目录和子目录的组件类的对象到Spring容器。
2.2.1. 配置流程
1.创建一个Maven项目
|
|

2.将Spring boot的依赖复制到pom.xml文件
|
<project xmlns="http://maven.apache.org/POM/4.0.0" xmlns:xsi="http://www.w3.org/2001/XMLSchema-instance" xsi:schemaLocation="http://maven.apache.org/POM/4.0.0 http://maven.apache.org/xsd/maven-4.0.0.xsd"> <modelVersion>4.0.0</modelVersion> <groupId>cn.gzsxt</groupId> <artifactId>spring-boot-demo-02</artifactId> <version>1.0</version> <parent> <groupId>org.springframework.boot</groupId> <artifactId>spring-boot-starter-parent</artifactId> <version>1.5.4.RELEASE</version> </parent> <dependencies> <dependency> <groupId>org.springframework.boot</groupId> <artifactId>spring-boot-starter-web</artifactId> </dependency> </dependencies> </project> |
3.将项目简单分层
|
|
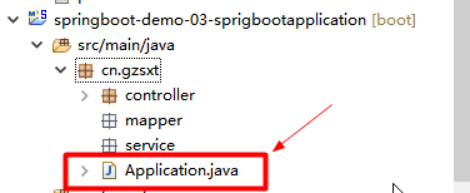
4.在cn.gzsxt文件夹下创建一个入口类Application.java
|
package cn.gzsxt; import org.springframework.boot.SpringApplication; import org.springframework.boot.autoconfigure.SpringBootApplication; //使用SpringBoot自动配置程序 @SpringBootApplication public class Application { public static void main(String[] args) { //执行当前类,根据@SpringBootApplication的配置,启动SpringBoot程序 SpringApplication.run(Application.class, args); } } |
5.创建一个Controller,业务控制器
|
package cn.gzsxt.controller; import org.springframework.stereotype.Controller; import org.springframework.web.bind.annotation.RequestMapping; import org.springframework.web.bind.annotation.ResponseBody; @Controller public class HelloController { @RequestMapping(value="/") @ResponseBody public String say(){ //返回字符串 return "HelloWorld!"; } } |
6.启动项目,控制台返回访问端口
|
|

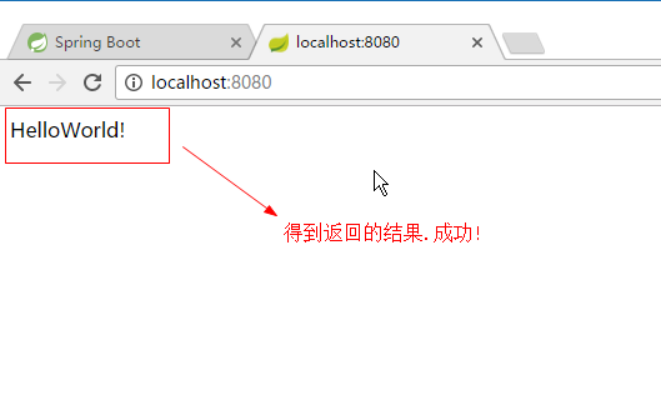
7.使用浏览器访问
|
|
2.2.2. 注意事项
1.为什么放在cn.gzsxt包下呢?
答:@SpringBootApplication的配置默认根据入口类的所在位置扫描包以及入口类所在位置以及子包范围。
根据以上配置,使用@SpringBootApplication配置Spring boot项目。会自动扫描cn.gzsxt.*下面HelloController类。
从而可以得出使用@SpringBootApplication可以实现将多个类扫描到Spring容器里面。
根据代码分析得到@SpringBootApplication做了三件事情:
- 声明当前类允许自动配置
|
@EnableAutoConfiguration |
- 声明当前类是一个配置类,因为扫描组件注解只能放在配置类上面
|
@SpringBootConfiguration 等同 @Configuration |
- 声明一个扫描组件注解,将所有组件类创建对象到容器
|
@ComponentScan |
2.3. 热启动
使用spring-boot:run命令启动项目,每次修改完成代码都要重新启动。是非常麻烦的。
我们就有那么一个想法,能不能修改完代码,程序不用重启直接自动编译了?
我们将修改完代码开发工具自动编译的过程称为,热启动。
Spring boot是支持热启动的。只有加入以下依赖就可以
|
<dependency> <groupId>org.springframework.boot</groupId> <artifactId>spring-boot-devtools</artifactId> <!-- optional=true,依赖不会传递,该项目依赖devtools; 之后依赖该项目的项目如果想要使用devtools,需要重新引入 --> <optional>true</optional> </dependency> |
3. SpringBoot常见基础包说明
|
|
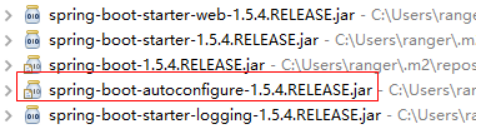
1.spring-boot-starter-web-1.5.4.RELEASE.jar:仅仅存放web项目需要的jar包的pom.xml
2.spring-boot-starter-1.5.4.RELEASE.jar:仅仅存放springboot最小核心需要的jar包的pom.xml
3.spring-boot-starter-logging-1.5.4.RELEASE.jar:仅仅存放日志输出需要的jar包的pom.xml
4.spring-boot-1.5.4.RELEASE.jar:springboot框架核心包
spring-boot-autoconfigure-1.5.4.RELEASE.jar:默认支持的自动配置的框架的配置包(重点)
重点是spring-boot-autoconfigure包,因为spring boot的所有内置的自动配置的类都在里面!
4. 常用API说明
4.1. SpringApplication类
4.1.1. 说明
作用:用于启动Spring Boot的程序,根据传入的类声明的注解来决定不同的启动方式。
4.1.2. 示例代码
|
package cn.gzsxt; import org.springframework.boot.SpringApplication; import org.springframework.boot.autoconfigure.SpringBootApplication; //使用SpringBoot自动配置程序 @SpringBootApplication public class Application { public static void main(String[] args) { //执行当前类,根据@SpringBootApplication的配置,启动SpringBoot程序 SpringApplication.run(Application.class, args); } } |
4.2. @EnableAutoConfiguration注解
4.2.1. 注解的声明
|
@SuppressWarnings("deprecation") @Target(ElementType.TYPE) @Retention(RetentionPolicy.RUNTIME) @Documented @Inherited @AutoConfigurationPackage @Import(EnableAutoConfigurationImportSelector.class) public @interface EnableAutoConfiguration { String ENABLED_OVERRIDE_PROPERTY = "spring.boot.enableautoconfiguration"; Class<?>[] exclude() default {}; String[] excludeName() default {}; } |
4.2.2. 作用
@EnableAutoConfiguration注解的作用是:启动程序时,告诉SpringApplication启动对象使用SpringBoot的默认配置。
只要在SpringBoot项目的入口类配置了@EnableAutoConfiguration,在SpringBoot框架启动是就会自动根据你导入的jar包来加载spring-boot-autoconfigure-1.5.4.RELEASE-sources.jar中的xxxAutoconfiguration配置类,使用其默认配置。
|
|
4.2.3. 属性说明
exclude属性:使用Class格式的方式,排除默认自动启动中不需要的配置类
excludeName属性:使用类的限制名的方式,排序默认自动启动中不需要的配置类
4.3. @SpringBootApplication注解
4.3.1. 注解声明
|
@Target(ElementType.TYPE) @Retention(RetentionPolicy.RUNTIME) @Documented @Inherited @SpringBootConfiguration @EnableAutoConfiguration @ComponentScan(excludeFilters = { @Filter(type = FilterType.CUSTOM, classes = TypeExcludeFilter.class), @Filter(type = FilterType.CUSTOM, classes = AutoConfigurationExcludeFilter.class) }) public @interface SpringBootApplication { @AliasFor(annotation = EnableAutoConfiguration.class, attribute = "exclude") Class<?>[] exclude() default {}; @AliasFor(annotation = EnableAutoConfiguration.class, attribute = "excludeName") String[] excludeName() default {}; @AliasFor(annotation = ComponentScan.class, attribute = "basePackages") String[] scanBasePackages() default {}; @AliasFor(annotation = ComponentScan.class, attribute = "basePackageClasses") Class<?>[] scanBasePackageClasses() default {}; } |
根据注解的声明可以得出:@SpringBootApplication注解也是启动Springboot的默认配置。只是在@EnableAutoConfiguration注解的基础上增加了扫描包@ComponentScan的这个注解。实现了并且扫描指定范围的类创建对象到容器里面。
4.3.2. 属性说明
1.basePackages属性
@SpringBootApplication默认扫描的范围是使用该注解的当前的类的包以及子包,如果要指定其他范围的包,可以是basePackages指定。
2.basePackageClasses属性
用于精确指定哪些类需要创建对象加载到Spring容器里面。
3.exclude属性
通过Class的方式排除不扫描的类,就是该类不创建对象。
4.excludeName属性
通过类的全限制名的方式,排除不扫描的类,指定的类不会在容器中创建对象。
4.4. @AutoConfigureBefore注解
4.4.1. 注解说明
指定在SpringBoot框架自动配置的配置类执行完成之前,执行指定的自定义的配置类。
如果放在Application入口类,表示在所有自动配置的配置类还没有可以就先加载自定义的配置类。
@AutoConfigureBefore注解属性:
value:使用类的方式指定自动配置类
name:使用类的全限制名(字符串)类指定配置类
4.4.2. 示例代码
1.创建一个普通的类,没有任何注解
|
package cn.gzsxt.utils; /** * 创建一个没有扫描注入容器注解的类 * @author ranger * */ public class TestUtils { /** * 返回测试信息 * @return */ public String test(){ return "-测试注入对象成功-"; } } |
2.创建一个自定义配置类,注入普通的类到Spring容器
|
package cn.gzsxt.config; import org.springframework.context.annotation.Bean; import org.springframework.context.annotation.Configuration; package cn.gzsxt.config; import org.springframework.boot.autoconfigure.condition.ConditionalOnMissingBean; import org.springframework.context.annotation.Bean; import org.springframework.context.annotation.Configuration; import cn.gzsxt.utils.TestUtils; /** * 创建一个自定义的配置类 * @author ranger * */ @Configuration public class MyConfiguration { /** * 返回一个对象到容器 * @return */ @Bean(name="testUtils") //表示如果Spring容器有TestUtils的对象就不执行这个方法在创建一次了。 @ConditionalOnMissingBean(TestUtils.class) public TestUtils getTestUtils(){ TestUtils testUtils=new TestUtils(); return testUtils; } } |
3.在入口类配置加入自定义配置类
|
package cn.gzsxt; import org.springframework.boot.SpringApplication; import org.springframework.boot.autoconfigure.AutoConfigureBefore; import org.springframework.boot.autoconfigure.SpringBootApplication; import cn.gzsxt.config.MyConfiguration; //使用SpringBoot自动配置程序 @SpringBootApplication //在自动配置的配置类之前启动自定义的配置类 @AutoConfigureBefore(value=MyConfiguration.class) public class Application { public static void main(String[] args) { //执行当前类,根据@SpringBootApplication的配置,启动SpringBoot程序 SpringApplication.run(Application.class, args); } } |
4.在Controller里面使用这个注入的对象
|
package cn.gzsxt.controller; import org.springframework.beans.factory.annotation.Autowired; import org.springframework.stereotype.Controller; import org.springframework.web.bind.annotation.RequestMapping; import org.springframework.web.bind.annotation.ResponseBody; import cn.gzsxt.utils.TestUtils; @Controller public class HelloController { @Autowired private TestUtils testUtils; @RequestMapping(value="/") @ResponseBody public String say(){ System.out.println(testUtils.test()); return testUtils.test(); } } |
5.测试,成功
|
|

4.5. @AutoConfigureAfter注解
指定在SpringBoot框架自动配置的配置类执行完成之后,然后执行指定的自定义的配置类。
4.6. @SpringBootTest注解
4.6.1. 注解说明
用于使用JUnit测试SpringBoot程序,启动SpringBoot框架。测试SpringBoot一定要加上。
4.6.2. 示例代码
|
package cn.gzsxt.test; import java.sql.SQLException; import javax.sql.DataSource; import org.junit.Test; import org.junit.runner.RunWith; import org.springframework.beans.factory.annotation.Autowired; import org.springframework.boot.test.context.SpringBootTest; import org.springframework.test.context.junit4.SpringJUnit4ClassRunner; @RunWith(SpringJUnit4ClassRunner.class) //如果不加该注解,无法启动SpringBoot @SpringBootTest public class DataSourceTest { @Autowired private DataSource dataSource; @Test public void dataSource() { try { System.out.println(dataSource.getConnection()); } catch (SQLException e) { // TODO Auto-generated catch block e.printStackTrace(); } } } |
5. SpringBoot配置流程(重点)
5.1. 概述
Spring Boot框架是一个将整合框架的整合代码都写好了的框架。所以我们要知道它的工作原理才能够,找到各种整合框架可以配置的属性,以及属性对应的属性名。
本章主要讲述如何在SpringBoot框架代码中找到application.properties配置文件的属性值。
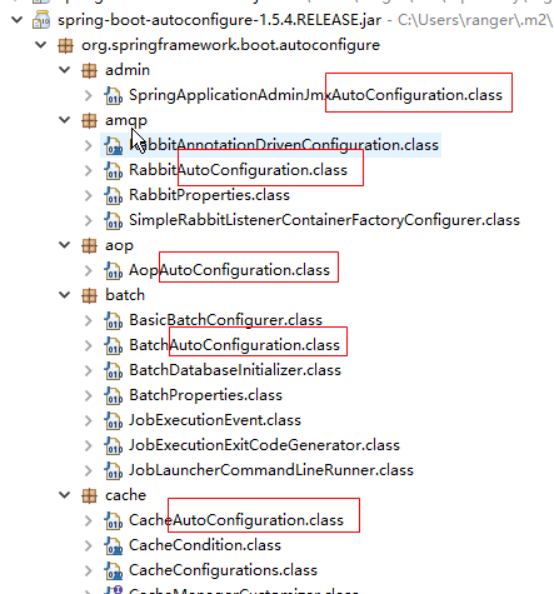
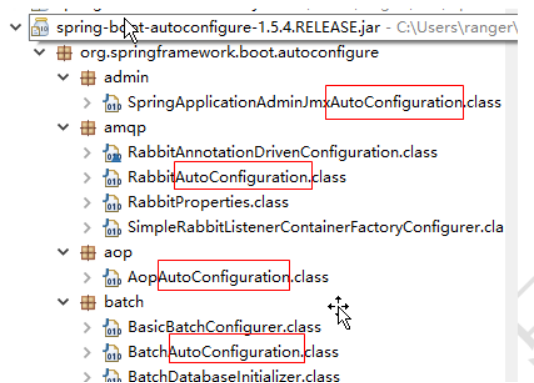
5.2. 配置流程说明
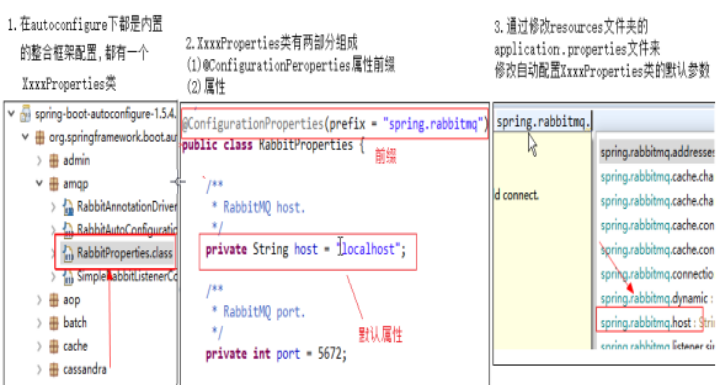
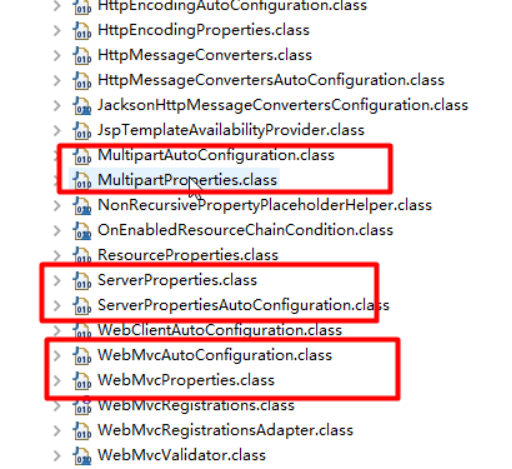
1.SpringBoot的spring-boot-autoconfigure-1.5.4.RELEASE.jar中编写了所以内置支持的框架的自动整合代码
2.所以支持的框架根据功能类型来划分包,每个包都有一个XxxxAutoConfiguration配置类,都是一个基于纯注解的配置类,是各种框架整合的框架代码。如图所示:
|
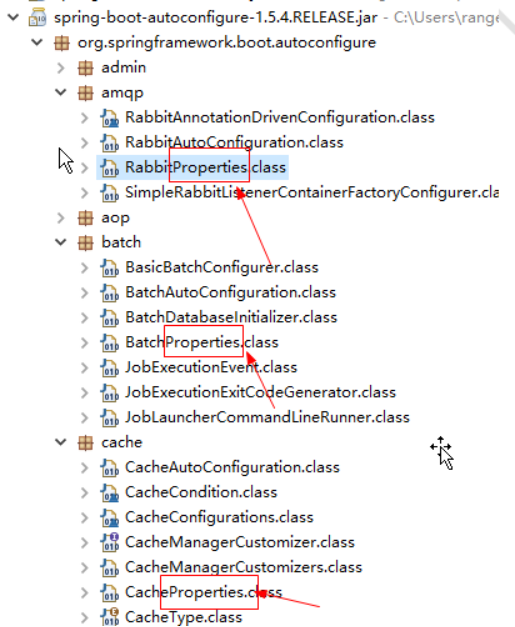
|
3.如果配置的框架有默认的配置参数,都放在一个命名为XxxxProperties的属性,如图所示
|
|
4.通过项目的resources下的application.properties文件可以修改每个整合框架的默认属性,从而实现了快速整合的目的。
|
|
5.3. 配置流程图
第一步:配置一个内置整合框架的参数,先到spring-boot-autoconfigure-1.5.4.RELEASE.jar找到对应的模块。
第二步:如果该框架有可以配置的参数,那么对应的整合模块中一定有一个XxxxProperties类,在里面可以找可以设置的参数。
第三部:在resources源目录下的application.properties文件里面可以修改XxxxProperties类中默认的参数。
配置流程如下:
|
|
6. 配置文件
Spring Boot的参数配置文件支持两种格式。分别为application.propertie,application.yml。
配置Spring Boot时可以二选一。
application.propertie:是键值对风格
application.yml:是层级键值对风格
6.1. application.propertie配置文件
6.1.1. application.propertie说明
默认情况下,Spring Boot会加载resources目录下的application.properties来获得配置的参数。
6.1.2. application.propertie多配置文件支持
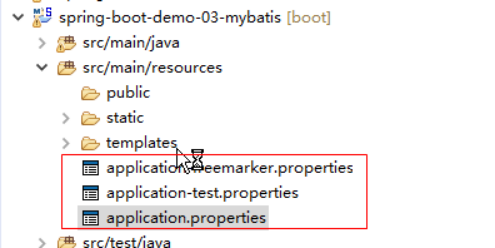
1.在application.properties配置文件下,增加多个application-xxx.properties文件名的配置文件,其中xxx是一个任意的字符串。
例如:
|
application-database.properties application-mvc.properties application-freemarker.properties |
2.在application.properties总配置文件指定,加载的多个配置文件
例如:要同时使用,四个配置文件
|
application.properties、 application-database.properties application-mvc.properties application-freemarker.properties |
那么在application.properties其他配置文件指定为:
|
spring.profiles.active=database,mvc,freemarker |
6.2. application.yml配置文件
6.2.1. application.yml说明
SpringBoot支持一种由SpringBoot框架自制的配置文件格式。后缀为yml。yml后缀的配置文件的功能和properties后缀的配置文件的功能是一致的。配置时可以二选一。
例如:配置文件:application.properties
|
#配置数据源 spring.datasource.url=jdbc:mysql://localhost:3306/school spring.datasource.driverClassName=com.mysql.jdbc.Driver spring.datasource.username=root spring.datasource.password=123456 spring.datasource.type=org.apache.commons.dbcp2.BasicDataSource #spring-data-jpa配置 #显示SQL语句 spring.jpa.show-sql=true #表示是否需要根据view的生命周期来决定session是否关闭 spring.jpa.open-in-view=true |
可以修改为配置文件:application.yml,内容为:
|
#配置数据源 spring: datasource: url: jdbc:mysql://localhost:3306/school driverClassName: com.mysql.jdbc.Driver username: root password: 123456 #配置连接池 type: org.apache.commons.dbcp2.BasicDataSource #配置JPA的属性 jpa: show-sql: true open-in-view: true |
其实application.yml配置文件就是将原来application.properties使用(.)分割的方式,改为树状结构,使用(:)分割。
注意:key的字段与值之间的冒号(:)后面一定要有一个空格。
6.2.2. application.yml多配置文件支持
1.在application.yml配置文件下,增加多个application-xxx.yml文件名的配置文件,其中xxx是一个任意的字符串。
例如:
|
application-database.yml application-mvc.yml application-freemarker.yml |
2.在application.yml总配置文件指定,加载的多个配置文件
例如:要同时使用,四个配置文件
|
application.yml application-database.yml application-mvc.yml application-freemarker.yml |
那么在application.yml其他配置文件指定为:
|
spring: profiles: active: database,mvc,freemarker |
6.3. 配置示例-Spring数据源配置
配置Spring数据源,并支持DBCP2数据源
1.在pom.xml加入支持数据源的类库
|
<!-- 数据库驱动 --> <dependency> <groupId>mysql</groupId> <artifactId>mysql-connector-java</artifactId> </dependency> <!-- dbcp2连接池 --> <dependency> <groupId>org.apache.commons</groupId> <artifactId>commons-dbcp2</artifactId> </dependency> <!-- Springboot测试包 --> <dependency> <groupId>org.springframework.boot</groupId> <artifactId>spring-boot-starter-test</artifactId> </dependency> |
2.找到数据源的配置类
|
|
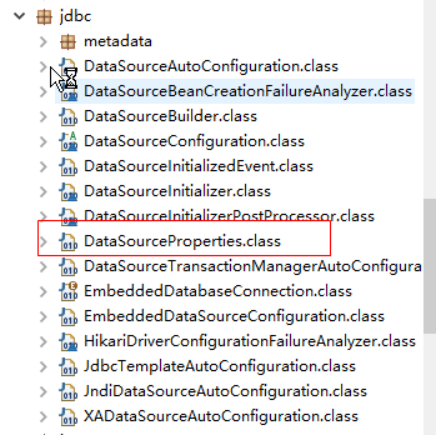
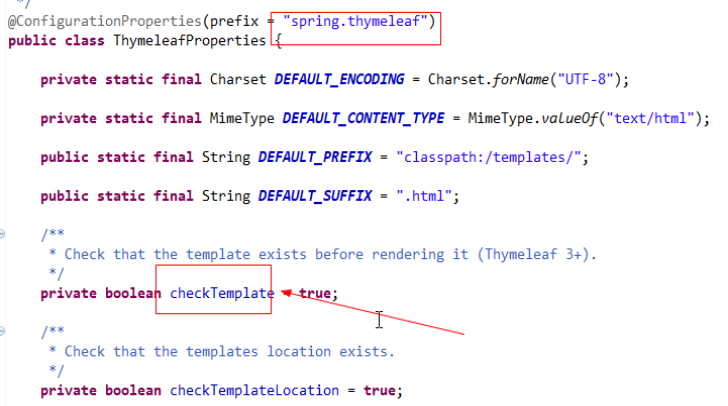
3.数据源的配置类的属性如下
|
//注意这里 @ConfigurationProperties(prefix = "spring.datasource") public class DataSourceProperties implements BeanClassLoaderAware, EnvironmentAware, InitializingBean { private ClassLoader classLoader; private Environment environment; private String name = "testdb"; private boolean generateUniqueName; //注意这里 private Class<? extends DataSource> type; private String driverClassName; private String url; private String username; private String password; private String jndiName; private boolean initialize = true; private String platform = "all"; private List<String> schema; private String schemaUsername; private String schemaPassword; private List<String> data; private String dataUsername; private String dataPassword; private boolean continueOnError = false; private String separator = ";"; private Charset sqlScriptEncoding; private EmbeddedDatabaseConnection embeddedDatabaseConnection = EmbeddedDatabaseConnection.NONE; private Xa xa = new Xa(); private String uniqueName; |
3.application.properties配置文件修改数据源参数:
|
#datasource spring.datasource.url=jdbc:mysql://localhost:3306/school spring.datasource.driverClassName=com.mysql.jdbc.Driver spring.datasource.username=root spring.datasource.password=123456 #support dbcp2 datasource spring.datasource.type=org.apache.commons.dbcp2.BasicDataSource |
1.spring.datasource这个前缀就是DataSourceProperties的@ConfigurationProperties(prefix = "spring.datasource")注解声明的前缀
2.属性就是DataSourceProperties对应的属性
4.测试代码
|
package cn.gzsxt.test; import java.sql.SQLException; import javax.sql.DataSource; import org.junit.Test; import org.junit.runner.RunWith; import org.springframework.beans.factory.annotation.Autowired; import org.springframework.boot.test.context.SpringBootTest; import org.springframework.test.context.junit4.SpringJUnit4ClassRunner; @RunWith(SpringJUnit4ClassRunner.class) //SpringBoot测试要加上这个注解 @SpringBootTest public class DataSourceTest { @Autowired private DataSource dataSource; @Test public void dataSource() { try { System.out.println(dataSource.getConnection()); } catch (SQLException e) { // TODO Auto-generated catch block e.printStackTrace(); } } } |
注意事项:
|
<project xmlns="http://maven.apache.org/POM/4.0.0" xmlns:xsi="http://www.w3.org/2001/XMLSchema-instance" xsi:schemaLocation="http://maven.apache.org/POM/4.0.0 http://maven.apache.org/xsd/maven-4.0.0.xsd"> <modelVersion>4.0.0</modelVersion> <groupId>cn.gzsxt.springboot</groupId> <artifactId>springboot-demo-06-dbcp2</artifactId> <version>1.0</version> <!-- 设置项目信息 --> <properties> <!-- 设置源代码的编码 --> <project.build.sourceEncoding>UTF-8</project.build.sourceEncoding> <!-- 输出的字节码的编码 --> <project.reporting.outputEncoding>UTF-8</project.reporting.outputEncoding> <!-- 设置JDK的版本 --> <java.version>1.8</java.version> </properties> <!-- Spring Boot依赖的父包,包括框架基础包的配置 --> <parent> <groupId>org.springframework.boot</groupId> <artifactId>spring-boot-starter-parent</artifactId> <version>1.5.4.RELEASE</version> </parent> <dependencies> <!-- 导入依赖的Web模块SpringMVC的配置 --> <dependency> <groupId>org.springframework.boot</groupId> <artifactId>spring-boot-starter-web</artifactId> </dependency> <dependency> <groupId>org.springframework.boot</groupId> <artifactId>spring-boot-devtools</artifactId> <!-- optional=true,依赖不会传递,该项目依赖devtools; 之后依赖该项目的项目如果想要使用devtools,需要重新引入 --> <optional>true</optional> </dependency> <!-- dbcp2依赖包 --> <dependency> <groupId>org.apache.commons</groupId> <artifactId>commons-dbcp2</artifactId> </dependency> <!-- mysql driver --> <dependency> <groupId>mysql</groupId> <artifactId>mysql-connector-java</artifactId> </dependency> <dependency> <groupId>org.springframework.boot</groupId> <artifactId>spring-boot-starter-test</artifactId> </dependency> <!-- jdbc --> <!-- SpringBoot配置jdbc模块,必须导入JDBC包的 --> <dependency> <groupId>org.springframework</groupId> <artifactId>spring-jdbc</artifactId> </dependency> </dependencies> </project> |
6.4. 获得自定义application.properties声明的属性值
使用@ConfigurationProperties注解可以直接获得application.properties配置的属性值。
@ConfigurationProperties属性说明:
prefix属性:表示获得application.properties时忽略的指定的前缀,如:
|
@ConfigurationProperties(prefix = "spring.resources", ignoreUnknownFields = false) |
ignoreUnknownFields属性:忽略未知的字段值。如果为true时,就是当application.properties设置的输入找不到对应的字段时,就忽略它。
@ConfigurationProperties的使用:
1.在pom.xml导入支持的依赖包
|
<dependency> <groupId>org.springframework.boot</groupId> <artifactId>spring-boot-configuration-processor</artifactId> <optional>true</optional> </dependency> |
2.自定义一个TestProperties 属性类
|
package cn.gzsxt.utils; import org.springframework.boot.context.properties.ConfigurationProperties; @ConfigurationProperties(prefix="cn.gzsxt" ) public class TestProperties { private String path; public String getPath() { return path; } public void setPath(String path) { this.path = path; } } |
3.自定义一个application-test.properties文件
|
cn.gzsxt.path=demo-03 |
4.在application.properties指定application-test.properties配置文件
|
spring.datasource.url=jdbc:mysql://localhost:3306/school spring.datasource.driverClassName=com.mysql.jdbc.Driver spring.datasource.username=root spring.datasource.password=123456 spring.datasource.type=org.apache.commons.dbcp2.BasicDataSource spring.profiles.active=test |
5.启动支持TestProperties类自动配置
在入口类Application增加EnableConfigurationProperties注解支持
|
package cn.gzsxt; import org.springframework.boot.SpringApplication; import org.springframework.boot.autoconfigure.SpringBootApplication; import org.springframework.boot.context.properties.EnableConfigurationProperties; import cn.gzsxt.utils.TestProperties; @SpringBootApplication @EnableConfigurationProperties(value=TestProperties.class) public class Application { public static void main(String[] args) { SpringApplication.run(Application.class, args); } } |
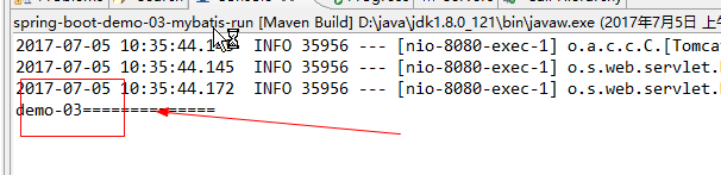
6.调用配置的属性path
|
package cn.gzsxt.controller; import java.util.HashMap; import java.util.Map; import org.springframework.beans.factory.annotation.Autowired; import org.springframework.stereotype.Controller; import org.springframework.web.bind.annotation.RequestMapping; import cn.gzsxt.service.StudentService; import cn.gzsxt.utils.TestProperties; @Controller public class StudentController { @Autowired private TestProperties testProperties; @RequestMapping(value="/path") public String path(){ System.out.println(testProperties.getPath()+"=============="); return "index"; } } |
7.测试结果
|
|
7. Spring Boot视图
7.1. 视图概述
由于SpringBoot建议使用jar的方式发布web程序。所以不建议使用jsp视图,也不对jsp视图做默认的支持。
如果确实要使用JSP视图发布Spring Boot的应用,那么需要使用war的方式发布。
Spring Boot默认自动配置支持视图是以下的模板引擎:
7.2. FreeMarker模板引擎的配置
7.2.1. 配置流程
1.在pom.xml导入FreeMarker模板引擎依赖的包
|
<!-- freemarker支持包 --> <dependency> <groupId>org.springframework.boot</groupId> <artifactId>spring-boot-starter-freemarker</artifactId> </dependency> |
2.Spring Boot的模板引擎的默认路径是resources/templates,所以在resources下创建一个templates文件夹。将视图页面放在里面
|
|
3.这样Spring Boot直接就支持了返回freemarker的ftl视图了。
|
@RequestMapping(value="/index") public String index(Model model,HttpSession session){ System.out.println("-测试插入数据-"); Map<String, Object> entity=new HashMap<String, Object>(); //插入数据 entity.put("sname", "test3"); studentService.insert(entity); //返回index就会跳到index.ftl return "index"; } |
4.根据需要可以在resources的application.properties配置文件,修改freemarker视图的默认属性。
|
|
例如:
1.application.properties配置文件增加以下配置
|
#setting freemarker encoding spring.freemarker.charset=UTF-8 |
7.2.2. 注意事项
注意Freemarker的自动配置的属性类为:spring-boot-autoconfigure-1.5.4.RELEASE.jar包的
org.springframework.boot.autoconfigure.freemarker.FreeMarkerProperties类。
freemarker视图的默认属性配置在里面
如下:
|
package org.springframework.boot.autoconfigure.freemarker; import java.util.HashMap; import java.util.Map; import org.springframework.boot.autoconfigure.template.AbstractTemplateViewResolverProperties; import org.springframework.boot.context.properties.ConfigurationProperties; @ConfigurationProperties(prefix = "spring.freemarker") public class FreeMarkerProperties extends AbstractTemplateViewResolverProperties { //默认的视图的存放路径 public static final String DEFAULT_TEMPLATE_LOADER_PATH = "classpath:/templates/"; //默认的前缀 public static final String DEFAULT_PREFIX = ""; //默认的后缀 public static final String DEFAULT_SUFFIX = ".ftl"; private Map<String, String> settings = new HashMap<String, String>(); private String[] templateLoaderPath = new String[] { DEFAULT_TEMPLATE_LOADER_PATH }; private boolean preferFileSystemAccess = true; public FreeMarkerProperties() { super(DEFAULT_PREFIX, DEFAULT_SUFFIX); } public Map<String, String> getSettings() { return this.settings; } public void setSettings(Map<String, String> settings) { this.settings = settings; } public String[] getTemplateLoaderPath() { return this.templateLoaderPath; } public boolean isPreferFileSystemAccess() { return this.preferFileSystemAccess; } public void setPreferFileSystemAccess(boolean preferFileSystemAccess) { this.preferFileSystemAccess = preferFileSystemAccess; } public void setTemplateLoaderPath(String... templateLoaderPaths) { this.templateLoaderPath = templateLoaderPaths; } } |
2.查看Spring Boot内置的FreeMarkerProperties类的属性,发现application.properties里面可以设置的属性竟然比FreeMarkerProperties定义的属性多,为什么呢?
答:因为Spring Boot直接引用了FreeMarker框架原来内部定义的属性,只是在前面加一个前缀。
所以导致有一些没有默认值的属性不在FreeMarkerProperties类里面。
7.3. Thymeleaf模板引擎的配置
7.3.1. 配置流程
1.导入Thymeleaf的支持包
|
<!-- thymeleaf支持包 --> <dependency> <groupId>org.springframework.boot</groupId> <artifactId>spring-boot-starter-thymeleaf</artifactId> </dependency> |
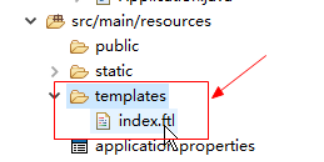
2.Spring Boot的Thymeleaf模板引擎的默认路径是resources/templates,所以在resources下创建一个templates文件夹。将视图页面放在里面
|
|

内容为:
|
<!DOCTYPE HTML> <!-- 注意Thymeleaf模板引擎一定要引入xmlns:th="http://www.thymeleaf.org"命名空间 --> <html xmlns:th="http://www.thymeleaf.org"> <head> <title>hello</title> <meta http-equiv="Content-Type" content="text/html; charset=UTF-8" /> </head> <body> <!-- ${name}用于获得Controller返回的Request的取值范围的值,${}一定要在th:开头的标签里才有效 --> <p th:text="'Hello!, ' + ${name} + '!'" >3333</p> </body> </html> |
3.这样Spring Boot直接就支持了返回Thymeleaf的html视图了。
|
@RequestMapping(value="/index") public String index(Model model){ System.out.println("-测试数据-"); model.addAttribute("name", "张三"); return "index"; } |
4.根据需要可以在resources的application.properties配置文件,增加Thymeleaf视图的默认属性。
|
spring.thymeleaf.mode=HTML5 spring.thymeleaf.encoding=UTF-8 spring.thymeleaf.content-type=text/html #开发时关闭缓存,不然没法看到实时页面 spring.thymeleaf.cache=false |
7.3.2. 注意事项
具体的application-thymeleaf.properties配置文件能够配置的属性,根据自身实际的情况,可以查看spring-boot-autoconfigure-1.5.4.RELEASE.jar设置。
Thymeleaf的属性类为:org.springframework.boot.autoconfigure.thymeleaf.ThymeleafProperties
|
|
7.4. JSP视图配置(极不推荐)
Spring Boot在默认自动配置已经不支持JSP视图。如果非要使用JSP视图。需要我们手工配置。
7.4.1. 配置流程
7.4.2. 注意事项
1.因为JSP是JavaWEB技术,依赖Servlet-API。所以如果使用jsp视图发布包格式为war包
2.也是因为JSP是依赖Servlet-API的,所以一定要实现一个SpringBootServletInitializer类的子类作为项目的入口,功能类似于web项目的web.xml
不管使用任何的模板引擎代替JSP。其实就可以认为它是类似于JSP的动态页面技术。
就是将原来JSP实现的功能,换一种方式来编写。。。
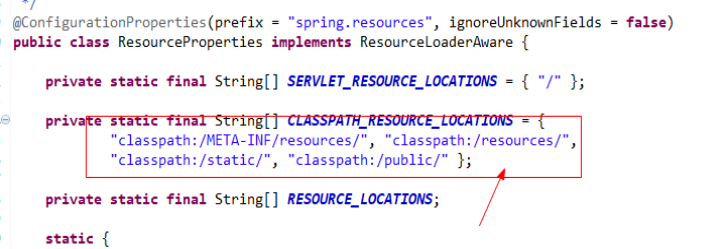
7.5. 默认读取的静态资源路径
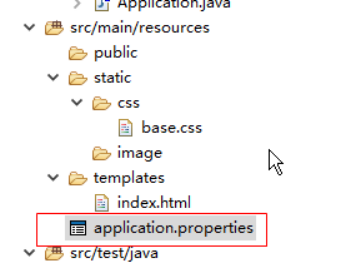
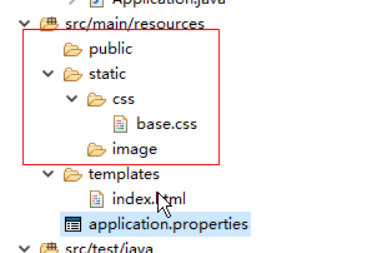
Spring Boot默认读取CSS、JavaScript、html、图片等静态资源的根目录为:
classpath:/META-INF/resources/
classpath:/resources
classpath:/static/
classpath:/public/
也就是说html使用到的CSS、image等静态资源可以放到以上目录文件夹
例如:
|
|
注意:具体查看org.springframework.boot.autoconfigure.web.ResourceProperties类的配置,如果要修改,在appplication.properties修改默认的路径。
|
|
8. SpringBoot整合
8.1. 使用的数据库SQL
框架整合统一使用一下SQL。
|
-- 导出 表 school.student 结构 DROP TABLE IF EXISTS `student`; CREATE TABLE IF NOT EXISTS `student` ( `SID` int(11) NOT NULL AUTO_INCREMENT COMMENT '编号', `SNAME` varchar(50) DEFAULT NULL COMMENT '姓名', `SEX` char(3) DEFAULT NULL COMMENT '性别', `BIRTHDAY` date DEFAULT NULL COMMENT '生日', `AGE` int(11) DEFAULT NULL COMMENT '年龄', PRIMARY KEY (`SID`) ) ENGINE=InnoDB AUTO_INCREMENT=6 DEFAULT CHARSET=utf8 COMMENT='学生表'; -- 正在导出表 school.student 的数据:~5 rows (大约) DELETE FROM `student`; /*!40000 ALTER TABLE `student` DISABLE KEYS */; INSERT INTO `student` (`SID`, `SNAME`, `SEX`, `BIRTHDAY`, `AGE`) VALUES (1, '张三', '男', '1990-03-05', 27), (2, '李四', '男', '1993-10-13', 24), (3, '王五', '女', '1998-02-01', 19), (4, '赵六', '男', '2000-04-02', 17), (5, '陈七', '女', '1985-01-16', 32); |
8.2. SpringBoot整合Mybatis
8.2.1. 整合说明
Spring Boot默认没有对mybatis支持,而是Mybatis对springboot进行了支持。所以Spring Boot整合Mybatis的整合包要去Mybatis的的官方寻找。
路径为:https://github.com/mybatis/spring-boot-starter
Maven路径在:http://www.mybatis.org/spring-boot-starter/mybatis-spring-boot-autoconfigure/
8.2.2. 配置流程
1.创建一个Maven项目
|
|
2.在pom.xml导入需要的依赖包
|
<project xmlns="http://maven.apache.org/POM/4.0.0" xmlns:xsi="http://www.w3.org/2001/XMLSchema-instance" xsi:schemaLocation="http://maven.apache.org/POM/4.0.0 http://maven.apache.org/xsd/maven-4.0.0.xsd"> <modelVersion>4.0.0</modelVersion> <groupId>cn.gzsxt</groupId> <artifactId>spring-boot-demo-01</artifactId> <version>1.0</version> <parent> <groupId>org.springframework.boot</groupId> <artifactId>spring-boot-starter-parent</artifactId> <version>1.5.4.RELEASE</version> </parent> <dependencies> <!-- freemarker支持包 --> <dependency> <groupId>org.springframework.boot</groupId> <artifactId>spring-boot-starter-freemarker</artifactId> </dependency> <!--mybatis支持包 --> <dependency> <groupId>org.mybatis.spring.boot</groupId> <artifactId>mybatis-spring-boot-starter</artifactId> <version>1.3.0</version> </dependency> <!-- 数据库驱动 --> <dependency> <groupId>mysql</groupId> <artifactId>mysql-connector-java</artifactId> </dependency> <!-- dbcp2连接池 --> <dependency> <groupId>org.apache.commons</groupId> <artifactId>commons-dbcp2</artifactId> </dependency> <!-- Springboot测试包 --> <dependency> <groupId>org.springframework.boot</groupId> <artifactId>spring-boot-starter-test</artifactId> </dependency> </dependencies> </project> |
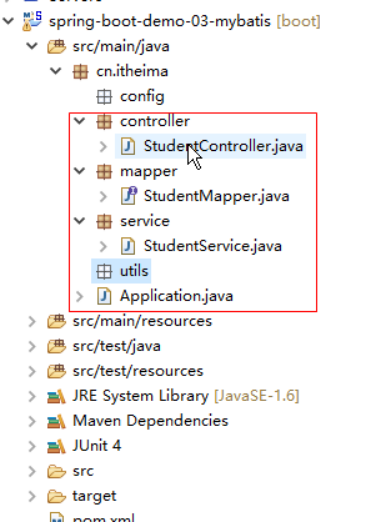
3.创建包结果,并且创建三个类
|
|
4.编写Application.Java类的内容
|
package cn.gzsxt; import org.springframework.boot.SpringApplication; import org.springframework.boot.autoconfigure.SpringBootApplication; @SpringBootApplication(scanBasePackages="cn.gzsxt") public class Application { public static void main(String[] args) { SpringApplication.run(Application.class, args); } } |
5.编写配置文件application.properties
|
spring.datasource.url=jdbc:mysql://localhost:3306/school spring.datasource.driverClassName=com.mysql.jdbc.Driver spring.datasource.username=root spring.datasource.password=123456 #dbcp2 datasource spring.datasource.type=org.apache.commons.dbcp2.BasicDataSource |
6.测试数据源
|
package cn.gzsxt.test; import java.sql.SQLException; import javax.sql.DataSource; import org.junit.Test; import org.junit.runner.RunWith; import org.springframework.beans.factory.annotation.Autowired; import org.springframework.boot.test.context.SpringBootTest; import org.springframework.test.context.junit4.SpringJUnit4ClassRunner; @RunWith(SpringJUnit4ClassRunner.class) @SpringBootTest public class DataSourceTest { @Autowired private DataSource dataSource; @Test public void dataSource() { try { System.out.println(dataSource.getConnection()); } catch (SQLException e) { // TODO Auto-generated catch block e.printStackTrace(); } } } |
7.测试数据源正确后,编写StudentMapper.Java接口
|
package cn.gzsxt.mapper; import java.util.Map; import org.apache.ibatis.annotations.Insert; import org.apache.ibatis.annotations.Mapper; //注意,使用的Mapper而不是@Repository @Mapper public interface StudentMapper { @Insert(value="INSERT INTO student (SNAME, SEX, BIRTHDAY, AGE) VALUES (#{sname}, #{sex},#{birthday}, #{age})") public int insert(Map<String,Object> entity); } |
8.编写一个Service类
|
package cn.gzsxt.service; import java.util.Map; import org.springframework.beans.factory.annotation.Autowired; import org.springframework.stereotype.Service; import cn.gzsxt.mapper.StudentMapper; @Service public class StudentService { @Autowired private StudentMapper studentMapper; public int insert(Map<String,Object> entity){ return studentMapper.insert(entity); } } |
9.编写一个Controller类
|
package cn.gzsxt.controller; import java.util.HashMap; import java.util.Map; import javax.servlet.http.HttpSession; import org.springframework.beans.factory.annotation.Autowired; import org.springframework.stereotype.Controller; import org.springframework.ui.Model; import org.springframework.web.bind.annotation.RequestMapping; import cn.gzsxt.service.StudentService; @Controller public class StudentController { @Autowired private StudentService studentService; @RequestMapping(value="/index") public String index(Model model,HttpSession session){ System.out.println("-测试插入数据-"); Map<String, Object> entity=new HashMap<String, Object>(); //插入数据 entity.put("sname", "test3"); studentService.insert(entity); return "index"; } } |
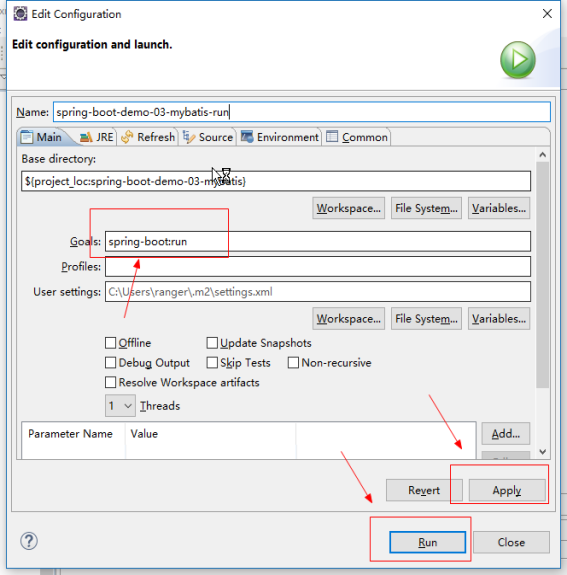
10.启动程序测试
|
|
启动成功:提示使用8080端口访问。
|
|

11.在浏览器执行访问
|
|
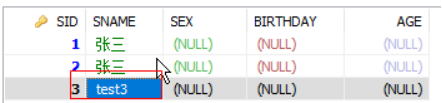
12.查看数据库结果,成功!
|
|
8.3. Spring Boot整合Spring-Data-JPA
8.3.1. 配置步骤
1.创建一个maven项目
|
|

2.复制依赖的包到pom.xml文件
|
<project xmlns="http://maven.apache.org/POM/4.0.0" xmlns:xsi="http://www.w3.org/2001/XMLSchema-instance" xsi:schemaLocation="http://maven.apache.org/POM/4.0.0 http://maven.apache.org/xsd/maven-4.0.0.xsd"> <modelVersion>4.0.0</modelVersion> <groupId>cn.gzsxt</groupId> <artifactId>spring-boot-demo-05-data-jpa</artifactId> <version>1.0</version> <parent> <groupId>org.springframework.boot</groupId> <artifactId>spring-boot-starter-parent</artifactId> <version>1.5.4.RELEASE</version> </parent> <dependencies> <dependency> <groupId>org.springframework.boot</groupId> <artifactId>spring-boot-starter-web</artifactId> </dependency> <!-- 增加springboot 整合data-jpa的包 --> <dependency> <groupId>org.springframework.boot</groupId> <artifactId>spring-boot-starter-data-jpa</artifactId> </dependency> <!-- 数据库驱动 --> <dependency> <groupId>mysql</groupId> <artifactId>mysql-connector-java</artifactId> </dependency> <!-- dbcp2连接池 --> <dependency> <groupId>org.apache.commons</groupId> <artifactId>commons-dbcp2</artifactId> </dependency> <!-- SpringBoot测试包 --> <dependency> <groupId>org.springframework.boot</groupId> <artifactId>spring-boot-starter-test</artifactId> </dependency> </dependencies> </project> |
3.创建一个入口类,用于启动SpringBoot
|
package cn.gzsxt; import org.springframework.boot.SpringApplication; import org.springframework.boot.autoconfigure.SpringBootApplication; @SpringBootApplication public class Application { public static void main(String[] args) { SpringApplication.run(Application.class, args); } } |
4.编写application.properties.注意文件名不要写错,配置数据源
|
#配置数据源 spring.datasource.url=jdbc:mysql://localhost:3306/school spring.datasource.driverClassName=com.mysql.jdbc.Driver spring.datasource.username=root spring.datasource.password=123456 spring.datasource.type=org.apache.commons.dbcp2.BasicDataSource #spring-data-jpa配置 #显示SQL语句 spring.jpa.show-sql=true #表示是否需要根据view的生命周期来决定session是否关闭 spring.jpa.open-in-view=true |
5.编写一个测试类测试数据源是否连接数据库成功
|
package cn.gzsxt.test; import java.sql.SQLException; import javax.sql.DataSource; import org.junit.Test; import org.junit.runner.RunWith; import org.springframework.beans.factory.annotation.Autowired; import org.springframework.boot.test.context.SpringBootTest; import org.springframework.test.context.junit4.SpringJUnit4ClassRunner; @RunWith(SpringJUnit4ClassRunner.class) @SpringBootTest public class DataSourceTest { @Autowired private DataSource dataSource; @Test public void dataSource(){ try { System.out.println(dataSource.getConnection()); } catch (SQLException e) { // TODO Auto-generated catch block e.printStackTrace(); } } } |
如果出现以下信息表示测试成功
|
|

6.创建一个实体类
|
package cn.gzsxt.pojo; import java.io.Serializable; import java.util.Date; import javax.persistence.Entity; import javax.persistence.GeneratedValue; import javax.persistence.GenerationType; import javax.persistence.Id; import javax.persistence.Table; @Entity @Table(name="student") public class Student implements Serializable{ @Id @GeneratedValue(strategy=GenerationType.IDENTITY) private Long sid;//BIGINT(20) NOT NULL AUTO_INCREMENT, private String sname;//VARCHAR(255) NULL DEFAULT NULL, private String sex;//VARCHAR(255) NULL DEFAULT NULL, private Integer age;//INT(11) NULL DEFAULT NULL, private Date birthday;//DATETIME(6) NULL DEFAULT NULL, public Long getSid() { return sid; } public void setSid(Long sid) { this.sid = sid; } public String getSname() { return sname; } public void setSname(String sname) { this.sname = sname; } public String getSex() { return sex; } public void setSex(String sex) { this.sex = sex; } public Integer getAge() { return age; } public void setAge(Integer age) { this.age = age; } public Date getBirthday() { return birthday; } public void setBirthday(Date birthday) { this.birthday = birthday; } } |
7.创建一个操接口
|
package cn.gzsxt.repository; import org.springframework.data.jpa.repository.JpaRepository; import org.springframework.stereotype.Repository; import cn.gzsxt.pojo.Student; @Repository public interface StudentRepository extends JpaRepository<Student, Long> { } |
8.创建一个Service
|
package cn.gzsxt.service; import org.springframework.beans.factory.annotation.Autowired; import org.springframework.stereotype.Service; import org.springframework.transaction.annotation.Transactional; import cn.gzsxt.pojo.Student; import cn.gzsxt.repository.StudentRepository; @Service public class StudentService { @Autowired private StudentRepository studentRepository; @Transactional public void save(Student entity){ studentRepository.save(entity); } } |
9.创建一个Controller
|
package cn.gzsxt.controller; import org.springframework.beans.factory.annotation.Autowired; import org.springframework.web.bind.annotation.RequestMapping; import org.springframework.web.bind.annotation.RestController; import cn.gzsxt.pojo.Student; import cn.gzsxt.service.StudentService; @RestController public class StudentController { @Autowired private StudentService studentService; @RequestMapping(value="/") public String save(){ Student entity=new Student(); entity.setSname("jpa用户"); studentService.save(entity); return entity.getSid().toString(); } } |
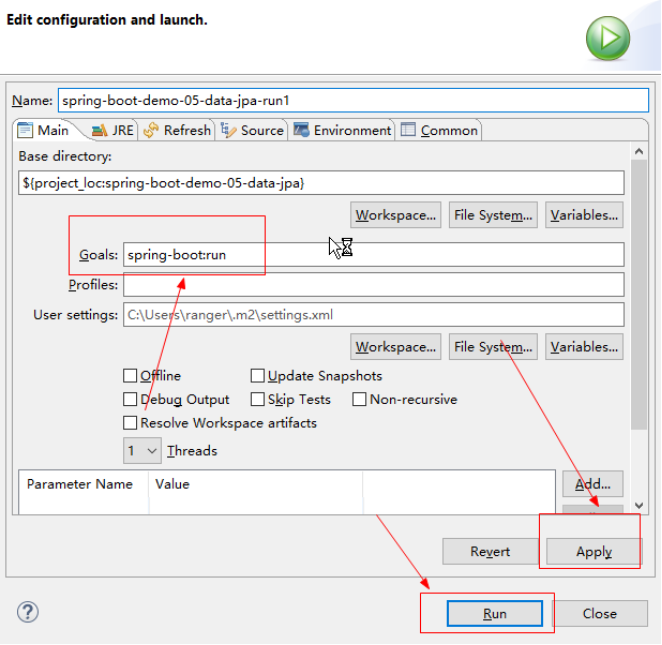
10.启动项目
|
|
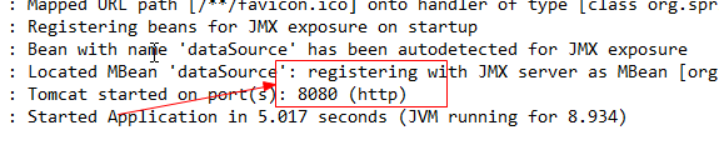
启动成功信息,提示使用8080端口访问
|
|
成功信息
|
后台输出的语句 |
8.3.2. 注意事项
1.Spring-data-jpa只要Maven导入spring-boot-starter-data-jpa模块已经自动整合了。只要配置好Spring数据源就可以直接使用。如果需要连接池,可以再加一个连接池
|
<!-- 增加springboot 整合data-jpa的包 --> <dependency> <groupId>org.springframework.boot</groupId> <artifactId>spring-boot-starter-data-jpa</artifactId> </dependency> <!-- 数据库驱动 --> <dependency> <groupId>mysql</groupId> <artifactId>mysql-connector-java</artifactId> </dependency> |
2.查看spring-boot-autoconfigure-1.5.4.RELEASE.jar可以获得整合的信息。
|
|
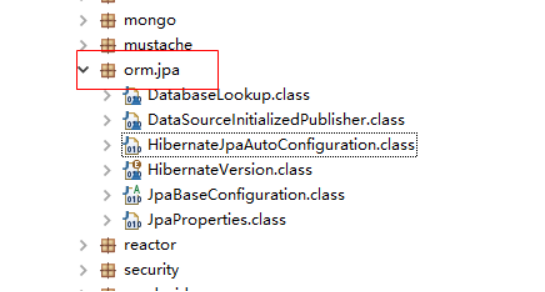
(1).可以配置的参数查看org.springframework.boot.autoconfigure.orm.jpa.JpaProperties类
(2).需要了解整合的代码查看
org.springframework.boot.autoconfigure.orm.jpa.HibernateJpaAutoConfiguration
9. 打包部署
SpringBoot支持使用Jar内嵌Web服务器(Tomcat)的方式发布,也支持生成war包放在外置的web服务器运行。
9.1. 使用jar发布应用
9.1.1. 配置步骤
1.pom.xml要显示加入插件org.springframework.boot,否则无法产生jar清单文件,导致打出来的jar无法使用命令运行。
|
<build> <plugins> <plugin> <groupId>org.springframework.boot</groupId> <artifactId>spring-boot-maven-plugin</artifactId> <!-- 排除重新打包 --> <executions> <execution> <goals> <goal>repackage</goal> </goals> </execution> </executions> </plugin> </plugins> </build> |
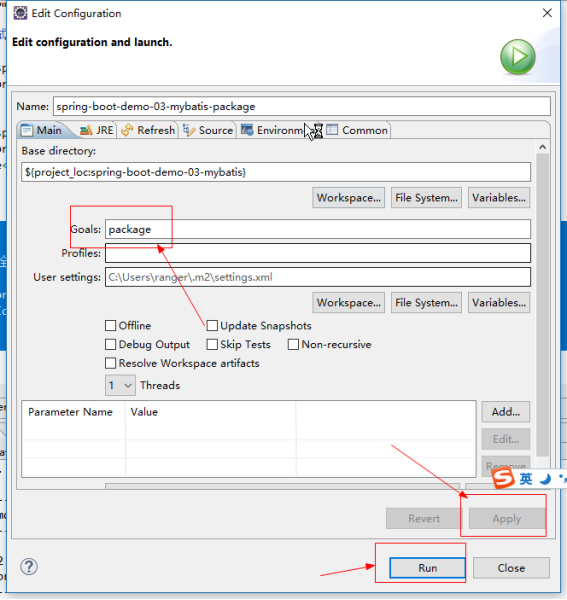
2.使用里面package打包
|
|
3.打包成功,产生spring-boot-demo-01-1.0.jar文件
|
|

4.将spring-boot-demo-01-1.0.jar复制到一个文件夹下,在同一级目录编写一个bat文件。
|
|

内容格式:#java -jar <jar名>,如下:
|
java -jar spring-boot-demo-01-1.0.jar |
5.双击bat文件startup.bat
|
|
9.1.2. 修改内嵌Tomcat的参数
在application.properties设置相关参数即可,如:
|
#设置Tomcat端口 server.port=80 #设置Tomcat路径编码 server.tomcat.uri-encoding=UTF-8 #设置超时时间 server.connection-timeout=1000 |
9.2. 使用war发布应用
9.2.1. 配置流程
1.修改pom.xml文件去掉嵌入式的Tomcat服务器,以及增加serlvet-api依赖包
|
<dependency> <groupId>org.springframework.boot</groupId> <artifactId>spring-boot-starter-web</artifactId> <!-- 移除嵌入式tomcat服务器 --> <exclusions> <exclusion> <groupId>org.springframework.boot</groupId> <artifactId>spring-boot-starter-tomcat</artifactId> </exclusion> </exclusions> </dependency> <!-- 加入servlet-api的支持 --> <dependency> <groupId>javax.servlet</groupId> <artifactId>javax.servlet-api</artifactId> <version>3.1.0</version> <scope>provided</scope> </dependency> |
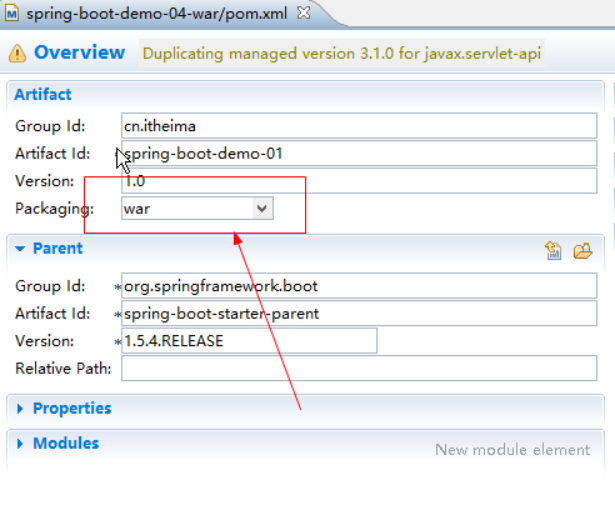
2.修改pom.xml文件的打包方式为war
|
|
3.增加一个web程序的WEB入口类要和Application同一级目录
|
package cn.gzsxt; import org.springframework.boot.builder.SpringApplicationBuilder; import org.springframework.boot.web.support.SpringBootServletInitializer; /** * 如果项目需要使用war发布,需要创建这个类,作为web程序的入口 * @author ranger * */ public class ServletInitializer extends SpringBootServletInitializer { @Override protected SpringApplicationBuilder configure(SpringApplicationBuilder builder) { //表示获得web的请求时,调用Application类的实现 return builder.sources(Application.class); } } |
4.打包生成war文件
|
|
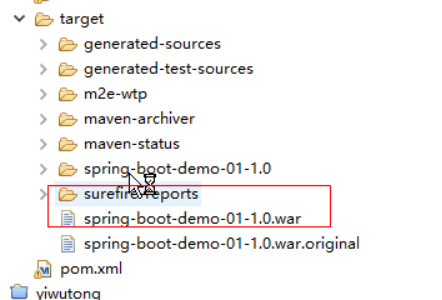
5.复制spring-boot-demo-01-1.0.war放在Tomcat的webapps下
|
|

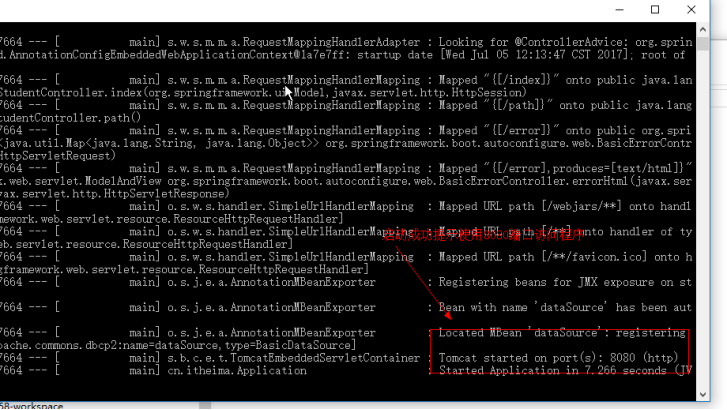
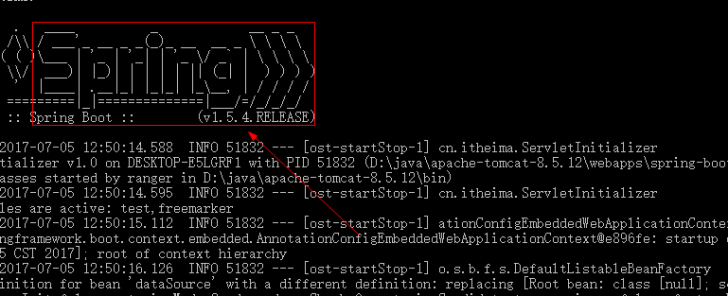
6.启动Tomcat,Tomcat控制台提示SpringBoot信息
|
|
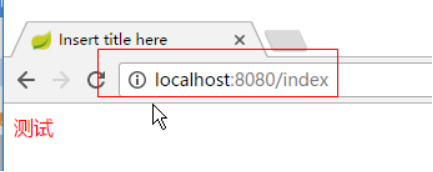
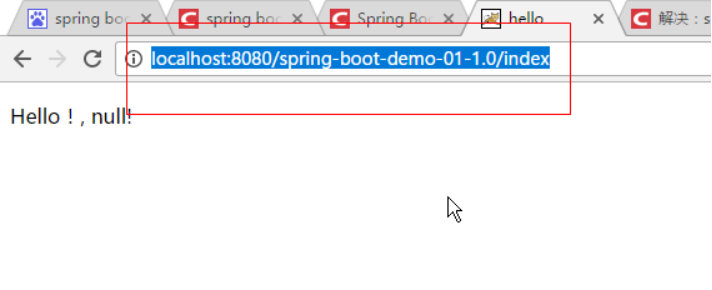
7.浏览器访问,成功
|
http://localhost:8080/spring-boot-demo-01-1.0/index |
9.2.2. 注意事项
9.2.2.1. 第1点
web网站入口类一定要继承SpringBootServletInitializer类,而且必须要给SpringBoot入口类Application同一级目录。
9.2.2.2. 第2点
|
<project xmlns="http://maven.apache.org/POM/4.0.0" xmlns:xsi="http://www.w3.org/2001/XMLSchema-instance" xsi:schemaLocation="http://maven.apache.org/POM/4.0.0 http://maven.apache.org/xsd/maven-4.0.0.xsd"> <modelVersion>4.0.0</modelVersion> <groupId>cn.gzsxt.platform</groupId> <artifactId>basic_platform_spring_boot</artifactId> <version>1.0</version> <packaging>war</packaging> <parent> <groupId>org.springframework.boot</groupId> <artifactId>spring-boot-starter-parent</artifactId> <version>1.5.13.RELEASE</version> <relativePath /> <!-- lookup parent from repository --> </parent> <!-- 设置自定义属性 --> <properties>
<project.build.sourceEncoding>GBK</project.build.sourceEncoding> <project.reporting.outputEncoding>GBK</project.reporting.outputEncoding> <java.version>1.8</java.version> <servlet.version>3.0.1</servlet.version> <jsp.version>2.2.1</jsp.version> </properties> <!-- 依赖 --> <dependencies> <dependency> <groupId>org.springframework.boot</groupId> <artifactId>spring-boot-starter-tomcat</artifactId> <scope>provided</scope> </dependency> <dependency> <groupId>org.springframework.boot</groupId> <artifactId>spring-boot-starter-thymeleaf</artifactId> <!-- 排除掉内置的tomcat使用我们外置tomcat --> <exclusions> <exclusion> <groupId>org.springframework.boot</groupId> <artifactId>spring-boot-starter-tomcat</artifactId> </exclusion> </exclusions> </dependency> <dependency> <groupId>org.springframework.boot</groupId> <artifactId>spring-boot-starter-web</artifactId> <!-- 移除嵌入式tomcat服务器 --> <exclusions> <exclusion> <groupId>org.springframework.boot</groupId> <artifactId>spring-boot-starter-tomcat</artifactId> </exclusion> </exclusions> </dependency> <dependency> <groupId>org.springframework.boot</groupId> <artifactId>spring-boot-starter-jdbc</artifactId> </dependency> <dependency> <groupId>org.mybatis.spring.boot</groupId> <artifactId>mybatis-spring-boot-starter</artifactId> <version>1.3.2</version> </dependency> <dependency> <groupId>mysql</groupId> <artifactId>mysql-connector-java</artifactId> <scope>runtime</scope> </dependency> <dependency> <groupId>org.springframework.boot</groupId> <artifactId>spring-boot-starter-test</artifactId> <scope>test</scope> </dependency> <!-- servlet --> <dependency> <groupId>javax.servlet</groupId> <artifactId>javax.servlet-api</artifactId> </dependency> <!-- jsp --> <dependency> <groupId>javax.servlet.jsp</groupId> <artifactId>javax.servlet.jsp-api</artifactId> <version>2.2.1</version> </dependency> <dependency> <groupId>org.apache.commons</groupId> <artifactId>commons-dbcp2</artifactId> </dependency> <!-- jstl --> <dependency> <groupId>javax.servlet</groupId> <artifactId>jstl</artifactId> </dependency> <dependency> <groupId>log4j</groupId> <artifactId>log4j</artifactId> <version>1.2.17</version> </dependency> </dependencies> <!-- 构建项目使用Tomcat7插件 --> <build> <plugins> <!-- 配置isntall安装时,不要执行JUnit测试代码 --> <plugin> <groupId>org.apache.maven.plugins</groupId> <artifactId>maven-surefire-plugin</artifactId> <configuration> <!-- 跳过打包安装时自动执行Junit的测试代码 --> <skipTests>true</skipTests> </configuration> </plugin> <!-- 配置编译的时候使用1.8 的JDK --> <plugin> <groupId>org.apache.maven.plugins</groupId> <artifactId>maven-compiler-plugin</artifactId> <configuration> <!-- 源码检查时使用1.8的JDK --> <source>1.8</source> <!-- 源码打包成目标程序时,使用1.8JDK --> <target>1.8</target> </configuration> </plugin> <plugin> <groupId>org.apache.maven.plugins</groupId> <artifactId>maven-war-plugin</artifactId> <configuration> <failOnMissingWebXml>false</failOnMissingWebXml> </configuration> </plugin> </plugins> </build> </project> |
9.2.2.3. 第3点:将映射接口使用@Mapper
|
@Mapper public interface ModularMapper |
9.2.2.4. 第4点,关闭thymeleaf模板引擎
注意,关闭thymeleaf模板引擎
|
#忽略默认的模板引擎 spring.thymeleaf.cache=false spring.thymeleaf.enabled=false |
9.2.2.5. 第5点,启动的是WebApplicationInitializer类
所以直接启动页面就可以
|
package cn.gzsxt.platform; import org.springframework.boot.builder.SpringApplicationBuilder; import org.springframework.boot.web.support.SpringBootServletInitializer; public class WebApplicationInitializer extends SpringBootServletInitializer { @Override protected SpringApplicationBuilder configure(SpringApplicationBuilder builder) { return builder.sources(Application.class); } } |
10. 总结
SpringBoot是什么
答:是一个Spring团队开发的微服务框架。 You just run
SpringBoot的作用是什么
- 一键打包,直接运行。。它可以实现使用jar发布我们的项目!!
- 将主流的框架全部先写好配置的代码,只有我们配置简单的几个必要的参数就可以整合成功。
SpringBoot为什么可以通过jar运行!!
因为SpringBoot在打包的时候,已经将web服务器(tomcat)内嵌在jar程序里面了。
SpringBoot可以使用war发布吗?
答:jar发布只是默认的打包方式,SpringBoot同时也支持war打包。
注意:war打包的三个必须条件
- 必须要移除默认内嵌的tomcat模块
- 必须要加入servlet-api的支持
- 必须要war一个网站的入口,通过继承SpringBootServletInitializer 来说实现 (web.xml)
SpringBoot使用jar发布,是如何启动项目的呢?
- 必须要启动默认自动配置 @EnableAutoConfiguraiton
- 在main方法使用SpringApplication类的静态方法run方法启动
|
@EnableAutoConfiguration public class SampleController {
public static void main(String[] args) throws Exception { //启动Spring Boot程序 SpringApplication.run(SampleController.class, args); } } |
以上使用@EnableAutoConfiguration配置启动的问题是什么
答:就是如果使用@EnableAutoConfiguration启动的问题是,每个组件类都要配置一次。很麻烦!!
如何解决@EnableAutoConfiguration的麻烦呢?
SpringBoot引用了一个@SpringBootApplication来解决。
@SpringBootApplication处理了哪些操作?
- @EnableAutoConfiguration (默认加载XxxxxAutoConfiuration的)
- @SpringConfiguration ==@Configuration (将当前类声明为一个配置类)
- @ComponentScan 扫描了当前类所在的包以及子包的所有组件类。
通过这个注解,我们只有配置一次就可以,加载所以自动配置的内置配置类,而且扫描了所有的组件类对象放在容器!!!
技巧,如果找陌生代码的Spring入口,直接搜索@SpringBootApplication
Spring主要使用的常见类与注解有哪些
1.@EnableAutoConfiguration 实现将各个模块的自动配置类加载,执行。
2.@SpringBootApplication 用于标记是一个SpringBoot入口
3.@AutoConfigureBefore 用于在没加载内置的模块之前加入自定义的配置类
4.@AutoConfigureAfter 用于在加载完所有的自动配置类之后加入自定义的配置类
--Spring要求我们要对Spring以及SpringMVC的纯注解配置,要理解。
要学习SpringBoot框架。我们如何理解它的加载流程呢?
答:
第一步:SpringBoot提供了很多jar包。我们只有抓住这个格式(xxxxx-autoconfigure-*.jar)的jar就可以了。因为所以的自动加载模块,不管是内置,或者第三方的都是这个命名。
|
|

第二步:我们需要找到这包里面对应的模块的两个类。就可以找到对应的配置信息。
XxxxxAutoConfiuration
XxxxxProperties
|
|
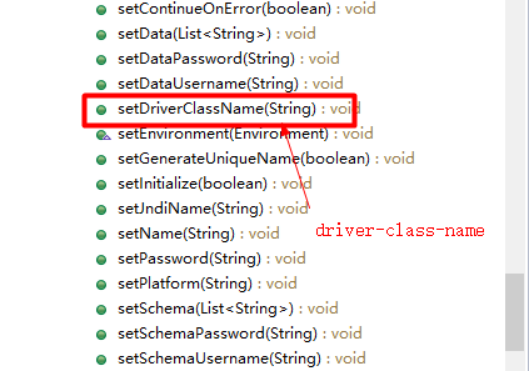
注意,SpringBoot 1.5.10以后命名规范是
如:方法名setDriverClassName --> properties文件属性名 driver-class-name
当然,属性名使用driverClassName也没有错 (不建议使用了)
|
|
SpringBoot支持的哪些视图?
答:
- thymeleaf (推荐使用)
- freemaker
- jsp (默认内置步支持,可以通过配置支持,不建议使用)
Spring的打包安装
- jar打包
- war打包