一、拖拽事件
一个元素:在拖动目标上触发事件 (源元素)
- ondrag 元素正在拖动时触发
- ondragstart 用户开始拖动元素时触发
- ondragend 用户完成元素拖动后触发
两个元素:释放目标时触发的事件:
ondragenter 当被鼠标拖动的对象进入其容器范围内时触发此事件
ondragover 当某被拖动的对象在另一对象容器范围内拖动时触发此事件
ondragleave 当被鼠标拖动的对象离开其容器范围内时触发此事件
ondrop 在一个拖动过程中,释放鼠标键时触发此事件
ondrop有一个小bug,如果想使用该事件必须阻止ondragover事件的默认行为
e.dataTransfer 可以跨元素事件
设置数据:e.dataTransfer.setData(key, value)
获得数据:e.dataTransfer.getData(key)
好处:不会产生全局变量


 1 <!DOCTYPE html>
 2 <html lang="en">
 3 <head>
 4     <meta charset="UTF-8">
 5     <meta name="viewport" content="width=device-width, initial-scale=1.0">
 6     <meta http-equiv="X-UA-Compatible" content="ie=edge">
 7     <title>Document</title>
 8     <style>
 9         li {
10             float: left;
11             list-style: none;
12              100px;
13             height: 100px;
14             margin-right: 10px;
15         }
16         li img {
17              100%;
18             height: 100%;
19         }
20         li:last-of-type {
21             position: fixed;
22             top: 150px;
23             left: 50px;
24         }
25     </style>
26 </head>
27 <body>
28     <ul>
29         <li><img src="imgs/1.png" alt=""></li>
30         <li><img src="imgs/2.png" alt=""></li>
31         <li><img src="imgs/3.png" alt=""></li>
32         <li><img src="imgs/erweima.png" alt=""></li>
33         <li><img src="imgs/sf.jpg" alt=""></li>
34         <li><img src="imgs/thanks.png" alt=""></li>
35         <li><img src="imgs/trash.png" alt=""></li>
36     </ul>
37     <script>
38     // 获得元素对象
39     var lis = document.querySelectorAll('li');
40     var ul = document.querySelector('ul');
41
42     // 给所有的li绑定拖拽事件
43     lis.forEach(function(value, index) {
44         // console.log(value);
45         value.ondragstart = function(e) {
46             // console.log(e);
47             e.dataTransfer.setData('idx', index);
48             // console.log(e.dataTransfer);
49         }
50     });
51
52     // 绑定垃圾桶丢弃事件
53     lis[6].ondragover = function() {
54         return false;
55     }
56     lis[6].ondrop = function(e) {
57         var idx = e.dataTransfer.getData('idx');
58         // 在dom中移除对应的li元素,垃圾桶不能删
59         if (idx !== 6) {
60             ul.removeChild(lis[idx]);
61         }
62
63     }
64     </script>
65 </body>
66 </html>
二、音频(audio)和视频(video)
方法:
play(): 播放
pause():暂停
属性:
volume:(音量) 0~1
muted:(是否静音) 值是布尔类型
duration:(总播放时长)
currentTime:(当前的播放时间)
  1 <!DOCTYPE html>
  2 <html lang="en">
  3 <head>
  4     <meta charset="UTF-8">
  5     <meta name="viewport" content="width=device-width, initial-scale=1.0">
  6     <meta http-equiv="X-UA-Compatible" content="ie=edge">
  7     <title>Document</title>
  8     <style>
  9         * {
 10             margin: 0;
 11             padding: 0;
 12         }
 13         #box {
 14              400px;
 15             height: 60px;
 16             background-color: red;
 17             position: relative;
 18         }
 19         #blue {
 20             position: absolute;
 21              350px;
 22             height: 6px;
 23             background-color: blue;
 24             top: 50%;
 25             margin-top: -3px;
 26             left: 50%;
 27             margin-left: -175px;
 28         }
 29         #orange {
 30             position: absolute;
 31             height: 6px;
 32             background-color: orange;
 33             top: 50%;
 34             margin-top: -3px;
 35             left: 50%;
 36             margin-left: -175px;
 37         }
 38         #btn {
 39              6px;
 40             left:25px;
 41             height: 30px;
 42             background-color: orange;
 43             position: absolute;
 44             top: 50%;
 45             margin-top: -15px;
 46         }
 47     </style>
 48 </head>
 49 <body>
 50     <video width="400" src="mp/1.mp4" controls></video>
 51     <div id="box">
 52         <div id="blue"></div>
 53         <div id="orange"></div>
 54         <div id="btn"></div>
 55     </div>
 56     <button id="play">播放</button>
 57     <button id="pause">暂停</button>
 58     <button id="add">音量+</button>
 59     <button id="reduce">音量-</button>
 60     <button id="muted">静音</button>
 61     <script>
 62     // 封装一个函数
 63     function $(selector) {
 64         return document.querySelector(selector);
 65     }
 66     // 绑定事件
 67     // 播放
 68     $('#play').onclick = function() {
 69         $('video').play();
 70     }
 71
 72     // 暂停
 73     $('#pause').onclick = function() {
 74         $('video').pause();
 75     }
 76
 77     // 音量+
 78     $('#add').onclick = function() {
 79         // console.log($('audio').volume);
 80
 81         $('video').volume = $('video').volume <= 0.9 ?  $('video').volume + 0.1 : 1;
 82     }
 83
 84     // 音量-
 85     $('#reduce').onclick = function() {
 86         $('video').volume = $('video').volume > 0.1 ?  $('video').volume - 0.1 : 0;
 87     }
 88
 89     // 静音
 90     $('#muted').onclick = function() {
 91         // console.log($('audio').muted);
 92         this.innerHTML = this.innerHTML === '静音' ? '恢复' : '静音';
 93         $('video').muted = !$('video').muted;
 94     }
 95
 96     // 给btn绑定鼠标按下事件
 97     $('#btn').onmousedown = function(e) {
 98         // 获得一个坐标
 99         var ox = e.clientX;
100         // 获得当前元素的left值
101         var ol = $('#btn').offsetLeft;
102         // 绑定鼠标移动事件
103         document.onmousemove = function(e) {
104             console.log(e.clientX);
105             // 获得移动的差值
106             var cx = e.clientX - ox;
107             // 获得新的left值
108             var nl = ol + cx;
109             // 边界判断
110             nl = nl > 375 ? 375 : nl;
111             nl = nl < 25 ? 25 : nl;
112             // 设置btn的left值
113             $('#btn').style.left = nl + 'px';
114             // console.log(nl);
115             // 改变orange的宽度
116             $('#orange').style.width = nl - 25 + 'px';
117             // 设置当前播放的位置
118             $('video').currentTime = (nl - 25) / 350  * $('video').duration;
119
120         }
121     }
122
123     // 鼠标抬起事件
124     document.onmouseup = function() {
125         // 取消鼠标移动事件
126         document.onmousemove = null;
127     }
128
129
130     </script>
131 </body>
132 </html>
三、Canvas(html5 提供的一个新的功能,html中只是一个标签,提供画布。真正操作canvas需要使用js)
标签自带的属性:宽度 height:高度
<canvas id="myCanvas" width="600" height="400"></canvas>
获取画笔: canvas.getContext(‘2d’);
baginPath() 开启路径
closePath()关闭路径
fill:填充颜色
fillStyle:设置填充颜色
坐标系(2D):x轴和y轴:默认情况下,canvas的坐标系和网页的坐标系是一样的,默认的坐标系原点为canvas画布的左上角的点
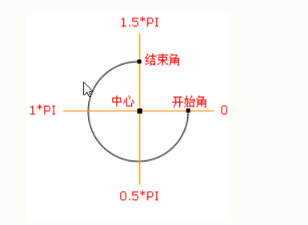
1.1 画弧(画圆)
方法:
arc(x,y,r,start,end,boll) ;
x:圆心的x坐标
y:圆心的y坐标
r:圆的半径
start:开始的角度位置,默认为0 水平向右
deg:结束角度的角度,如果绘制圆使用 Math.PI * 2 以π的方式进行计算
bool:表示是否逆时针
1.2 绘制坐标轴
画直线有两种方法
1 移动到某个位置:moveTo
画线:lineTo
 // 移动到0,0
//     /*
//         moveTo(x, y)
//         x:要移动到的坐标的x值
//         y:要移动到的坐标的y值
//     */

lineTo(x, y)
//         x:要画到的坐标的x值
//         y:要画到的坐标的y值
2 封装函数 line(x1,y1,x2,y2)从(x1,y1)划线到(x2,y2)
 1 <!DOCTYPE html>
 2 <html lang="en">
 3 <head>
 4     <meta charset="UTF-8">
 5     <meta name="viewport" content="width=device-width, initial-scale=1.0">
 6     <meta http-equiv="X-UA-Compatible" content="ie=edge">
 7     <title>Document</title>
 8     <style>
 9         canvas{
10             border:1px solid red;
11             display:block;
12             margin:0 auto;
13         }
14     </style>
15 </head>
16 <body>
17     <canvas width="600" height="400"></canvas>
18     <script>
19         var canvas=document.querySelector("canvas");
20         var ctx=canvas.getContext("2d");
21         line(5,5,290,5);
22         line(280,0,290,5);
23         line(280,10,290,5);
24         line(5,5,290,5);
25         line(5,5,5,290);
26         line(10,280,5,290);
27         line(0,280,5,290);
28         function line(sx,sy,ex,ey){
29             //开启路径
30             ctx.beginPath();
31             //移动到某点
32             ctx.moveTo(sx,sy);
33             //划线
34             ctx.lineTo(ex,ey);
35             //描边
36             ctx.stroke()
37             //关闭路径
38             ctx.closePath();
39         };
40     </script>
41 </body>
42 </html>
描边:stroke
设置描边色:strokeStyle
设置字体属性:font
写字:fillText
 1 <!DOCTYPE html>
 2 <html lang="en">
 3 <head>
 4     <meta charset="UTF-8">
 5     <meta name="viewport" content="width=device-width, initial-scale=1.0">
 6     <meta http-equiv="X-UA-Compatible" content="ie=edge">
 7     <title>Document</title>
 8     <style>
 9         * {
10             margin: 0;
11             padding: 0;
12         }
13         canvas {
14             border: 1px solid red;
15             display: block;
16             margin: 0 auto;
17         }
18     </style>
19 </head>
20 <body>
21     <canvas id="canvas" width="600" height="400"></canvas>
22     <script>
23     // 获得元素对象
24     var canvas = document.getElementById('canvas');
25
26     // 获得画笔对象
27     var ctx = canvas.getContext('2d');
28     // 设置描边色
29     ctx.strokeStyle = '#808080';
30
31 //     // 开启路径
32 //     ctx.beginPath();
33 //     // 移动到0,0
34 //     /*
35 //         moveTo(x, y)
36 //         x:要移动到的坐标的x值
37 //         y:要移动到的坐标的y值
38 //     */
39 //     ctx.moveTo(0, 0);
40 //     // 画线
41 //     /*
42 //         lineTo(x, y)
43 //         x:要画到的坐标的x值
44 //         y:要画到的坐标的y值
45 //     */
46 //     ctx.lineTo(600, 400);
47 //     // 设置描边色
48 //     ctx.strokeStyle = 'green';
49 //     // 描边
50 //     ctx.stroke();
51
52 //     // 关闭路径
53 //     ctx.closePath();
54 //     /*
55 //         font:设置字体的属性
56 //     */
57 //    ctx.font = '30px 宋体';
58 //     /*
59 //         fillText(content, x, y)
60 //             content:要写的字
61 //             x:第一个字左下角的x坐标
62 //             y:第一个字左下角的y坐标
63 //     */
64 //     ctx.fillText('我爱你', 0, 30);
65
66     // 画x轴
67     line(5, 5, 590, 5);
68     line(580, 0, 590, 5);
69     line(580, 10, 590, 5);
70     ctx.fillText('X轴', 570, 20);
71     // 画y轴
72     line(5, 5, 5, 390);
73     line(0, 380, 5, 390);
74     line(10, 380, 5, 390);
75     ctx.fillText('Y轴', 10, 390);
76
77
78     function line(sx, sy, ex, ey) {
79         // 开启路径
80         ctx.beginPath();
81         // 移动到某点
82         ctx.moveTo(sx, sy);
83         // 画线
84         ctx.lineTo(ex, ey);
85         // 描边
86         ctx.stroke();
87         // 关闭路径
88         ctx.closePath();
89     }
90     </script>
91 </body>
92 </html>
1.3绘制矩形
描边矩形: strokeRect(sx, sy, width, height)
填充矩形:fillRect(sx, sy, width, height)
绘制矩形需要几个点: 两个点 开始的顶点, 结束时对角线的点
sx;开始点的x坐标
sy:开始点的y坐标
矩形的宽度
height:矩形的高度
 1 <!DOCTYPE html>
 2 <html lang="en">
 3 <head>
 4     <meta charset="UTF-8">
 5     <meta name="viewport" content="width=device-width, initial-scale=1.0">
 6     <meta http-equiv="X-UA-Compatible" content="ie=edge">
 7     <title>Document</title>
 8     <style>
 9         * {
10             margin: 0;
11             padding: 0;
12         }
13         canvas {
14             display: block;
15             border: 1px solid red;
16             margin: 0 auto;
17         }
18     </style>
19 </head>
20 <body>
21     <canvas width="700" height="400"></canvas>
22     <script>
23     // 获得元素对象
24     var canvas = document.querySelector('canvas');
25
26     // 获得画笔对象
27     var ctx = canvas.getContext('2d');
28     // 绘制描边矩形
29     ctx.strokeRect(0, 0, 100, 100);
30     // 绘制填充矩形
31     ctx.fillRect(100, 100, 100, 100);
32     ctx.strokeRect(200, 200, 100, 100);
33     ctx.fillRect(300, 300, 100, 100);
34     ctx.strokeRect(400, 200, 100, 100);
35     ctx.fillRect(500, 100, 100, 100);
36     ctx.strokeRect(600, 0, 100, 100);
37     // 清除矩形
38     // ctx.clearRect(0, 0, canvas.width, canvas.height);
39     </script>
40 </body>
41 </html>