原文链接:https://www.bbsmax.com/A/n2d9WPwJDv/
1.简介
如果你执行过mvn test或者执行其他maven命令时跑了测试用例,你就已经用过maven-surefire-plugin了。
maven-surefire-plugin是maven里执行测试用例的插件,不显示配置就会用默认配置。这个插件的surefire:test命令会默认绑定maven执行的test阶段。
2.maven-surefire-plugin的使用
2.1.1.插件自动匹配
最简单的配置方式就不配置或者是只声明插件。
<plugin>
	<groupId>org.apache.maven.plugins</groupId>
	<artifactId>maven-surefire-plugin</artifactId>
	<version>2.19</version>
</plugin>
2.1.2.插件手动匹配
当然,如果你明确用的是JUnit4.7及以上版本,可以明确声明:
<plugin>
	<groupId>org.apache.maven.plugins</groupId>
	<artifactId>maven-surefire-plugin</artifactId>
	<version>2.19</version>
	<dependencies>
		<dependency>
			<groupId>org.apache.maven.surefire</groupId>
			<artifactId>surefire-junit47</artifactId>
			<version>2.19</version>
		</dependency>
	</dependencies>
</plugin>
JUnit4.0(含)到JUnit4.7(不含)的版本,这样声明:
<plugin>
	<groupId>org.apache.maven.plugins</groupId>
	<artifactId>maven-surefire-plugin</artifactId>
	<version>2.19</version>
	<dependencies>
		<dependency>
			<groupId>org.apache.maven.surefire</groupId>
			<artifactId>surefire-junit4</artifactId>
			<version>2.19</version>
		</dependency>
	</dependencies>
</plugin>
JUnit3.8(含)到JUnit4.0(不含)的版本,这样声明:
<plugin>
	<groupId>org.apache.maven.plugins</groupId>
	<artifactId>maven-surefire-plugin</artifactId>
	<version>2.19</version>
	<dependencies>
		<dependency>
			<groupId>org.apache.maven.surefire</groupId>
			<artifactId>surefire-junit3</artifactId>
			<version>2.19</version>
		</dependency>
	</dependencies>
</plugin>
2.2.准备测试用例
我们现在准备两个类,一个被测试的类,一个测试用例.目录结构如下
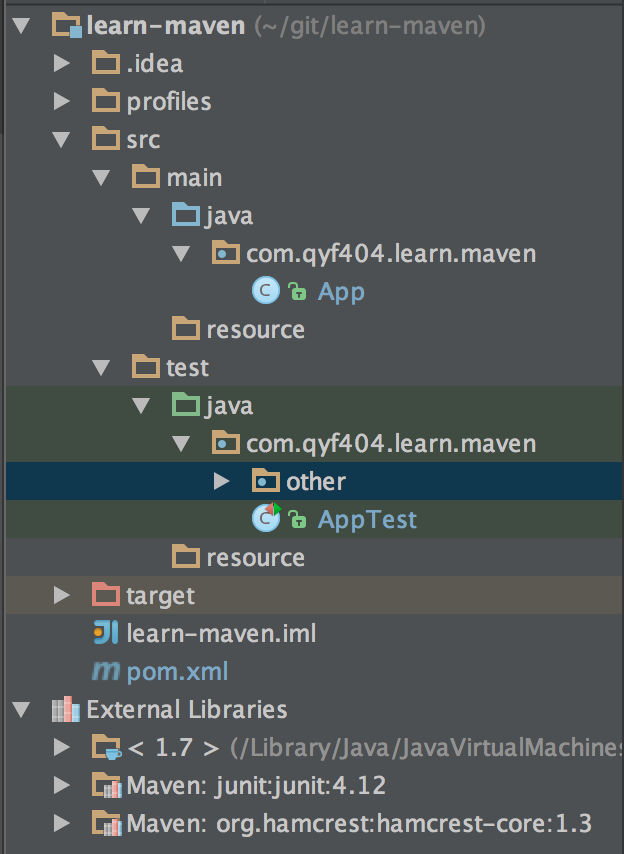
现在我们准备一个简单的类.
package com.qyf404.learn.maven;
public class App {
    public int add(int a, int b) {
        return a + b;
    }
    public int subtract(int a, int b) {
        return a - b;
    }
}
再创建一个测试用例.
package com.qyf404.learn.maven;
import org.junit.After;
import org.junit.Assert;
import org.junit.Before;
import org.junit.Test;
public class AppTest {
    private App app;
    @Before
    public void setUp() {
        app = new App();
    }
    @Test
    public void testAdd() throws InterruptedException {
        int a = 1;
        int b = 2;
        int result = app.add(a, b);
        Assert.assertEquals(a + b, result);
    }
    @Test
    public void testSubtract() throws InterruptedException {
        int a = 1;
        int b = 2;
        int result = app.subtract(a, b);
        Assert.assertEquals(a - b, result);
    }
    @After
    public void tearDown() throws Exception {
    }
}
2.3.用maven执行测试用例
用maven执行测试用例很简单,直接运行mvn test就可以.一般我们执行maven打包命令mvn package前maven会默认执行test命令.
3.进阶
后面让我们来研究一下maven-surefire-plugin这个插件更多的知识,这些多数都是和配置相关的.
3.1.跳过测试用例
在工作中,很多情况下我们打包是不想执行测试用例的,可能是测试用例不完事,或是测试用例会影响数据库数据.跳过测试用例执行过程有三个种方法.
3.1.1.在configuration中声明
在插件的configuration配置中声明跳过测试用例
<plugin>
    <groupId>org.apache.maven.plugins</groupId>
    <artifactId>maven-surefire-plugin</artifactId>
    <version>2.19</version>
    <dependencies>
        <dependency>
            <groupId>org.apache.maven.surefire</groupId>
            <artifactId>surefire-junit47</artifactId>
            <version>2.19</version>
        </dependency>
    </dependencies>
    <configuration>
        <skipTests>true</skipTests>
    </configuration>
</plugin>
3.1.2.在properties中声明
在properties配置中声明跳过测试用例
<properties>
    <maven.test.skip>true</maven.test.skip>
</properties>
或
<properties>
    <skipTests>true</skipTests>
</properties>
3.1.3.在执行命令中声明
在执行maven命令时可以声明跳过测试用例
qyfmac$ mvn test -Dmaven.test.skip=true
或
qyfmac$ mvn test -DskipTests=true
3.1.4.跳过测试用例优先级排序
首先分两种情况,一种是配置skipTests,一种是配置maven.test.skip(真要命,声明位置就三处了,还搞出两个变量名,一共就是5中情况).
-
如果是配置
skipTests, configuration的配置优先级最高,命令中得配置次之, properties的配置最低. -
即
configuration > 命令 > properties -
如果是配置
maven.test.skip,命令中得配置优先级最高, properties的配置最低.
即命令 > properties -
skipTests和maven.test.skip有一个被设置成了true,则跳过测试用例.
即skipTests||maven.test.skip决定是否跳过测试用例执行.
3.2.maven命令执行一个测试用例
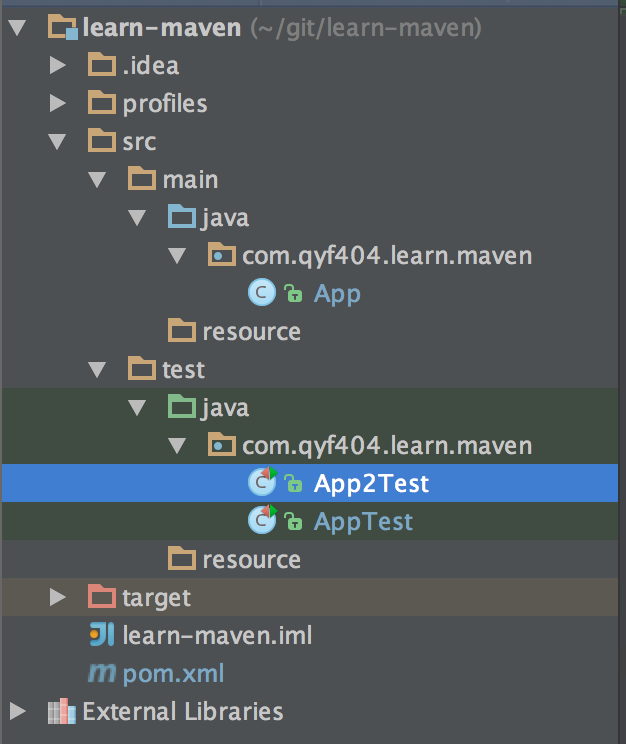
很多情况下我们写完一个测试用例后,想马上运行一下,看看执行情况.如果用IDE开发,里面一般都有直接运行一个测试用例的方法.但是如果用maven命令达到同样的效果,就需要加些命令参数了.
比如我们现在再加一个测试用例App2Test.java.
package com.qyf404.learn.maven;
import org.junit.After;
import org.junit.Assert;
import org.junit.Before;
import org.junit.Test;
import org.junit.runner.RunWith;
import org.junit.runners.JUnit4;
@RunWith(JUnit4.class)
public class App2Test {
    private App app;
    @Before
    public void setUp() {
        app = new App();
    }
    @Test
    public void testAdd() throws InterruptedException {
        int a = 1;
        int b = 2;
        int result = app.add(a, b);
        Thread.currentThread().sleep(1000);
        Assert.assertEquals(a + b, result);
    }
    @After
    public void tearDown() throws Exception {
    }
}
直接运行 mvn test是这样的,它执行了全部测试用例.
现在我们用命令mvn test -Dtest=App2Test指定执行App2Test.
-Dtest的参数是可以用表达式的.
-
比如执行多个测试用例可以用逗号分开
mvn test -Dtest=App2Test,AppTest. -
也可以用ant风格的路径表达式
mvn test -Dtest=*2Test,mvn test -Dtest=???2Test. -
甚至指定具体的测试方法
mvn test -Dtest=*Test#testAdd. -
指定具体包里的测试用例
mvn test -Dtest=com/qyf404/learn/maven/*.
3.3.测试用例的包含与例外配置
上面说了,在执行命令时可以指定执行哪个或哪些测试用例,其实在pom.xml里也是可以配置的.
比如打包时执行测试用例AppTest,不执行App2Test,可以这么配置.
<plugin>
    <groupId>org.apache.maven.plugins</groupId>
    <artifactId>maven-surefire-plugin</artifactId>
    <version>2.19</version>
    <dependencies>
        <dependency>
            <groupId>org.apache.maven.surefire</groupId>
            <artifactId>surefire-junit47</artifactId>
            <version>2.19</version>
        </dependency>
    </dependencies>
    <configuration>
        <!--配置是否跳过测试用例执行-->
        <!--<skipTests>true</skipTests>-->
        <includes>
            <include>**/AppTest.java</include>
        </includes>
        <excludes>
            <exclude>**/App2Test.java</exclude>
        </excludes>
    </configuration>
</plugin>
<include>和<exclude>里的配置方式和-Dtest后面的一样可以配置表达式:
-
指定具体类
<include>AppTest</include>. -
指定具体类
<include>AppTest.java</include>. -
指定具体类
<include>AppTest.class</include>. -
指定具体类
<include>com/qyf404/learn/maven/AppTest.class</include>. -
指定具体类
<include>com/qyf404/learn/maven/AppTest.class,App2Test</include>. -
叹号[!]表示否定
<include>!*2Test.class</include>. -
使用ant风格的路径表达式
<include>**/*Test</include>. -
使用ant风格的路径表达式
<include>**/???Test</include>. -
更复杂的
%regex[expr]表达式<include>%regex[com.qyf404.learn.maven.*Test.class]</include>. -
更复杂的
%regex[expr]表达式<include>%regex[com.qyf404.*.*Test.class]</include>. -
更复杂的
%regex[expr]表达式<include>%regex[com.qyf404.[learn|test].*Test.class]</include>,中间的方括号表示或的概念,即learn或test的情况. -
更复杂的
%regex[expr]表达式<include>!%regex[com.qyf404.*.*2Test.class]</include>,这里面的叹号表示否定,即包含不符合该表达式的测试用例. -
更复杂的
%regex[expr]表达式<include>%regex[.*2Test.class]</include>,这种配置方式忽略了包前缀,可以理解成倒着匹配全类名. -
更复杂的
%regex[expr]表达式里最好不要有问号[?],而且匹配的是类的全类名. -
不可以指定具体方法,这种配置是错误的
<include>*Test#testAdd</include>. -
不可以指定java文件在
%regex[expr]里具体方法,这种配置是错误的<include>%regex[com.qyf404.learn.maven.*Test.java]</include>. -
如果同时配置了
<include>和<exclude>,最终执行的测试用例是二者的交集.
3.4.分组执行测试用例
上面我们说了,可以配置<include>这些信息来控制执行哪些测试用例,但是JUnit里有个注解@Category可以对测试用例组分组标记,而用maven执行测试用例时,我们也可以根据这个注解的标记,来确定执行哪组测试用例.
比如我们的测试用例是这样的:
package com.qyf404.learn.maven;
import org.junit.After;
import org.junit.Assert;
import org.junit.Before;
import org.junit.Test;
import org.junit.experimental.categories.Category;
public class AppTest {
    private App app;
    @Before
    public void setUp() {
        app = new App();
    }
    @Test
    @Category(com.qyf404.learn.maven.FastTests.class)
    public void testAdd() throws InterruptedException {
        int a = 1;
        int b = 2;
        int result = app.add(a, b);
        System.out.println("---" + Thread.currentThread().getName());
        Assert.assertEquals(a + b, result);
    }
    @Test()
    @Category(com.qyf404.learn.maven.SlowTests.class)
    public void testSubtract() throws InterruptedException {
        int a = 1;
        int b = 2;
        int result = app.subtract(a, b);
        System.out.println("---" + Thread.currentThread().getName());
        Assert.assertEquals(a - b, result);
    }
    @After
    public void tearDown() throws Exception {
    }
}
pom.xml里这么配置:
<plugin>
    <groupId>org.apache.maven.plugins</groupId>
    <artifactId>maven-surefire-plugin</artifactId>
    <version>2.19</version>
    <configuration>
        <groups>com.qyf404.learn.maven.SlowTests</groups>
    </configuration>
</plugin>
在执行mvn test时,则只执行标记@Category(com.qyf404.learn.maven.SlowTests.class)的测试用例.
3.5.若有测试执行失败则跳过其他测试
在打包时,默认情况会执行全部测试用例,然后给出一个执行的统计结果,如下所示:
Results :
Tests run: 3, Failures: 1, Errors: 0, Skipped: 0
很多情况下我们希望测试用例没有失败的才能打包,如果出现打包失败,需要立刻停止执行其他测试用例.为满足这个要求,我们需要增加一些配置设定.
<configuration>
    <skipAfterFailureCount>1</skipAfterFailureCount>
</configuration>
里面的数字1表示当有一个测试用例执行失败或发生异常时,跳过后续的其他测试用例.这个数字其实只要是一个大于零的数就可以.表达的意思就是当有N个测试用例执行失败或异常时,跳过后续的其他测试用例.
3.6.重新运行失败的测试用例
当我们的一个测试用例测试的是一个远程服务,在某些情况下可能由于环境问题(比如网络)导致测试用例执行失败,但这并不是程序问题.换句话说,当一个测试用例执行N次,有一次执行成功就认为成功.这个时候我们就需要配置一个参数,运行执行失败的此时用例重新执行.
<configuration>
    <rerunFailingTestsCount>2</rerunFailingTestsCount>
</configuration>
里面的数字2表示当某个测试用例执行失败以后,还可以重新执行2次,有一次执行成功就认为测试用例执行成功.里面的2只要是一个大于零的整数就可以,表示重试次数.如果发生重试,在maven的执行报告中会多一个Flakes.
3.7.Debugging Tests
一般情况我们可以在IDE中直接执行测试用例,有时候会出现这种情况,IED中直接执行测试用例是没问题的,但是用maven命令打包时就执行失败了.我们可以在命令中加入-X或--debug来打印更多的日志信息来排查问题.但也可以开启JVM的调试端口来远程debug.
3.7.1.以调试模式执行maven命令
执行maven命令mvn -Dmaven.surefire.debug test以开启调试模式.当然也可以用完整的命令来指定端口
mvn -Dmaven.surefire.debug="-Xdebug -Xrunjdwp:transport=dt_socket,server=y,suspend=y,address=5005 -Xnoagent -Djava.compiler=NONE" test
命令执行后是这个样子:
qyfmac$ mvn -Dmaven.surefire.debug test
[INFO] Scanning for projects...
[INFO]
[INFO] ------------------------------------------------------------------------
[INFO] Building learn-maven 1.0-SNAPSHOT
[INFO] ------------------------------------------------------------------------
[INFO]
[INFO] --- maven-resources-plugin:2.6:resources (default-resources) @ learn-maven ---
[WARNING] Using platform encoding (UTF-8 actually) to copy filtered resources, i.e. build is platform dependent!
[INFO] skip non existing resourceDirectory /Users/qyfmac/git/learn-maven/src/main/resources
[INFO]
[INFO] --- maven-compiler-plugin:3.1:compile (default-compile) @ learn-maven ---
[INFO] Nothing to compile - all classes are up to date
[INFO]
[INFO] --- maven-resources-plugin:2.6:testResources (default-testResources) @ learn-maven ---
[WARNING] Using platform encoding (UTF-8 actually) to copy filtered resources, i.e. build is platform dependent!
[INFO] skip non existing resourceDirectory /Users/qyfmac/git/learn-maven/src/test/resources
[INFO]
[INFO] --- maven-compiler-plugin:3.1:testCompile (default-testCompile) @ learn-maven ---
[INFO] Nothing to compile - all classes are up to date
[INFO]
[INFO] --- maven-surefire-plugin:2.19:test (default-test) @ learn-maven ---
-------------------------------------------------------
 T E S T S
-------------------------------------------------------
Listening for transport dt_socket at address: 5005
后面我们就需要根据这个5005端口去启动本地源码了.
3.7.2.使用IDE远程调试
开始调试前需要先配置IDE,我以idea为例说明如何配置.
- 在右上角选择
Edit Configurations....
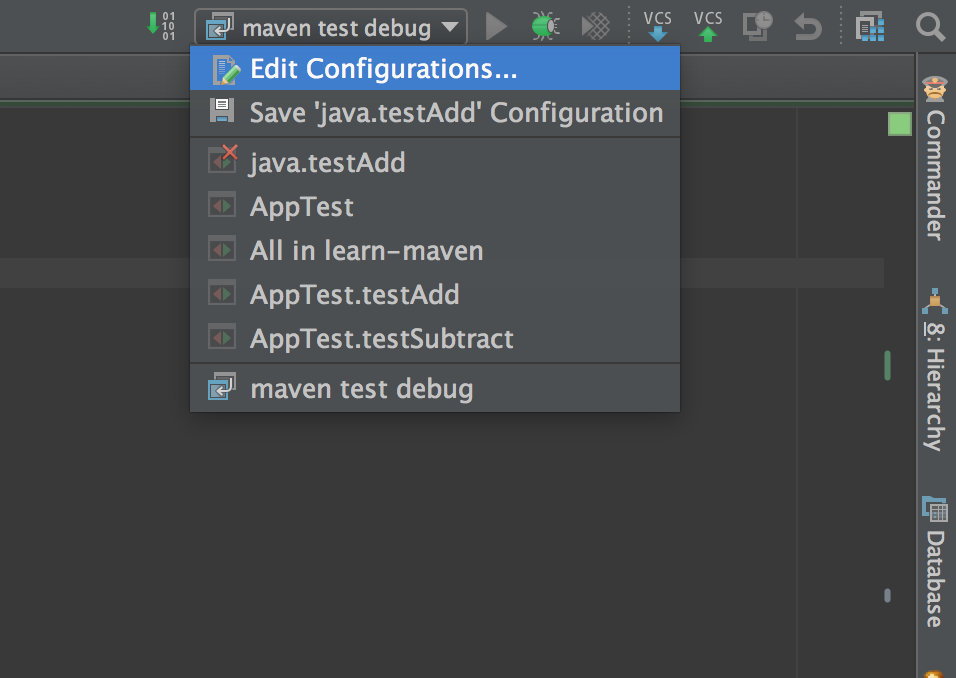
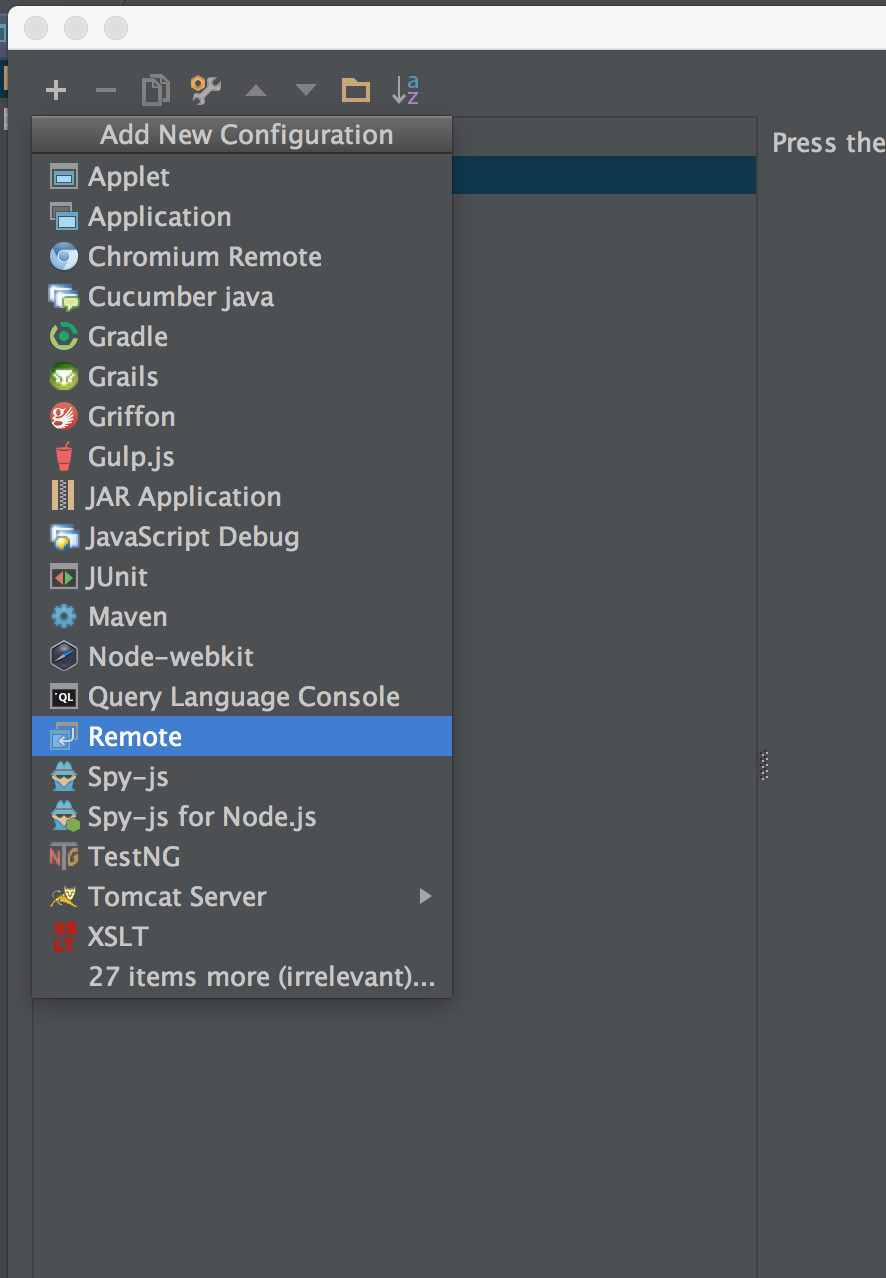
在打开的对话框中选择左上角的加号,然后选择Remote.
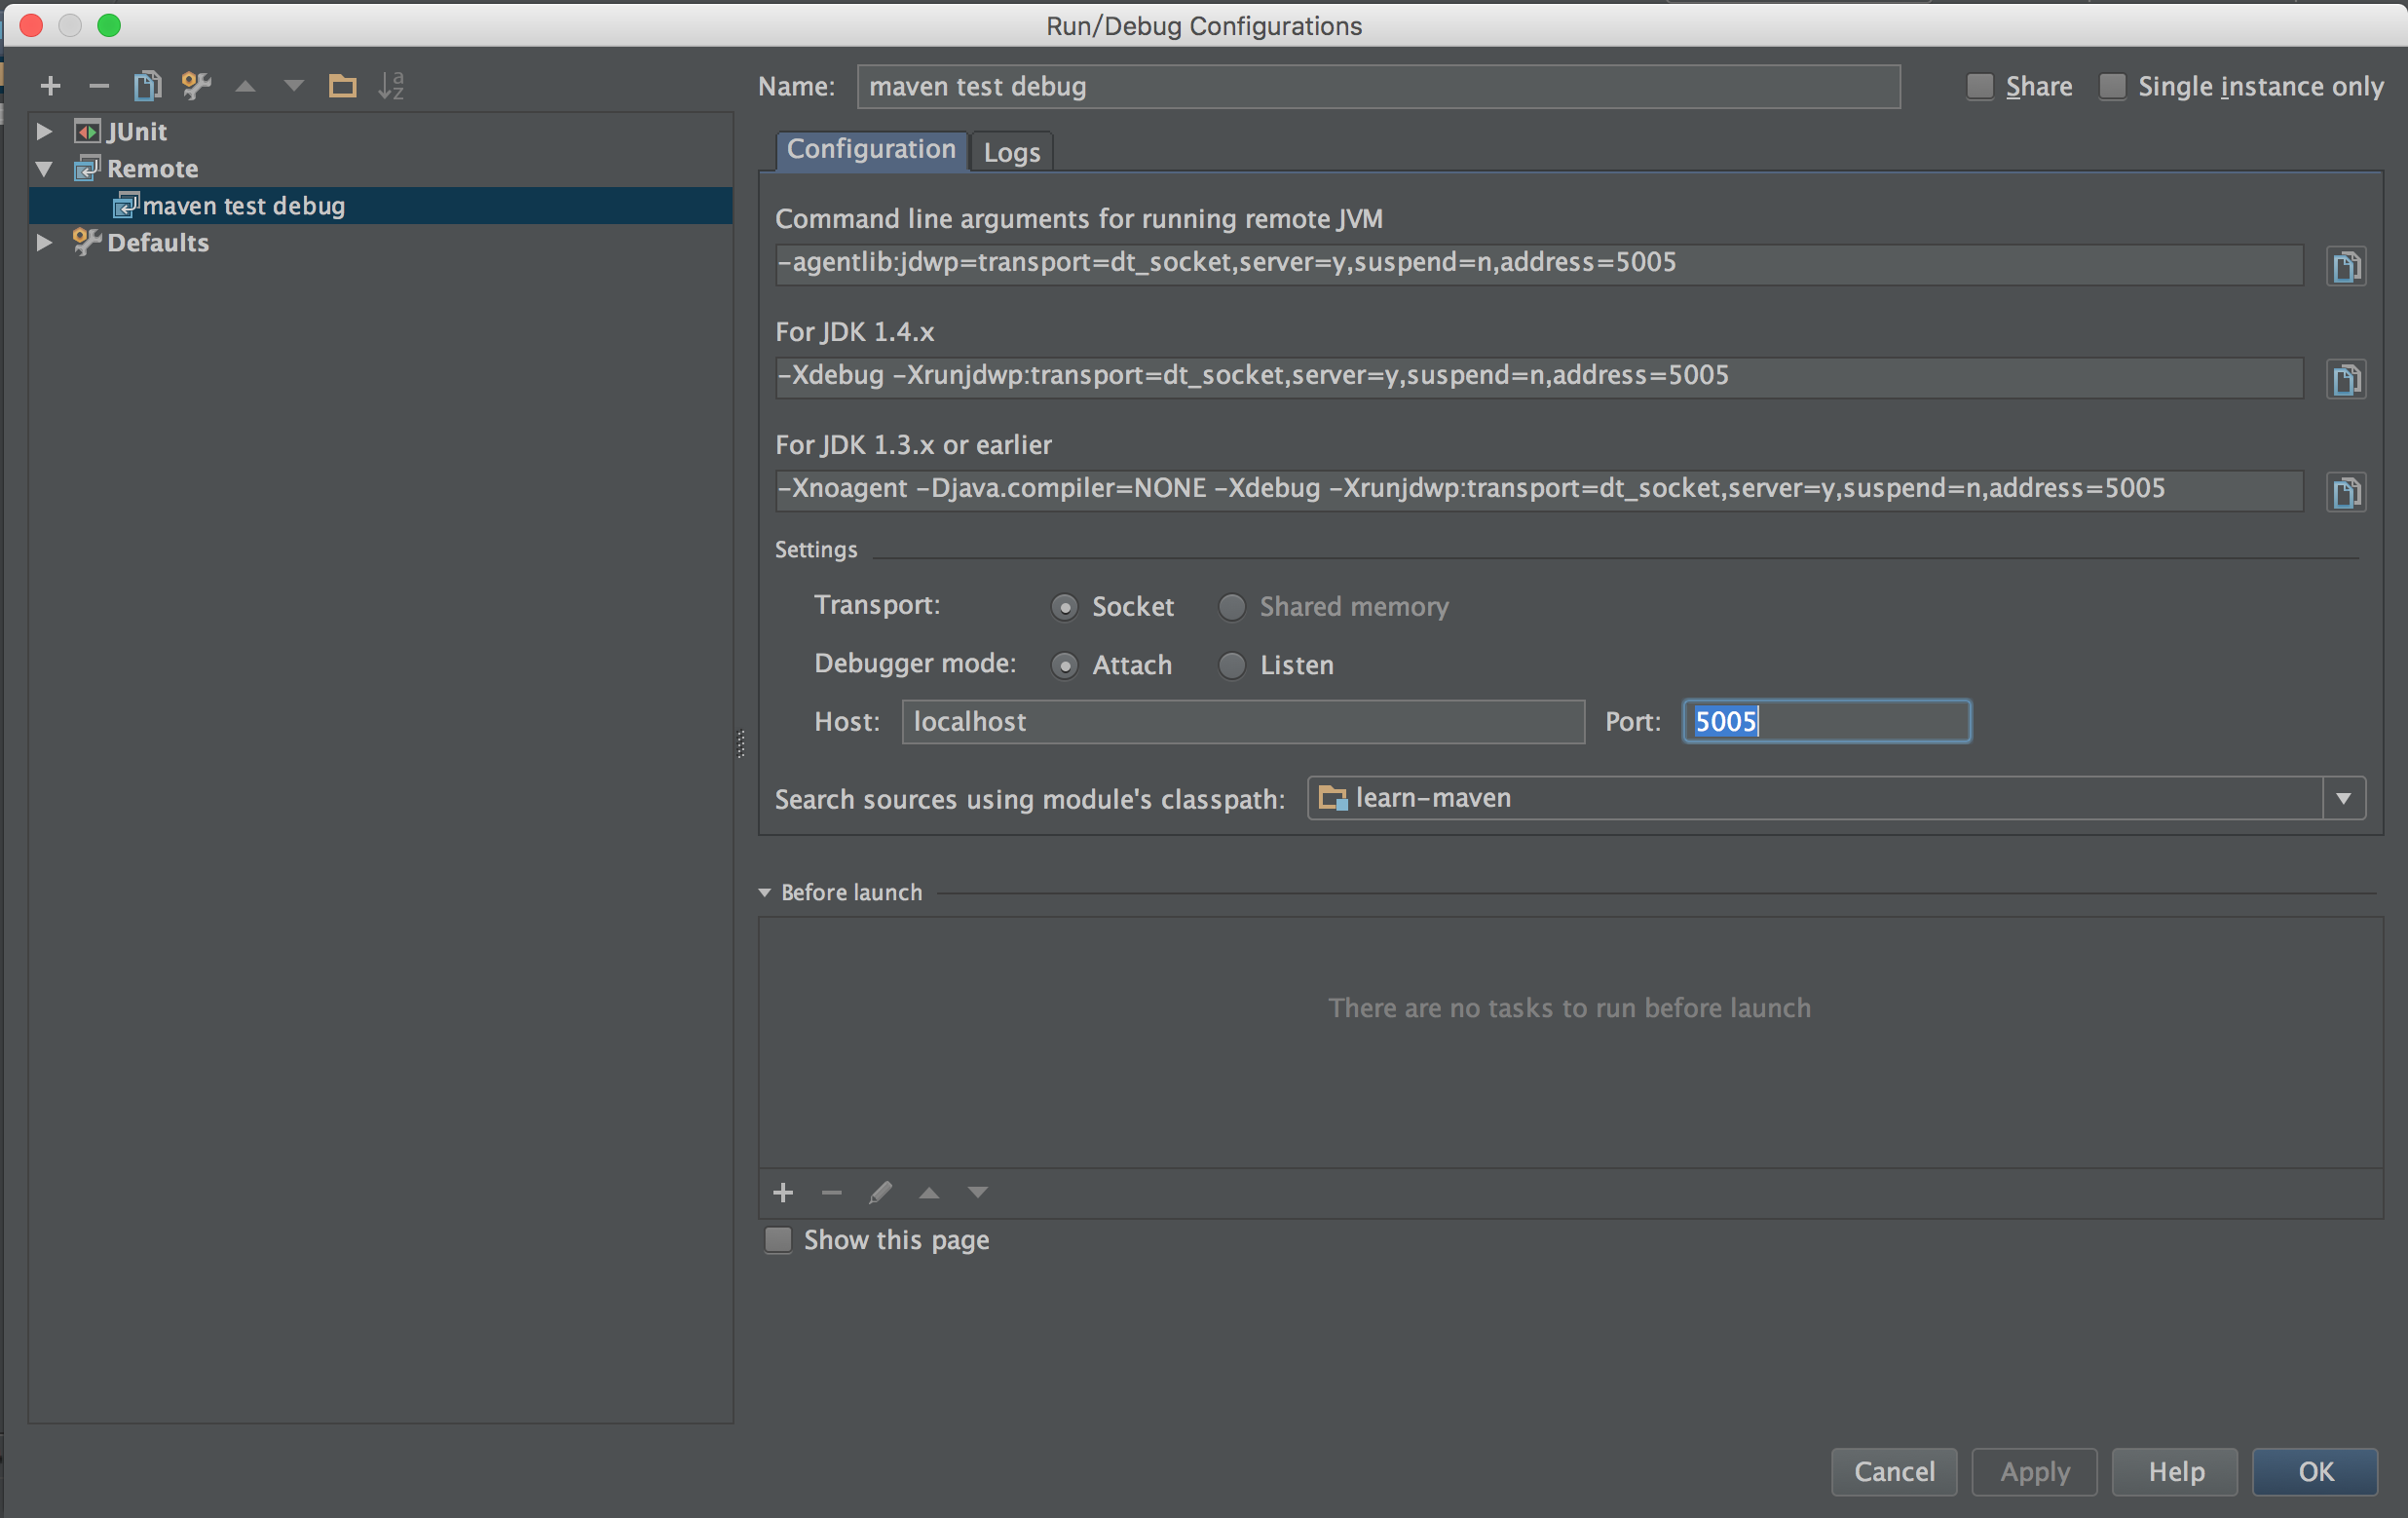
配置远程调试的参数,主要就是改个名字和端口,其他的配置一般不需要修改.设定好后点保存
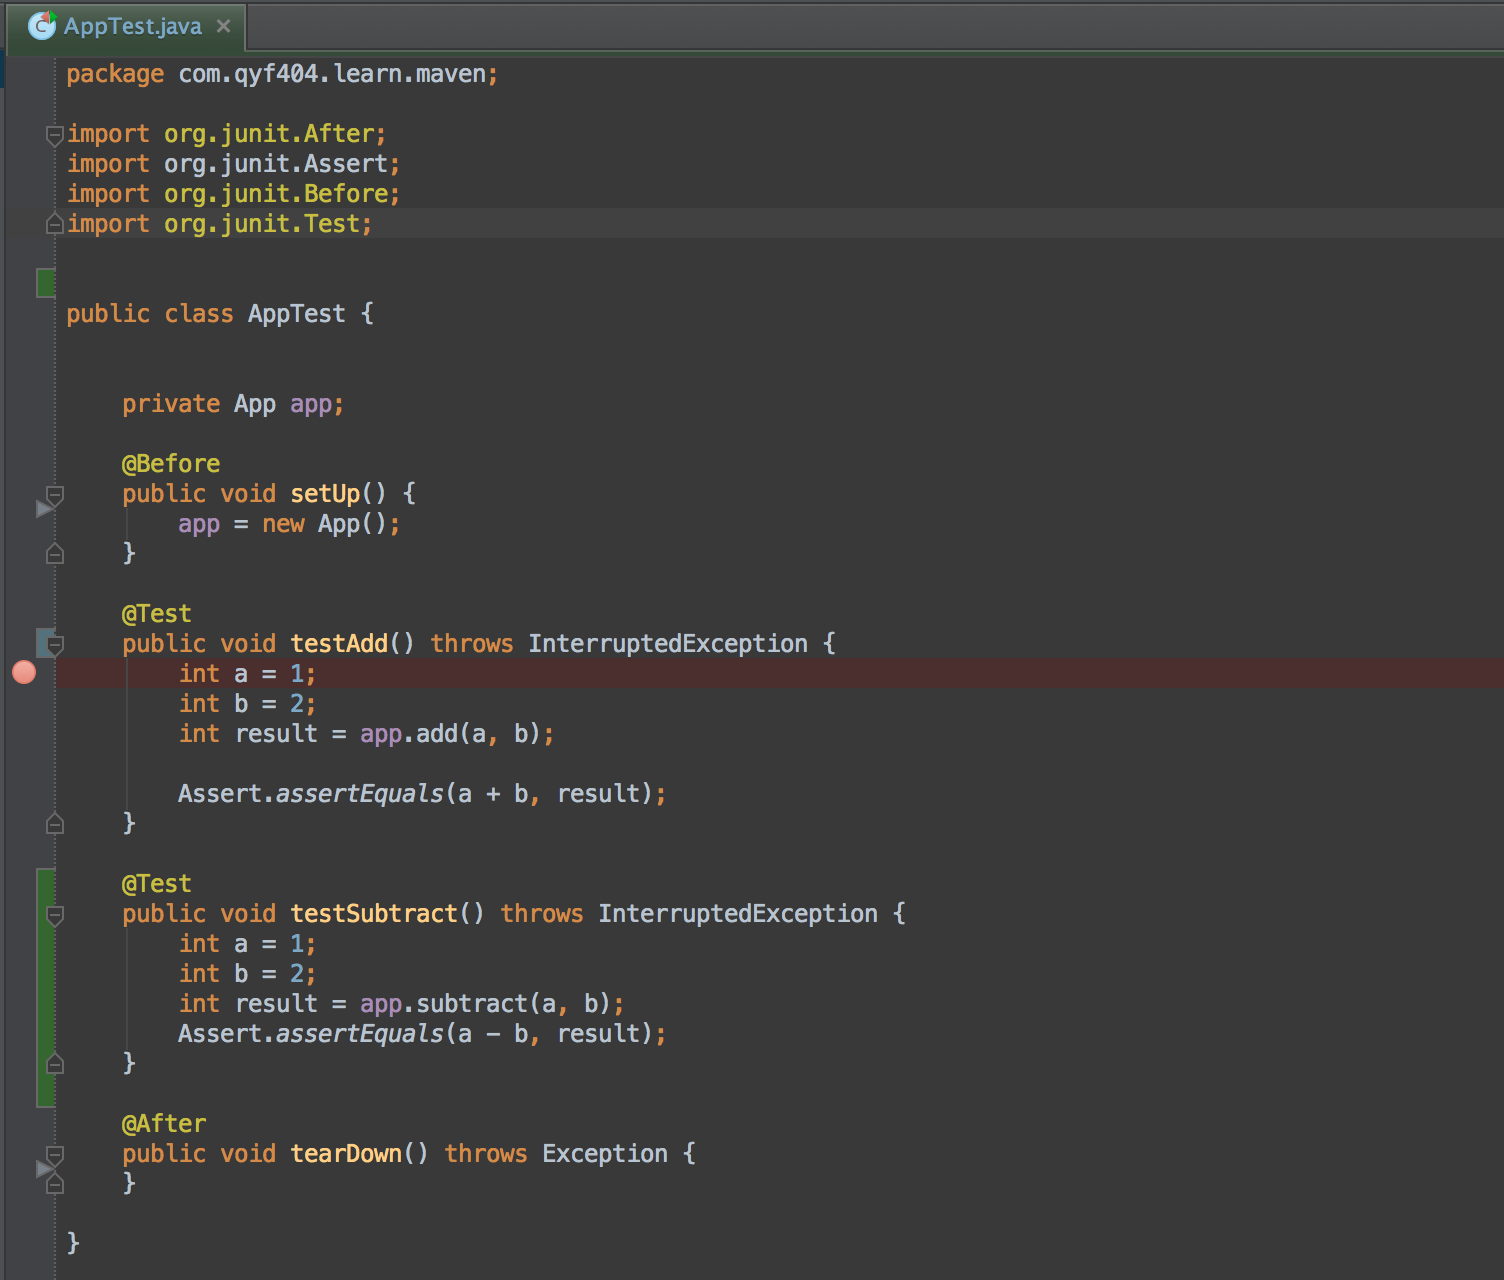
在要debug得测试用例上设置一个断点.
选择刚才设置好的配置启动远程调试.
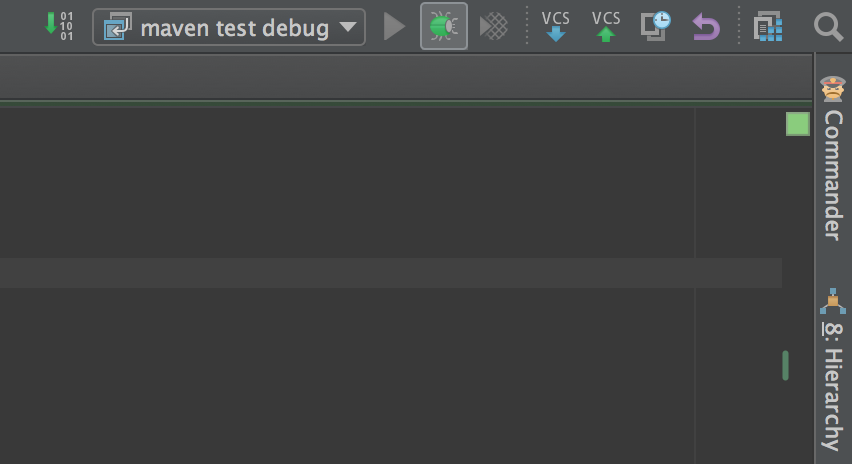
开始debug你的程序吧.

3.8.并发执行测试用例
如果测试用例很多,而且并行执行时不会互相影响,这时我们可以配置一个线程数来加快测试用例的执行效率.
<plugin>
	<groupId>org.apache.maven.plugins</groupId>
	<artifactId>maven-surefire-plugin</artifactId>
	<version>2.19</version>
	<configuration>
		<parallel>methods</parallel>
		<threadCount>10</threadCount>
	</configuration>
</plugin>
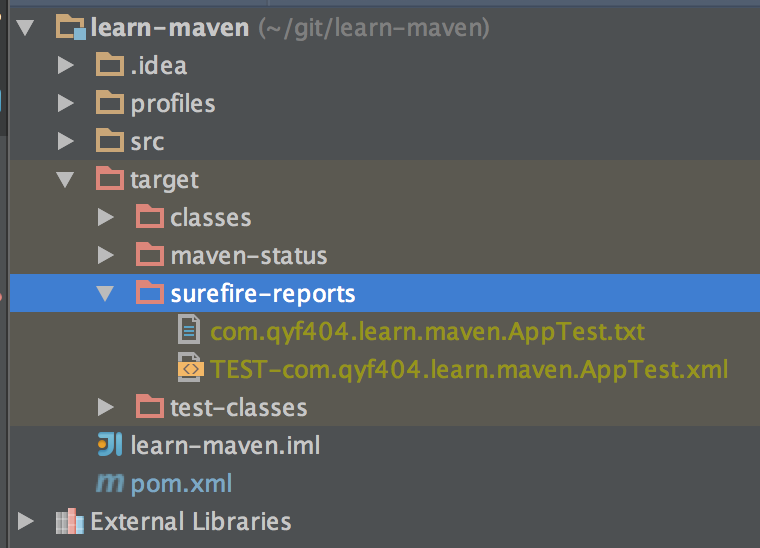
3.9.查看测试报告
在执行完mvn test后,会在target目录下生成测试报告