下面讲述根据xml生成对应序列化反序列化类的过程,xml需要首先转化为xsd,然后再生成为实体类。其中,XSD是XML Schema Definition的缩写。
1.拥有一个xml文件
2.打开vs的command line:
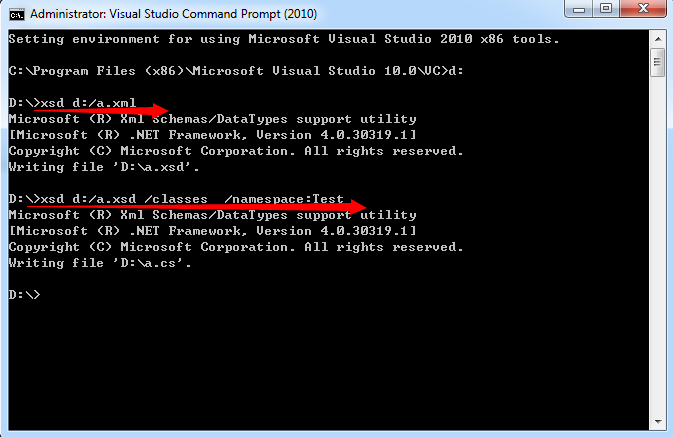
xsd *.xml ,执行这个命令 是通过xml文件生成xsd文件,xsd文件将生成在当前命令目录下。
xsd *.xsd /classes 是通过xsd文件生成xml的解析类,cs文件。示例顺便指定了命名空间为Test
这样就可以把cs文件放到项目中去使用了,这个cs文件就是xml对应的解析类。
PS :xsd自动解析的文件不知道每个节点是不是唯一的还是有多个。如果需要指定某节点是唯一的,可以在生成xsd文件之后,把xsd文件放到vs中,

使用xml(Text) editor 方式打开,然后指定maxOccurs="1",这样就指定了当前节点为唯一一个了。maxOccurs="unbounded",表明xml节点可以有很多个。 这样再把修改的xsd使用xsd *.xsd /classes 命令生成cs文件,或许更满足你的需求。
3. 解析 xml
        static void Main(string[] args)
        {
            try
            {
                XmlSerializer ser = new XmlSerializer(typeof(Response));
                //读取xml进行解析
                FileStream fs = new FileStream(@"D:a.xml", FileMode.Open);
                Response response = ser.Deserialize(fs) as Response;
                response.SIP.Line1.Port = "9999";
                fs.Close();
                //修改xml并保存
                fs = new FileStream(@"D:a.xml", FileMode.Open, FileAccess.Write);
                ser.Serialize(fs, response);
                fs.Close();
            }
            catch (Exception ex)
            {
                Console.WriteLine(ex.Message);
            }
        }
其中Response是我xml的首节点。
附加:
我的xml示例是:
<Response>
  <APIVersion>1.0</APIVersion>
  <Authenticated>true</Authenticated>
  <Global>
    <SoftwareUpgrade>
      <Enabled>false</Enabled>
      <Version/>
      <URL/>
      <Rule/>
      <RetryInterval>3600</RetryInterval>
    </SoftwareUpgrade>
    <Provisioning>
      <Enabled>true</Enabled>
      <URL>https://eeee.cn</URL>
      <Interval>86400</Interval>
    </Provisioning>
    <Phonebook>
      <Enabled>true</Enabled>
      <URL>https://ffff.com</URL>
    </Phonebook>
  </Global>
  <SIP>
    <Line1>
      <DisplayName>Terr</DisplayName>
      <URI>5538769</URI>
      <PreferredURI>for@abc.com</PreferredURI>
      <AuthName>5530769</AuthName>
      <Password>1sPU</Password>
      <Transport>TCP</Transport>
      <Mailbox>
        123
      </Mailbox>
      <Port>7899</Port>
      <Proxy>
        <AutoMode>off</AutoMode>
        <Proxy1>proxy</Proxy1>
        <Proxy2/>
      </Proxy>
    </Line1>
  </SIP>
</Response>