JAVA 8
Spring Boot 2.5.3
MySQL 5.7.21(单机)
Redis 4.0.9(单机)
---
授人以渔:
1、Spring Boot Reference Documentation
This document is also available as Multi-page HTML, Single page HTML and PDF.
有PDF版本哦,下载下来!
Caching 一章
无PDF,网页上可以搜索。
3、Spring Framework Core
Chapter 4. Spring Expression Language (SpEL)
目录
本文介绍在S.B.项目中使用缓存(Caching),首先使用默认的1)基于内存的simple版缓存,然后,升级为使用2)Redis版的缓存。
本文使用的项目:来自博客园
mysql-hello
项目相关配置——后面会用到:
MySQL配置
#
# MySQL on Ubuntu
spring.datasource.url=jdbc:mysql://mylinux:3306/db_example?serverTimezone=Asia/Shanghai
spring.datasource.username=springuser
spring.datasource.password=ThePassword
#spring.datasource.driver-class-name =com.mysql.jdbc.Driver # This is deprecated
spring.datasource.driver-class-name =com.mysql.cj.jdbc.Driver
spring.jpa.hibernate.ddl-auto=update
spring.jpa.properties.hibernate.dialect=org.hibernate.dialect.MySQL5InnoDBDialect
# 是否输出sql语句,调试用,,缓存有效时,可以看到不执行SQL语句
#spring.jpa.show-sql: true
Redis及缓存配置
# 使用Redis做缓存
#
# Redis
# mylinux 是虚拟机的本地域名,配置到 hosts文件中
#spring.redis.host=mylinux
#spring.redis.port=6379

# 缓存类型(非必须,Spring Boot会按照顺序检测,当然,也可以指定)
#spring.cache.type=REDIS在应用入口类添加 @EnableCaching
@SpringBootApplication
// 开启缓存
@EnableCaching
@Slf4j
public class MysqlHelloApplication {
启动后,Spring容器中存在以下名称包含 cache的Bean:来自博客园
name=org.springframework.cache.annotation.ProxyCachingConfiguration
name=org.springframework.cache.config.internalCacheAdvisor
name=cacheOperationSource
name=cacheInterceptor

name=org.springframework.boot.autoconfigure.cache.RedisCacheConfiguration
# cache管理器
name=cacheManager
name=org.springframework.boot.autoconfigure.cache.CacheAutoConfiguration$CacheManagerEntityManagerFactoryDependsOnPostProcessor
name=org.springframework.boot.autoconfigure.cache.CacheAutoConfiguration
# cache管理器定制器
name=cacheManagerCustomizers
name=cacheAutoConfigurationValidator
name=spring.cache-org.springframework.boot.autoconfigure.cache.CacheProperties
name=org.springframework.boot.actuate.autoconfigure.cache.CachesEndpointAutoConfiguration
name=cachesEndpoint
name=cachesEndpointWebExtension
其中,名为 cacheManager 的Bean是重点,编写程序检查其信息:来自博客园
@RestController
@RequestMapping(value="/cacheManager")
@Slf4j
public class CacheManagerController {

	@Autowired
	private CacheManager cacheManager;

	@GetMapping(value="/test")
	public Boolean test() {
		log.info("cacheManager检查:cacheManager={}, cacheManager",
				cacheManager.getClass(), cacheManager);
		Collection<String> names = cacheManager.getCacheNames();
		log.info("cacheNames={}", names);
		names.forEach(name->{
			log.info("name={}, value={}", name, cacheManager.getCache(name));

			Cache cache = cacheManager.getCache(name);
			log.info("cache.name={}", cache.getName());
			log.info("cache.get={}", cache.get(name));
			log.info("cache.getNativeCache={}", cache.getNativeCache());
		});

        return true;
    }
}
调用接口 /cacheManager/test,日志输出(部分):
o.l.m.tcache.CacheManagerController      : cacheManager检查:cacheManager=
class org.springframework.cache.concurrent.ConcurrentMapCacheManager, cacheManager
o.l.m.tcache.CacheManagerController      : cacheNames=[]
从上面的日志可以看出,默认的 cacheManager 为 ConcurrentMapCacheManager 类型。
注意,使用默认的 cacheManager ,甚至不要引入 spring-boot-starter-data-redis 包,否则,其类型会变为 RedisCacheManager。
注意,上面的接口 可以用来检查cacheManager的情况。来自博客园
测试实体类:
BOOK.java
package org.lib.mysqlhello.tcache.try1;

import java.io.Serializable;

import javax.persistence.Column;
import javax.persistence.Entity;
import javax.persistence.GeneratedValue;
import javax.persistence.GenerationType;
import javax.persistence.Id;

import lombok.Data;
import lombok.NoArgsConstructor;

/**
 * 书
 * 使用Redis缓存时,Book类必须implements Serializable!!
 * @author ben
 * @date 2021-08-26 10:34:44 CST
 */
@Entity
@NoArgsConstructor
@Data
//public class Book implements Serializable {
public class Book {

	/**
	 * serialVersionUID
	 */
//	private static final long serialVersionUID = 210826L;

	@Id
	@GeneratedValue(strategy = GenerationType.IDENTITY)
	private Long id;

	/**
	 * 书名
	 */
	@Column(columnDefinition = "VARCHAR(500) NOT NULL")
	private String name;
	/**
	 * 作者
	 */
	@Column(columnDefinition = "VARCHAR(100) NOT NULL")
	private String author;
	/**
	 * 销量
	 */
	@Column(columnDefinition = "INT DEFAULT 0")
	private Integer sales;

	/**
	 * 构造函数
	 * @param name
	 * @param author
	 */
	public Book(String name, String author) {
		this.name = name;
		this.author = author;
		this.sales = 0;
	}

}
实体类 Book,Long id为主键,存于MySQL。
编写Controller、Service、Dao等,其中,在 执行 CRUD 的 BookServiceImpl 上使用缓存机制:来自博客园
增加、删除时,移除缓存;
获取时,从缓存中拿,没有去数据库拿;
更新时,更新后,存入缓存。
@Service
@Slf4j
public class BookServiceImpl implements BookService {

	@Autowired
	private BookDao bookDao;

	private final static String BOOK_CACHE_VALUE = "mysql-hello";
	// key 的 单引号 必须有!
	private final static String BOOK_CACHE_KEY = "'book'";

	@Override
	@CacheEvict(value=BOOK_CACHE_VALUE, key=BOOK_CACHE_KEY)
	public Book add(AddDTO dto) {
		Book newbook = new Book(dto.getName(), dto.getAuthor());
		Book savedBook = bookDao.save(newbook);
		log.info("新增书:id={}", savedBook.getId());
		return savedBook;
	}

	@Override
	@CacheEvict(value = BOOK_CACHE_VALUE, key="'book_' + #id")
	public Boolean del(Long id) {
		bookDao.deleteById(id);
		return bookDao.existsById(id);
	}

	@Override
	@CachePut(value=BOOK_CACHE_VALUE, key="'book_' + #dto.getId()")
	public Book update(UpdateDTO dto) {
		Long id = dto.getId();
		if (Objects.isNull(id)) {
			return null;
		}

		Book oldBook = bookDao.findById(id).orElse(null);
		if (Objects.isNull(oldBook)) {
			return null;
		}

		oldBook.setSales(oldBook.getSales() + dto.getSalesIncr());
		Book savedBook = bookDao.save(oldBook);

		return savedBook;
	}

	@Override
    // 必须使用unless
	@Cacheable(value=BOOK_CACHE_VALUE, key="'book_' + #id", unless="#result == null")
	public Book findById(Long id) {
		if (Objects.isNull(id)) {
			return null;
		}
		return bookDao.findById(id).orElse(null);
	}

}
执行 /try1/book/add,添加成功;
执行 /cacheManager/test,检查日志:cacheManager.getCacheNames() 返回了一个 [mysql-hello]—— /try1/book/add 接口的 @CacheEvict注解 的 value值。来自博客园
try1.BookController         : add Book
try1.BookServiceImpl        : 新增书:id=20
CacheManagerController      : cacheManager检查:cacheManager=class org.springframework.cache.concurrent.ConcurrentMapCacheManager, cacheManager
CacheManagerController      : cacheNames=[mysql-hello]
CacheManagerController      : name=mysql-hello, value=org.springframework.cache.concurrent.ConcurrentMapCache@29b34e8a
CacheManagerController      : cache.name=mysql-hello
CacheManagerController      : cache.get=null
CacheManagerController      : cache.getNativeCache={}
添加后,此时缓存中 只有一个 name,其下还没有数据。
执行 /try1/book/findById?id=id,id为一个存在的记录;

注,使用缓存时,调用查询接口前不需要调用 添加接口。
注,findById函数的 @Cacheable不能少,否则,查询结果为null时也会被添加到缓存,,错误情景:查询不存的id=22,返回null,添加新记录id=22,此时调用查询接口是无效的,一直返回null。来自博客园
执行 /cacheManager/test,检查日志:
try1.BookController         : findById Book
CacheManagerController      : cacheManager检查:cacheManager=class org.springframework.cache.concurrent.ConcurrentMapCacheManager, cacheManager
CacheManagerController      : cacheNames=[mysql-hello]
CacheManagerController      : name=mysql-hello, value=org.springframework.cache.concurrent.ConcurrentMapCache@533dba02
CacheManagerController      : cache.name=mysql-hello
CacheManagerController      : cache.get=null
CacheManagerController      : cache.getNativeCache={book_21=Book(id=21, name=Spring Cloud, author=Pivot, sales=0)}
可以看到,cache.getNativeCache 有值了,以 book_21 开头——21为测试的id。
再查询 id=20 的记录,此时,cacheManager变化如下:多了 book_20,共2条记录了
cache.getNativeCache={book_20=Book(id=20, name=Spring Cloud, author=Pivot, sales=0),
book_21=Book(id=21, name=Spring Cloud, author=Pivot, sales=0)}疑问:最多可以存多少呢?和JVM内存大小有关系吧?来自博客园
缓存的目的是加快查询速度,使用缓存,不使用缓存的查询速度怎么测试呢?Jemeter。TODO
打开文首 MySQL配置中的配置:
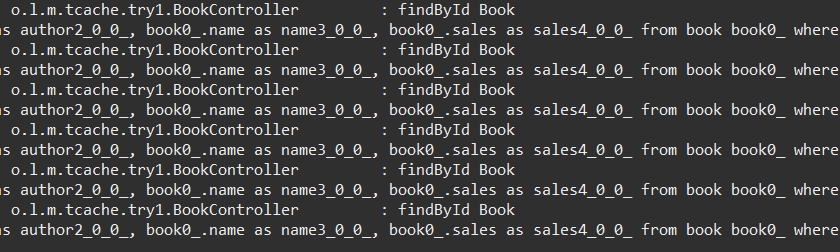
spring.jpa.show-sql: true可以看到,使用缓存后,只有首次查询时会使用SQL查询数据库,其后——有效期内(怎么配置?),都是直接从缓存中获取。见下面两图:

注释掉 findById 函数的 @Cacheable 注解后测试: 每次都执行SQL查询数据库,浪费资源啊!来自博客园
更新测试
执行 /try1/book/findById 查询,检查cacheManager;
然后,执行 /try1/book/update 更新,检查cacheManager,此时,缓存中上一部查询的数据已经发生变化;
再次执行 /try1/book/findById 查询,现实从缓存中获取了最新的数据——没有执行SQL语句。来自博客园
更新测试日志
# 1、cacheManager检查
2021-09-04 12:37:31.706  INFO 2828 --- [io-30000-exec-2] o.l.m.tcache.CacheManagerController      : cacheManager检查:cacheManager=class org.springframework.cache.concurrent.ConcurrentMapCacheManager, cacheManager
2021-09-04 12:37:31.706  INFO 2828 --- [io-30000-exec-2] o.l.m.tcache.CacheManagerController      : cacheNames=[]

# 2、查询 从数据库查询
2021-09-04 12:37:34.961  INFO 2828 --- [io-30000-exec-3] o.l.m.tcache.try1.BookController         : findById Book
Hibernate: select book0_.id as id1_0_0_, book0_.author as author2_0_0_, book0_.name as name3_0_0_, book0_.sales as sales4_0_0_ from book book0_ where book0_.id=?

# 3、cacheManager检查 有数据了
2021-09-04 12:37:36.583  INFO 2828 --- [io-30000-exec-4] o.l.m.tcache.CacheManagerController      : cacheManager检查:cacheManager=class org.springframework.cache.concurrent.ConcurrentMapCacheManager, cacheManager
2021-09-04 12:37:36.583  INFO 2828 --- [io-30000-exec-4] o.l.m.tcache.CacheManagerController      : cacheNames=[mysql-hello]
2021-09-04 12:37:36.583  INFO 2828 --- [io-30000-exec-4] o.l.m.tcache.CacheManagerController      : name=mysql-hello, value=org.springframework.cache.concurrent.ConcurrentMapCache@7e6e18fa
2021-09-04 12:37:36.583  INFO 2828 --- [io-30000-exec-4] o.l.m.tcache.CacheManagerController      : cache.name=mysql-hello
2021-09-04 12:37:36.583  INFO 2828 --- [io-30000-exec-4] o.l.m.tcache.CacheManagerController      : cache.get=null
2021-09-04 12:37:36.583  INFO 2828 --- [io-30000-exec-4] o.l.m.tcache.CacheManagerController      : cache.getNativeCache={book_21=Book(id=21, name=Spring Cloud, author=Pivot, sales=101)}

# 4、更新
2021-09-04 12:37:47.622  INFO 2828 --- [io-30000-exec-5] o.l.m.tcache.try1.BookController         : update Book
Hibernate: select book0_.id as id1_0_0_, book0_.author as author2_0_0_, book0_.name as name3_0_0_, book0_.sales as sales4_0_0_ from book book0_ where book0_.id=?
Hibernate: update book set author=?, name=?, sales=? where id=?

# 5、查询 没有从数据库查询
2021-09-04 12:37:56.675  INFO 2828 --- [io-30000-exec-6] o.l.m.tcache.try1.BookController         : findById Book

# 6、cacheManager检查 这一步可以放到 4、5之间
2021-09-04 12:38:04.280  INFO 2828 --- [io-30000-exec-7] o.l.m.tcache.CacheManagerController      : cacheManager检查:cacheManager=class org.springframework.cache.concurrent.ConcurrentMapCacheManager, cacheManager
2021-09-04 12:38:04.280  INFO 2828 --- [io-30000-exec-7] o.l.m.tcache.CacheManagerController      : cacheNames=[mysql-hello]
2021-09-04 12:38:04.281  INFO 2828 --- [io-30000-exec-7] o.l.m.tcache.CacheManagerController      : name=mysql-hello, value=org.springframework.cache.concurrent.ConcurrentMapCache@7e6e18fa
2021-09-04 12:38:04.281  INFO 2828 --- [io-30000-exec-7] o.l.m.tcache.CacheManagerController      : cache.name=mysql-hello
2021-09-04 12:38:04.281  INFO 2828 --- [io-30000-exec-7] o.l.m.tcache.CacheManagerController      : cache.get=null
2021-09-04 12:38:04.281  INFO 2828 --- [io-30000-exec-7] o.l.m.tcache.CacheManagerController      : cache.getNativeCache={book_21=Book(id=21, name=Spring Cloud, author=Pivot, sales=202)}
删除测试
执行 /try1/book/findById 接口,cacheManager检查;
执行 /try1/book/del 接口,cacheManager检查;
执行 /try1/book/findById 接口——此时返回null,cacheManager检查;来自博客园
删除测试日志
# 1、查询2次
2021-09-04 12:43:57.784  INFO 17032 --- [io-30000-exec-2] o.l.m.tcache.try1.BookController         : findById Book
Hibernate: select book0_.id as id1_0_0_, book0_.author as author2_0_0_, book0_.name as name3_0_0_, book0_.sales as sales4_0_0_ from book book0_ where book0_.id=?
2021-09-04 12:44:06.036  INFO 17032 --- [io-30000-exec-3] o.l.m.tcache.try1.BookController         : findById Book

# 2、cacheManager检查 有数据
2021-09-04 12:44:10.118  INFO 17032 --- [io-30000-exec-4] o.l.m.tcache.CacheManagerController      : cacheManager检查:cacheManager=class org.springframework.cache.concurrent.ConcurrentMapCacheManager, cacheManager
2021-09-04 12:44:10.118  INFO 17032 --- [io-30000-exec-4] o.l.m.tcache.CacheManagerController      : cacheNames=[mysql-hello]
2021-09-04 12:44:10.119  INFO 17032 --- [io-30000-exec-4] o.l.m.tcache.CacheManagerController      : name=mysql-hello, value=org.springframework.cache.concurrent.ConcurrentMapCache@5a161c5a
2021-09-04 12:44:10.119  INFO 17032 --- [io-30000-exec-4] o.l.m.tcache.CacheManagerController      : cache.name=mysql-hello
2021-09-04 12:44:10.119  INFO 17032 --- [io-30000-exec-4] o.l.m.tcache.CacheManagerController      : cache.get=null
2021-09-04 12:44:10.119  INFO 17032 --- [io-30000-exec-4] o.l.m.tcache.CacheManagerController      : cache.getNativeCache={book_20=Book(id=20, name=Spring Cloud, author=Pivot, sales=0)}

# 3、删除
2021-09-04 12:44:20.261  INFO 17032 --- [io-30000-exec-5] o.l.m.tcache.try1.BookController         : del Book
Hibernate: select book0_.id as id1_0_0_, book0_.author as author2_0_0_, book0_.name as name3_0_0_, book0_.sales as sales4_0_0_ from book book0_ where book0_.id=?
Hibernate: delete from book where id=?
Hibernate: select count(*) as col_0_0_ from book book0_ where book0_.id=?

# 4、cacheManager检查 没有数据了
2021-09-04 12:44:32.404  INFO 17032 --- [io-30000-exec-6] o.l.m.tcache.CacheManagerController      : cacheManager检查:cacheManager=class org.springframework.cache.concurrent.ConcurrentMapCacheManager, cacheManager
2021-09-04 12:44:32.404  INFO 17032 --- [io-30000-exec-6] o.l.m.tcache.CacheManagerController      : cacheNames=[mysql-hello]
2021-09-04 12:44:32.404  INFO 17032 --- [io-30000-exec-6] o.l.m.tcache.CacheManagerController      : name=mysql-hello, value=org.springframework.cache.concurrent.ConcurrentMapCache@5a161c5a
2021-09-04 12:44:32.404  INFO 17032 --- [io-30000-exec-6] o.l.m.tcache.CacheManagerController      : cache.name=mysql-hello
2021-09-04 12:44:32.404  INFO 17032 --- [io-30000-exec-6] o.l.m.tcache.CacheManagerController      : cache.get=null
2021-09-04 12:44:32.404  INFO 17032 --- [io-30000-exec-6] o.l.m.tcache.CacheManagerController      : cache.getNativeCache={}

# 5、查询2次 都执行了SQL
2021-09-04 12:44:36.937  INFO 17032 --- [io-30000-exec-7] o.l.m.tcache.try1.BookController         : findById Book
Hibernate: select book0_.id as id1_0_0_, book0_.author as author2_0_0_, book0_.name as name3_0_0_, book0_.sales as sales4_0_0_ from book book0_ where book0_.id=?

2021-09-04 12:44:41.631  INFO 17032 --- [io-30000-exec-8] o.l.m.tcache.try1.BookController         : findById Book
Hibernate: select book0_.id as id1_0_0_, book0_.author as author2_0_0_, book0_.name as name3_0_0_, book0_.sales as sales4_0_0_ from book book0_ where book0_.id=?
疑问:删除数据后,查询时会执行SQL,要是一直查询 不存在的数据,数据库服务器的压力岂不是很大?怎么解决?设置缓存时间?TODO
小结,
默认的缓存使用的是JVM里面的ConcurrentMap,单应用可用在,不能在应用间共享缓存数据;
应用重启后,缓存数据丢失;
在分布式系统时,不能使用:A应用缓存数据到自己的JVM,而B应用更新了数据,此时,从A获取的数据是脏数据——有效期内,,A、B应用是同一个应用的不同实例;
怎么解决?使用Redis作为缓存系统。来自博客园
补充:
在S.B.手册中,提到了其缓存功能有下面的实现(优先级从高到低(in the indicated order)):
1. Generic
2. JCache (JSR-107) (EhCache 3, Hazelcast, Infinispan, and others)
3. EhCache 2.x
4. Hazelcast
5. Infinispan
6. Couchbase
7. Redis
8. Caffeine
9. Simple
上面介绍的默认的实现,是其中的Simple——优先级最低。这也是前面提到的,使用默认 缓存实现时,不要引入 spring-boot-starter-data-redis 的原因。
添加依赖包:
<dependency>
	<groupId>org.springframework.boot</groupId>
	<artifactId>spring-boot-starter-data-redis</artifactId>
</dependency>
Redis配置——前文已展示。
修改 /cacheManager/test 接口:cacheManager 为 RedisCacheManager类型时的信息输出
修改cacheManager检查
	@GetMapping(value="/test")
	public Boolean test() {
		log.info("cacheManager检查:cacheManager={}, cacheManager",
				cacheManager.getClass(), cacheManager);
		Collection<String> names = cacheManager.getCacheNames();
		log.info("cacheNames={}", names);
		names.forEach(name->{
			log.info("name={}, value={}", name, cacheManager.getCache(name));

			Cache cache = cacheManager.getCache(name);
			log.info("cache.name={}", cache.getName());
			log.info("cache.get={}", cache.get(name));
			log.info("cache.getNativeCache={}", cache.getNativeCache());
		});

		// 输出 RedisCacheManager 的配置
		if (RedisCacheManager.class.equals(cacheManager.getClass())) {
			log.info("RedisCacheManager探究:");
			RedisCacheManager rcm = (RedisCacheManager) cacheManager;
			Map<String, RedisCacheConfiguration> cconfig = rcm.getCacheConfigurations();
			cconfig.forEach((key, val)->{
				log.info("key={}, value={}", key, val);
				log.info("val-5: {}, {}, {}, {}, {}", val.getAllowCacheNullValues(),
						val.getKeyPrefix().orElse(""),
						val.getTtl(),
						val.getKeySerializationPair(),
						val.getValueSerializationPair());
			});
		}

		return true;
	}
添加Book,成功;
执行 cacheManager检查:
试验1日志
2021-09-04 14:27:26.240  INFO 14868 --- [io-30000-exec-1] o.l.m.tcache.try1.BookController         : add Book
Hibernate: insert into book (author, name, sales) values (?, ?, ?)
2021-09-04 14:27:26.369  INFO 14868 --- [io-30000-exec-1] o.l.m.tcache.try1.BookServiceImpl        : 新增书:id=24


2021-09-04 14:27:34.588  INFO 14868 --- [io-30000-exec-3] o.l.m.tcache.CacheManagerController      : cacheManager检查:cacheManager=class org.springframework.data.redis.cache.RedisCacheManager, cacheManager
2021-09-04 14:27:34.588  INFO 14868 --- [io-30000-exec-3] o.l.m.tcache.CacheManagerController      : cacheNames=[mysql-hello]
2021-09-04 14:27:34.589  INFO 14868 --- [io-30000-exec-3] o.l.m.tcache.CacheManagerController      : name=mysql-hello, value=org.springframework.data.redis.cache.RedisCache@6a7c7921
2021-09-04 14:27:34.589  INFO 14868 --- [io-30000-exec-3] o.l.m.tcache.CacheManagerController      : cache.name=mysql-hello
2021-09-04 14:27:34.595  INFO 14868 --- [io-30000-exec-3] o.l.m.tcache.CacheManagerController      : cache.get=null
2021-09-04 14:27:34.595  INFO 14868 --- [io-30000-exec-3] o.l.m.tcache.CacheManagerController      : cache.getNativeCache=org.springframework.data.redis.cache.DefaultRedisCacheWriter@3f0c00da
2021-09-04 14:27:34.595  INFO 14868 --- [io-30000-exec-3] o.l.m.tcache.CacheManagerController      : RedisCacheManager探究:
2021-09-04 14:27:34.596  INFO 14868 --- [io-30000-exec-3] o.l.m.tcache.CacheManagerController      : key=mysql-hello, value=org.springframework.data.redis.cache.RedisCacheConfiguration@11308dc7
2021-09-04 14:27:34.596  INFO 14868 --- [io-30000-exec-3] o.l.m.tcache.CacheManagerController      : val-5: true, ::, PT0S, org.springframework.data.redis.serializer.RedisSerializerToSerializationPairAdapter@4e6545eb, org.springframework.data.redis.serializer.RedisSerializerToSerializationPairAdapter@1aaf6f81
日志分析:
cache.getNativeCache 的值看不懂,倒数 2行 的日志 看不懂。
cache.getNativeCache 的 DefaultRedisCacheWriter 类型及公共函数:来自博客园

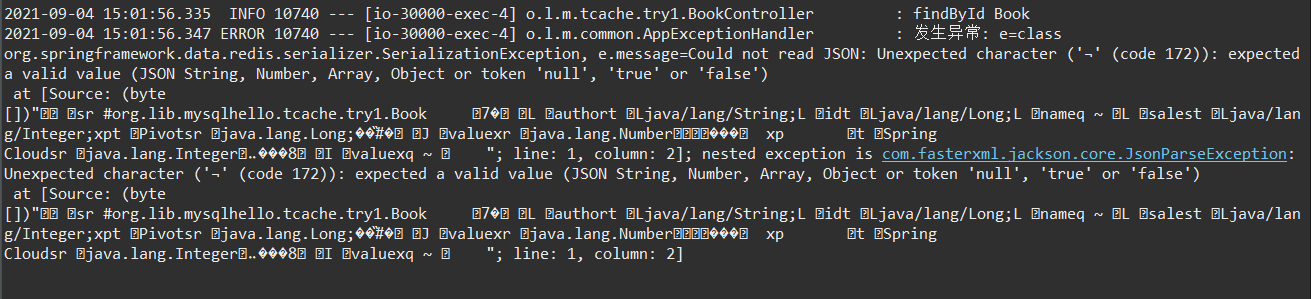
查询上面添加成功的id=24的记录——发生异常:
Failed to serialize object using DefaultSerializer...Failed to deserialize payload
2021-09-04 14:31:56.435  INFO 14868 --- [io-30000-exec-6] o.l.m.tcache.try1.BookController         : findById Book
Hibernate: select book0_.id as id1_0_0_, book0_.author as author2_0_0_, book0_.name as name3_0_0_, book0_.sales as sales4_0_0_ from book book0_ where book0_.id=?
2021-09-04 14:31:56.493 ERROR 14868 --- [io-30000-exec-6] o.l.m.common.AppExceptionHandler         : 发生异常: e=class
org.springframework.data.redis.serializer.SerializationException, e.message=Cannot serialize; nested exception is
org.springframework.core.serializer.support.SerializationFailedException: Failed to serialize object using
DefaultSerializer; nested exception is java.lang.IllegalArgumentException: DefaultSerializer requires a
Serializable payload but received an object of type [org.lib.mysqlhello.tcache.try1.Book]反序列化异常!
修改cacheManager等Bean?可以。其实,这里的问题是 payload无法被序列化,Book对象无法被序列化——Book没有实现Serializable接口!
改造:Book实现Serializable
@Entity
@NoArgsConstructor
@Data
public class Book implements Serializable {

	/**
	 * serialVersionUID
	 */
	private static final long serialVersionUID = 210826L;
// 省略
再次执行 查询记录(/try1/book/findById):执行成功。但是,首次查询耗时1秒多!
cacheManager检查 结果没变化,但没有看到缓存的记录数据。
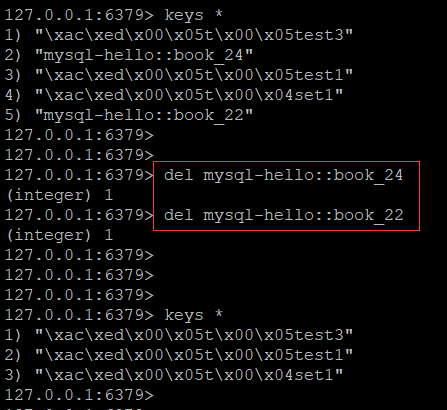
直接检查Redis服务器:存在一个记录对应的 key = mysql-hello::book_24,但是,有效期却是 永不失效!
127.0.0.1:6379> keys *
1) "xacxedx00x05tx00x05test3"
2) "xacxedx00x05tx00x04set1"
3) "mysql-hello::book_24"
4) "xacxedx00x05tx00x05test1"
127.0.0.1:6379>
127.0.0.1:6379>
127.0.0.1:6379> ttl mysql-hello::book_24
(integer) -1
上面的解决方式需要:
1)实体类必须是 可序列化的
2)Redis中的缓存值是永不过期的
怎么解决上面的限制条件呢?定制 RedisCacheConfiguration。
取消上面 Book类的序列化,添加下面的配置——缓存有效期300秒(5分钟)。
AppCacheCofig.java
@Configuration
public class AppCacheCofig {

	/**
	 * RedisCacheConfiguration定制
	 * 修改后,实体类不需要 implements Serializable
	 * @author ben
	 * @date 2021-08-26 19:50:38 CST
	 * @return
	 */
	@Bean
	public RedisCacheConfiguration redisCacheConfiguration() {
		Jackson2JsonRedisSerializer<Object> jackson2JsonRedisSerializer = new Jackson2JsonRedisSerializer<>(Object.class);
		ObjectMapper om = new ObjectMapper();
		om.setVisibility(PropertyAccessor.ALL, JsonAutoDetect.Visibility.ANY);

		// 标记为过时
//		om.enableDefaultTyping(ObjectMapper.DefaultTyping.NON_FINAL);
		// 替代上面的过时方法
		om.activateDefaultTyping(om.getPolymorphicTypeValidator(), ObjectMapper.DefaultTyping.NON_FINAL,
				JsonTypeInfo.As.WRAPPER_ARRAY);

		jackson2JsonRedisSerializer.setObjectMapper(om);

		RedisSerializationContext.SerializationPair<Object> pair =
				RedisSerializationContext.SerializationPair.fromSerializer(jackson2JsonRedisSerializer);

		RedisCacheConfiguration redisCacheConfiguration = RedisCacheConfiguration.defaultCacheConfig()
				.entryTtl(Duration.ofSeconds(300))
				.serializeValuesWith(pair);

		return redisCacheConfiguration;
	}

}
执行 /book/findById——查询存在的记录:执行失败,发生异常
查询时,之前缓存中的数据还存在——和目前的序列化方式不同,因此,发生了错误。
解决方案:删除Redis中旧的值即可。来自博客园
删除后,再查询:成功。
缓存中的键值的有效期也变化了:不再是 -1。
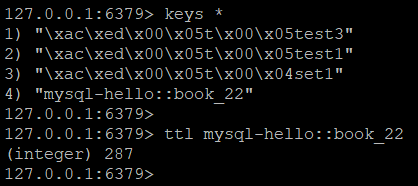
成功。
补充:AppCacheCofig 中还可以配置 RedisCacheManager
但是,不使用下面的代码,也可以完成本文的试验。
	@Bean
	public RedisCacheManager cacheManager(RedisConnectionFactory redisConnectionFactory) {
		// 初始化一个RedisCacheWriter
		RedisCacheWriter redisCacheWriter = RedisCacheWriter.nonLockingRedisCacheWriter(redisConnectionFactory);
		RedisCacheManager cacheManager = new RedisCacheManager(redisCacheWriter, this.redisCacheConfiguration());
		return cacheManager;
	}
缓存有效期到了,缓存中的键值就消失了:

测试更新、测试删除:成功。
![]()
注意,更新后,key的有效期被设置为 300秒 了。
补充:Redis中怎么存缓存数据的呢?
1)默认+序列化实体类
从Redis中看不懂
127.0.0.1:6379> get mysql-hello::book_23
"xacxedx00x05srx00#org.lib.mysqlhello.tcache.try1.Bookx00x00x00x00x00x037x8ax02x00x04Lx00x06
authortx00x12Ljava/lang/String;Lx00x02idtx00x10Ljava/lang/Long;Lx00x04nameqx00~x00x01Lx00x05salest
x00x13Ljava/lang/Integer;xptx00x05Pivotsrx00x0ejava.lang.Long;x8bxe4x90xccx8f#xdfx02x00x01Jx00
x05valuexrx00x10java.lang.Numberx86xacx95x1dx0bx94xe0x8bx02x00x00xpx00x00x00x00x00x00x00
x17tx00x0cSpring Cloudsrx00x11java.lang.Integerx12xe2xa0xa4xf7x81x878x02x00x01Ix00x05valuexq
x00~x00ax00x00x00x00"
2)使用 Jackson2JsonRedisSerializer
127.0.0.1:6379> get mysql-hello::book_25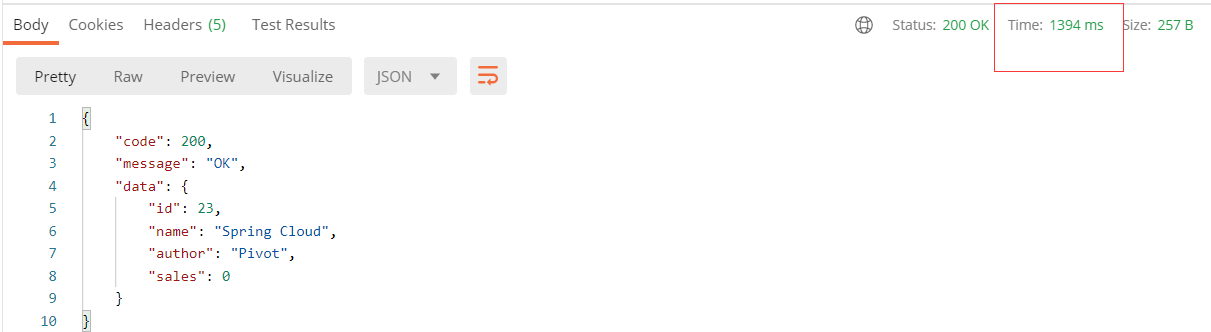
"["org.lib.mysqlhello.tcache.try1.Book",{"id":25,"name":"Spring Cloud","author":"Pivot","sales":0}]"试验期间发现,使用Redis做缓存时,首次访问数据的速度非常慢——秒级:
怎么优化呢?和惰性加载有关系吗?
我的解决方案:项目启动时,执行一次 redis操作,以便和Redis服务器建立好连接。
	@Resource
	RedisTemplate<String, Object> redisTemplate;

	@Bean
	public CommandLineRunner redisInit() {
		return (args) -> {
			cs.accept("redisInit...");
			redisTemplate.opsForValue().set("redisinit", 1, Duration.ofSeconds(1));
		};
	}
测试情况:
首次查询速度大大加快,有1秒多,变成了300多毫秒。
还有更好的解决方法吗?300毫秒,是我的服务器太差了?毕竟是本机的虚拟机。TODO
试验:启动两个实例测试缓存使用
测试通过。
实例A查询,使用了SQL语句;
实例B查询时,直接从缓存拿数据。
》》》全文完《《《
后记:
博文写完了,其实,内心是忐忑的,还有好多东西没掌握的,能用,用起来了。
上面的缓存使用的是 实体类 的主键-ID字段,是否可以使用其它的 唯一索引键(UNIQUE)呢?
spring.cache.*、spring.cache.redis.* 的相关配置,这些配置和代码中的定制化配置的优先级如何?
RedisCacheConfiguration 还有哪些配置?里面的超时时间 限定了300秒,多个实体类需要不同的超时时间呢?怎么弄?
参考了不少博文才解决了问题,有优质的博文,会补充到参考文档里面。
2、spring-boot-2 redis-cache序列化配置注意点
3、Spring Boot 自带缓存及结合 Redis 使用
4、