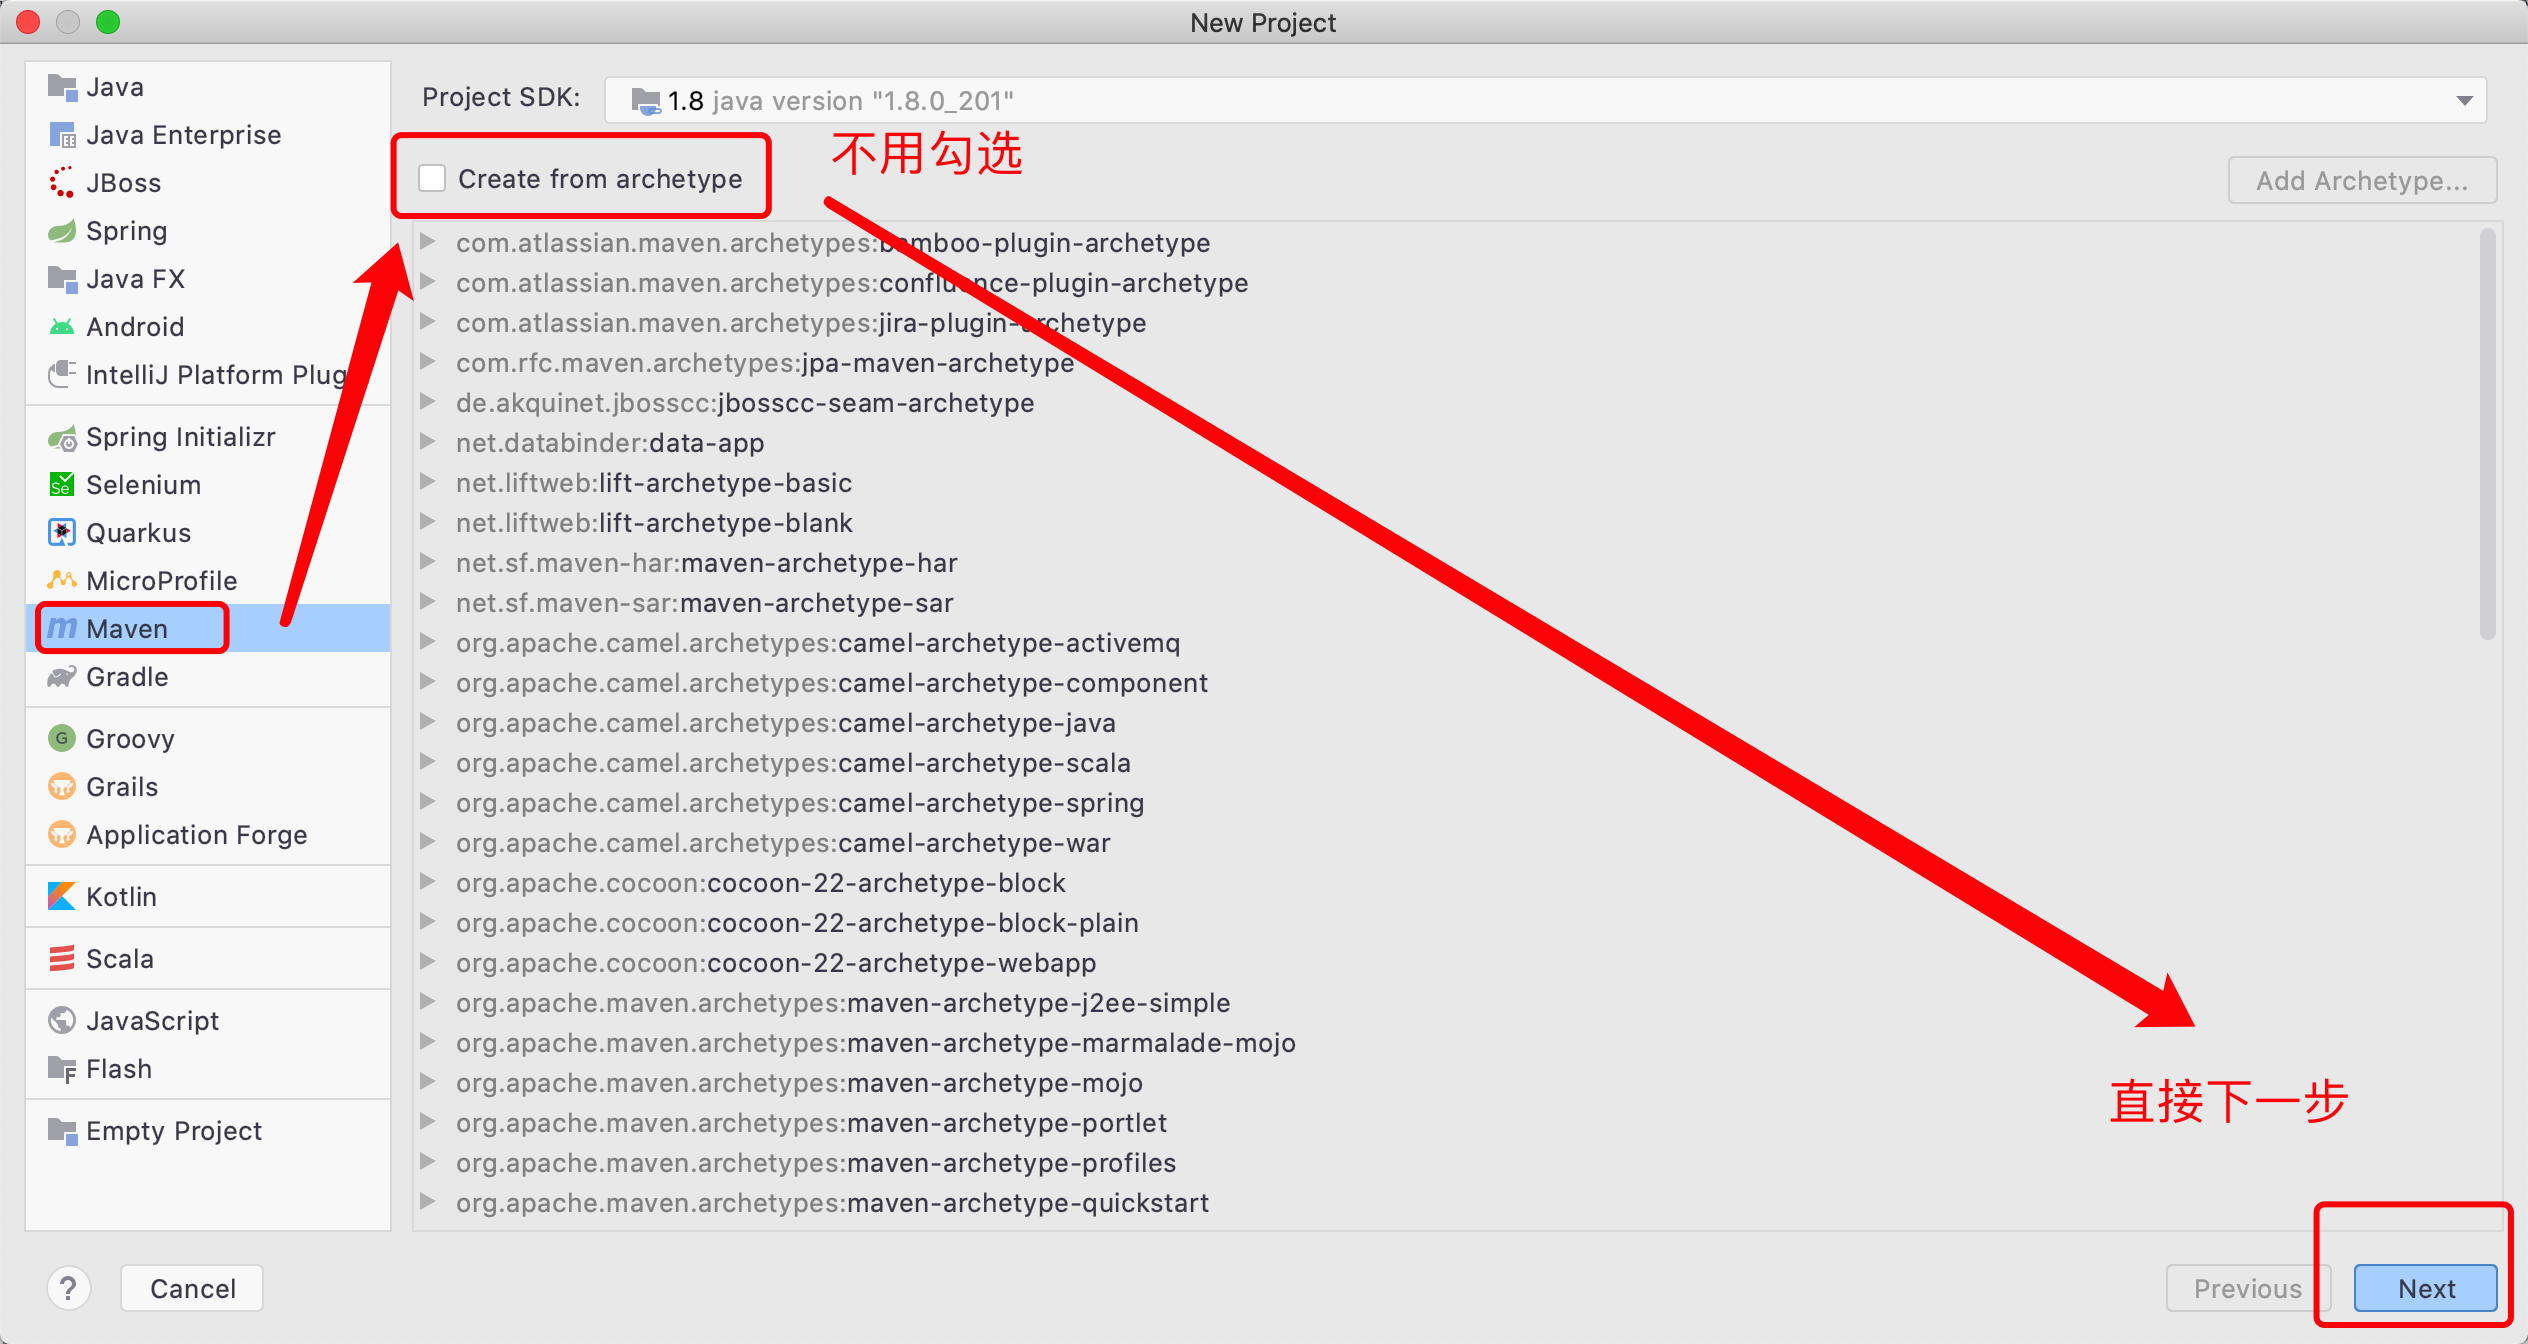
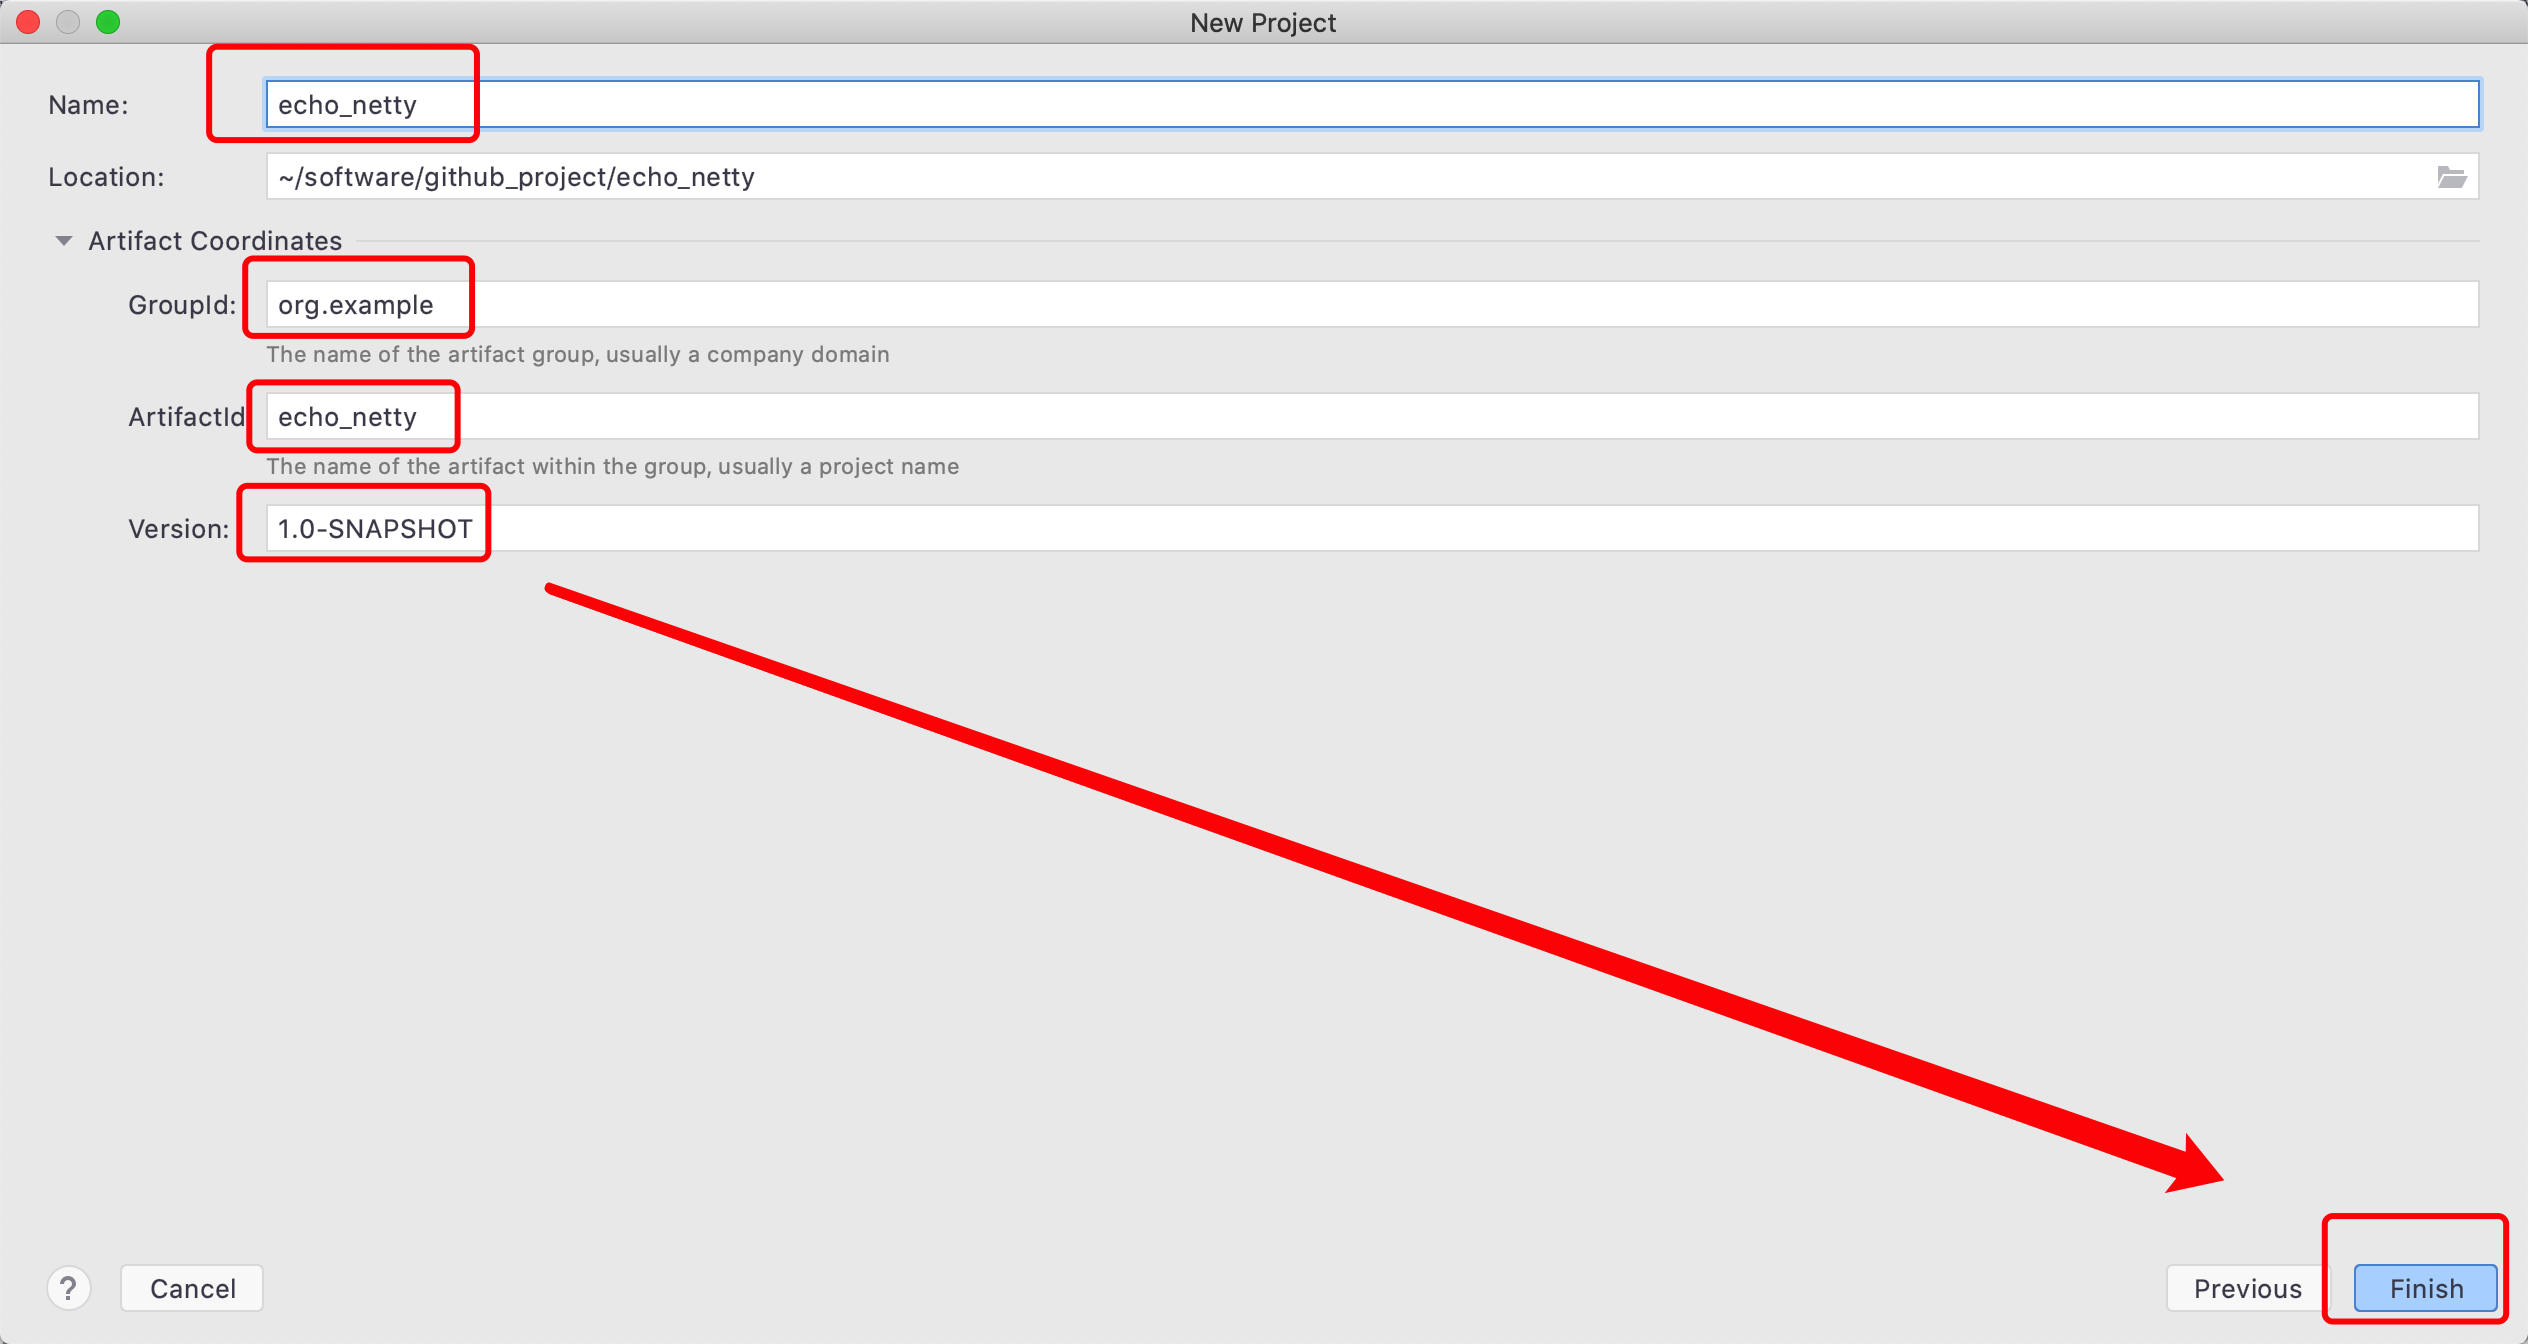
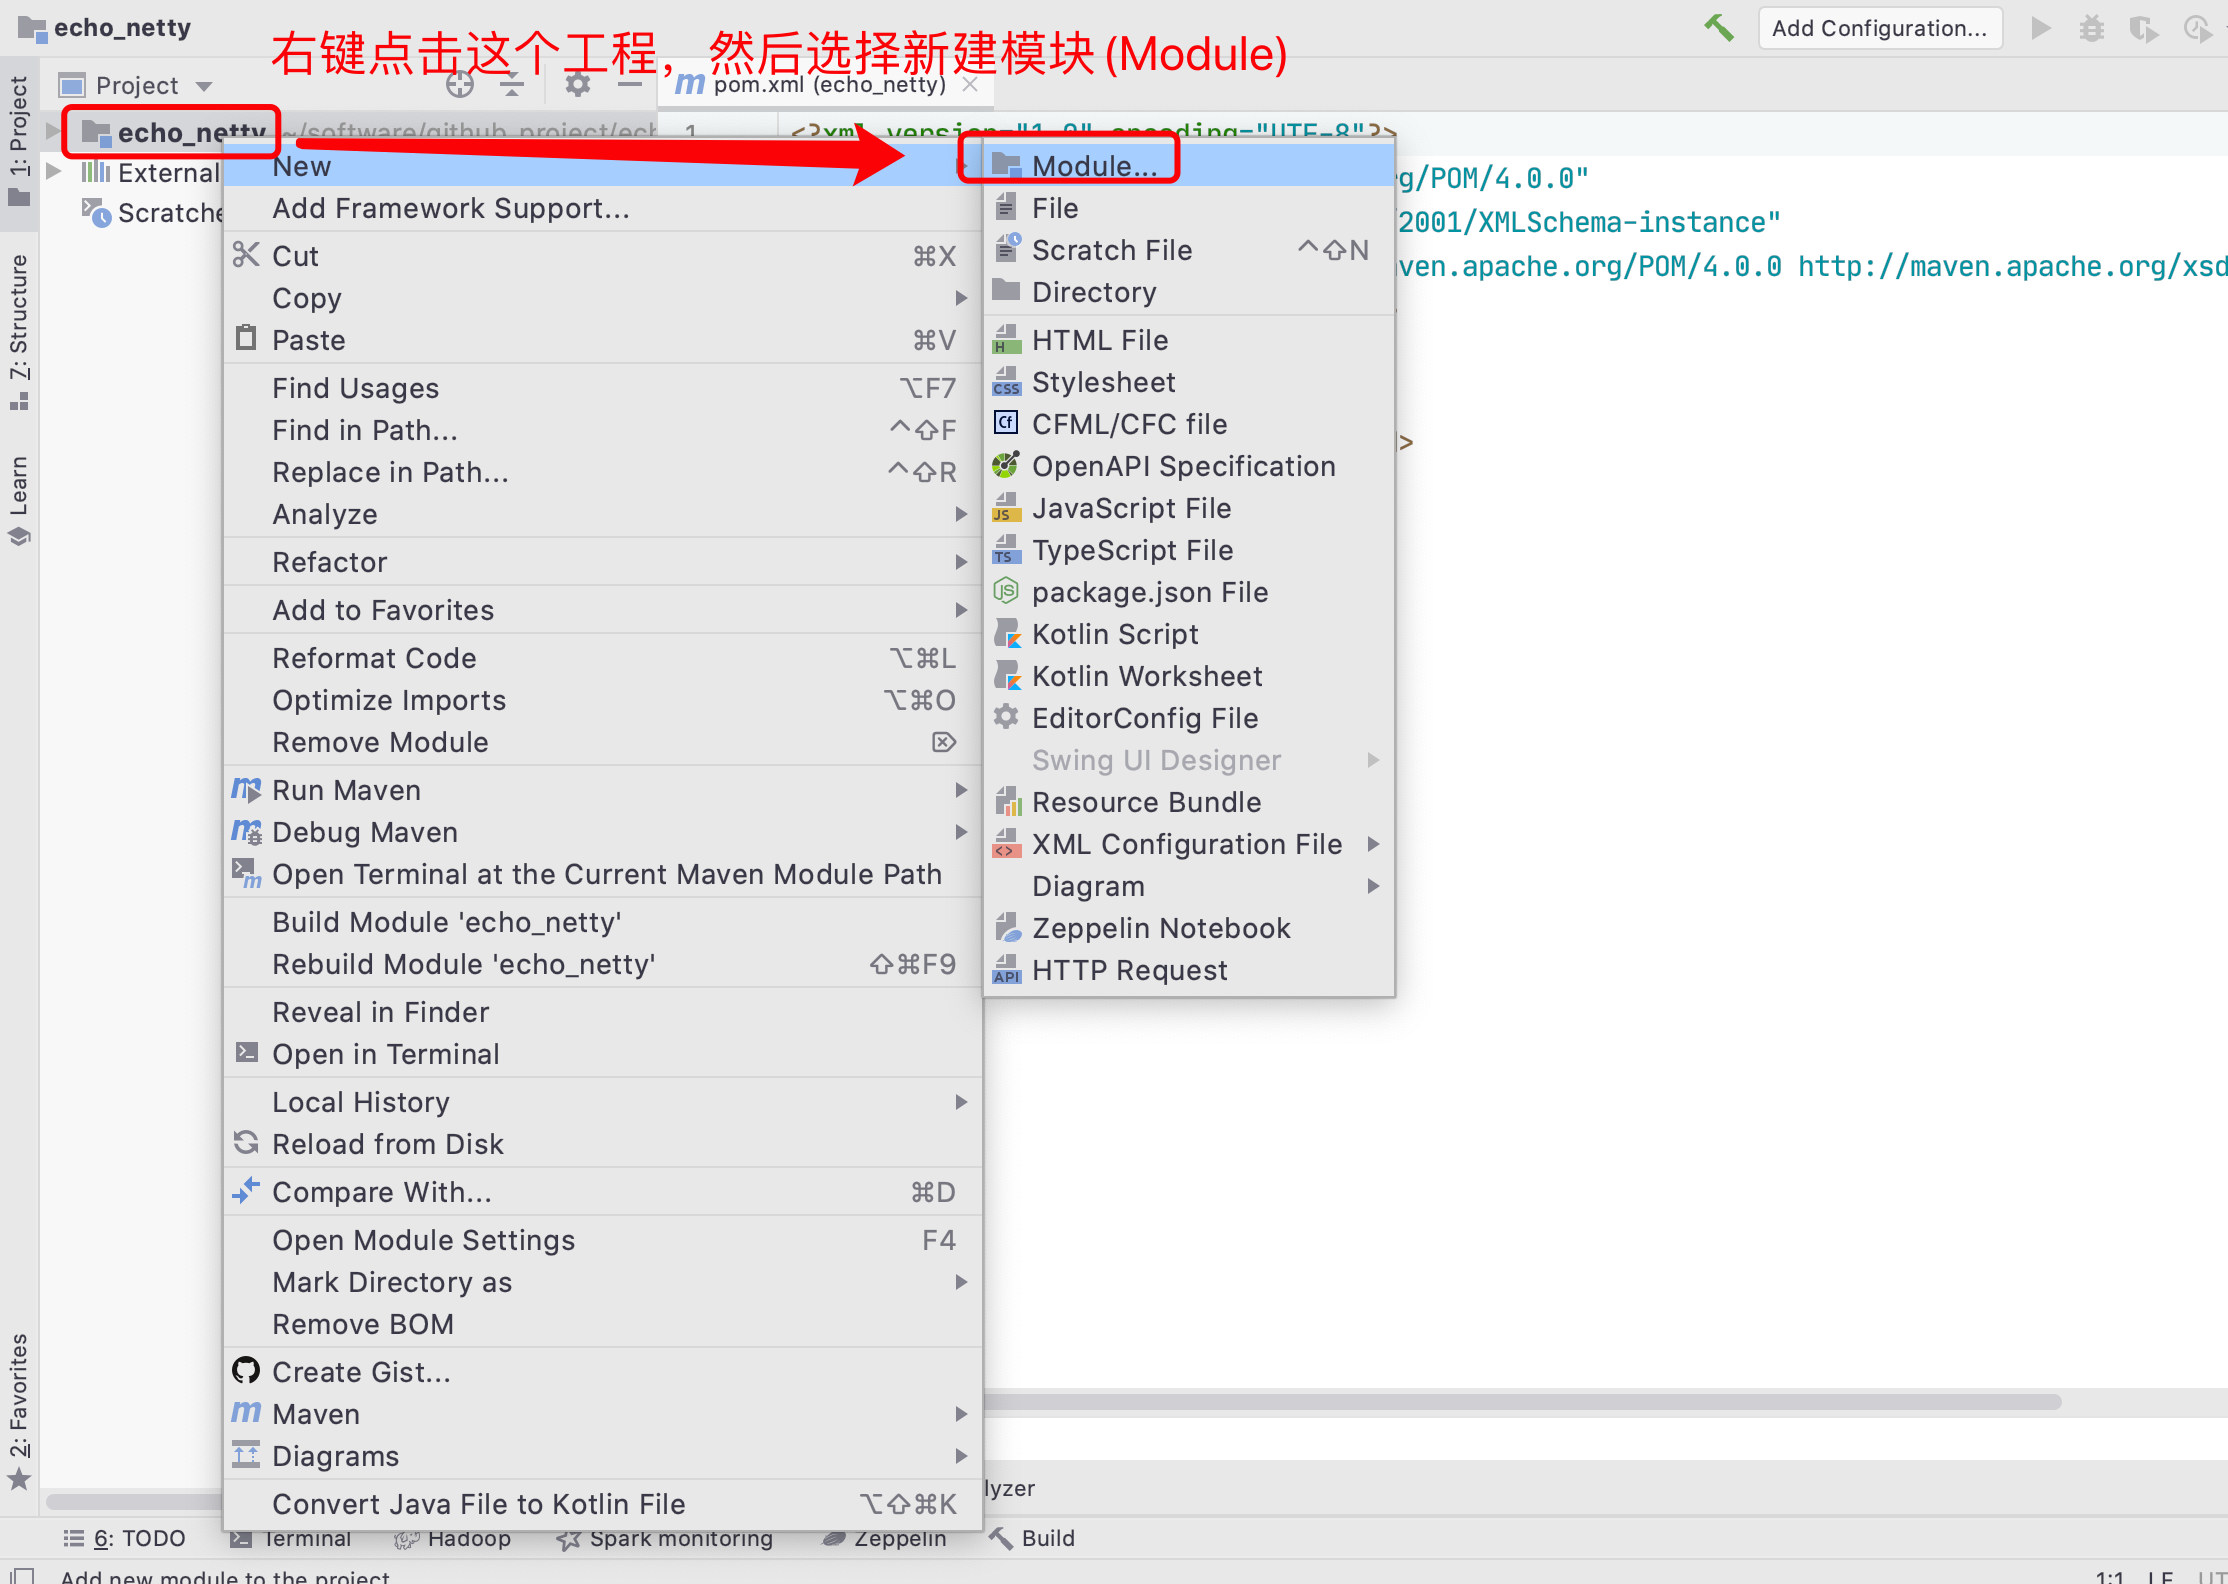
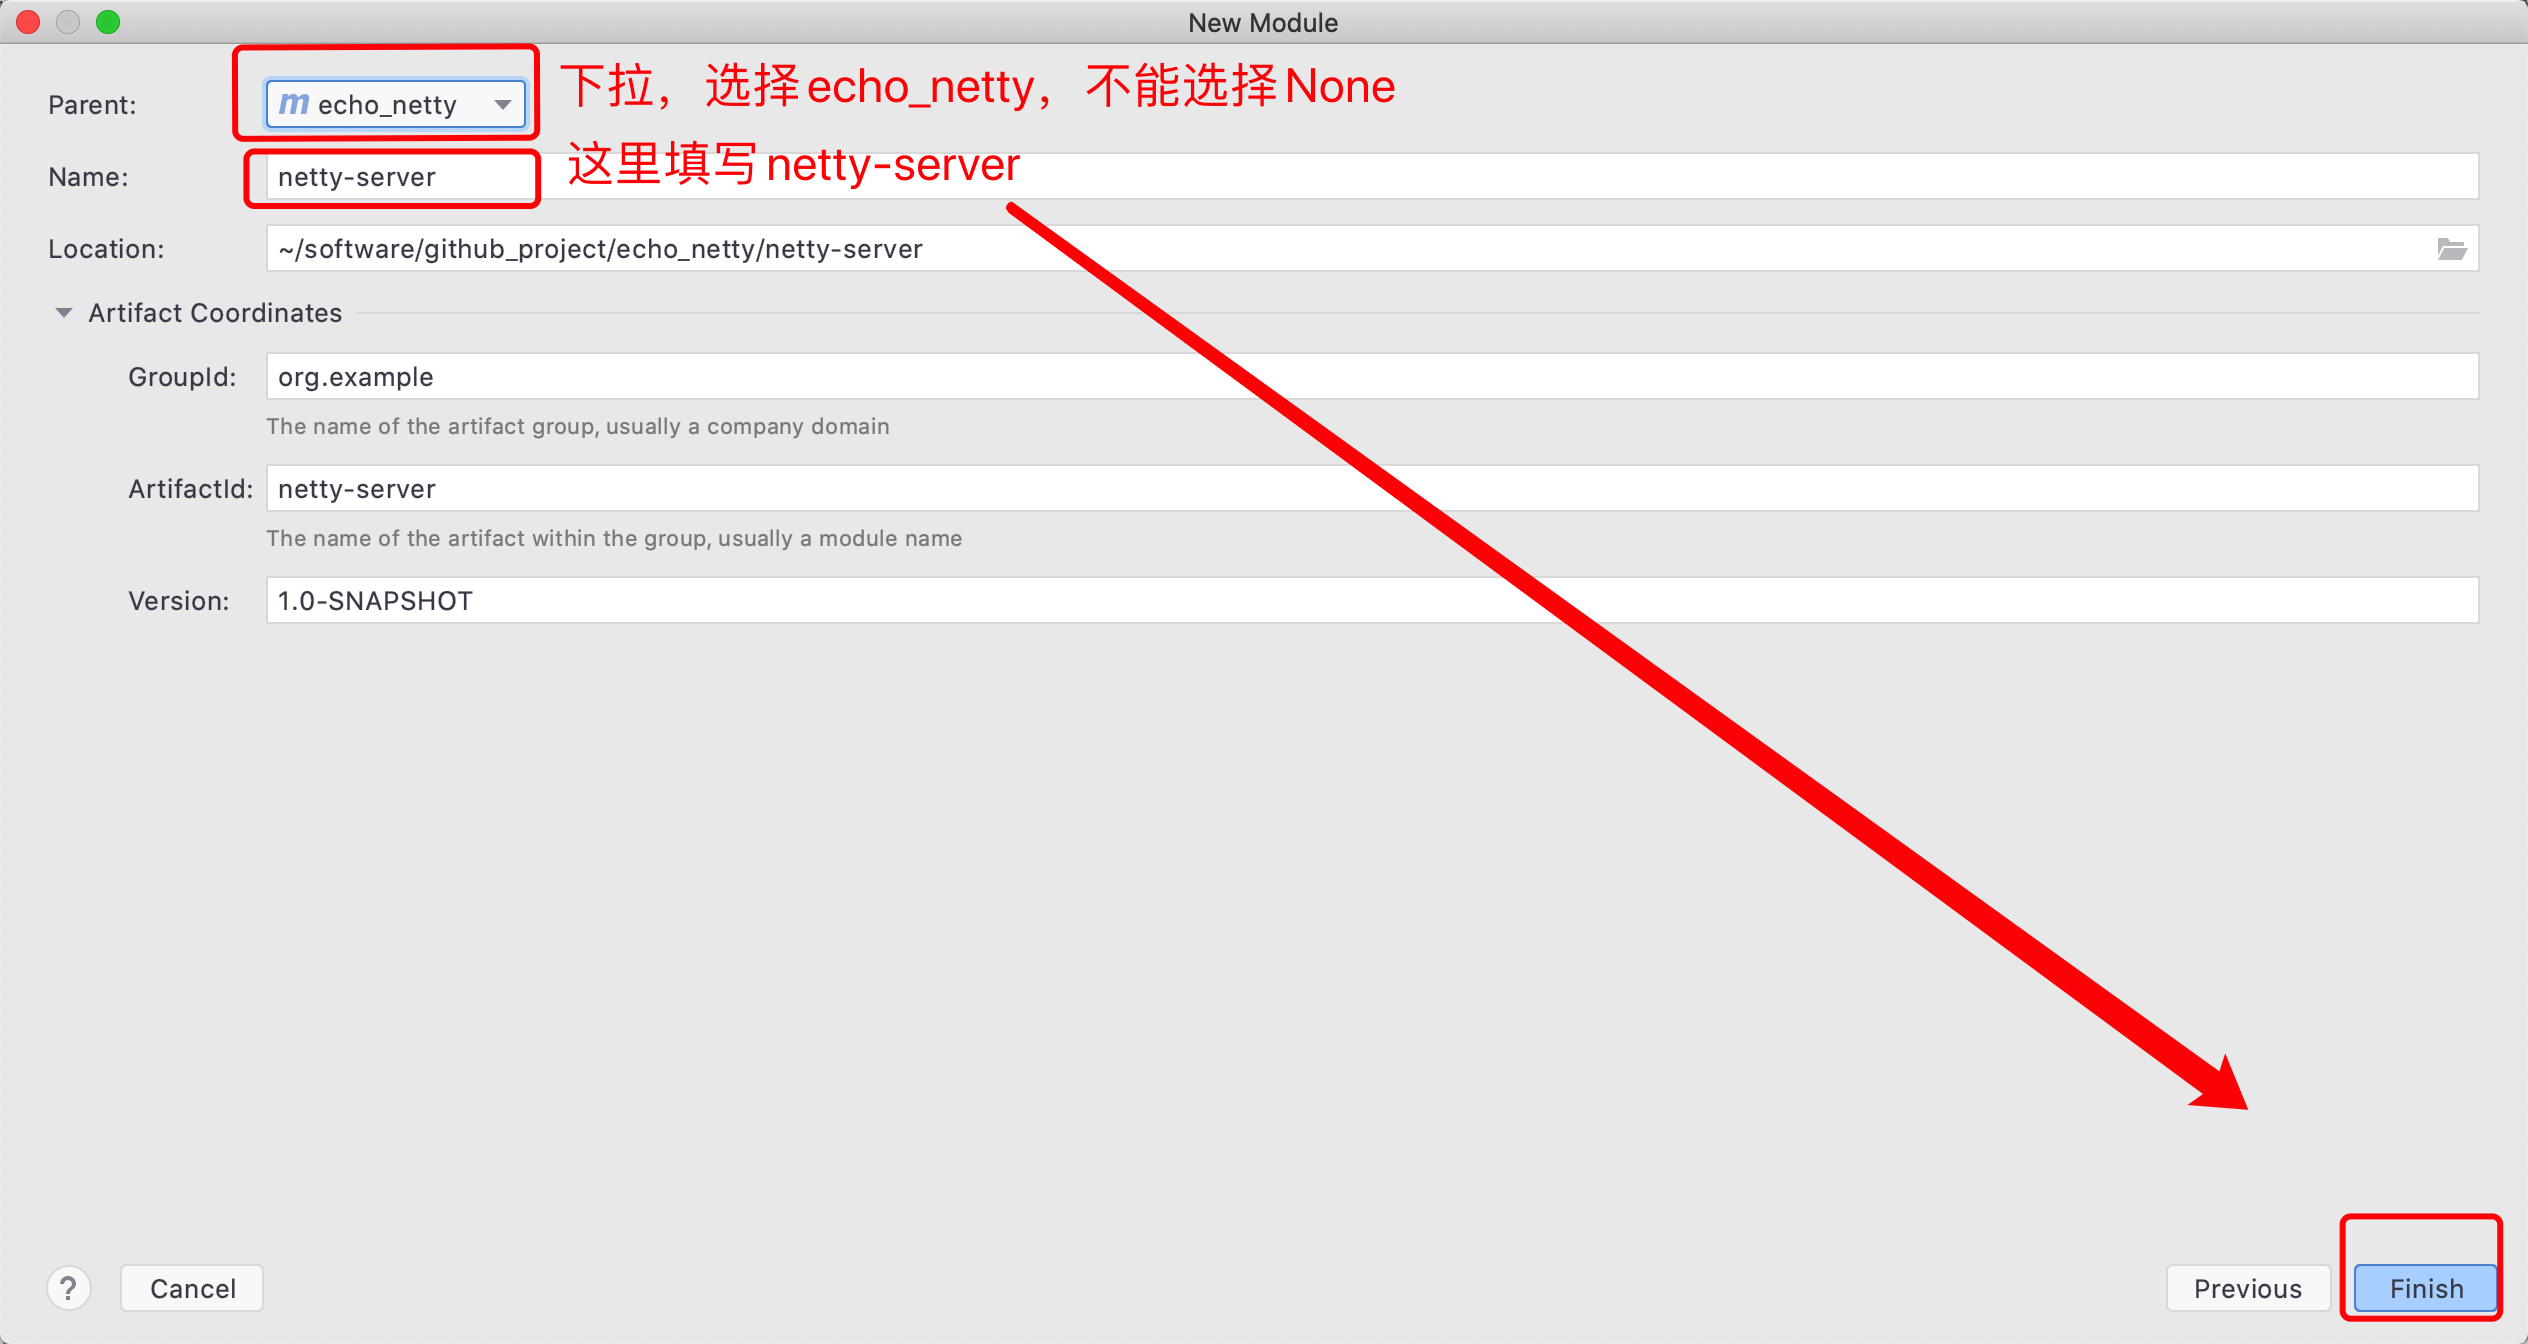
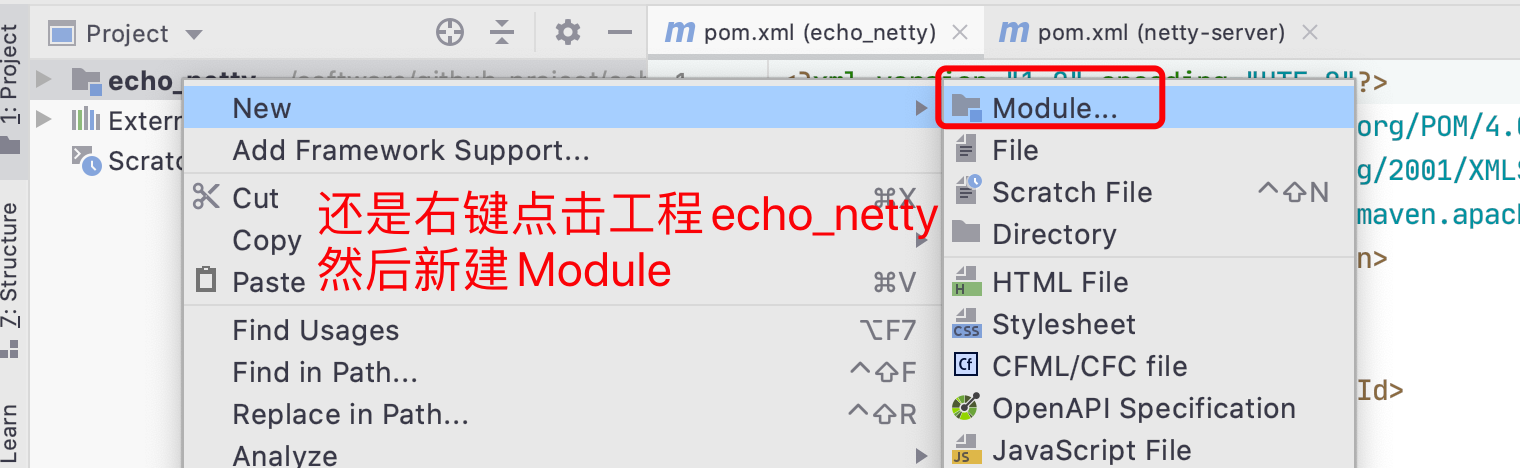
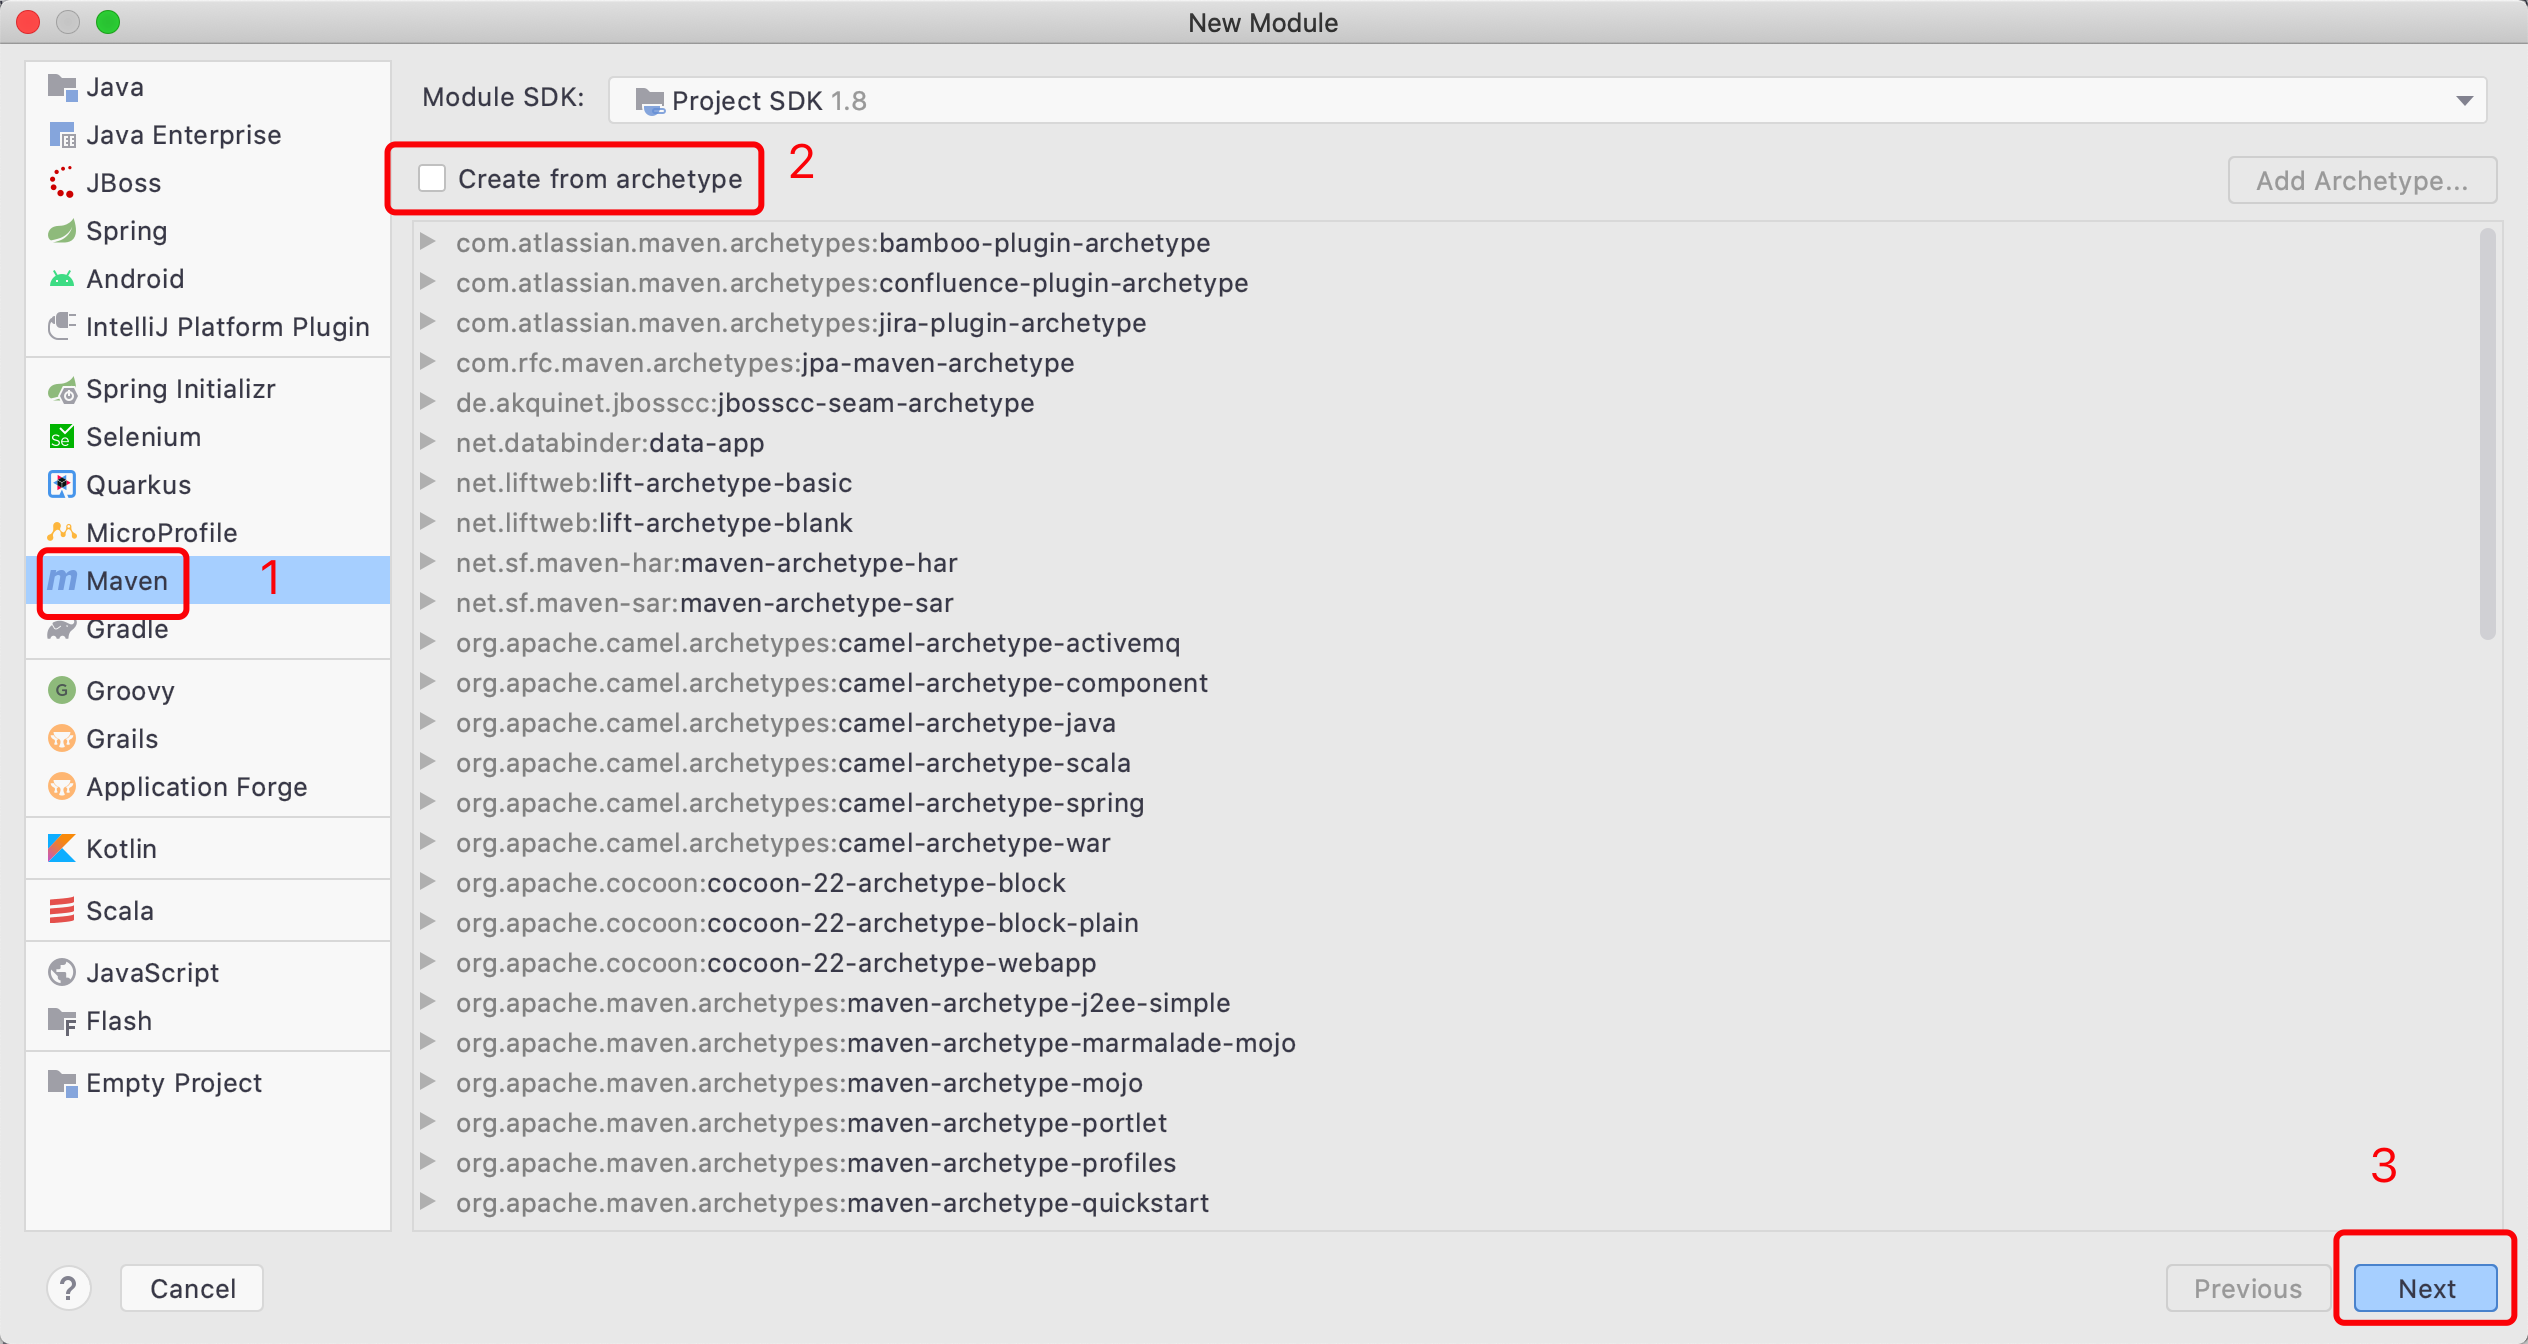
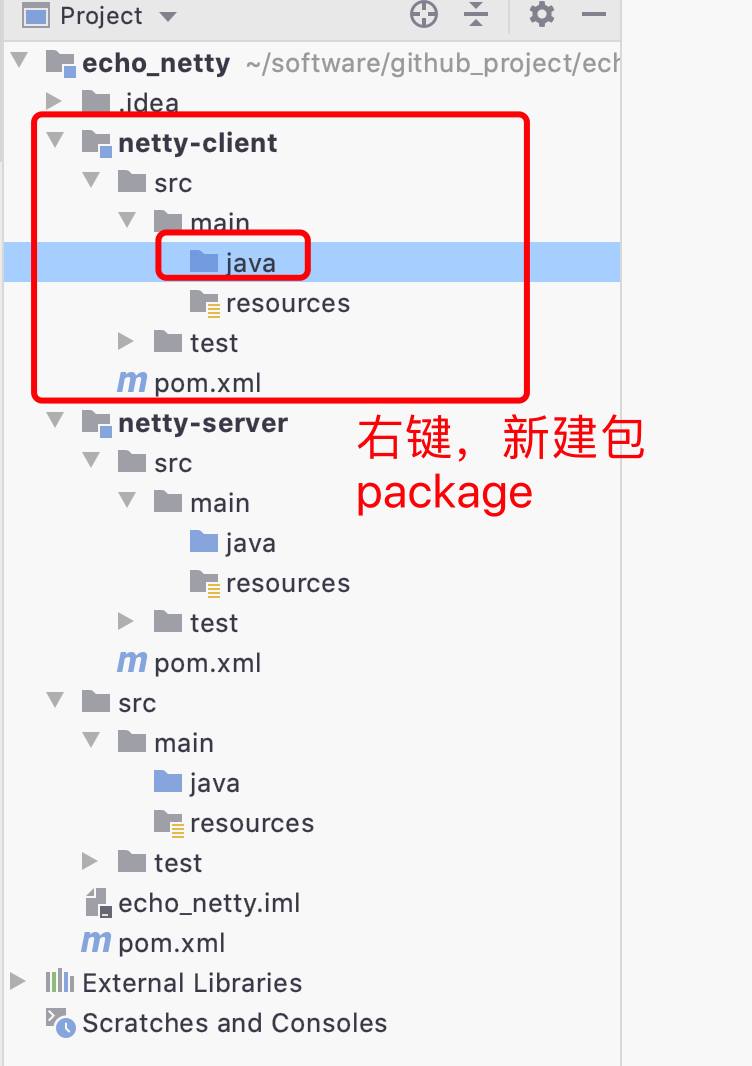
1.创建Maven工程
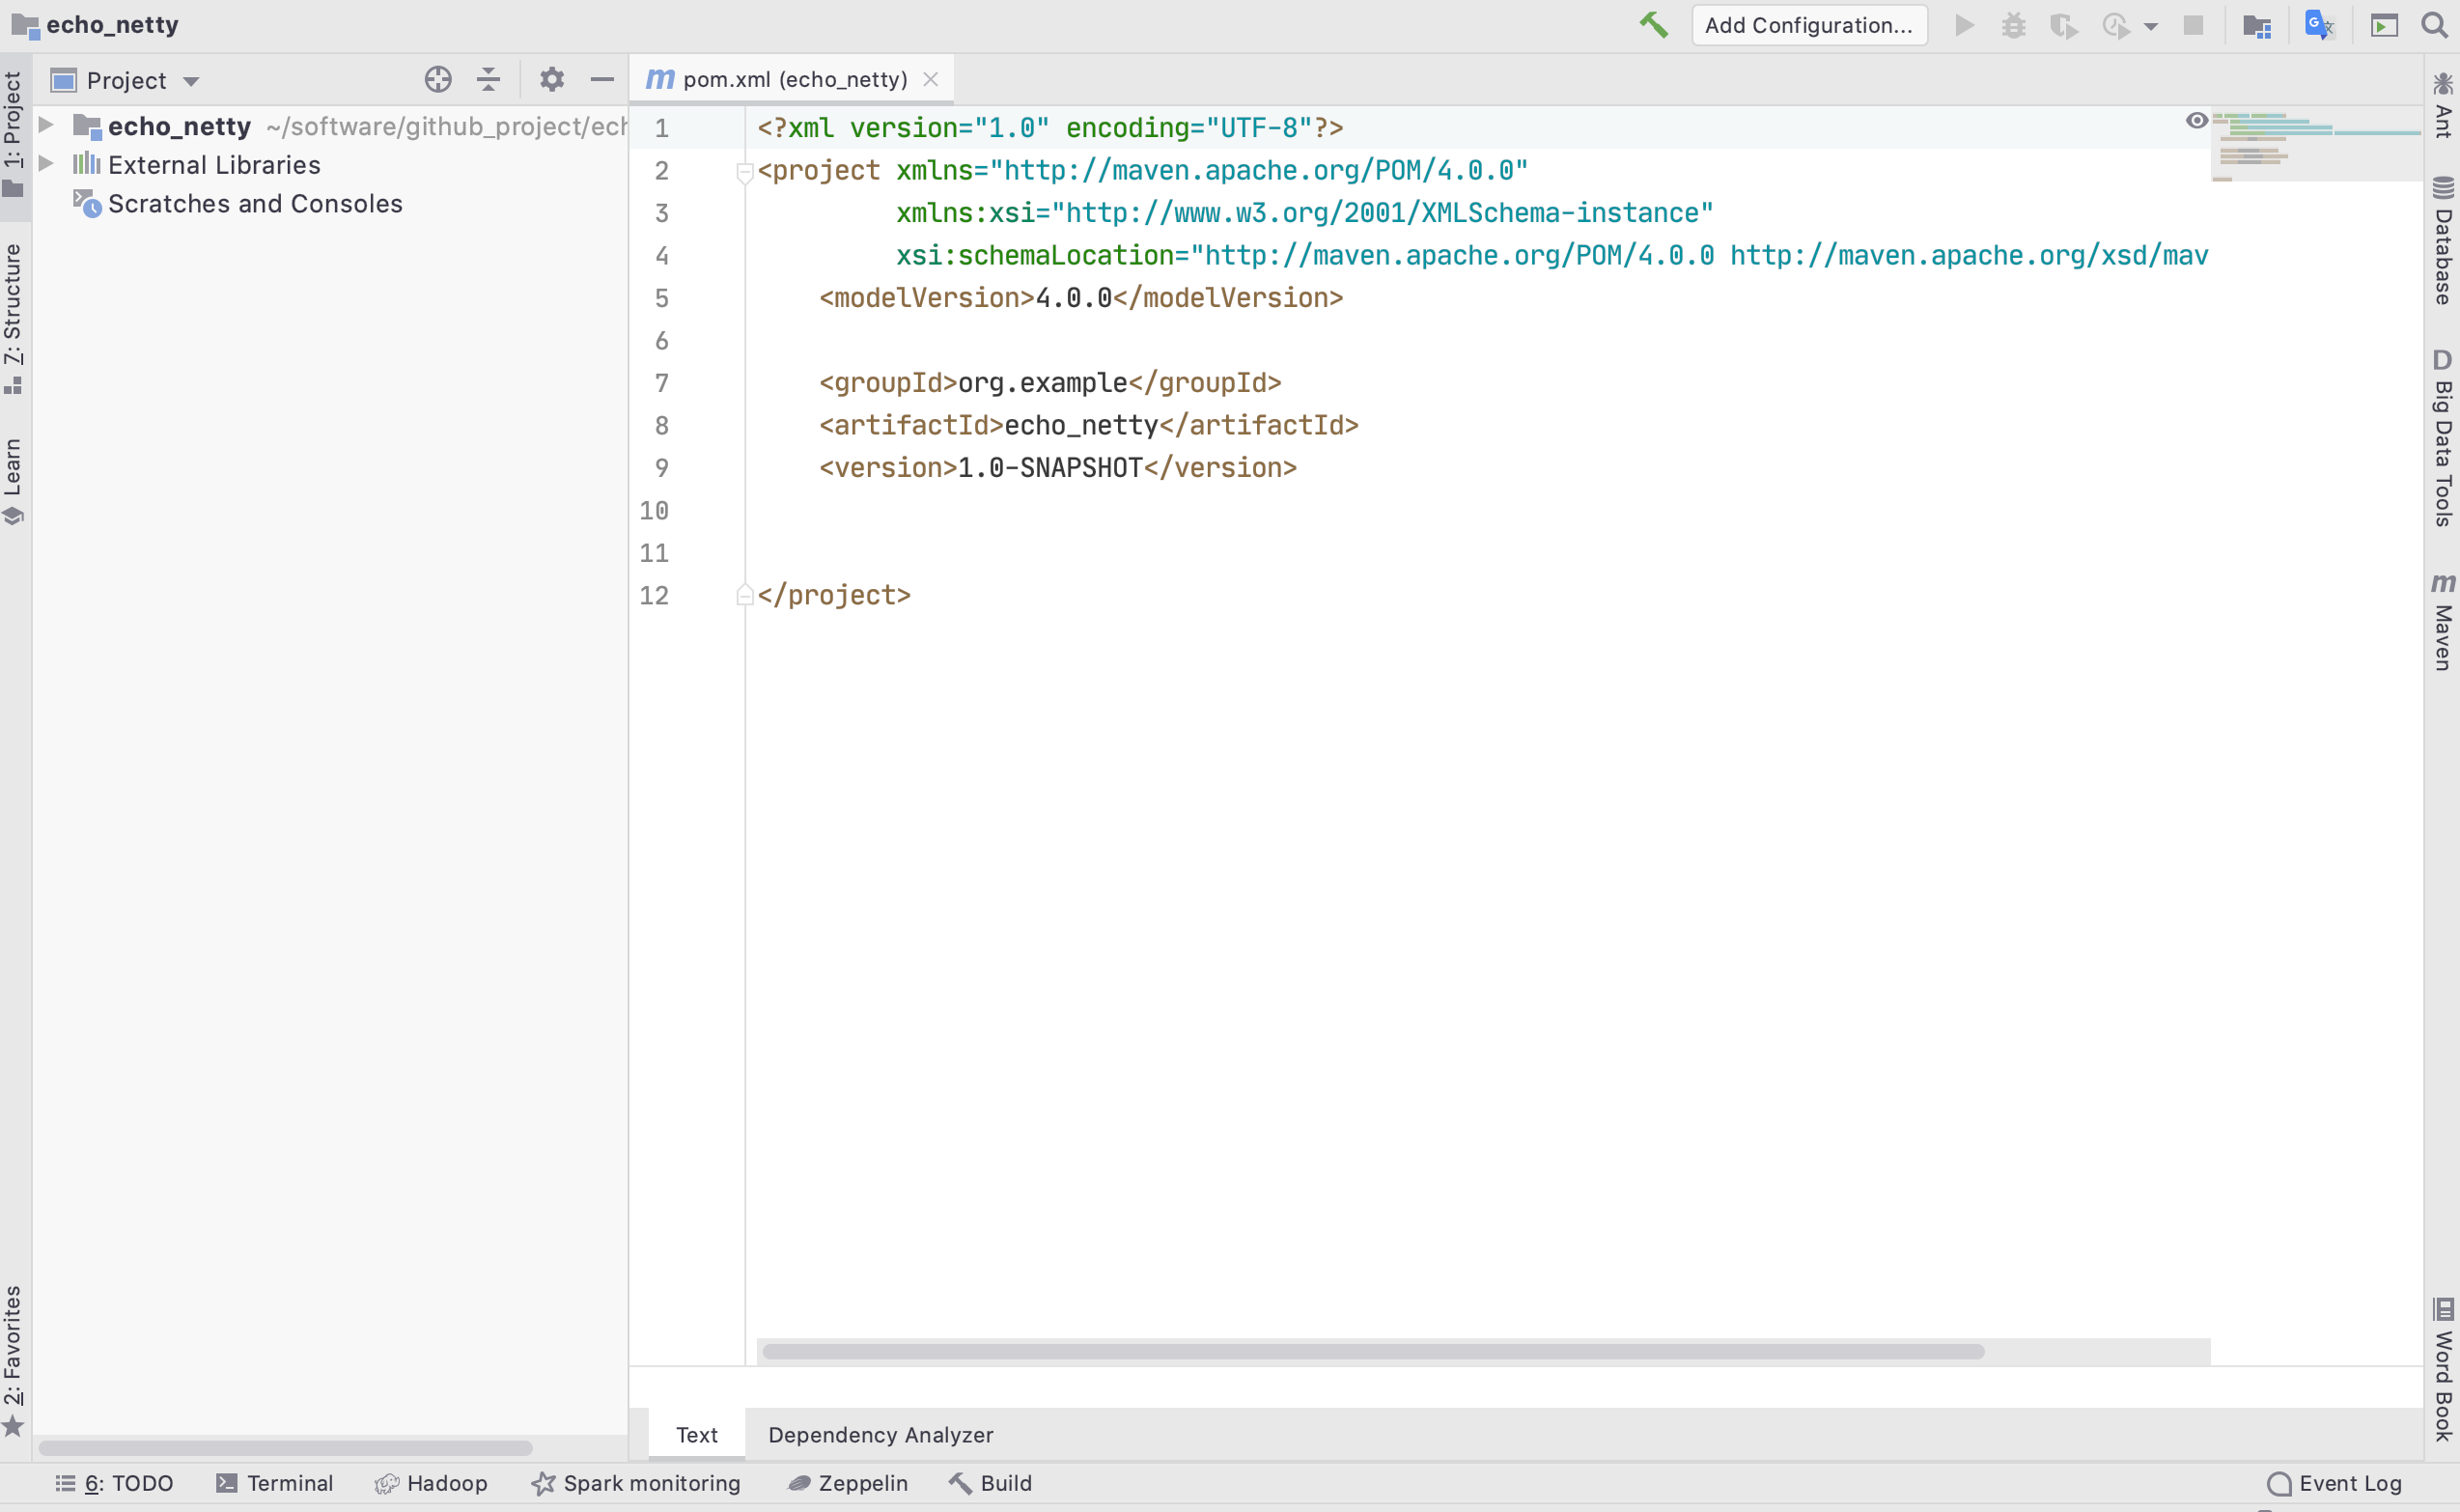


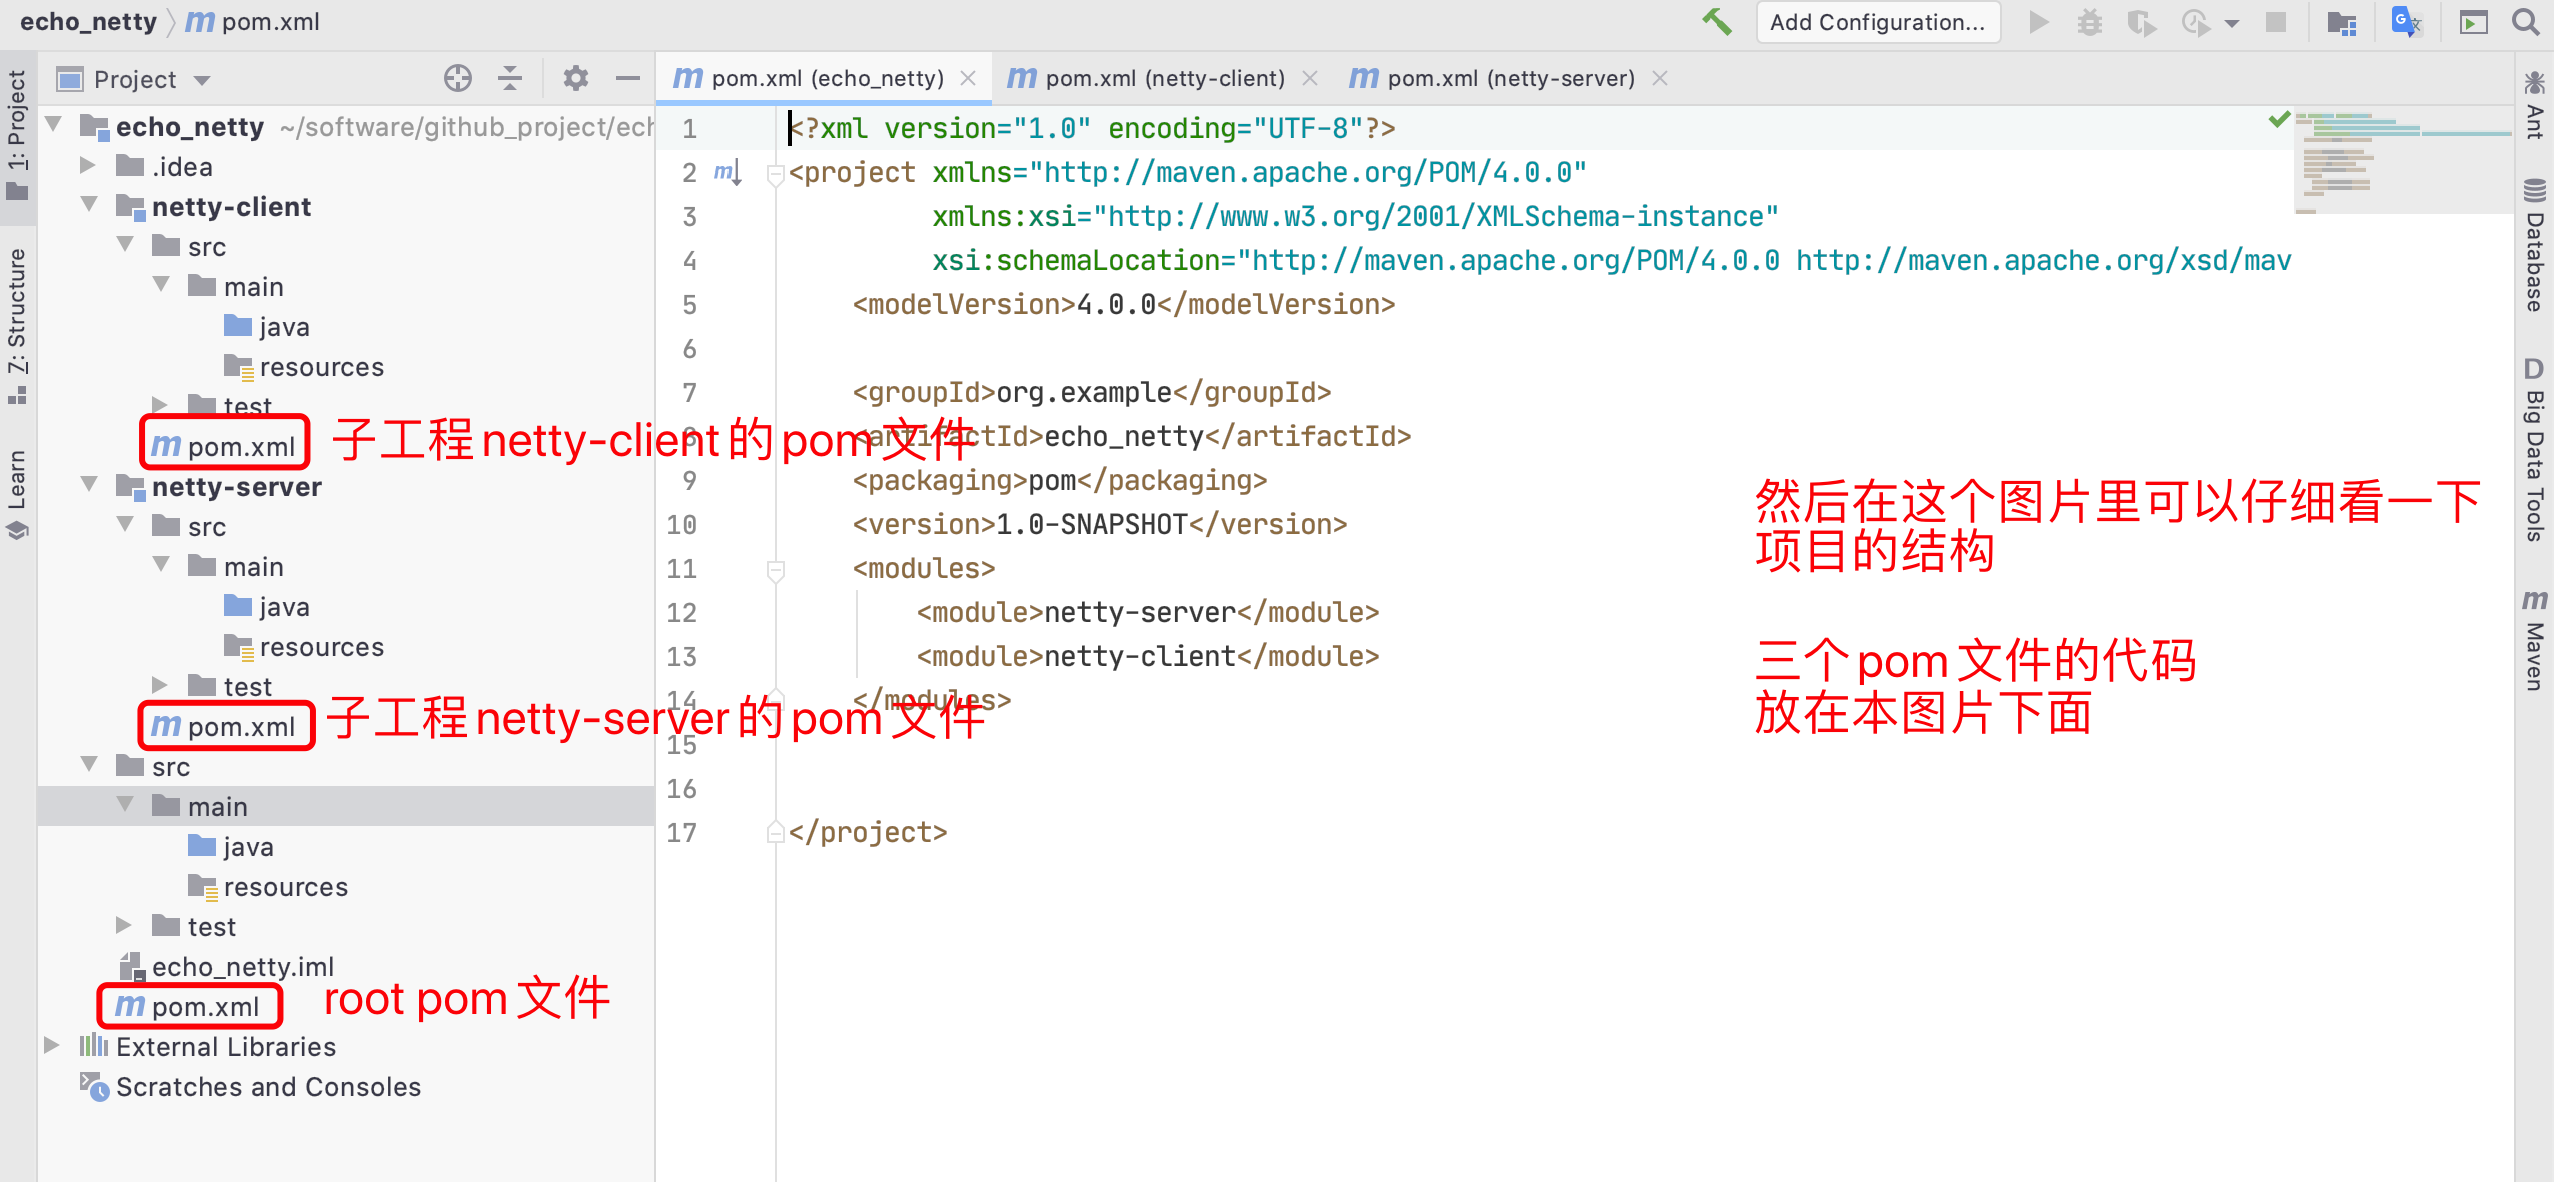
1.1 父节点的pom.xml代码(root pom文件)
 1 <?xml version="1.0" encoding="UTF-8"?>
 2 <project xmlns="http://maven.apache.org/POM/4.0.0"
 3          xmlns:xsi="http://www.w3.org/2001/XMLSchema-instance"
 4          xsi:schemaLocation="http://maven.apache.org/POM/4.0.0 http://maven.apache.org/xsd/maven-4.0.0.xsd">
 5     <modelVersion>4.0.0</modelVersion>
 6
 7     <groupId>org.example</groupId>
 8     <artifactId>echo_netty</artifactId>
 9     <packaging>pom</packaging>
10     <version>1.0-SNAPSHOT</version>
11     <modules>
12         <module>netty-server</module>
13         <module>netty-client</module>
14     </modules>
15
16 </project>
1.2 子工程netty-server的pom.xml文件代码
 1 <?xml version="1.0" encoding="UTF-8"?>
 2 <project xmlns="http://maven.apache.org/POM/4.0.0"
 3          xmlns:xsi="http://www.w3.org/2001/XMLSchema-instance"
 4          xsi:schemaLocation="http://maven.apache.org/POM/4.0.0 http://maven.apache.org/xsd/maven-4.0.0.xsd">
 5     <parent>
 6         <artifactId>echo_netty</artifactId>
 7         <groupId>org.example</groupId>
 8         <version>1.0-SNAPSHOT</version>
 9     </parent>
10     <modelVersion>4.0.0</modelVersion>
11
12     <artifactId>netty-server</artifactId>
13
14
15 </project>
1.3 子工程netty-client的pom.xml文件代码
 1 <?xml version="1.0" encoding="UTF-8"?>
 2 <project xmlns="http://maven.apache.org/POM/4.0.0"
 3          xmlns:xsi="http://www.w3.org/2001/XMLSchema-instance"
 4          xsi:schemaLocation="http://maven.apache.org/POM/4.0.0 http://maven.apache.org/xsd/maven-4.0.0.xsd">
 5     <parent>
 6         <artifactId>echo_netty</artifactId>
 7         <groupId>org.example</groupId>
 8         <version>1.0-SNAPSHOT</version>
 9     </parent>
10     <modelVersion>4.0.0</modelVersion>
11
12     <artifactId>netty-client</artifactId>
13
14
15 </project>
1.4 修改父工程的pom.xml,修改后如下所示:
 1 <?xml version="1.0" encoding="UTF-8"?>
 2 <project xmlns="http://maven.apache.org/POM/4.0.0"
 3          xmlns:xsi="http://www.w3.org/2001/XMLSchema-instance"
 4          xsi:schemaLocation="http://maven.apache.org/POM/4.0.0 http://maven.apache.org/xsd/maven-4.0.0.xsd">
 5     <modelVersion>4.0.0</modelVersion>
 6
 7     <groupId>org.example</groupId>
 8     <artifactId>echo_netty</artifactId>
 9     <packaging>pom</packaging>
10     <version>1.0-SNAPSHOT</version>
11     <modules>
12         <module>netty-server</module>
13         <module>netty-client</module>
14     </modules>
15
16     <properties>
17         <echo-server.hostname>localhost</echo-server.hostname>
18         <echo-server.port>9999</echo-server.port>
19     </properties>
20
21     <dependencies>
22         <dependency>
23             <groupId>io.netty</groupId>
24             <artifactId>netty-all</artifactId>
25             <version>4.1.10.Final</version>
26             <scope>compile</scope>
27         </dependency>
28     </dependencies>
29
30     <build>
31         <plugins>
32             <plugin>
33                 <artifactId>maven-compiler-plugin</artifactId>
34             </plugin>
35             <plugin>
36                 <artifactId>maven-failsafe-plugin</artifactId>
37             </plugin>
38             <plugin>
39                 <artifactId>maven-surefire-plugin</artifactId>
40             </plugin>
41             <plugin>
42                 <groupId>org.codehaus.mojo</groupId>
43                 <artifactId>exec-maven-plugin</artifactId>
44             </plugin>
45         </plugins>
46     </build>
47 </project>
1.5 修改netty-server的pom.xml,修改后如下所示:
 1 <?xml version="1.0" encoding="UTF-8"?>
 2 <project xmlns="http://maven.apache.org/POM/4.0.0"
 3          xmlns:xsi="http://www.w3.org/2001/XMLSchema-instance"
 4          xsi:schemaLocation="http://maven.apache.org/POM/4.0.0 http://maven.apache.org/xsd/maven-4.0.0.xsd">
 5     <parent>
 6         <artifactId>echo_netty</artifactId>
 7         <groupId>org.example</groupId>
 8         <version>1.0-SNAPSHOT</version>
 9     </parent>
10     <modelVersion>4.0.0</modelVersion>
11
12     <artifactId>netty-server</artifactId>
13
14     <build>
15         <plugins>
16             <plugin>
17                 <groupId>org.codehaus.mojo</groupId>
18                 <artifactId>exec-maven-plugin</artifactId>
19                 <executions>
20                     <execution>
21                         <id>run-server</id>
22                         <goals>
23                             <goal>java</goal>
24                         </goals>
25                     </execution>
26                 </executions>
27                 <configuration>
28                     <mainClass>com.echo.server.EchoServer</mainClass>
29                     <arguments>
30                         <argument>${echo-server.port}</argument>
31                     </arguments>
32                 </configuration>
33             </plugin>
34         </plugins>
35     </build>
36
37 </project>
1.6 修改netty-client的pom.xml,修改后如下所示:
 1 <?xml version="1.0" encoding="UTF-8"?>
 2 <project xmlns="http://maven.apache.org/POM/4.0.0"
 3          xmlns:xsi="http://www.w3.org/2001/XMLSchema-instance"
 4          xsi:schemaLocation="http://maven.apache.org/POM/4.0.0 http://maven.apache.org/xsd/maven-4.0.0.xsd">
 5     <parent>
 6         <artifactId>echo_netty</artifactId>
 7         <groupId>org.example</groupId>
 8         <version>1.0-SNAPSHOT</version>
 9     </parent>
10     <modelVersion>4.0.0</modelVersion>
11
12     <artifactId>netty-client</artifactId>
13
14     <build>
15         <plugins>
16             <plugin>
17                 <groupId>org.codehaus.mojo</groupId>
18                 <artifactId>exec-maven-plugin</artifactId>
19                 <executions>
20                     <execution>
21                         <id>run-server</id>
22                         <goals>
23                             <goal>java</goal>
24                         </goals>
25                     </execution>
26                 </executions>
27                 <configuration>
28                     <mainClass>com.echo.client.EchoClient</mainClass>
29                     <arguments>
30                         <argument>${echo-server.hostname}</argument>
31                         <argument>${echo-server.port}</argument>
32                     </arguments>
33                 </configuration>
34             </plugin>
35         </plugins>
36     </build>
37
38 </project>
2. 开始写netty客户端的代码


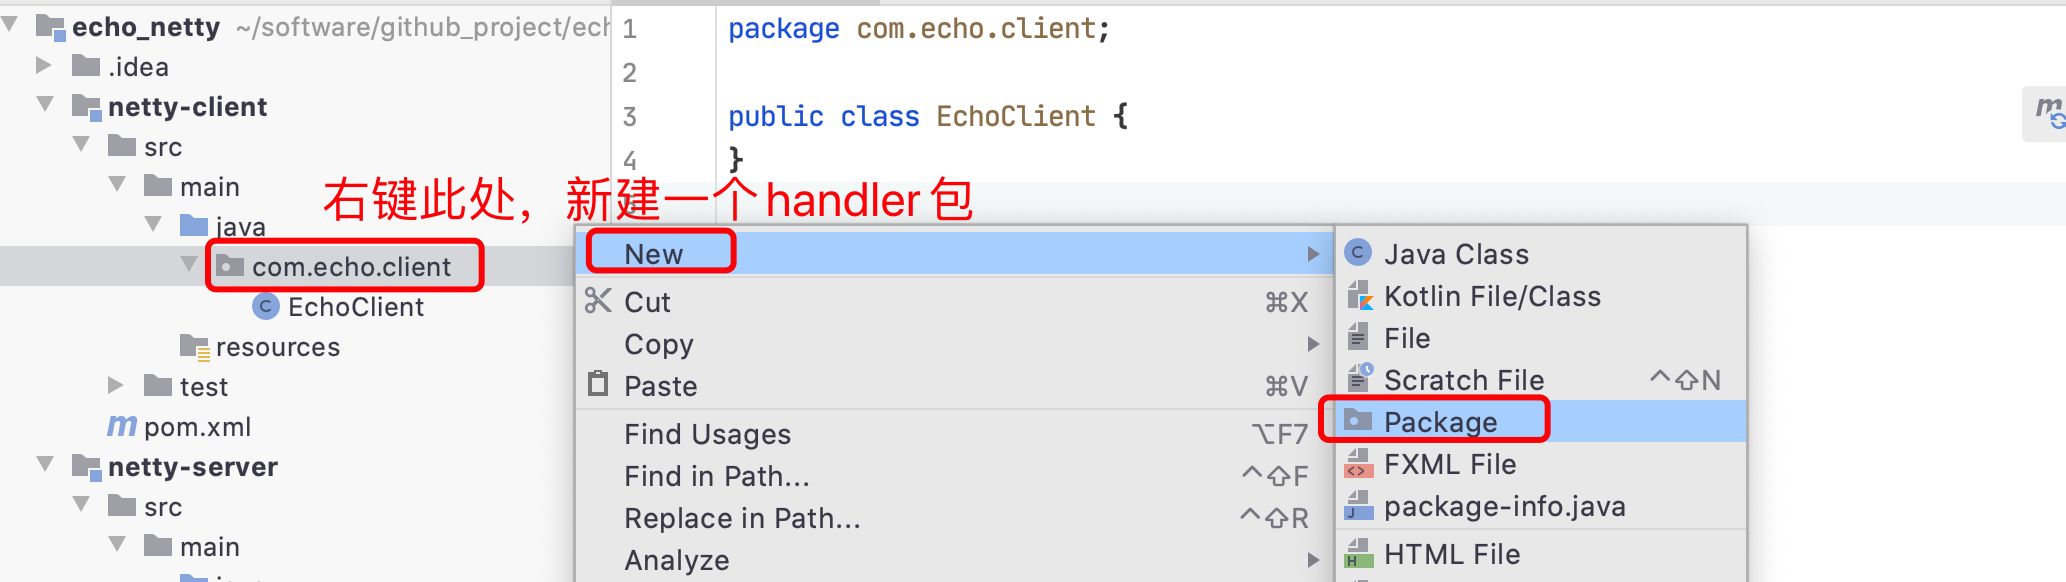

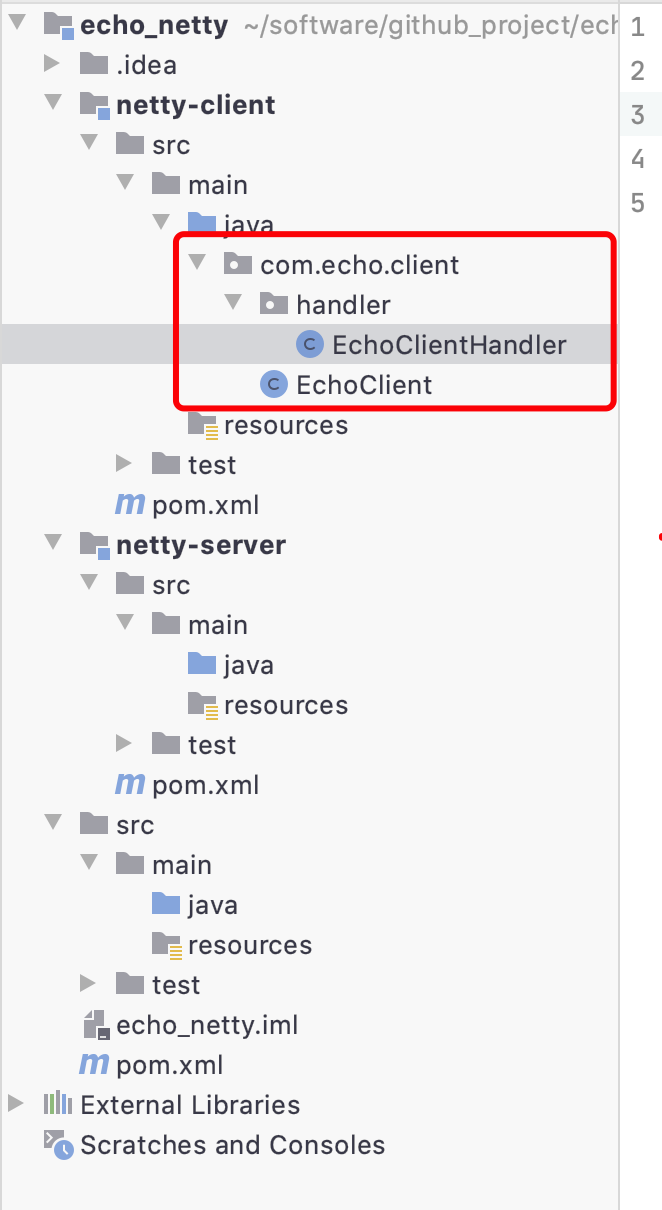
到这里的时候,项目的结构应该是这个样子的,然后让我们修改一下EchoClient.java和EchoClientHandler.java文件的内容,修改后最终代码放在下面,大家请看:
2.1 EchoClient.java的最终代码
 1 package com.echo.client;
 2
 3 import java.net.InetSocketAddress;
 4
 5 import com.echo.client.handler.EchoClientHandler;
 6 import io.netty.bootstrap.Bootstrap;
 7 import io.netty.channel.ChannelFuture;
 8 import io.netty.channel.ChannelInitializer;
 9 import io.netty.channel.EventLoopGroup;
10 import io.netty.channel.nio.NioEventLoopGroup;
11 import io.netty.channel.socket.SocketChannel;
12 import io.netty.channel.socket.nio.NioSocketChannel;
13
14 public class EchoClient {
15
16     private final String host;
17     private final int port;
18
19     public EchoClient(String host, int port) {
20         this.host = host;
21         this.port = port;
22     }
23
24     public static void main(String[] args) throws Exception {
25         if (args.length != 2) {
26             System.err.println(
27                     "Usage: " + EchoClient.class.getSimpleName() +
28                             " <host> <port>");
29             return;
30         }
31         String host = args[0];
32         int port = Integer.parseInt(args[1]);
33         new EchoClient(host, port).start();
34     }
35
36     public void start() throws Exception {
37         EventLoopGroup group = new NioEventLoopGroup();
38         try {
39             Bootstrap b = new Bootstrap();
40             b.group(group)
41                     .channel(NioSocketChannel.class)
42                     .remoteAddress(new InetSocketAddress(host, port))
43                     .handler(new ChannelInitializer<SocketChannel>() {
44
45                         @Override
46                         protected void initChannel(SocketChannel ch) throws Exception {
47                             ch.pipeline().addLast(new EchoClientHandler());
48                         }
49
50                     });
51             ChannelFuture f = b.connect().sync();
52             f.channel().closeFuture().sync();
53         } finally {
54             group.shutdownGracefully().sync();
55         }
56     }
57
58 }
2.2 EchoClientHandler.java的最终代码
 1 package com.echo.client.handler;
 2
 3 import io.netty.buffer.ByteBuf;
 4 import io.netty.buffer.Unpooled;
 5 import io.netty.channel.ChannelHandler.Sharable;
 6 import io.netty.channel.ChannelHandlerContext;
 7 import io.netty.channel.SimpleChannelInboundHandler;
 8 import io.netty.util.CharsetUtil;
 9
10 @Sharable
11 public class EchoClientHandler extends SimpleChannelInboundHandler<ByteBuf> {
12
13     @Override
14     public void channelActive(ChannelHandlerContext ctx) throws Exception {
15         ctx.writeAndFlush(Unpooled.copiedBuffer("Netty rocks!", CharsetUtil.UTF_8));
16     }
17
18     @Override
19     protected void channelRead0(ChannelHandlerContext ctx, ByteBuf in) throws Exception {
20         System.out.println("Client received: " + in.toString(CharsetUtil.UTF_8));
21     }
22
23     @Override
24     public void exceptionCaught(ChannelHandlerContext ctx, Throwable cause) throws Exception {
25         cause.printStackTrace();
26         ctx.close();
27     }
28
29 }
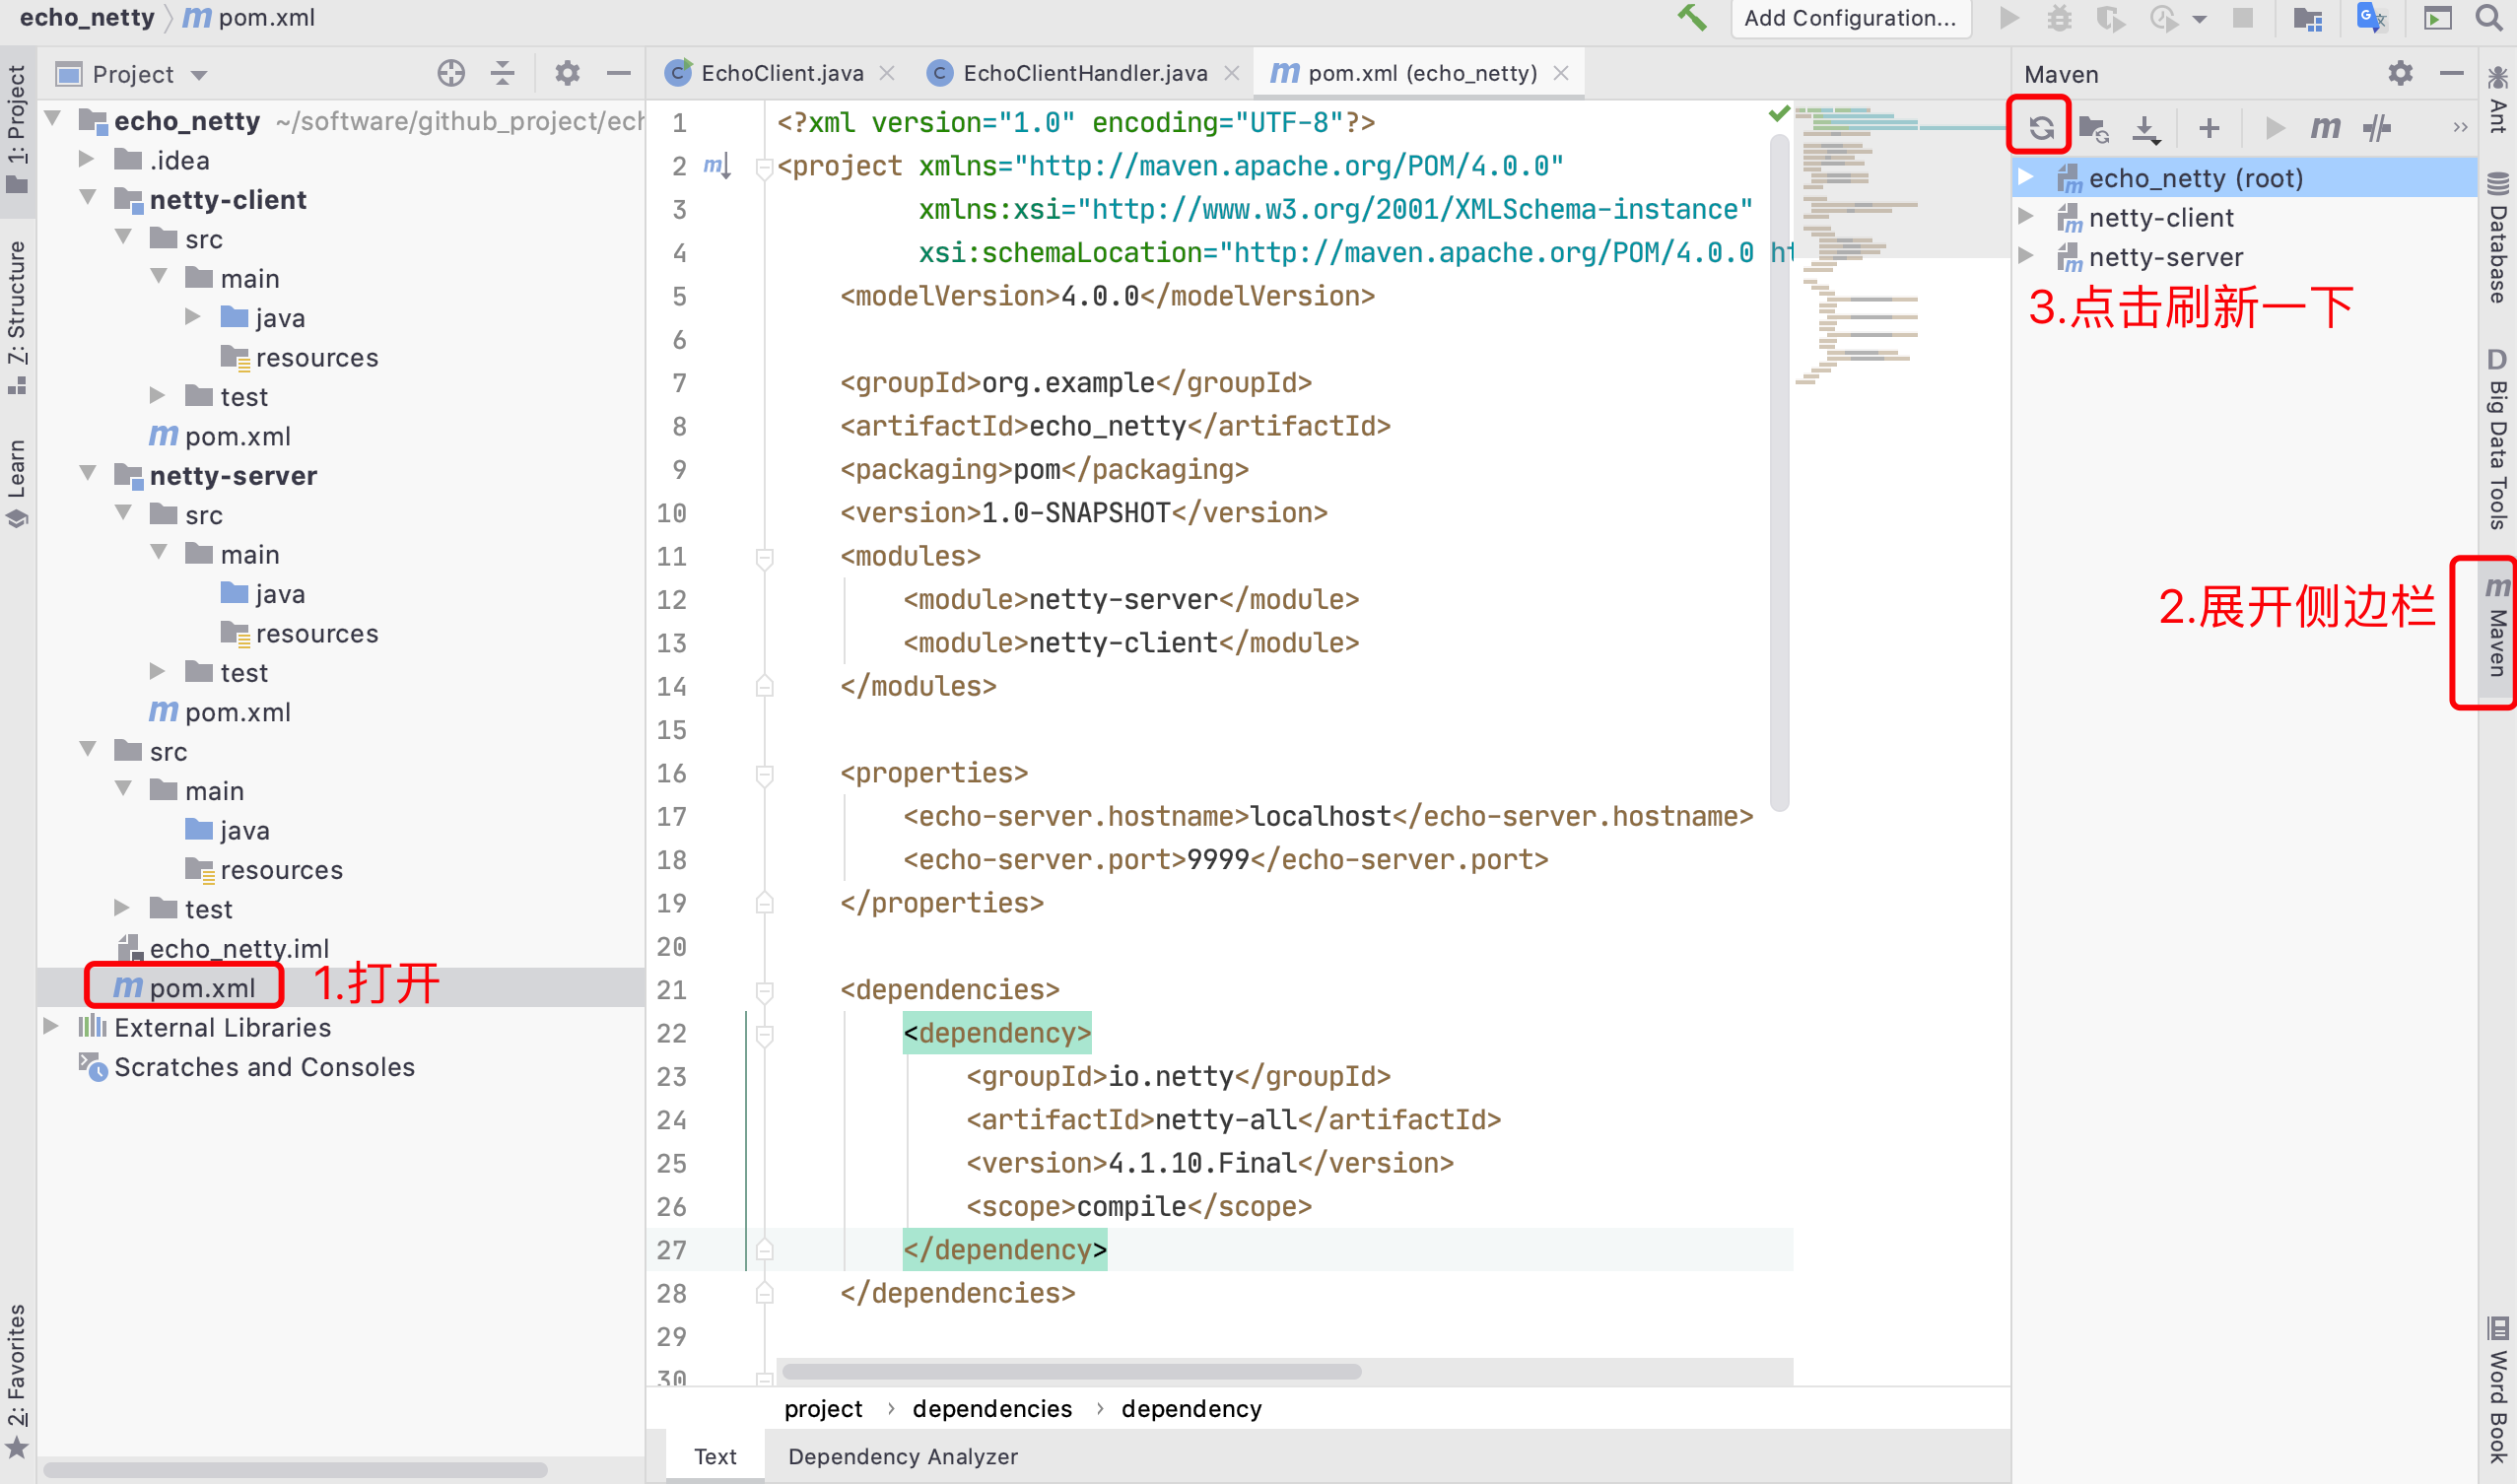
到这的时候,如果有报错的话,一般是maven没有刷新导致的。
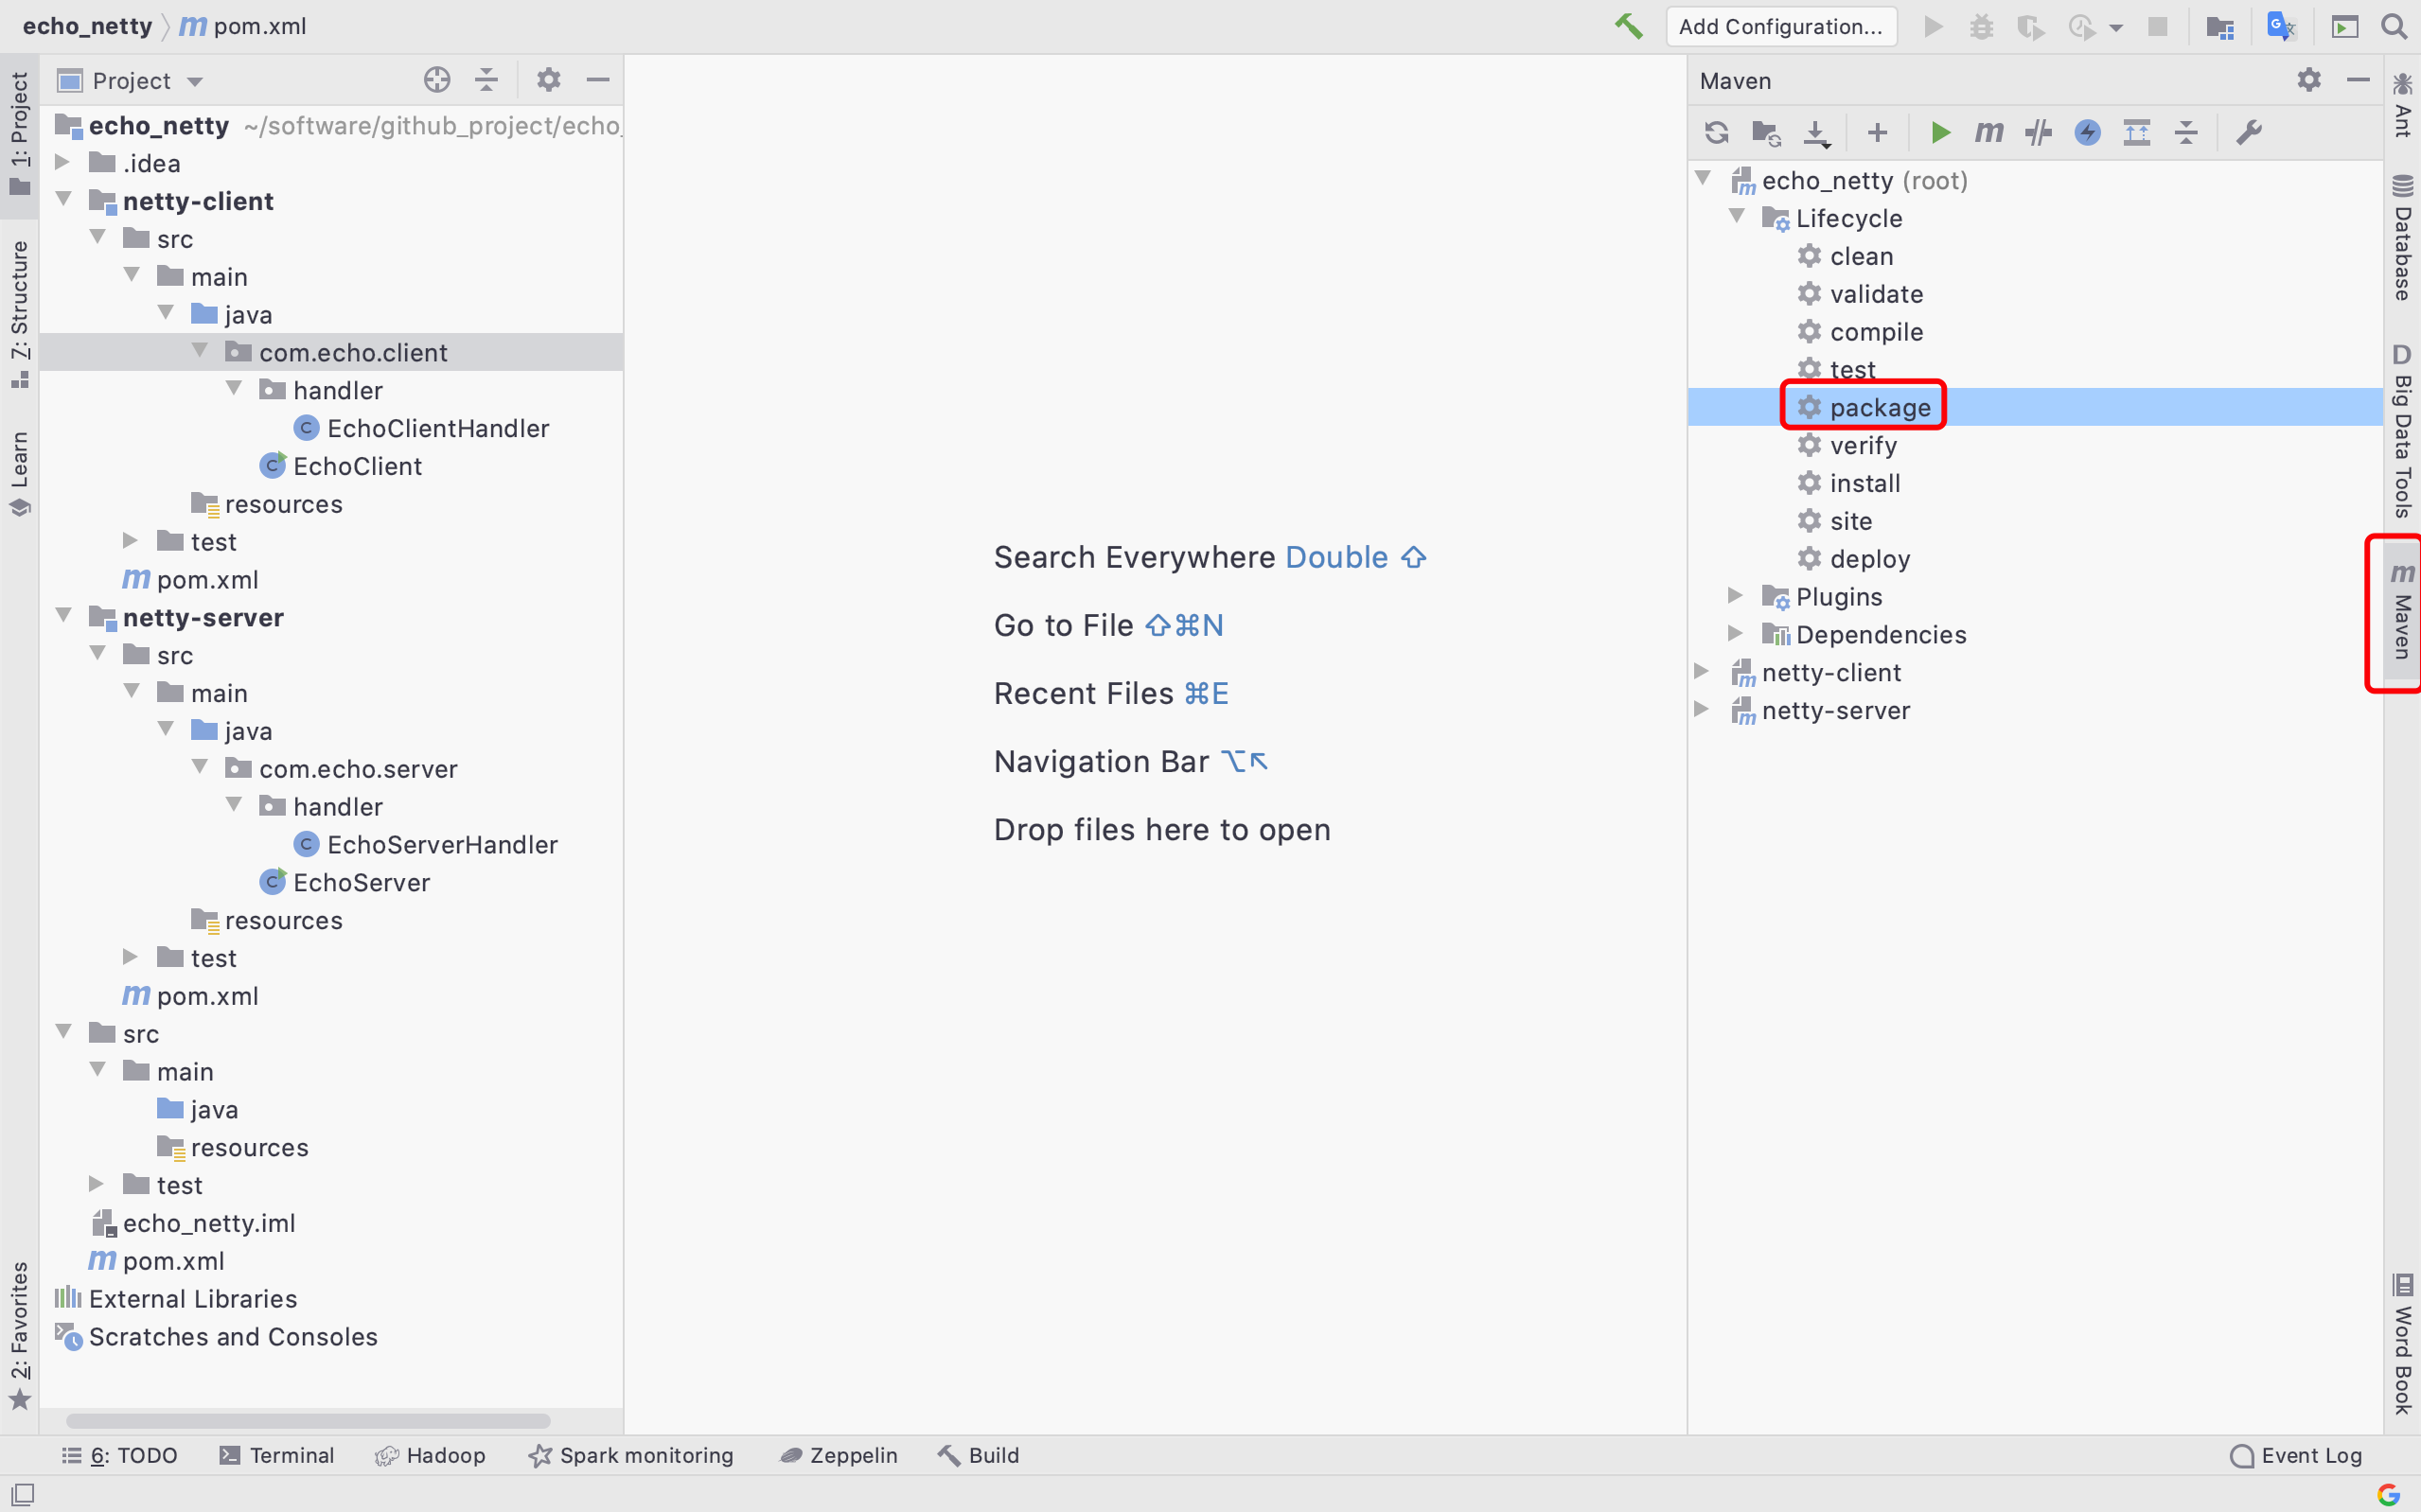
解决方法是,打开父工程的pom.xml ,然后点击idea的右侧的maven刷新按钮,如下图所示
至此,EchoClient端的代码就写好了。暂时先不启动,先写好EchoServer,再一起启动。下面介绍EchoServer端的代码。
3. 开始写netty服务端的代码

3.2 修改EchoServer.java文件代码,修改后最终代码如下:
 1 package com.echo.server;
 2
 3 import java.net.InetSocketAddress;
 4
 5 import com.echo.server.handler.EchoServerHandler;
 6 import io.netty.bootstrap.ServerBootstrap;
 7 import io.netty.channel.ChannelFuture;
 8 import io.netty.channel.ChannelInitializer;
 9 import io.netty.channel.EventLoopGroup;
10 import io.netty.channel.nio.NioEventLoopGroup;
11 import io.netty.channel.socket.SocketChannel;
12 import io.netty.channel.socket.nio.NioServerSocketChannel;
13
14 public class EchoServer {
15
16     private final int port;
17
18     public EchoServer(int port) {
19         this.port = port;
20     }
21
22     public void start() throws Exception {
23         final EchoServerHandler serverHandler = new EchoServerHandler();
24         EventLoopGroup group = new NioEventLoopGroup();
25         try {
26             ServerBootstrap b = new ServerBootstrap();
27             b.group(group)
28                     .channel(NioServerSocketChannel.class)
29                     .localAddress(new InetSocketAddress(port))
30                     .childHandler(new ChannelInitializer<SocketChannel>() {
31
32                         @Override
33                         protected void initChannel(SocketChannel ch) throws Exception {
34                             ch.pipeline().addLast(serverHandler);
35                         }
36                     });
37             // 此处绑定服务器,并等待绑定完成。对sync()方法的调用将导致当前Thread阻塞,直到绑定完成
38             ChannelFuture f = b.bind().sync();
39             // 由于调用了sync()方法,程序将会阻塞等待,直到服务器的Channel关闭
40             f.channel().closeFuture().sync();
41         } finally {
42             group.shutdownGracefully().sync();
43         }
44     }
45
46     public static void main(String[] args) throws Exception {
47         if (args.length != 1) {
48             System.err.println(
49                     "Usage: " + EchoServer.class.getSimpleName() + " <port>"
50             );
51             return;
52         }
53         int port = Integer.parseInt(args[0]);
54         new EchoServer(port).start();
55     }
56
57 }
3.3 修改EchoServerHandler.java文件代码,修改后最终代码如下:
 1 package com.echo.server.handler;
 2
 3 import io.netty.buffer.ByteBuf;
 4 import io.netty.buffer.Unpooled;
 5 import io.netty.channel.ChannelHandler.Sharable;
 6 import io.netty.channel.ChannelFutureListener;
 7 import io.netty.channel.ChannelHandlerContext;
 8 import io.netty.channel.ChannelInboundHandlerAdapter;
 9 import io.netty.util.CharsetUtil;
10
11 // @Sharable标示一个ChannelHandler可以被多个Channel安全共享
12 @Sharable
13 public class EchoServerHandler extends ChannelInboundHandlerAdapter {
14
15     @Override
16     public void channelRead(ChannelHandlerContext ctx, Object msg) throws Exception {
17         ByteBuf in = (ByteBuf) msg;
18         System.out.println(
19                 "Server received: " + in.toString(CharsetUtil.UTF_8));
20         // 将接收到的消息写给发送者,即客户端,而不冲刷出站消息
21         ctx.write(in);
22     }
23
24     @Override
25     public void channelReadComplete(ChannelHandlerContext ctx) throws Exception {
26         // 将未决消息冲刷到远程节点,并且关闭该Channel
27         ctx.writeAndFlush(Unpooled.EMPTY_BUFFER)
28                 .addListener(ChannelFutureListener.CLOSE);
29     }
30
31     @Override
32     public void exceptionCaught(ChannelHandlerContext ctx, Throwable cause) throws Exception {
33         cause.printStackTrace();
34         ctx.close();
35     }
36
37 }
至此,所有的代码已经写好,下一步进行运行测试
4.运行代码
4.1 打包代码
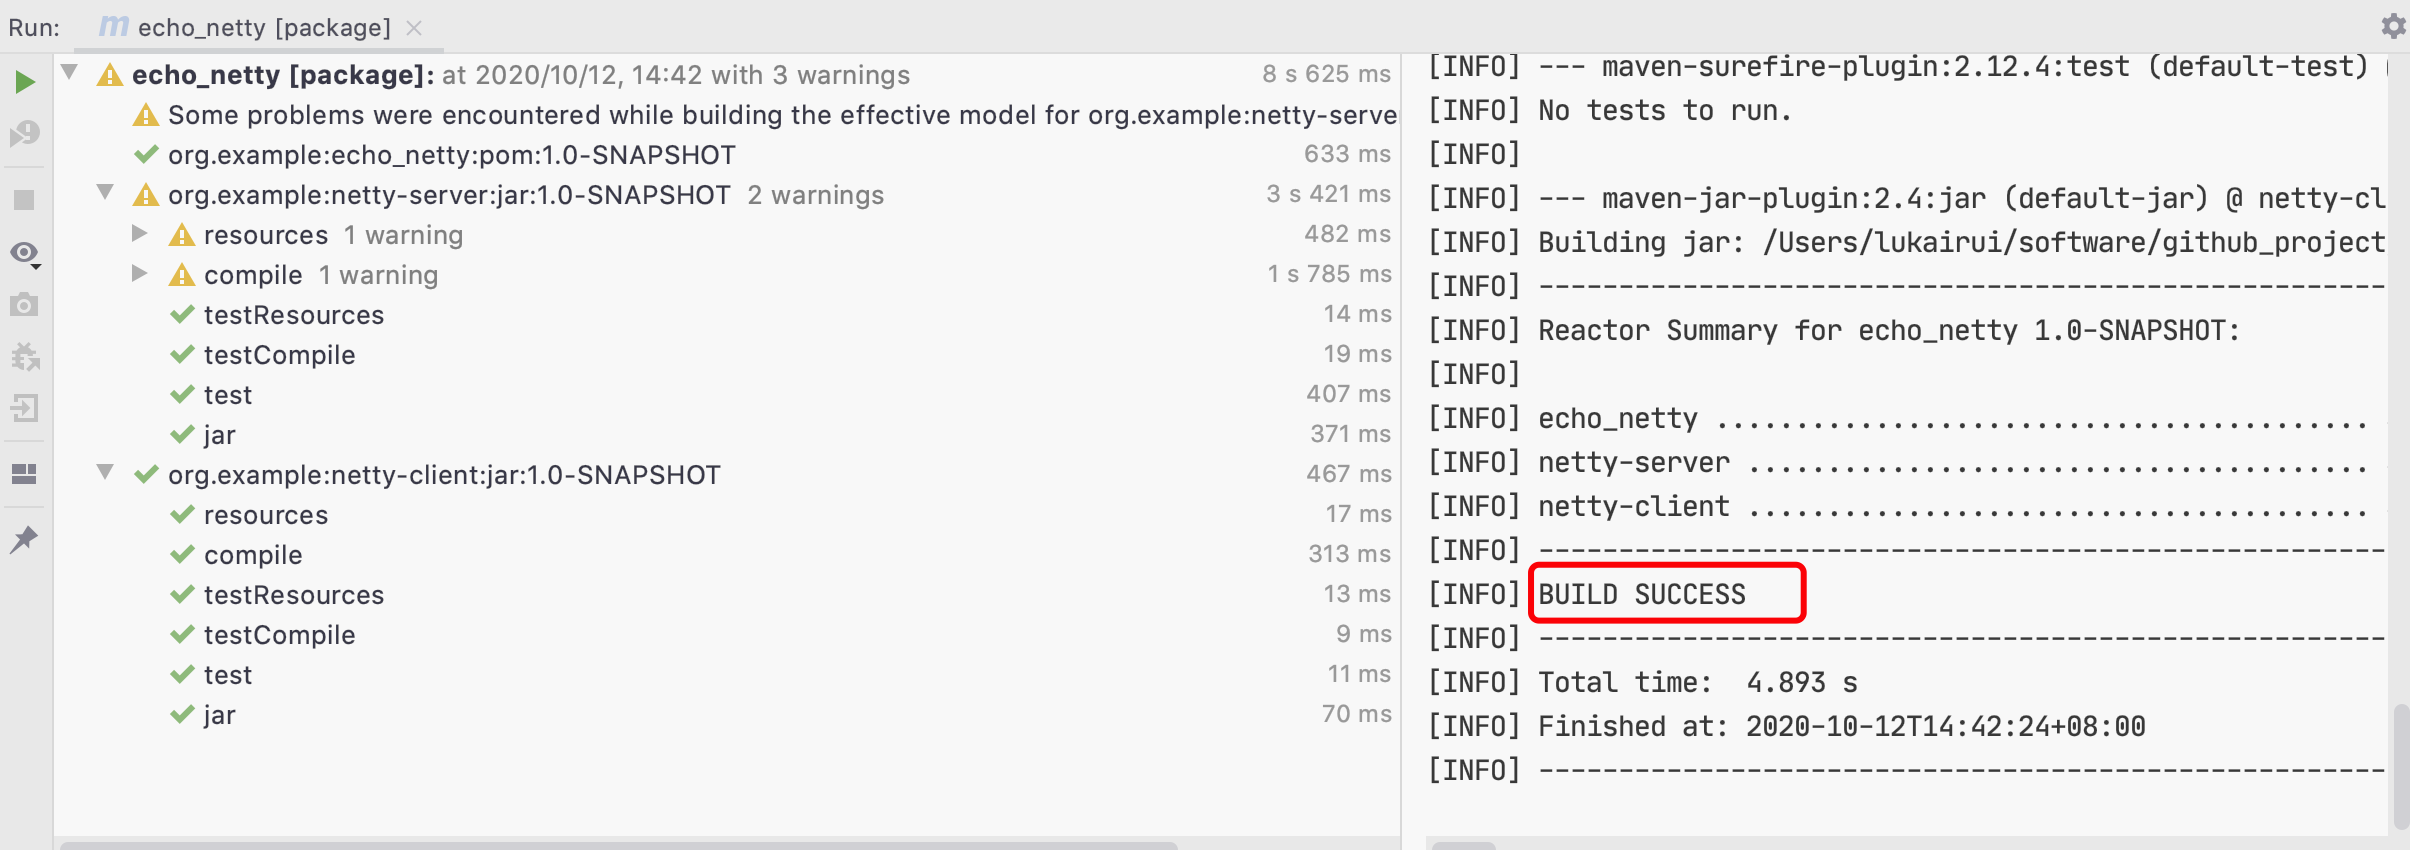
当出现BUILD SUCCESS的时候,代表代码已经打包好了。
4.2 运行server端
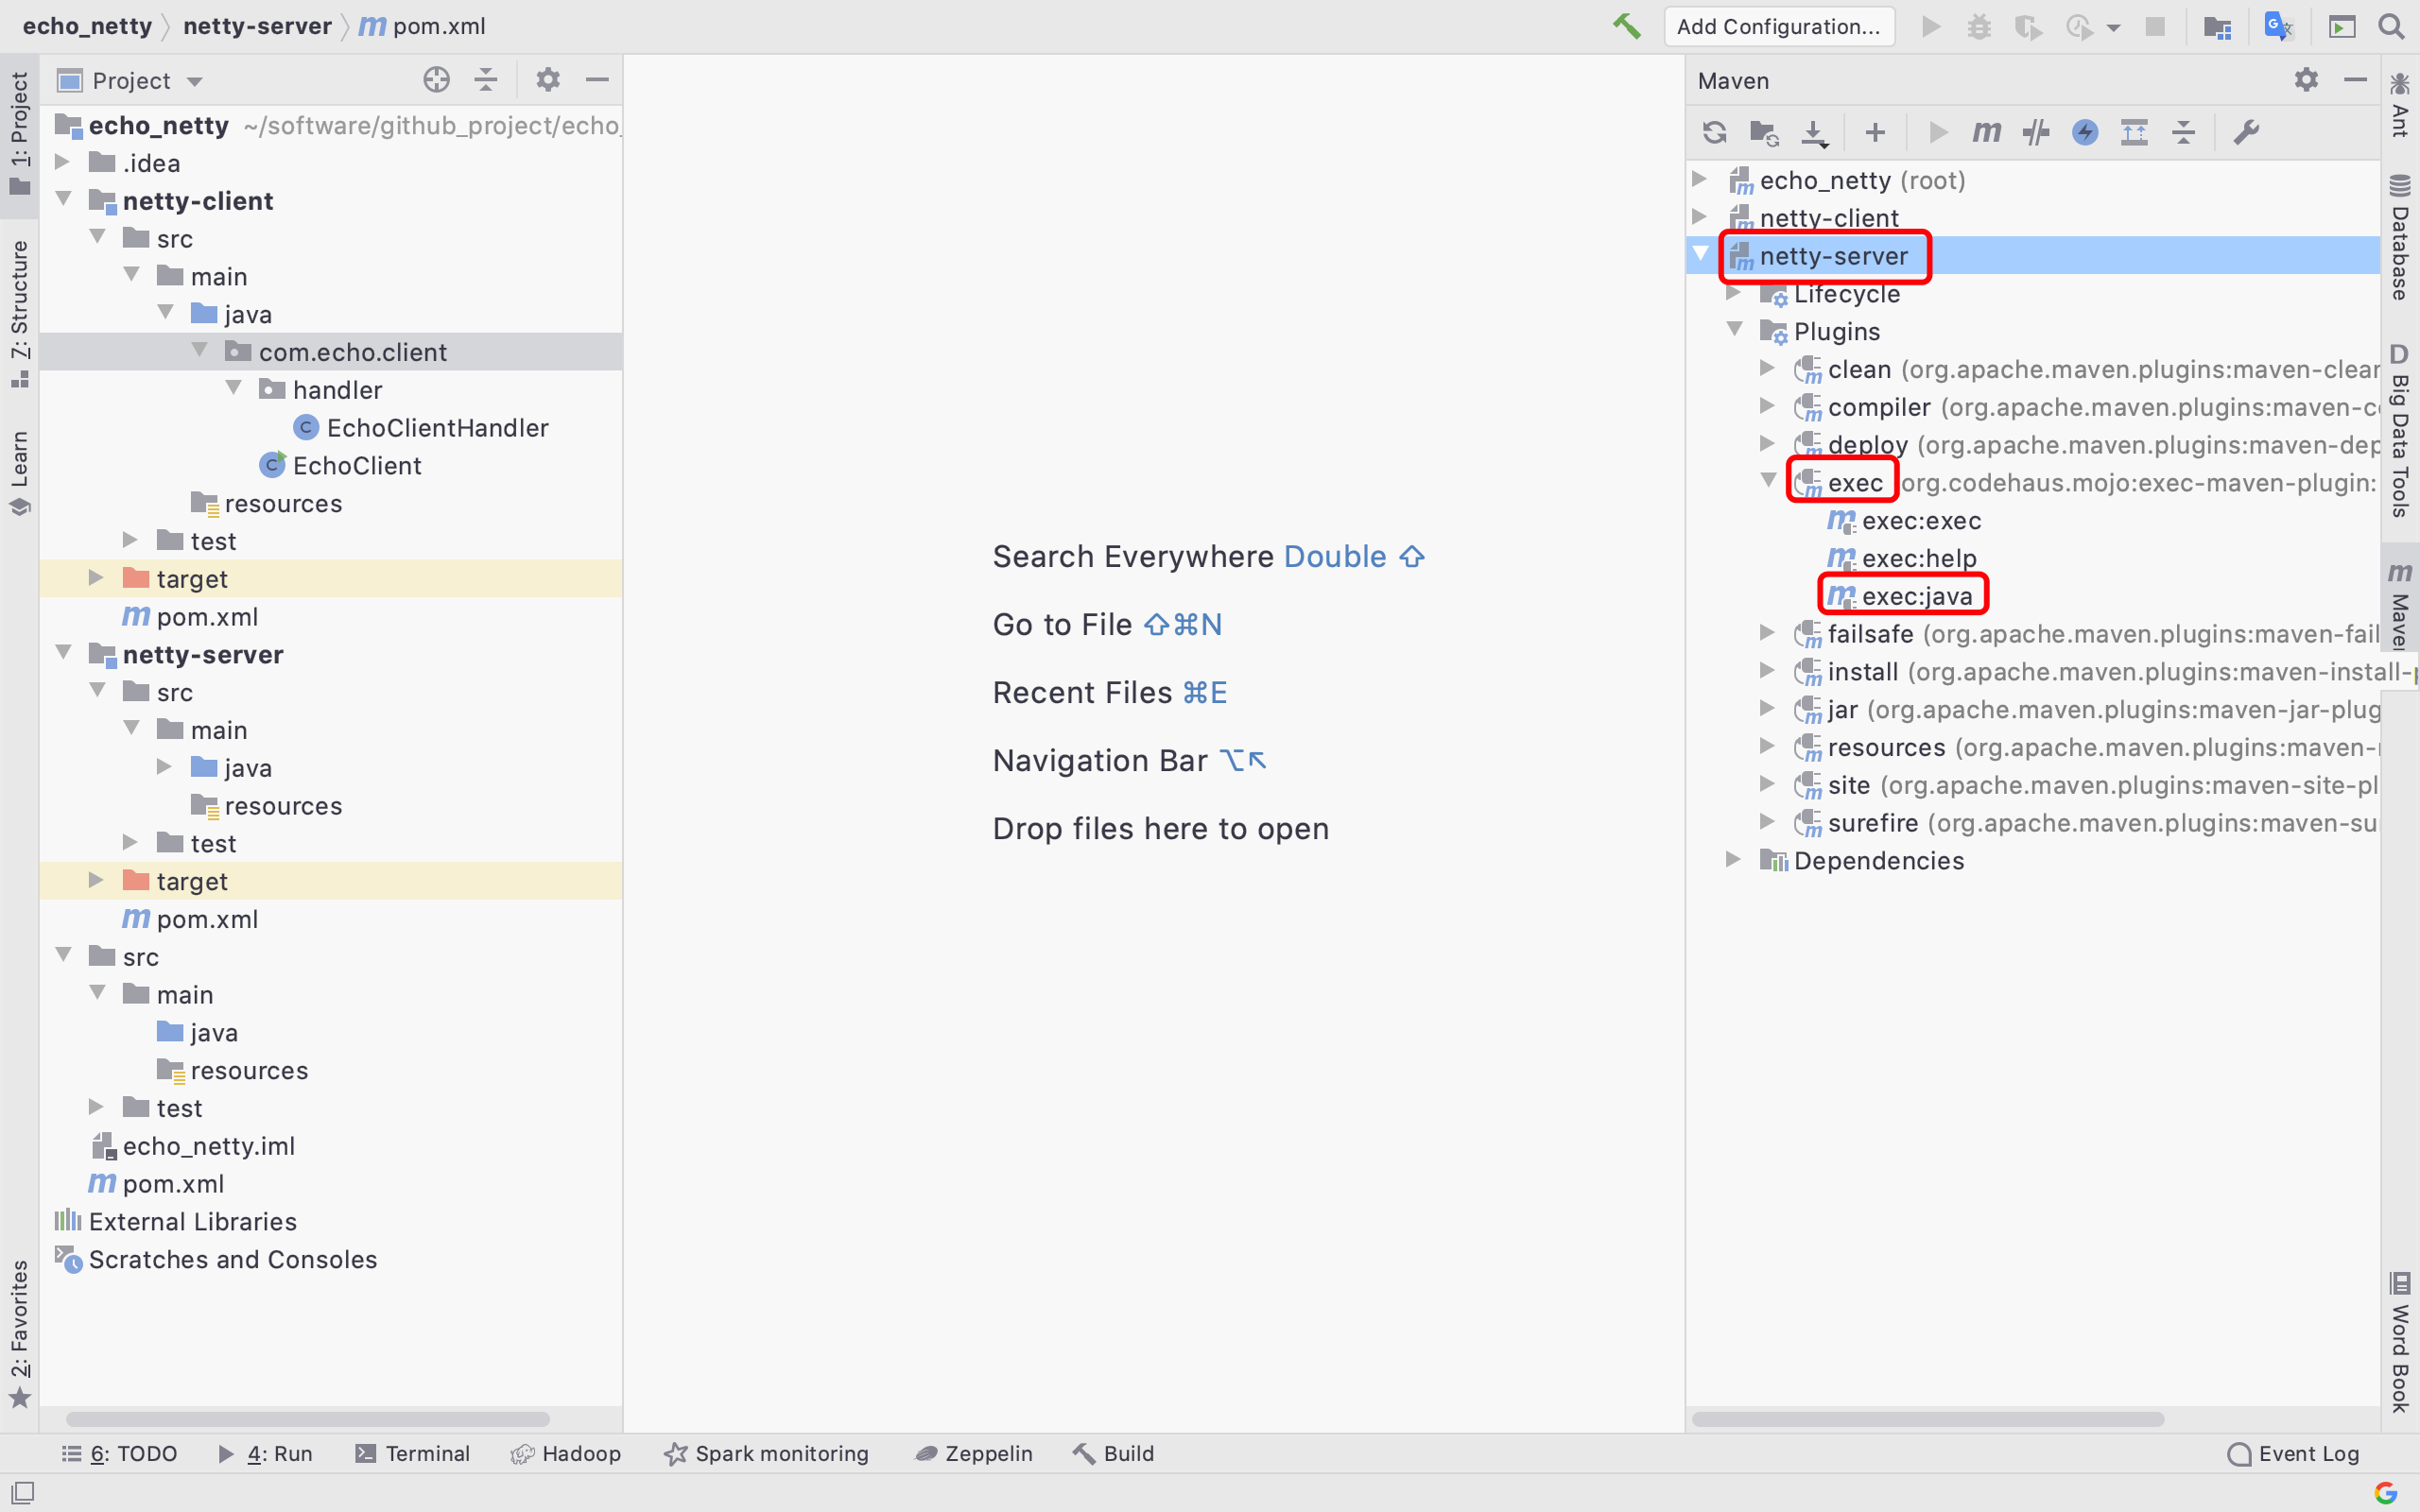

出现一直在转圈的时候,代表server端启动成功了
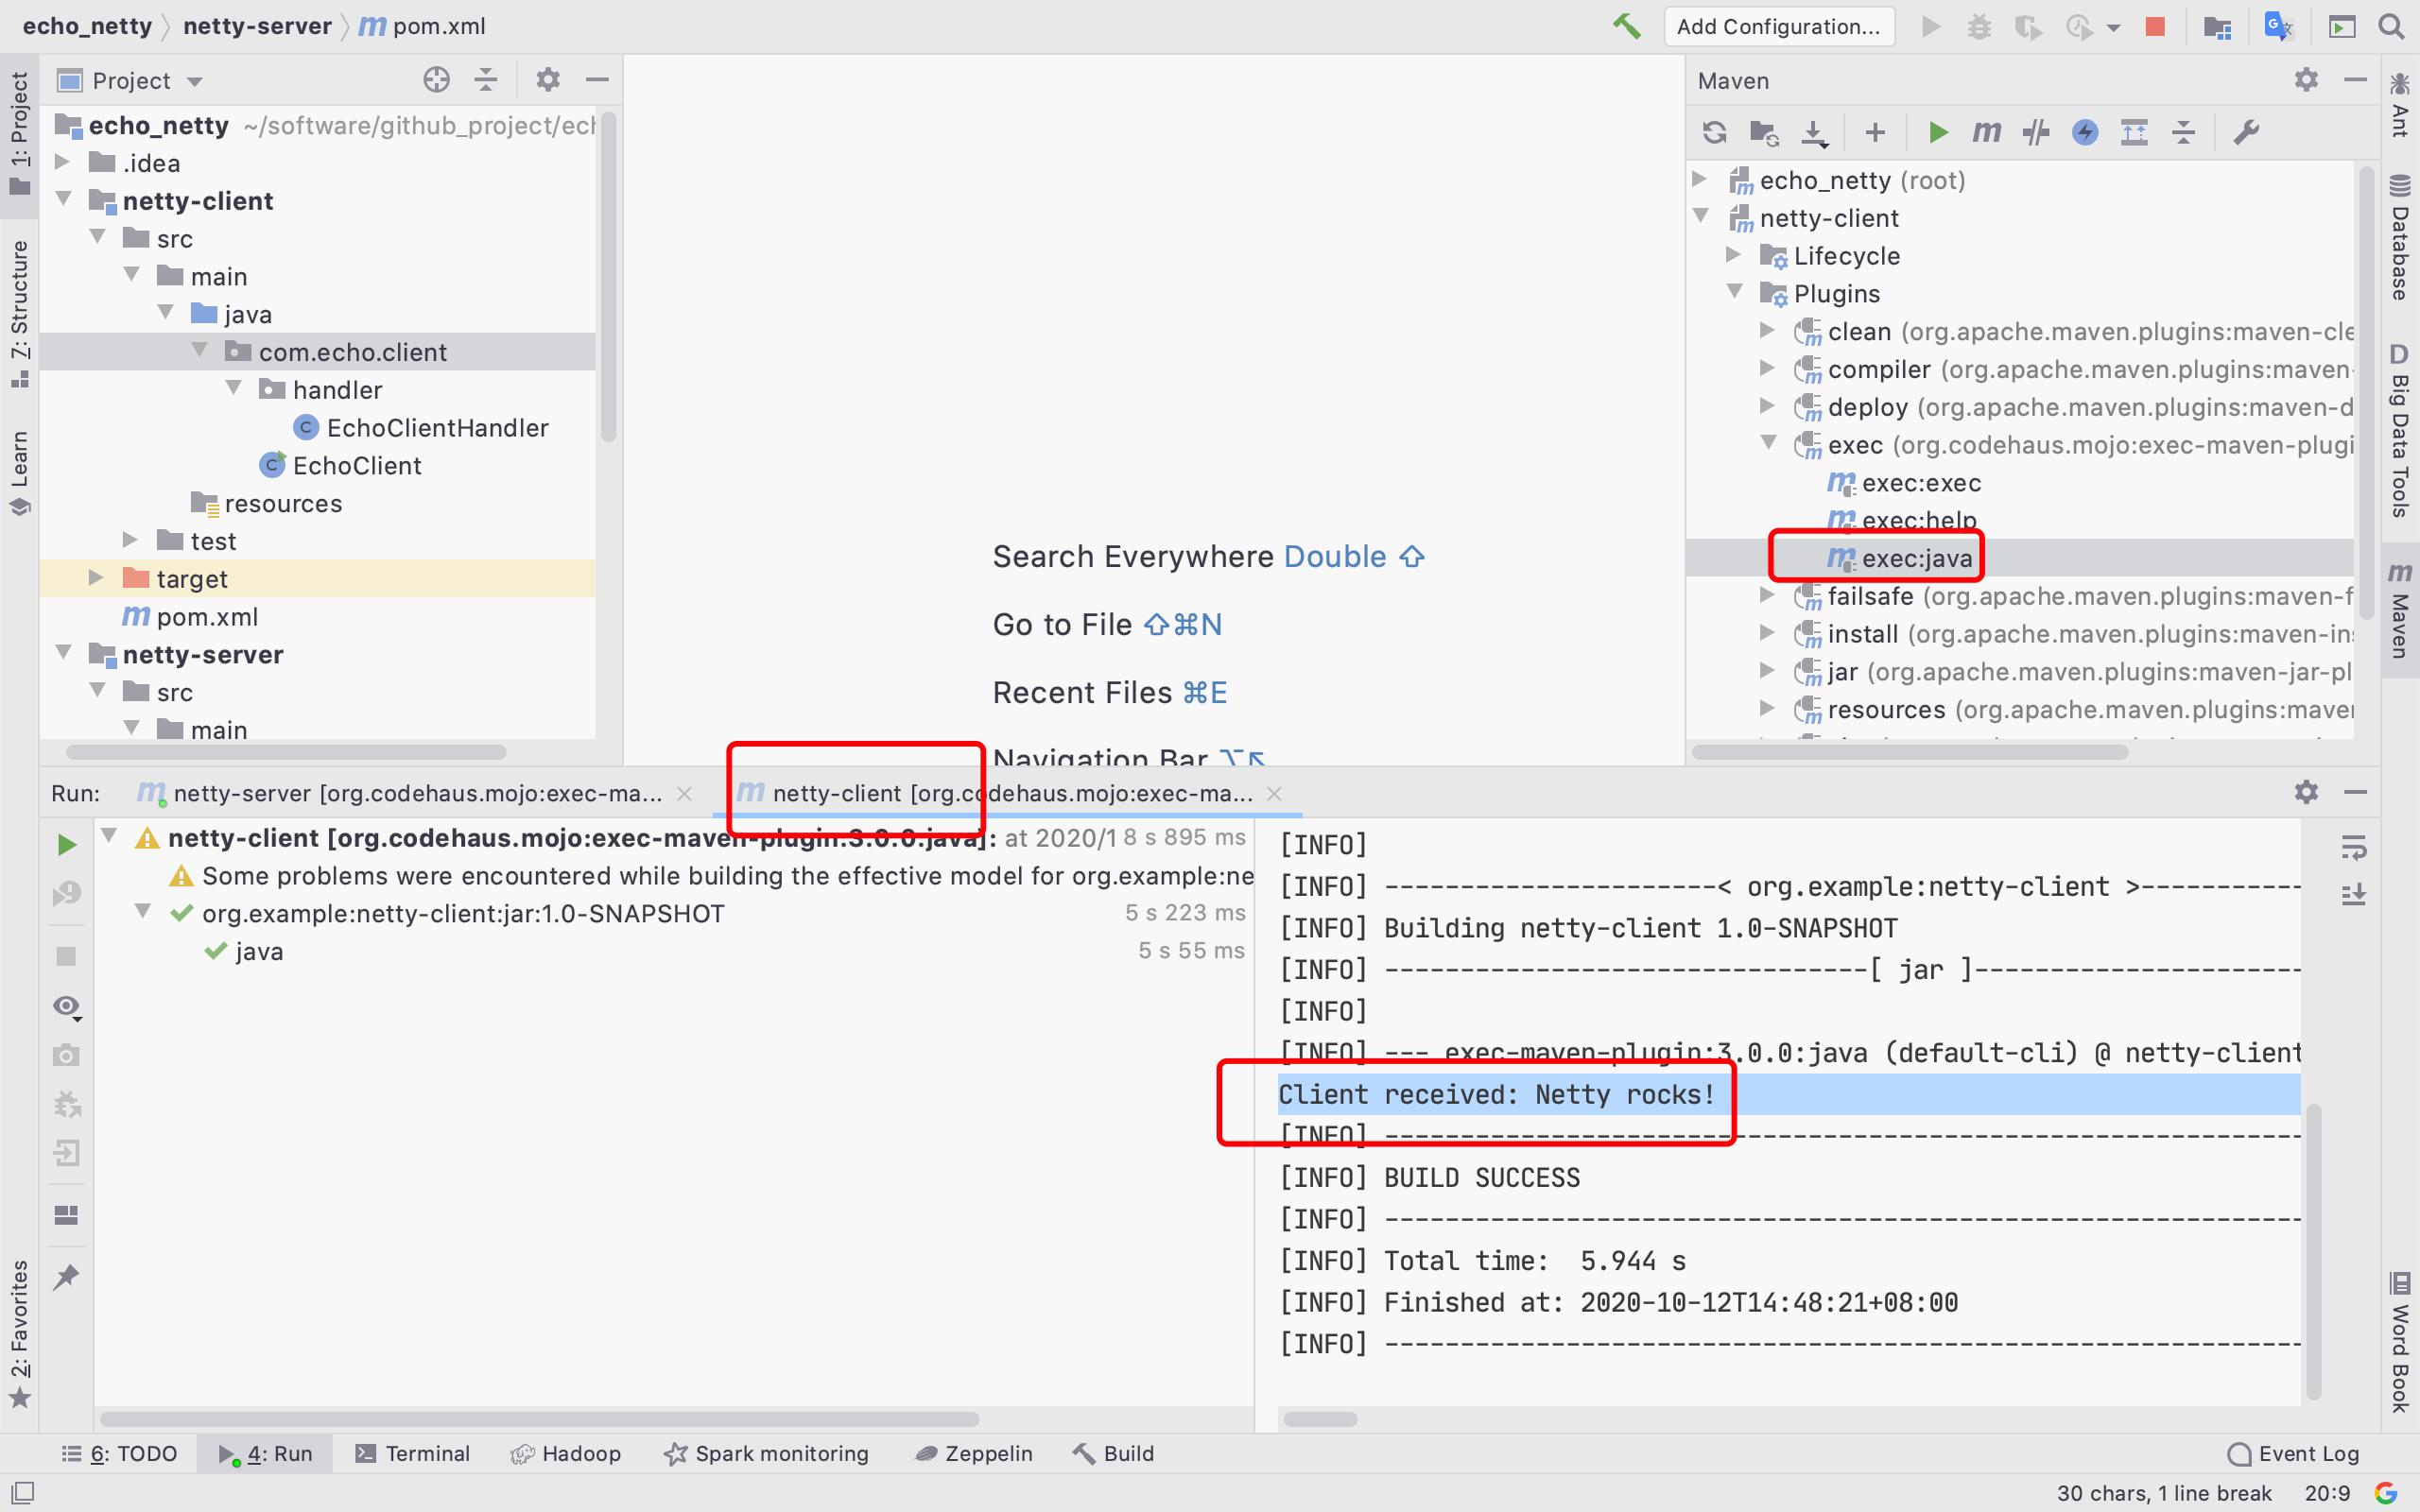
4.3 运行client端
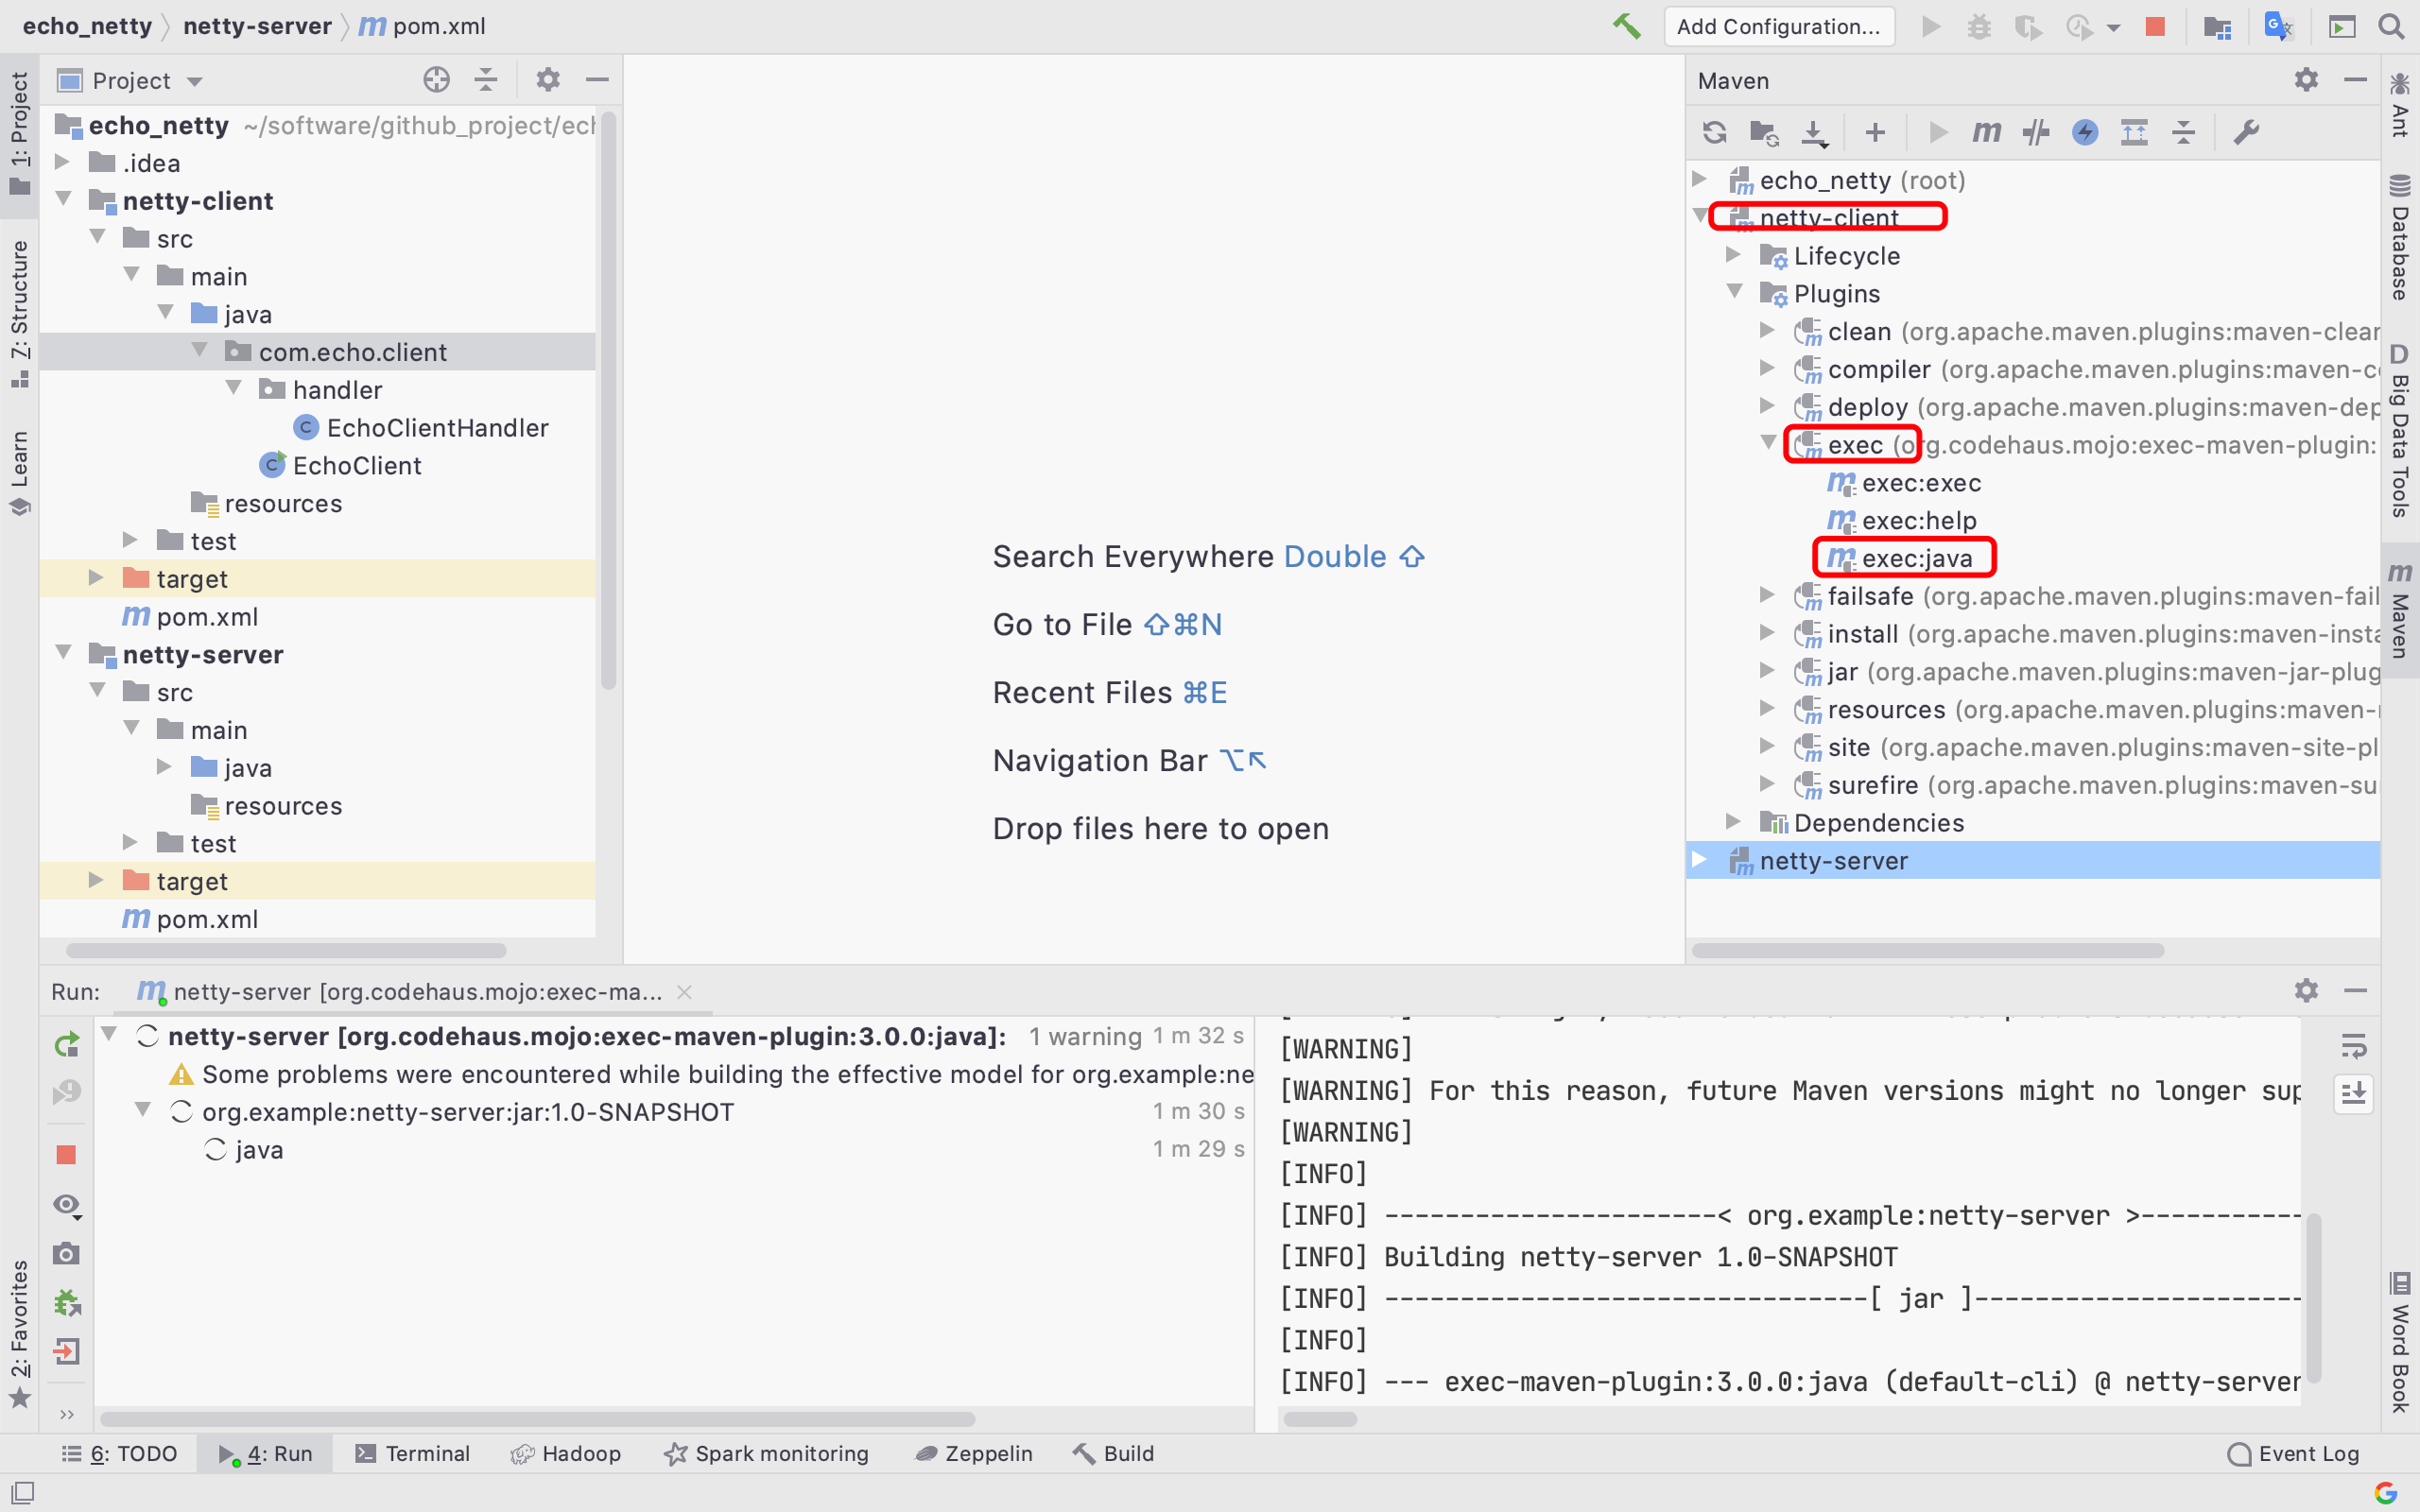
双击运行client端,然后稍等片刻,会发现下图已经出现了
Client received: Netty rocks!
这一行字。说明客户端和服务端通信成功。
接着看一下server端打印的输出,如下图:

可以看到,server端已经输出了从客户端收到的消息!!!
至此,所有的演示都结束了,大家自己动手进行实践吧。