RabbitMQ 消息中间件
MQ全称为Message Queue,消息队列是应用程序和应用程序之间的通信方法。
- 系统可用性降低:系统引入的外部依赖越多,系统稳定性越差。一旦 MQ 宕机,就会对业务造成影响。如何保证MQ的高可用
- 系统复杂度提高:MQ 的加入大大增加了系统的复杂度,以前系统间是同步的远程调用,现在是通过 MQ 进行异步调用。如何保证消息没有被重复消费?怎么处理消息丢失情况?那么保证消息传递的顺序性?
- 一致性问题:A 系统处理完业务,通过 MQ 给B、C、D三个系统发消息数据,如果 B 系统、C 系统处理成功,D 系统处理失败。如何保证消息数据处理的一致性?
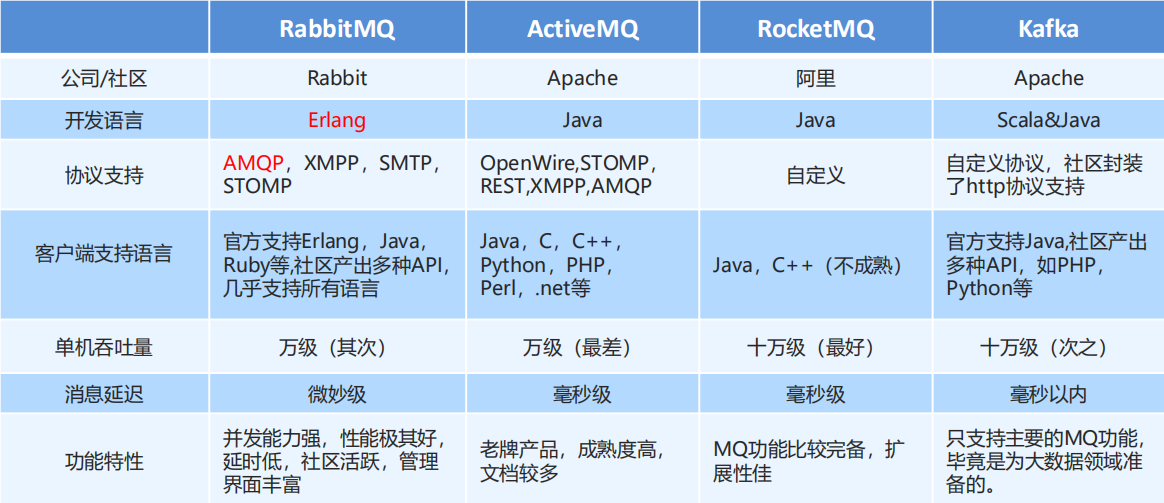
- RabbitMQ 是基于 AMQP 协议使用 Erlang 语言开发的一款消息队列产品。
- AMQP 是协议,类比HTTP AMQP,即 Advanced Message Queuing Protocol(高级消息队列协议),是一个网络协议,是应用层协议的一个开放标准,为面向消息的中间件设计。基于此协议的客户端与消息中间件可传递消息,并不受客户端/中间件不同产品,不同的开发语言等条件的限制
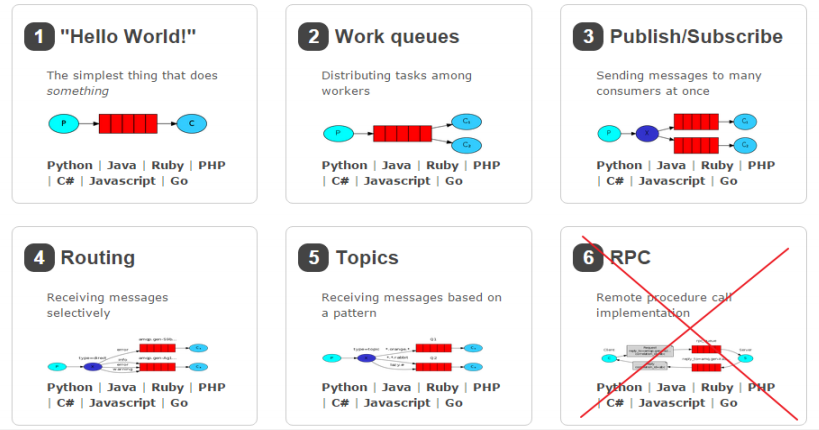
- RabbitMQ提供了6种工作模式
- JMS 是 API 规范接口,类比 JDBC。JMS 即 Java 消息服务(JavaMessage Service)应用程序接口,是一个 Java 平台中关于面向消息中间件
的API

Rabbit 的五种工作模式
第一种工作模式代码
提供端
 1 public class Producer {
 2     public static void main(String[] args) throws IOException, TimeoutException {
 3         //1、创建连接工长
 4         ConnectionFactory factory = new ConnectionFactory();
 5         //2、设置参数
 6         factory.setHost("127.0.0.1");//设置ip,默认为localhost
 7         factory.setPort(5672);//设置端口号,默认5672
 8         factory.setVirtualHost("/zhb");//设置默认虚拟机
 9         factory.setUsername("zhb");//设置用户名 默认 guest
10         factory.setPassword("zhb");//设置密码
11         //3、获取连接
12         Connection connection = factory.newConnection();
13         //4、创建Channel
14         Channel channel = connection.createChannel();
15         //5、创建对列queue
16         /*
17         queueDeclare(String queue, boolean durable, boolean exclusive, boolean autoDelete, Map<String, Object> arguments)
18         1.queue 设置队列名称
19         2.durable 是否进行持久化,当mq重启后,这个队列还存在
20         3.exclusive 是否独占,只能有一个消费者监听这个队列
21         4.autoDelete 是否自动删除,当没有消费者,自动删除
22         5.arguments 参数,
23          */
24         //如果有这个名字的交换机,就不创建,没有就创建
25         channel.queueDeclare("hello_word",true,false,false,null);
26         //6、发送消息
27         /*
28         basicPublish(String exchange, String routingKey, BasicProperties props, byte[] body)
29         1.exchange 交换机名称  ,简单模式下使用默认交换机,""
30         2.routingKey 路由名称   简单模式下,与队列名称一致就可
31         3.props: 配置信息
32         4.body发送的消息数据
33          */
34         byte[] body = "hello_word mq".getBytes();
35         channel.basicPublish("","hello_word",null,body);
36
37         //7、关闭资源
38         channel.close();
39         connection.close();
40
41     }
42 }
消费端
 1 public class consumer {
 2     public static void main(String[] args) throws IOException, TimeoutException {
 3         //1、创建连接工长
 4         ConnectionFactory factory = new ConnectionFactory();
 5         //2、设置参数
 6         factory.setHost("127.0.0.1");//设置ip,默认为localhost
 7         factory.setPort(5672);//设置端口号,默认5672
 8         factory.setVirtualHost("/zhb");//设置默认虚拟机
 9         factory.setUsername("zhb");//设置用户名 默认 guest
10         factory.setPassword("zhb");//设置密码
11         //3、获取连接
12         Connection connection = factory.newConnection();
13         //4、创建Channel
14         Channel channel = connection.createChannel();
15         //5、接收消息
16         /*
17         basicConsume(String queue, boolean autoAck, Consumer callback)
18         1.queue 队列名称
19         2.autoAck 是否自动确认
20         3.callback: 回调对象
21          */
22     Consumer consumer = new DefaultConsumer(channel){
23             /**
24              * 回调方法,当收到消息后,会自动执行该方法
25              * @param consumerTag 标识
26              * @param envelope 获取一些信息,交换机,路由key
27              * @param properties 配置信息
28              * @param body  收到的消息
29              * @throws IOException 异常
30              */
31             public void handleDelivery(String consumerTag, Envelope envelope, AMQP.BasicProperties properties, byte[] body) throws IOException {
32                 System.out.println("consumerTag = " + consumerTag);
33                 System.out.println("Exchange = " + envelope.getExchange());
34                 System.out.println("RoutingKey = " + envelope.getRoutingKey());
35                 System.out.println("properties = " + properties);
36                 System.out.println("body = " + new String(body));
37             }
38         };
39         channel.basicConsume("hello_word",true,consumer);
40     }
41 }
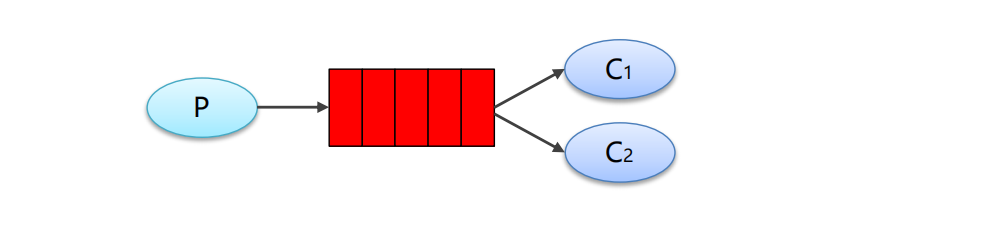
第二种工作模式 Work queue
 1 public class Producer_Fanout {
 2     public static void main(String[] args) throws IOException, TimeoutException {
 3         //1、创建连接工长
 4         ConnectionFactory factory = new ConnectionFactory();
 5         //2、设置参数
 6         factory.setHost("127.0.0.1");//设置ip,默认为localhost
 7         factory.setPort(5672);//设置端口号,默认5672
 8         factory.setVirtualHost("/zhb");//设置默认虚拟机
 9         factory.setUsername("zhb");//设置用户名 默认 guest
10         factory.setPassword("zhb");//设置密码
11         //3、获取连接
12         Connection connection = factory.newConnection();
13         //4、创建Channel
14         Channel channel = connection.createChannel();
15
16         /*
17         exchangeDeclare(String exchange, BuiltinExchangeType type,
18          boolean durable, boolean autoDelete, boolean internal,
19          Map<String, Object> arguments)
20          1.exchange 交换机名称
21          2.type 交换机类型
22             DIRECT("direct")定向
23             FANOUT("fanout")扇形(广播)发送消息到每一个队列
24             TOPIC("topic")通配符方式
25             HEADERS("headers")参数匹配
26          3.durable  是否持久化
27          4.autoDelete 是否自动删除
28          5.internal 内部使用一般为false
29          6.arguments 参数
30
31          */
32         //5、创建交换机
33         channel.exchangeDeclare("test_fanout", BuiltinExchangeType.FANOUT,true,false,false,null);
34         //6、创建对列queue
35         /*
36         queueDeclare(String queue, boolean durable, boolean exclusive, boolean autoDelete, Map<String, Object> arguments)
37         1.queue 设置队列名称
38         2.durable 是否进行持久化,当mq重启后,这个队列还存在
39         3.exclusive 是否独占,只能有一个消费者监听这个队列
40         4.autoDelete 是否自动删除,当没有消费者,自动删除
41         5.arguments 参数,
42          */
43         //如果有这个名字的交换机,就不创建,没有就创建
44         channel.queueDeclare("fanout_queues1",true,false,false,null);
45         channel.queueDeclare("fanout_queues2",true,false,false,null);
46         //7、队列于交换机绑定
47         channel.queueBind("fanout_queues1","test_fanout","");
48         channel.queueBind("fanout_queues2","test_fanout","");
49
50         //8、发送消息
51         /*
52         basicPublish(String exchange, String routingKey, BasicProperties props, byte[] body)
53         1.exchange 交换机名称  ,简单模式下使用默认交换机,""
54         2.routingKey 路由名称   广播模式下使用""
55         3.props: 配置信息
56         4.body发送的消息数据
57          */
58         for (int i = 0; i < 10; i++) {
59             byte[] body = ("hello_world mq :"+i).getBytes();
60
61             channel.basicPublish("test_fanout","",null,body);
62         }
63
64         //7、关闭资源
65         channel.close();
66         connection.close();
67
68     }
69 }
 1 public class Consumer_Fanout {
 2     public static void main(String[] args) throws IOException, TimeoutException {
 3         //1、创建连接工长
 4         ConnectionFactory factory = new ConnectionFactory();
 5         //2、设置参数
 6         factory.setHost("127.0.0.1");//设置ip,默认为localhost
 7         factory.setPort(5672);//设置端口号,默认5672
 8         factory.setVirtualHost("/zhb");//设置默认虚拟机
 9         factory.setUsername("zhb");//设置用户名 默认 guest
10         factory.setPassword("zhb");//设置密码
11         //3、获取连接
12         Connection connection = factory.newConnection();
13         //4、创建Channel
14         Channel channel = connection.createChannel();
15         //5、接收消息
16         /*
17         basicConsume(String queue, boolean autoAck, Consumer callback)
18         1.queue 队列名称
19         2.autoAck 是否自动确认
20         3.callback: 回调对象
21          */
22     Consumer consumer = new DefaultConsumer(channel){
23             /**
24              * 回调方法,当收到消息后,会自动执行该方法
25              * @param consumerTag 标识
26              * @param envelope 获取一些信息,交换机,路由key
27              * @param properties 配置信息
28              * @param body  收到的消息
29              * @throws IOException 异常
30              */
31             public void handleDelivery(String consumerTag, Envelope envelope, AMQP.BasicProperties properties, byte[] body) throws IOException {
32                 /*System.out.println("consumerTag = " + consumerTag);*/
33                 System.out.println("Exchange = " + envelope.getExchange());
34                 System.out.println("RoutingKey = " + envelope.getRoutingKey());
35                 /*System.out.println("properties = " + properties);
36                 System.out.println("body = " + new String(body));*/
37             }
38         };
39         // channel.basicConsume("fanout_queues1",true,consumer);
40        channel.basicConsume("fanout_queues2",true,consumer);
41     }
42 }
第四种工作模式 Routing 路由模式
路由模式特点:
-
-
消息的发送方在 向 Exchange发送消息时,也必须指定消息的
RoutingKey。 -
Exchange不再把消息交给每一个绑定的队列,而是根据消息的
Routing Key进行判断,只有队列的Routingkey与消息的Routing key完全一致,才会接收到消息
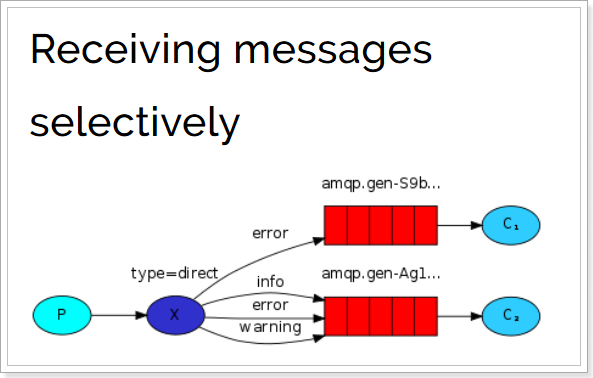
生产者代码 重新修改交换机类型(direct)并为列配上不同的路由key,向他们发送消息
 1 public class Producer_Rounting {
 2     public static void main(String[] args) throws IOException, TimeoutException {
 3         //1、创建连接工长
 4         ConnectionFactory factory = new ConnectionFactory();
 5         //2、设置参数
 6         factory.setHost("127.0.0.1");//设置ip,默认为localhost
 7         factory.setPort(5672);//设置端口号,默认5672
 8         factory.setVirtualHost("/zhb");//设置默认虚拟机
 9         factory.setUsername("zhb");//设置用户名 默认 guest
10         factory.setPassword("zhb");//设置密码
11         //3、获取连接
12         Connection connection = factory.newConnection();
13         //4、创建Channel
14         Channel channel = connection.createChannel();
15
16         /*
17         exchangeDeclare(String exchange, BuiltinExchangeType type,
18          boolean durable, boolean autoDelete, boolean internal,
19          Map<String, Object> arguments)
20          1.exchange 交换机名称
21          2.type 交换机类型
22             DIRECT("direct")定向
23             FANOUT("fanout")扇形(广播)发送消息到每一个队列
24             TOPIC("topic")通配符方式
25             HEADERS("headers")参数匹配
26          3.durable  是否持久化
27          4.autoDelete 是否自动删除
28          5.internal 内部使用一般为false
29          6.arguments 参数
30
31          */
32         //5、创建交换机
33         channel.exchangeDeclare("test_direct", BuiltinExchangeType.DIRECT, true, false, false, null);
34         //6、创建对列queue
35         /*
36         queueDeclare(String queue, boolean durable, boolean exclusive, boolean autoDelete, Map<String, Object> arguments)
37         1.queue 设置队列名称
38         2.durable 是否进行持久化,当mq重启后,这个队列还存在
39         3.exclusive 是否独占,只能有一个消费者监听这个队列
40         4.autoDelete 是否自动删除,当没有消费者,自动删除
41         5.arguments 参数,
42          */
43         //如果有这个名字的交换机,就不创建,没有就创建
44         channel.queueDeclare("direct_queues1", true, false, false, null);
45         channel.queueDeclare("direct_queues2", true, false, false, null);
46         //7、队列于交换机绑定
47         /*
48         queueBind(String queue, String exchange, String routingKey)
49          */
50         channel.queueBind("direct_queues1", "test_direct", "insert");
51         channel.queueBind("direct_queues1", "test_direct", "update");
52         channel.queueBind("direct_queues2", "test_direct", "update");
53
54         //8、发送消息
55         /*
56         basicPublish(String exchange, String routingKey, BasicProperties props, byte[] body)
57         1.exchange 交换机名称  ,简单模式下使用默认交换机,""
58         2.routingKey 路由名称   广播模式下使用""
59         3.props: 配置信息
60         4.body发送的消息数据
61          */
62
63         byte[] body1 = ("hello_world mq : insert").getBytes();
64         byte[] body2 = ("hello_world mq : update").getBytes();
65         channel.basicPublish("test_direct", "insert", null, body1);
66         channel.basicPublish("test_direct", "update", null, body2);
67
68
69         //7、关闭资源
70         channel.close();
71         connection.close();
72
73     }
74 }
消费端代码 与传播类似
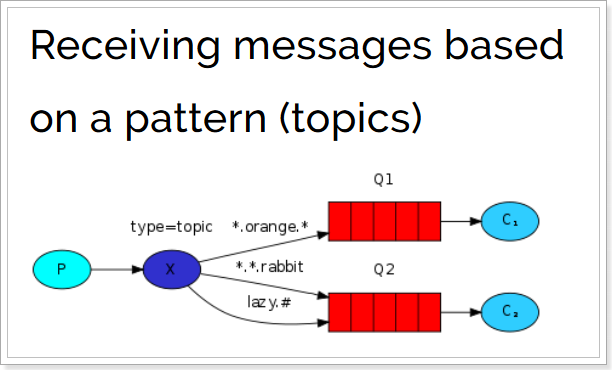
第五种方式 Topics通配符模式
Routingkey 一般都是有一个或多个单词组成,多个单词之间以”.”分割,例如: item.insert
通配符规则:
#
*:匹配不多不少恰好1个词
模式总计:
1、简单模式 HelloWorld
一个生产者、一个消费者,不需要设置交换机(使用默认的交换机)
2、工作队列模式 WorkQueue
一个生产者、多个消费者(竞争关系),不需要设置交换机(使用默认的交换机)
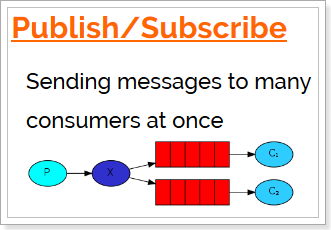
3、发布订阅模式 Publish/Subscribe
需要设置类型为fanout的交换机,并且交换机和队列进行绑定,当发送消息到交换机后,交换机会将消息发送到绑定的队列
4、路由模式 Rounting
需要设置类型为direct的交换机,交换机和队列进行绑定,并且指定routing key,当发送消息到交换机后,交换机会根据routing key将消息发送到对应的队列
5、通配符模式Topic
需要设置类型为topic的交换机,交换机和队列进行绑定,并且指定通配符方式的routing key,当发送消息到交换机后,交换机会根据routing key将消息发送到对应的队列
Spring整合RabbitMQ
生产者依赖
生产者xml
1 rabbitmq.host=192.168.12.135 2 rabbitmq.port=5672 3 rabbitmq.username=**** 4 rabbitmq.password=**** 5 rabbitmq.virtual-host=/****
 1 <?xml version="1.0" encoding="UTF-8"?>
 2 <beans xmlns="http://www.springframework.org/schema/beans"
 3        xmlns:xsi="http://www.w3.org/2001/XMLSchema-instance"
 4        xmlns:context="http://www.springframework.org/schema/context"
 5        xmlns:rabbit="http://www.springframework.org/schema/rabbit"
 6        xsi:schemaLocation="http://www.springframework.org/schema/beans
 7        http://www.springframework.org/schema/beans/spring-beans.xsd
 8        http://www.springframework.org/schema/context
 9        https://www.springframework.org/schema/context/spring-context.xsd
10        http://www.springframework.org/schema/rabbit
11        http://www.springframework.org/schema/rabbit/spring-rabbit.xsd">
12     <!--加载配置文件-->
13     <context:property-placeholder location="classpath:properties/rabbitmq.properties"/>
14
15     <!-- 定义rabbitmq connectionFactory -->
16     <rabbit:connection-factory id="connectionFactory" host="${rabbitmq.host}"
17                                port="${rabbitmq.port}"
18                                username="${rabbitmq.username}"
19                                password="${rabbitmq.password}"
20                                virtual-host="${rabbitmq.virtual-host}"/>
21     <!--定义管理交换机、队列-->
22     <rabbit:admin connection-factory="connectionFactory"/>
23
24     <!--定义持久化队列,不存在则自动创建;不绑定到交换机则绑定到默认交换机
25     默认交换机类型为direct,名字为:"",路由键为队列的名称
26     -->
27     <rabbit:queue id="spring_queue" name="spring_queue" auto-declare="true"/>
28
29     <!-- ~~~~~~~~~~~~~~~~~~~~~~~~~~~~广播;所有队列都能收到消息~~~~~~~~~~~~~~~~~~~~~~~~~~~~ -->
30     <!--定义广播交换机中的持久化队列,不存在则自动创建-->
31     <rabbit:queue id="spring_fanout_queue_1" name="spring_fanout_queue_1" auto-declare="true"/>
32
33     <!--定义广播交换机中的持久化队列,不存在则自动创建-->
34     <rabbit:queue id="spring_fanout_queue_2" name="spring_fanout_queue_2" auto-declare="true"/>
35
36     <!--定义广播类型交换机;并绑定上述两个队列-->
37     <rabbit:fanout-exchange id="spring_fanout_exchange" name="spring_fanout_exchange" auto-declare="true">
38         <rabbit:bindings>
39             <rabbit:binding queue="spring_fanout_queue_1"/>
40             <rabbit:binding queue="spring_fanout_queue_2"/>
41         </rabbit:bindings>
42     </rabbit:fanout-exchange>
43
44     <!-- ~~~~~~~~~~~~~~~~~~~~~~~~~~~~通配符;*匹配一个单词,#匹配多个单词 ~~~~~~~~~~~~~~~~~~~~~~~~~~~~ -->
45     <!--定义广播交换机中的持久化队列,不存在则自动创建-->
46     <rabbit:queue id="spring_topic_queue_star" name="spring_topic_queue_star" auto-declare="true"/>
47     <!--定义广播交换机中的持久化队列,不存在则自动创建-->
48     <rabbit:queue id="spring_topic_queue_well" name="spring_topic_queue_well" auto-declare="true"/>
49     <!--定义广播交换机中的持久化队列,不存在则自动创建-->
50     <rabbit:queue id="spring_topic_queue_well2" name="spring_topic_queue_well2" auto-declare="true"/>
51
52     <rabbit:topic-exchange id="spring_topic_exchange" name="spring_topic_exchange" auto-declare="true">
53         <rabbit:bindings>
54             <rabbit:binding pattern="heima.*" queue="spring_topic_queue_star"/>
55             <rabbit:binding pattern="heima.#" queue="spring_topic_queue_well"/>
56             <rabbit:binding pattern="itcast.#" queue="spring_topic_queue_well2"/>
57         </rabbit:bindings>
58     </rabbit:topic-exchange>
59
60     <!--定义rabbitTemplate对象操作可以在代码中方便发送消息-->
61     <rabbit:template id="rabbitTemplate" connection-factory="connectionFactory"/>
62 </beans>
生产者代码
 1 @RunWith(SpringJUnit4ClassRunner.class)
 2 @ContextConfiguration(locations = "classpath:spring/spring-rabbitmq.xml")
 3 public class ProducerTest {
 4
 5     @Autowired
 6     private RabbitTemplate rabbitTemplate;
 7
 8     /**
 9      * 只发队列消息
10      * 默认交换机类型为 direct
11      * 交换机的名称为空,路由键为队列的名称
12      */
13     @Test
14     public void queueTest(){
15         //路由键与队列同名
16         rabbitTemplate.convertAndSend("spring_queue", "只发队列spring_queue的消息。");
17     }
18
19     /**
20      * 发送广播
21      * 交换机类型为 fanout
22      * 绑定到该交换机的所有队列都能够收到消息
23      */
24     @Test
25     public void fanoutTest(){
26         /**
27          * 参数1:交换机名称
28          * 参数2:路由键名(广播设置为空)
29          * 参数3:发送的消息内容
30          */
31         rabbitTemplate.convertAndSend("spring_fanout_exchange", "", "发送到spring_fanout_exchange交换机的广播消息");
32     }
33
34     /**
35      * 通配符
36      * 交换机类型为 topic
37      * 匹配路由键的通配符,*表示一个单词,#表示多个单词
38      * 绑定到该交换机的匹配队列能够收到对应消息
39      */
40     @Test
41     public void topicTest(){
42         /**
43          * 参数1:交换机名称
44          * 参数2:路由键名
45          * 参数3:发送的消息内容
46          */
47         rabbitTemplate.convertAndSend("spring_topic_exchange", "heima.bj", "发送到spring_topic_exchange交换机heima.bj的消息");
48         rabbitTemplate.convertAndSend("spring_topic_exchange", "heima.bj.1", "发送到spring_topic_exchange交换机heima.bj.1的消息");
49         rabbitTemplate.convertAndSend("spring_topic_exchange", "heima.bj.2", "发送到spring_topic_exchange交换机heima.bj.2的消息");
50         rabbitTemplate.convertAndSend("spring_topic_exchange", "itcast.cn", "发送到spring_topic_exchange交换机itcast.cn的消息");
51     }
52 }
消费者依赖
1 <?xml version="1.0" encoding="UTF-8"?>
 2 <project xmlns="http://maven.apache.org/POM/4.0.0"
 3          xmlns:xsi="http://www.w3.org/2001/XMLSchema-instance"
 4          xsi:schemaLocation="http://maven.apache.org/POM/4.0.0 http://maven.apache.org/xsd/maven-4.0.0.xsd">
 5     <modelVersion>4.0.0</modelVersion>
 6
 7     <groupId>com.itheima</groupId>
 8     <artifactId>spring-rabbitmq-consumer</artifactId>
 9     <version>1.0-SNAPSHOT</version>
10     <dependencies>
11         <dependency>
12             <groupId>org.springframework</groupId>
13             <artifactId>spring-context</artifactId>
14             <version>5.1.7.RELEASE</version>
15         </dependency>
16
17         <dependency>
18             <groupId>org.springframework.amqp</groupId>
19             <artifactId>spring-rabbit</artifactId>
20             <version>2.1.8.RELEASE</version>
21         </dependency>
22     </dependencies>
23
24
25 </project>
消费者xml
1 rabbitmq.host=192.168.12.135 2 rabbitmq.port=5672 3 rabbitmq.username=**** 4 rabbitmq.password=**** 5 rabbitmq.virtual-host=/****
 1 <?xml version="1.0" encoding="UTF-8"?>
 2 <beans xmlns="http://www.springframework.org/schema/beans"
 3        xmlns:xsi="http://www.w3.org/2001/XMLSchema-instance"
 4        xmlns:context="http://www.springframework.org/schema/context"
 5        xmlns:rabbit="http://www.springframework.org/schema/rabbit"
 6        xsi:schemaLocation="http://www.springframework.org/schema/beans
 7        http://www.springframework.org/schema/beans/spring-beans.xsd
 8        http://www.springframework.org/schema/context
 9        https://www.springframework.org/schema/context/spring-context.xsd
10        http://www.springframework.org/schema/rabbit
11        http://www.springframework.org/schema/rabbit/spring-rabbit.xsd">
12     <!--加载配置文件-->
13     <context:property-placeholder location="classpath:properties/rabbitmq.properties"/>
14
15     <!-- 定义rabbitmq connectionFactory -->
16     <rabbit:connection-factory id="connectionFactory" host="${rabbitmq.host}"
17                                port="${rabbitmq.port}"
18                                username="${rabbitmq.username}"
19                                password="${rabbitmq.password}"
20                                virtual-host="${rabbitmq.virtual-host}"/>
21
22     <bean id="springQueueListener" class="com.itheima.rabbitmq.listener.SpringQueueListener"/>
23     <bean id="fanoutListener1" class="com.itheima.rabbitmq.listener.FanoutListener1"/>
24     <bean id="fanoutListener2" class="com.itheima.rabbitmq.listener.FanoutListener2"/>
25     <bean id="topicListenerStar" class="com.itheima.rabbitmq.listener.TopicListenerStar"/>
26     <bean id="topicListenerWell" class="com.itheima.rabbitmq.listener.TopicListenerWell"/>
27     <bean id="topicListenerWell2" class="com.itheima.rabbitmq.listener.TopicListenerWell2"/>
28
29     <rabbit:listener-container connection-factory="connectionFactory" auto-declare="true">
30         <rabbit:listener ref="springQueueListener" queue-names="spring_queue"/>
31         <rabbit:listener ref="fanoutListener1" queue-names="spring_fanout_queue_1"/>
32         <rabbit:listener ref="fanoutListener2" queue-names="spring_fanout_queue_2"/>
33         <rabbit:listener ref="topicListenerStar" queue-names="spring_topic_queue_star"/>
34         <rabbit:listener ref="topicListenerWell" queue-names="spring_topic_queue_well"/>
35         <rabbit:listener ref="topicListenerWell2" queue-names="spring_topic_queue_well2"/>
36     </rabbit:listener-container>
37 </beans>
消费者代码
 1 队列监听器
 2
 3 public class SpringQueueListener implements MessageListener {
 4     public void onMessage(Message message) {
 5         try {
 6             String msg = new String(message.getBody(), "utf-8");
 7
 8             System.out.printf("接收路由名称为:%s,路由键为:%s,队列名为:%s的消息:%s
",
 9                     message.getMessageProperties().getReceivedExchange(),
10                     message.getMessageProperties().getReceivedRoutingKey(),
11                     message.getMessageProperties().getConsumerQueue(),
12                     msg);
13         } catch (Exception e) {
14             e.printStackTrace();
15         }
16     }
17 }
18
19
20 广播监听器1
21 public class FanoutListener1 implements MessageListener {
22     public void onMessage(Message message) {
23         try {
24             String msg = new String(message.getBody(), "utf-8");
25
26             System.out.printf("广播监听器1:接收路由名称为:%s,路由键为:%s,队列名为:%s的消息:%s
",
27                     message.getMessageProperties().getReceivedExchange(),
28                     message.getMessageProperties().getReceivedRoutingKey(),
29                     message.getMessageProperties().getConsumerQueue(),
30                     msg);
31         } catch (Exception e) {
32             e.printStackTrace();
33         }
34     }
35 }
36
37
38 广播监听器2
39 public class FanoutListener2 implements MessageListener {
40     public void onMessage(Message message) {
41         try {
42             String msg = new String(message.getBody(), "utf-8");
43
44             System.out.printf("广播监听器2:接收路由名称为:%s,路由键为:%s,队列名为:%s的消息:%s
",
45                     message.getMessageProperties().getReceivedExchange(),
46                     message.getMessageProperties().getReceivedRoutingKey(),
47                     message.getMessageProperties().getConsumerQueue(),
48                     msg);
49         } catch (Exception e) {
50             e.printStackTrace();
51         }
52     }
53 }
54
55
56 星号统配
57 public class TopicListenerStar implements MessageListener {
58     public void onMessage(Message message) {
59         try {
60             String msg = new String(message.getBody(), "utf-8");
61
62             System.out.printf("通配符*监听器:接收路由名称为:%s,路由键为:%s,队列名为:%s的消息:%s
",
63                     message.getMessageProperties().getReceivedExchange(),
64                     message.getMessageProperties().getReceivedRoutingKey(),
65                     message.getMessageProperties().getConsumerQueue(),
66                     msg);
67         } catch (Exception e) {
68             e.printStackTrace();
69         }
70     }
71 }
72
73
74 井号统配
75 public class TopicListenerWell implements MessageListener {
76     public void onMessage(Message message) {
77         try {
78             String msg = new String(message.getBody(), "utf-8");
79
80             System.out.printf("通配符#监听器:接收路由名称为:%s,路由键为:%s,队列名为:%s的消息:%s
",
81                     message.getMessageProperties().getReceivedExchange(),
82                     message.getMessageProperties().getReceivedRoutingKey(),
83                     message.getMessageProperties().getConsumerQueue(),
84                     msg);
85         } catch (Exception e) {
86             e.printStackTrace();
87         }
88     }
89 }