在微信公众号里打开的网页,想要调用手机扫一扫,语音功能,这需要用到微信JS-SDK。因为是在微信里打开,受微信控制,所以只能用官方提供的sdk了。
注意-_- 坑:多个页面用到接口,必须都配一次config,url要是当前网页完整路径(现在是单页面,即www.abc.com/log,www.abc.com/list),不包括#后面的。
准备工作:
1. 认真读官方文档,可以减少不少坑。 (文档也有坑,字多,有的过时了,没更新。)
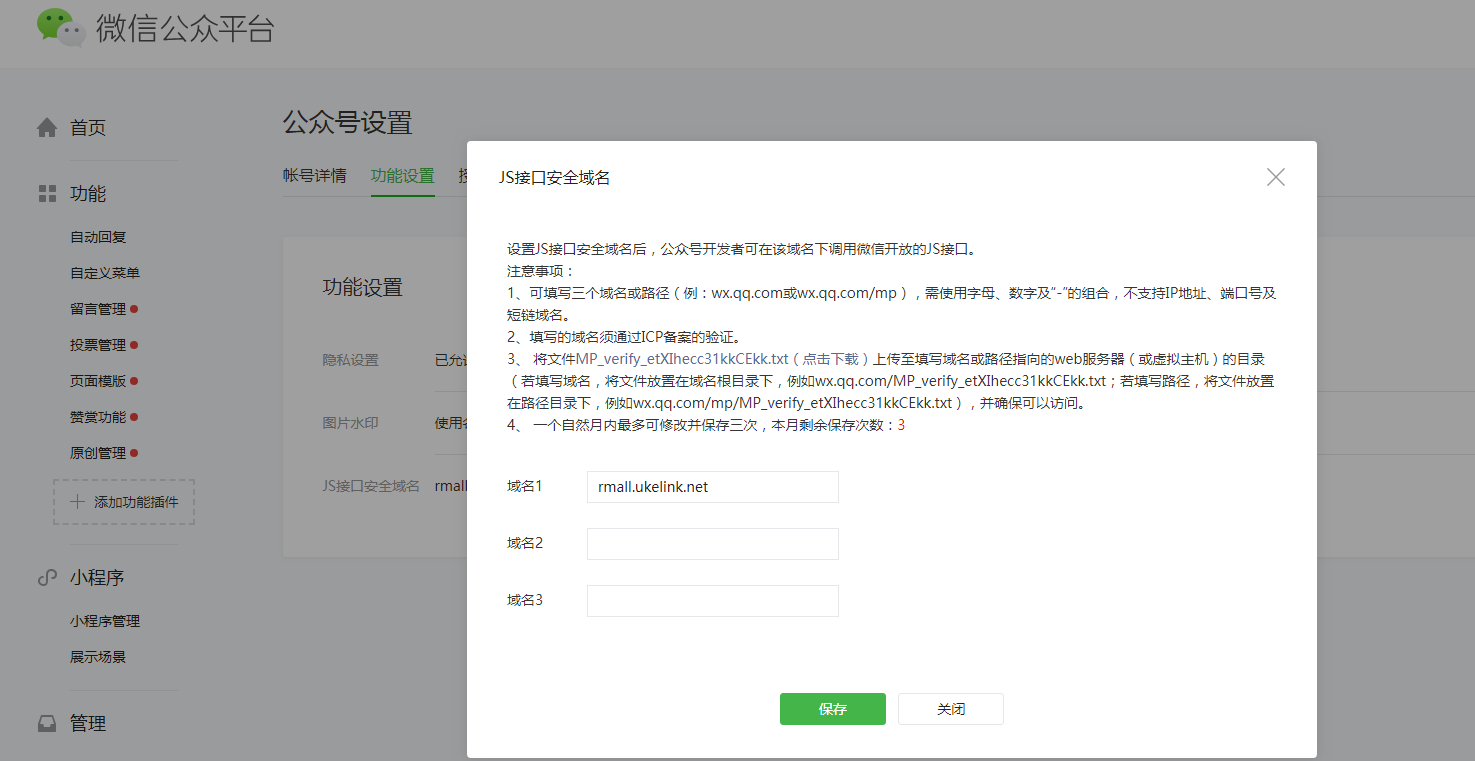
2.在公众号后台,配置JS接口安全域名,并把文件(下图第3点)下载到自己服务器。
3. 后端提供了接口,获取微信的签名等信息,用来配置config ( 前端直接调接口就行,生成签名这些只能有后台去调微信接口,官方文档也有写到)
正式开发:
【扫一扫】
1.在每个用到微信接口的页面,都需要单独调用一次后台接口,配置一次config。 因为每次签名所需要的url,必须是页面完整的url。
我用到的是vue,所以在created生命周期去请求配置config。

       const pageUrl = window.location.href; // 当前页面的url
            const vx_url="/wx/auth"; // 这是后台提供的接口。
            const data={ url:pageUrl }
             this.$api.get(vx_url, data).then((result) => {
                 if (result.success) {
                 this.$wx.config({
                   debug: false, // 开启调试模式,调用的所有api的返回值会在客户端alert出来,若要查看传入的参数,可以在pc端打开,参数信息会通过log打出,仅在pc端时才会打印。
                   appId: 'wx222222', // 必填,公众号的唯一标识
                   timestamp:result.data.timestamp , // 必填,生成签名的时间戳
                   nonceStr: result.data.noncestr, // 必填,生成签名的随机串
                   signature: result.data.signature,// 必填,签名
                   jsApiList: ['scanQRCode'] // 必填,需要使用的JS接口列表
                 });
                 }
             });
2. 在点击按钮后去调用微信接口,这种方式可以直接调用,不用写在ready里。
this.$wx.scanQRCode({
                          needResult: 1, // 默认为0,扫描结果由微信处理,1则直接返回扫描结果,
                          scanType: ["qrCode"],
                          success: (res)=> {// console.log('扫描结果',res);
                          }
               });
【语音】
1.配置config
created() {
            const pageUrl = window.location.href;
            const vx_url = "/wx/auth";
            const data = {
                url: pageUrl
            }

            this.$api.get(vx_url,  data).then((result) => {
                if (result.success) {
                    this.$wx.config({
                        debug: false, // 开启调试模式,调用的所有api的返回值会在客户端alert出来,若要查看传入的参数,可以在pc端打开,参数信息会通过log打出,仅在pc端时才会打印。
                        appId: 'wx2222', // 必填,公众号的唯一标识
                        timestamp: result.data.timestamp, // 必填,生成签名的时间戳
                        nonceStr: result.data.noncestr, // 必填,生成签名的随机串
                        signature: result.data.signature, // 必填,签名
                        jsApiList: ['startRecord', 'stopRecord', 'uploadVoice', 'onVoiceRecordEnd' ] // 必填,需要使用的JS接口列表
                    });
                }
            });
        }
2.开始录音
sendVoice(event) {
                event.preventDefault();            if (util.judgeEquipment().isWeixin) {
                        this.$wx.startRecord({
                            success: () => {
                                this.isSend = true;
                                this.isReord = true;
                                const touch = event.touches[0], //获取第一个触点
                                    x = Number(touch.pageX), //页面触点X坐标
                                    y = Number(touch.pageY); //页面触点Y坐标
                                // 记录触点初始位置
                                this.startX = x;
                                this.startY = y;
                                this.startTime = new Date().getTime();
                                this.voiceTxt = '松开 发送';
                                this.$wx.onVoiceRecordEnd({
                                    // 录音时间超过一分钟没有停止的时候会执行 complete 回调
                                    complete: function(res) {
                                        this.resetVoiceOption();
                                        this.uploadVoice(res.localId);
                                    }
                                });
                            }
                        });
                    }
            },
3.手指移动
    touchmove(event) {
                const touch = event.touches[0], //获取第一个触点
                    x = Number(touch.pageX), //页面触点X坐标
                    y = Number(touch.pageY); //页面触点Y坐标
                // 记录移动位置
                this.endX = x;
                this.endY = y;
                if (this.startY - this.endY < 0) {
                    // 向上滑
                    this.recordStatusTxt = recordingTxt;
                    this.isSend = true;
                } else {
                    // 向下滑
                    this.recordStatusTxt = cancelRecordTxt;
                    this.isSend = false;
                }
            },
4.结束录音
    touchend(e) {
                e.preventDefault();
                this.resetVoiceOption();
                this.endTime = new Date().getTime();
                const diffTime = this.endTime - this.startTime;
                if (this.startTime === 0 || diffTime < 500) {
                    this.$toast("录音时间太短", "none", 1500);
                    return
                }
                const recordTime = Math.ceil(diffTime / 1000); // 录音多少秒

                this.$wx.stopRecord({
                    success: (res) => {
                        if (this.isSend) {
                            this.uploadVoice(res.localId);
                        }
                    }
                });
            },
5.上传语音
由于微信服务器只会保留语音文件3天,所以需要后台去微信服务器下载到自己服务器。后端从微信下载语音接口文档 https://developers.weixin.qq.com/doc/offiaccount/Asset_Management/Get_temporary_materials.html
        uploadVoice(_localId) {
                this.$wx.uploadVoice({
                    localId: _localId, // 需要上传的音频的本地ID,由stopRecord接口获得
                    isShowProgressTips: 0, // 1显示进度提示,0不显示
                    success: (resp) => {
                        const url = '/wx/downloadVoice' // 后台提供的接口。先把语音上传到微信服务器,然后把serverId发给后台,后台通过这id去微信服务器下载语音到自己服务器,再返回url给前端
                        const data = {
                            mediaId:resp.serverId
                        }
                        this.$api.get(url, data).then((result) => {
                            if (result.success) {
                                // 返回是 .amr
                                console.log(result.data)
                            }
                        });
                    }
                });
            },
6.重置
    resetVoiceOption(){
                this.isReord = false;
                this.voiceTxt = '按住 说话';
                this.recordStatusTxt = recordingTxt;
                this.startX = 0;
                this.startY = 0;
                this.endX = 0;
                this.endY = 0;
            },
7.播放
由于微信录音文件是.amr格式,h5音频标签无法播放的。
方案1:后台从微信服务器下载回来语音文件时,直接转换成MP3格式
方案2:前端使用‘benz-amr-recorder’这个库,可以播放
const BenzAMRRecorder = require('benz-amr-recorder');
const amr = new BenzAMRRecorder();
                // url是后台返回的 https://www.abc.com/7A1BAEEB.amr
                amr.initWithUrl(src).then(() => {
                    amr.play(); // 播放
                    // const amrDuration = Math.ceil(amr.getDuration());
                    // console.log('音频时长', amrDuration); // 获取音频时长
                });

                amr.onEnded(() => {// console.log(播放结束)
                })
附:官网事例demo
补上HTML和data部分的代码:
用的是uni-app
<view class="input">
      <input
              v-if="featuresType == 0"
              class="txt"
              placeholder="请输入文字"
              v-model="commentText"
              confirm-type="send"
              @confirm="sendTxt"
        />
        <input
              disabled
              :placeholder="voiceTxt"
              v-else
              class="btn-voice"
              @longpress="sendVoice"
              @touchend="touchend"
              @touchmove="touchmove"
            />
</view>

data(){
  return{
  }
}