一、Spring Boot Admin用于管理和监控一个或者多个Spring Boot程序。Spring Boot Admin分为Server端和Client 端,Client端可以通过向Http Server端注册,也可以结合SpringCloud的服务注册组件Eureka 进行注册。SpringBoot Admin 提供了用AngularJs 写的 Ul 界面,用于管理和监控。其中监控内容包括Spring Boot的监控组件Actuator的各个Http节点,也支持更高级的功能,包括Turbine、Jmx、Loglevel 等。
二、直接使用Spring Boot Admin监控客户端
1、Admin Server
(1)加入依赖
        <dependency>
            <groupId>org.springframework.boot</groupId>
            <artifactId>spring-boot-starter-web</artifactId>
        </dependency>
        <dependency>
            <groupId>de.codecentric</groupId>
            <artifactId>spring-boot-admin-starter-server</artifactId>
            <version>2.0.4</version>
        </dependency>
        <dependency>
            <groupId>org.springframework.boot</groupId>
            <artifactId>spring-boot-starter-actuator</artifactId>
        </dependency>
(2)编写启动项
package com.cetc;

import de.codecentric.boot.admin.server.config.EnableAdminServer;
import org.springframework.boot.SpringApplication;
import org.springframework.boot.autoconfigure.SpringBootApplication;

@SpringBootApplication
@EnableAdminServer
public class AdminServerApplication {

    public static void main(String[] args) {
        SpringApplication.run(AdminServerApplication.class, args);
    }

}
(3)编写配置文件application.yaml
server:
  port: 8691
spring:
  application:
    name: admin-server
management:
  endpoints:
    web:
      exposure:
        include: ["*"]
  endpoint:
    health:
      show-details: always
2、Admin Client,为了简单使用,我这里还是通过feign的方式去接入Eureka的服务。
(1)目录结构和Spring-Cloud之Feign声明式调用-4类似,这里全部写出来,有兴趣可以看下方源码

(2)加入依赖
        <dependency>
            <groupId>org.springframework.boot</groupId>
            <artifactId>spring-boot-starter-web</artifactId>
        </dependency>
        <!--admin-client-->
        <dependency>
            <groupId>org.springframework.boot</groupId>
            <artifactId>spring-boot-starter-actuator</artifactId>
        </dependency>
        <dependency>
            <groupId>de.codecentric</groupId>
            <artifactId>spring-boot-admin-starter-client</artifactId>
            <version>2.0.4</version>
        </dependency>
        <!--admin-client-->
(3)启动项没有什么特别的,这里直接编写配置文件application.yaml
server:
  port: 8692
spring:
  application:
    name: admin-client
  boot:
    admin:
      client:
        url: ["http://127.0.0.1:8691"] # 配置注册的admin Server服务
eureka:
  client:
    service-url:
      defaultZone: http://127.0.0.1:8670/eureka/ # 实际开发中建议使用域名的方式
management:
  endpoints:
    web:
      exposure:
        include: ["*"]
  endpoint:
    health:
      show-details: always
    logfile:
      external-file: logs/log.log # 这里的配置主要是在admin server中看到日志记录
logging:
  path: logs
  file: logs/log.log # 日志配置
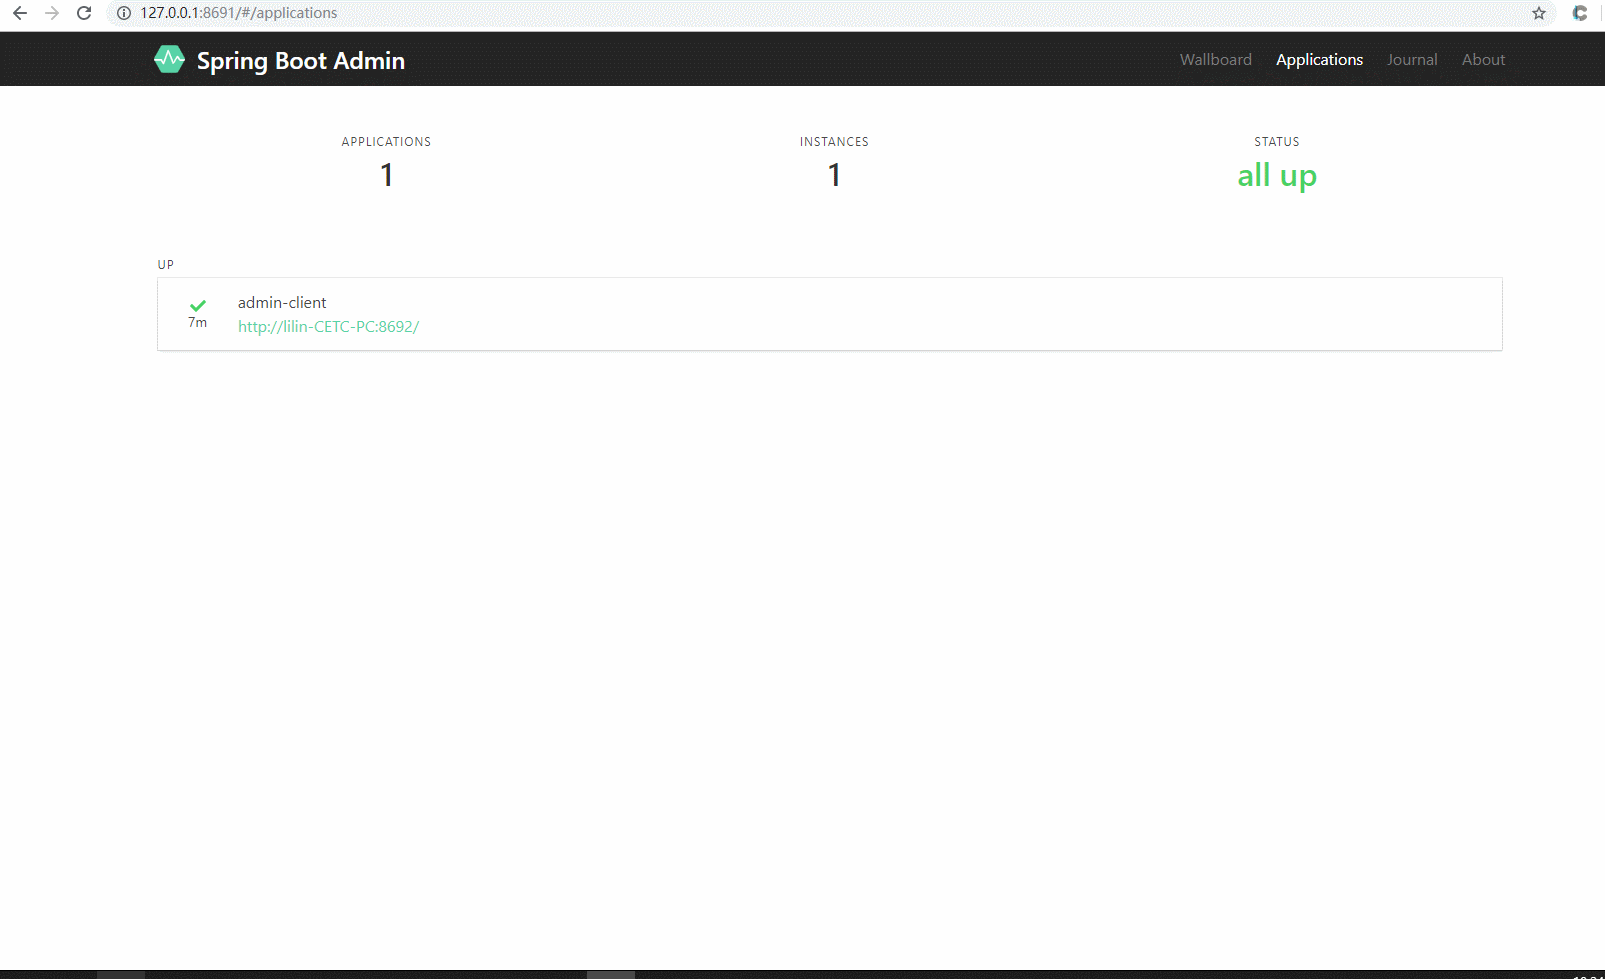
3、测试。启动Eureka-Server,Eureka-Client,Admin-Server,Admin-Client。端口分别为:8670、8673、8691、8692。
(1)Eureka-Server注册效果

(2)Admin-Server效果
三、让Admin-Server通过Eureka注册中心来监控所有服务(这才是重点),这里还加入了Security配置,主要目的是为了安全。
1、Admin-Server
(1)所需依赖
        <dependency>
            <groupId>org.springframework.cloud</groupId>
            <artifactId>spring-cloud-starter-netflix-eureka-client</artifactId>
        </dependency>
        <dependency>
            <groupId>org.springframework.boot</groupId>
            <artifactId>spring-boot-starter-web</artifactId>
        </dependency>
        <dependency>
            <groupId>de.codecentric</groupId>
            <artifactId>spring-boot-admin-starter-server</artifactId>
            <version>2.0.4</version>
        </dependency>
        <dependency>
            <groupId>org.springframework.boot</groupId>
            <artifactId>spring-boot-starter-actuator</artifactId>
        </dependency>
        <dependency>
            <groupId>org.springframework.boot</groupId>
            <artifactId>spring-boot-starter-security</artifactId>
        </dependency>
说明:spring-boot-admin-starter-server的版本选择要慎重,不然会有很多坑。
(2)编写启动项
package com.cetc;

import de.codecentric.boot.admin.server.config.EnableAdminServer;
import org.springframework.boot.SpringApplication;
import org.springframework.boot.autoconfigure.SpringBootApplication;
import org.springframework.cloud.netflix.eureka.EnableEurekaClient;

@SpringBootApplication
@EnableAdminServer
@EnableEurekaClient
public class AdminServerApplication {

    public static void main(String[] args) {
        SpringApplication.run(AdminServerApplication.class, args);
    }
}
(3)编写Security配置,这里也可以参考官网配置:https://codecentric.github.io/spring-boot-admin/2.0.4/#_securing_spring_boot_admin_server
package com.cetc.config;

import org.springframework.context.annotation.Configuration;
import org.springframework.security.config.annotation.web.builders.HttpSecurity;
import org.springframework.security.config.annotation.web.configuration.EnableWebSecurity;
import org.springframework.security.config.annotation.web.configuration.WebSecurityConfigurerAdapter;

@Configuration
@EnableWebSecurity
public class SecurityConfiguration extends WebSecurityConfigurerAdapter{

    @Override
    protected void configure(HttpSecurity http) throws Exception {
        http
            .csrf().disable()
            .authorizeRequests()
        .antMatchers("/assets/**").permitAll()
            .anyRequest().authenticated()
        .and()
            //说明:这里和官网不同的是,因为默认端口为/login,所以我这里直接放开login.html就可以了不用配置loginProcessingUrl
            //在说明一点,这里是采用的本地页面的。如果前后端分开,请配具体的登录接口。
            .formLogin()
            .loginPage("/login.html").permitAll()
        .and()
            //默认接口/logout,不用配置logoutUrl
            .logout()
            .logoutSuccessUrl("/login.html")
        .and()
            //这里必须加入httpBasic,因为Eureka-Server是基于最原始的方式进行验证的。
            .httpBasic();
    }
}
(4)编写配置文件
server:
  port: 8691
spring:
  application:
    name: admin-server
  security:
    user:
      name: admin
      password: admin # 加入登录密码
eureka:
  client:
    service-url:
      defaultZone: http://127.0.0.1:8670/eureka/ # 实际开发中建议使用域名的方式
  instance:
    metadata-map:
      user.name: ${spring.security.user.name}
      user.password: ${spring.security.user.password}
management:
  endpoints:
    web:
      exposure:
        include: ["*"]
  endpoint:
    health:
      show-details: always # 显示具体详情
说明:metadata-map,主要用于方向验证使用。
2、Admin-Client这里不需要修改任何配置,只需要注册配置文件手动注册的配置
server:
  port: 8692
spring:
  application:
    name: admin-client
#  boot:
#    admin:
#      client:
#        url: ["http://127.0.0.1:8691"] # 配置注册的admin Server服务
eureka:
  client:
    service-url:
      defaultZone: http://127.0.0.1:8670/eureka/ # 实际开发中建议使用域名的方式
management:
  endpoints:
    web:
      exposure:
        include: ["*"]
  endpoint:
    health:
      show-details: always
    logfile:
      external-file: logs/log.log # 这里的配置主要是在admin server中看到日志记录
logging:
  path: logs
  file: logs/log.log # 日志配置
3、测试。启动Eureka-Server,Eureka-Client,Admin-Server,Admin-Client。端口分别为:8670、8673、8691、8692。
(1)Eureka-Server效果

(2)Admin-Server效果

说明:为什么Eureka-Client是INSTANCES DOWN的状态。这里服务其实是正常的,最主要的点在于Eureka-Client没有配置actuator。所以访问不到/acturtor/health接口。
四、源码地址:https://github.com/lilin409546297/spring-cloud/tree/master/admin