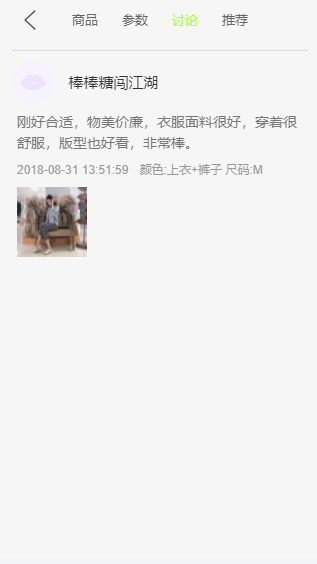
已经实现了,点击详情页navbar的四个模块,会对应到每个商品中的相应位置。那么,我们现在想实现的是:比如滚到相应的尺寸模块或者评论时,navbar上的详情或者排列会自动变色。


这个,主要用了以下思路来实现:
首先,我们可以用一种很直观的方式来表达,首先先在scroll标签中设置probeType为3(因为在原来封装scroll的时候,将probeType的默认值设置为0,设置为3的时候可方便滚动且实时监听他的位置)
<scroll class="content" ref="scroll" @scroll="contentscroll" :probe-type="3">
之前在scroll.vue中曾经设置过监听滚动的位置的时候,发送出scroll事件,那么在此标签中,将监听contentscroll事件。
那么,接下来我们来讲述下contentscroll事件应该如何设计,首先是比较复杂的逻辑关系的设定。首先回顾下,我们把一个在data中初始化一个数组themeTopY,且在imageLoad中,每次都push了每个模块的offsetTop值。
 data() {
    return {
      themeTopY:[0,0,0,0],
      currentIndex:0
    }
  }
 imageLoad() {
      this.refresh()
      // console.log("refresh no debounce")
        this.themeTopY =[ ]
        this.themeTopY.push(0)
        this.themeTopY.push(this.$refs.params.$el.offsetTop)
        this.themeTopY.push(this.$refs.comment.$el.offsetTop)
        this.themeTopY.push(this.$refs.recommend.$el.offsetTop)
        console.log(this.themeTopY)
    }
且,温故下原来封装的scroll:
<template>
<div class="wrapper" ref="wrapper">
 <div class="content">
   <slot></slot>
 </div>
</div>
</template>
<!--//ref如果是绑定在组件中的,那么通过this.$refs.refname获取到的是一个组件对象-->
<!--//ref如果绑定在普通元素中,那么会通过this.$refs.refname获取的一个元素对象-->
<script>
import BScroll from "better-scroll"
export default {
  name: "scroll",
  props:['probeType',"pullUpLoad"],
  //'pullUpLoad'
  data(){
    return{
      scroll:null
    }
  },
  mounted(){
    //1.创建BScroll对象
this.scroll = new BScroll(this.$refs.wrapper,{
click:true,
  probeType:this.probeType,
  pullUpLoad:this.pullUpLoad
  //监听滚动到底部
})
    // this.scroll.scrollTo(0,0)
    //2.监听滚动的位置
    this.scroll.on("scroll",(position)=>{
      // console.log(position);
      this.$emit("scroll",position)
    })
    //3.监听上拉加载事件
    // this.scroll.on("pullingUp",()=>{
    // this.$emit("pullingUp")
    // })
//监听滚动到底部
if(this.pullUpLoad){
  this.scroll.on("pullingUp",()=>{
    // console.log("监听");
    this.$emit("pullingUp")
  })


    }
  },
  methods: {
    scrollTo(x, y, time = 1000) {
      this.scroll.scrollTo(x, y, time)
    },
    // finishPullUp(){
    //   this.scroll.finishPullUp()
    // },
    refresh() {
      // console.log("----1----");
      this.scroll.refresh()
    },
    finishPullUp() {
    },

    // },
    getScrollY() {
      return this.scroll ? this.scroll.y : 0
    }
  }
}
</script>

<style scoped>

</style>
后期,我们来处理下detail.vue中的contentscroll事件:
 contentscroll(position){
      // console.log(position);
      const positionY = -position.y
      for(let i= 0;i<this.themeTopY.length;i++){
        if(this.currentIndex !== i && i< this.themeTopY.length -1 && positionY >= this.themeTopY[i] && positionY < this.themeTopY[i+1] ||
          (i === this.themeTopY.length - 1 && positionY > this.themeTopY[i])){
          this.currentIndex = i;
          console.log(this.currentIndex);
          this.$refs.nav.currentIndex = i
        }
      }
解释下上述的代码:
首先,我们设定positionY为y轴上的position,由于其值在我测试后显示为负值,所以我直接在前面添加了一个负号。
之后,设置了一个for循环,设置i小于themeTopy的长度。之后,我主要做了一个或逻辑,来处理它。左边,我设置,i小于themeTopY的长度,且当positionY大于等于i的offsetTop值,小于下标i+1的offsetTop值的时候,
可以执行;或者i等于themeTopY的长度值减1的时候,也就是themeTopY的最后一个下标,且positionY大于最后一个数组元素的offsetTop时 ,也可以执行相应语句。之后,我在data中初始化了一个currentIndex,且在或逻辑的左边,设置当currentIndex的值不等于i的时候,才会执行相应左边的语句。之后,在执行时,我将i值赋予currentIndex,且将i值赋予navbar组件中的currentIndex值,我们再把detail中的navbar代码复现下:
e>
  <div class="bbb">
    <navbar>
      <div slot="left" class="left" @click="backclick">
        <img src="../../../src/assets/img/back.svg">
      </div>
      <div slot="center" class="title">
        <div v-for="(item,index) in title"
             class="aaa" :class="{active:index === currentIndex}" v-on:click="itemclick(index)">
          {{item}}
        </div>
      </div>
    </navbar>
  </div>
</template>

<script>
import Navbar from "../../../src/components/common/navbar/navbar";
export default {
  name: "detailnav",
  components: {Navbar},
  data(){
    return{
      title:['商品','参数','讨论','推荐'],
      currentIndex:0
    }
  },
  methods:{
    itemclick(index){
      this.currentIndex = index
      this.$emit("itemclick",index)
    },
    backclick(){
      this.$router.back()
    }
  }
}
</script>

<style scoped>
.title{
  display: flex;
  font-size: 13px;
}
.aaa{
  flex: 1;
}
.active{
  color: greenyellow;
}
.left img{
  margin-top: 10px;
}
.bbb{
  background-color: #f6f6f6;
  /*height: 100vh;*/

}
</style>
那么,我们可以很清晰地发现,当事件中的i值赋予给navbar中的currentIndex,那么就可以实现滚动商品的四个详情模块的时候,亦可以实现滚动到哪个模块就激活navbar上的某个值。
这个方法的话,逻辑还是有点杂糅,还有个更为简单的方法。
我们可以在themeTopY这个数组的最后,直接push一个极大值,这样的话,直接在每个区间中执行就ok了,那我们来看下其代码实现。
 imageLoad() {
      this.refresh()
        this.themeTopY =[ ]
        this.themeTopY.push(0)
        this.themeTopY.push(this.$refs.params.$el.offsetTop)
        this.themeTopY.push(this.$refs.comment.$el.offsetTop)
        this.themeTopY.push(this.$refs.recommend.$el.offsetTop)
        this.themeTopY.push(Number.MAX_VALUE)
        console.log(this.themeTopY)
    }
contentscroll(position) {
      // console.log(position);
      const positionY = -position.y
      for (let i = 0; i < this.themeTopY.length - 1; i++) {
        if (this.currentIndex !== i && (positionY >= this.themeTopY[i] && positionY < this.themeTopY[i + 1])) {
          this.currentIndex = i;
          // this.$refs.nav.currentIndex = this.currentIndex
          this.$refs.nav.currentIndex = i
        }

      }

    }
我们看下上述代码,当我在数组最后push进了一个极大值的时候,我的逻辑也可以实现的很为简洁了。首先,我们将i的值限制,限制其小于themeTop的长度-1,之后我们只需要,将positionY的值限制在大于等于数组中i位置的offsetTop且小于i+1的位置即可。
之后我们将i值赋予给nav中的currentIndex即可实现。