我的前端工具集(二)文件上传的封装
liuyuhang原创,未经允许禁止转载
目录
1.文件上传样式与功能
1.1.文件上传的表现
文件上传控件的代码比较简单,功能都是浏览器封装好的,实际上也没啥不好的,就是难看
你做出来这个样子,产品经理肯定跟你急!!

代码也蛮容易的,如下:
1 <input type="file" class="fileUpload" />
不多说了,反正我自己都看不过去(公司没专职产品经理,我是个混合职业!)
1.2.需求描述
- 任意的按钮或某种html控件,点击以后能够使用上传控件的功能
- 选择文件后文件的路径要与文件名要能够正确的显示出来
2.封装思路
2.1.隐藏 file 控件
第一反应是style=“display:none”
然而网上搜了一下,竟然很多人说style="opacity: 0",然后将制作后的控件的z-index提前,
同时调整相对位置,将原控件覆盖。
提供这种方案的,你有病么?哪里抄的?透明度为0但是还占位,东西还存在,还要写很多内容
来调整位置。。。
脑袋有泡。
2.2.click事件联动调用
type=“file”的input元素本身是有内置的click事件的,我们需要将自己重写的html的点击事件,来获取
隐藏的type=“file”的input元素,然后调用其click事件,这样就能够完成上传功能。
2.3.上传的文件路径显示
文件是否选择成功,选择的什么文件,需要有一个“空间”来接收并显示,浏览器自身的上传控件后面,
会在选择了文件以后,显示文件名的。
使用console.log($("#fileInput").val()),和console.log($("#fileInput"))打印的内容如下图:

展开jquery对象后,在value属性中找到了上述信息,如下图:

因此获取文件名也不是啥难事了。
3.代码
3.1.HTML代码如下:
 1        <!-- 上传控件 -->
 2             <div id="fileUploadList">
 3                 <div class="input-group" style='margin:5px 0px 5px 0px'>
 4                     <!-- 隐藏的文件上传按钮,太tmd难看 -->
 5                     <input type="file" class="fileUpload" style="display: none" />
 6                     <!-- 重做的上传按钮,各种绑定 -->
 7                     <span class="input-group-btn">
 8                         <button class="btn btn-default chooseFile" type="button">选择</button>
 9                         <button class="btn btn-warning modifyChooseFile" type="button">修改</button>
10                         <button class="btn btn-success fileUploadSubmit" type="button">上传</button>
11                     </span> <input type="text" class="form-control" readonly="readonly">
12                 </div>
13             </div>
3.2.JS代码如下:
 1      $(function() {
 2              fileUploadListener("fileUploadList"); //初始化监听器
 3         })
 4         /**
 5          * 监听器
 6          */
 7         function fileUploadListener(id) {
 8             $("#" + id + " .btn").unbind("click"); //移除监听器
 9             //文本框绑定监听器
10             $("#" + id + " .fileUpload").change(function() {
11                 $(this).next().next().val($(this).val());
12             })
13             //选择文件按钮监听器
14             $("#" + id + " .chooseFile").click(function() {
15                 $(this).parent().prev().click();
16                 console.log($(this).parent().prev())
17             });
18             //修改按钮监听器
19             $("#" + id + " .modifyChooseFile").click(function() {
20                 $(this).parent().prev().click();
21                 console.log($(this).parent().prev())
22             });
23             //上传按钮监听器
24             $("#" + id + " .fileUploadSubmit").click(function() {
25                 var dom = $(this).parent().prev();
26                 testUpload(dom);
27             });
28         }
3.3.异步文件上传代码如下:
 1 /*
 2          * 点击上传按钮的submit的函数
 3          */
 4         function testUpload(dom) {
 5             var fileObj = dom[0].files[0];//文件上传控件中的file信息获取
 6             if (null == fileObj || '' == fileObj || 'undefinded' == typeof fileObj) {//校验
 7                 dom.next().next().val("你未选择任何文件!");//提示
 8                 return null;
 9             }
10             if (fileObj.size > 1024 * 1024 * 10) { //文件大于10m
11                 dom.next().next().val("你选择的文件太大了,超过了10M,限制上传");//提示
12                 return null;
13             }
14             var fileForm = new FormData(); //创建file from
15             fileForm.append("action", "UploadVMKImagePath"); //修改头
16             fileForm.append("file", fileObj); //添加文件对象
17
18             var data = fileForm;
19
20             $.ajax({
21                 url : local + "/testFileUpload.do", //测试上传文件接口
22                 data : data,
23                 type : "Post",
24                 dataType : "json",
25                 cache : false, //上传文件无需缓存
26                 processData : false, //用于对data参数进行序列化处理 这里必须false
27                 contentType : false, //头信息修改,必须
28                 success : function(resultMap) {
29                     console.log(resultMap);//获取的返回信息
30                     console.log("上传完成!");
31                 },
32                 error : function(resultMap) {
33                     console.error(resultMap);
34                 }
35             })
36         }
代码自己看,反正内容不多!!
4.效果


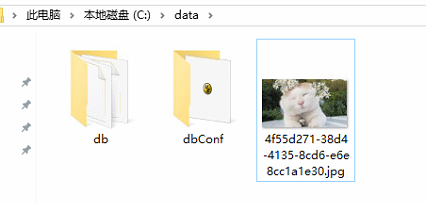
好歹能看了,css自己改去吧。文件已经躺在本地了!
以上!!