这篇内容我们给大家介绍一下Spring整合MyBatis框架的技术补充。在其他博客中都有介绍此类技术的实现,有些甚至写到了四种方式的整合实现。但是我们在这里通过如下的几个技术来完成Spring整合MyBatis的应用:Spring+Servlet+MyBatis。如果大家对Spring整合Servlet有不清楚的地方,请参照我们的第14讲内容:http://www.cnblogs.com/liuyangjava/p/6725670.html
1. 按照MVC架构的方式,我们先对项目进行分包
- 控制层:com.gxa.spring.controller
- 业务层:com.gxa.spring.service
- Dao层:com.gxa.spring.dao
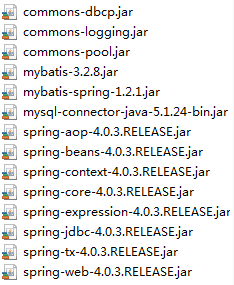
2. Spring整合MyBatis需要加入的jar包
3. 我们创建几个spring配置文件
- spring-controller.xml
- spring-service.xml
- spring-dao.xml
4. 因为MyBatis主要服务于Dao层,所以整合的关键点是在spring-dao.xml配置文件
- 采用org.mybatis.spring.SqlSessionFactoryBean来创建与管理MyBatis的SqlSessionFactory
- 利用org.mybatis.spring.mapper.MapperScannerConfigurer来扫描MyBatis的Dao接口
- 同时还需要注意一点,MyBatis的映射文件中的namespace必须填写Dao层的接口
5. 上面已经叙述整合需要注意的关键点,下面我们就给具体的代码实现步骤
- 创建Student实体类
package com.gxa.spring.entity;

/**
 * MyBatis中的实体类:对一张数据库表的映射
 * 1. 根据表的名称创建一个对象的Java类
 * 2. 根据表的字段创建对应的属性
 * @author caleb
 *
 */
public class Student {
    private int id;
    private String sname;
    private int t_id;
    public int getId() {
        return id;
    }
    public void setId(int id) {
        this.id = id;
    }
    public String getSname() {
        return sname;
    }
    public void setSname(String sname) {
        this.sname = sname;
    }
    public int getT_id() {
        return t_id;
    }
    public void setT_id(int t_id) {
        this.t_id = t_id;
    }
}
- 创建StudentDao接口
package com.gxa.spring.dao;

import java.util.List;

import com.gxa.spring.entity.Student;

public interface StudentDao {
    public List<Student> getUser();
}
- 创建mybatis-config.xml和StudentMapper.xml
<?xml version="1.0" encoding="UTF-8"?>
<!DOCTYPE configuration PUBLIC "-//mybatis.org//DTD Config 3.0//EN" "http://mybatis.org/dtd/mybatis-3-config.dtd">
<configuration>
    <mappers>
        <mapper resource="com/gxa/spring/entity/StudentMapper.xml"/>
    </mappers>
</configuration>
<?xml version="1.0" encoding="UTF-8"?>
<!DOCTYPE mapper PUBLIC "-//mybatis.org//DTD Mapper 3.0//EN" "http://mybatis.org/dtd/mybatis-3-mapper.dtd">
<mapper namespace="com.gxa.spring.dao.StudentDao">

    <select id="getUser" resultType="com.gxa.spring.entity.Student">
        select * from student
    </select>

</mapper>
- 创建spring-dao.xml文件
<?xml version="1.0" encoding="UTF-8"?>
<beans xmlns="http://www.springframework.org/schema/beans"
    xmlns:xsi="http://www.w3.org/2001/XMLSchema-instance"
    xmlns:p="http://www.springframework.org/schema/p"
    xmlns:context="http://www.springframework.org/schema/context"
    xsi:schemaLocation="http://www.springframework.org/schema/beans
        http://www.springframework.org/schema/beans/spring-beans.xsd
        http://www.springframework.org/schema/context
        http://www.springframework.org/schema/context/spring-context.xsd">

    <context:property-placeholder location="classpath:com/gxa/spring/config/jdbc.properties"/>

    <bean id="dataSource" class="org.apache.commons.dbcp.BasicDataSource" destroy-method="close">
        <property name="driverClassName" value="${mysql.driver}"></property>
        <property name="url" value="${mysql.url}"></property>
        <property name="username" value="${mysql.username}"></property>
        <property name="password" value="${mysql.password}"></property>
    </bean>

    <!-- 利用Spring来管理MyBatis的SqlSessionFactory -->
    <!-- 必须加入属性的配置, dataSource 和 configLocation或mapperLoactions -->
    <bean id="sqlSessionFactory" class="org.mybatis.spring.SqlSessionFactoryBean">
        <property name="dataSource" ref="dataSource"></property>
        <property name="configLocation" value="classpath:com/gxa/spring/config/mybatis-config.xml"></property>
    </bean>

    <!-- 利用Spring来扫描MyBatis的Dao -->
    <bean class="org.mybatis.spring.mapper.MapperScannerConfigurer">
        <property name="basePackage" value="com.gxa.spring.dao"></property>
        <property name="sqlSessionFactoryBeanName" value="sqlSessionFactory"></property>
    </bean>

</beans>
- 创建StudentSerivce接口和StudentServiceImpl实现类
package com.gxa.spring.service;

public interface StudentService {
    public void getUser();
}
package com.gxa.spring.service.impl;

import java.util.List;

import org.springframework.beans.factory.annotation.Autowired;
import org.springframework.stereotype.Service;

import com.gxa.spring.dao.StudentDao;

@Service
public class StudentServiceImpl implements StudentService {

    @Autowired
    private StudentDao studentDao;

    @Override
    public void getUser() {
        List<Student> list = studentDao.getUser();
        for (Student s : list) {
            System.out.println(s.getId() + "  " + s.getSname());
        }
    }

}
- 创建spring-service.xml文件
<?xml version="1.0" encoding="UTF-8"?>
<beans xmlns="http://www.springframework.org/schema/beans"
    xmlns:xsi="http://www.w3.org/2001/XMLSchema-instance"
    xmlns:p="http://www.springframework.org/schema/p"
    xmlns:context="http://www.springframework.org/schema/context"
    xsi:schemaLocation="http://www.springframework.org/schema/beans
        http://www.springframework.org/schema/beans/spring-beans.xsd
        http://www.springframework.org/schema/context
        http://www.springframework.org/schema/context/spring-context.xsd">

    <context:component-scan base-package="com.gxa.spring.service"></context:component-scan>

</beans>
- 创建StudentServlet控制器
package com.gxa.spring.controller;

import java.io.IOException;

import javax.servlet.ServletException;
import javax.servlet.annotation.WebServlet;
import javax.servlet.http.HttpServlet;
import javax.servlet.http.HttpServletRequest;
import javax.servlet.http.HttpServletResponse;

import org.springframework.beans.factory.annotation.Autowired;
import org.springframework.beans.factory.config.AutowireCapableBeanFactory;
import org.springframework.stereotype.Controller;
import org.springframework.web.context.WebApplicationContext;
import org.springframework.web.context.support.WebApplicationContextUtils;

import com.gxa.spring.service.StudentService;

@Controller
@WebServlet("/student.do")
public class StudentServlet extends HttpServlet {

    /**
     * Servlet和Spring框架整合时候, Servlet本身是不能自动依赖注入
     * 解决方案:
     * 1. Spring框架提供的接口, AutowireCapableBeanFactory
     * 2. 就可以完成Servlet中依赖对象的自动装配
     */
    @Autowired
    private StudentService studentService;

    @Override
    public void init() throws ServletException {
        /**
         * 利用init方法来调用Spring容器BeanFactory
         * 看看UserServlet是否能够通过Spring容器获取对象
         */
        WebApplicationContext wc = WebApplicationContextUtils.getRequiredWebApplicationContext(getServletContext()); //通过Web容器去得到BeanFactory对象
        AutowireCapableBeanFactory autowireCapableBeanFactory = wc.getAutowireCapableBeanFactory();
        autowireCapableBeanFactory.autowireBean(this);
    }

    @Override
    protected void doPost(HttpServletRequest req, HttpServletResponse resp) throws ServletException, IOException {

    }

    @Override
    protected void doGet(HttpServletRequest req, HttpServletResponse resp) throws ServletException, IOException {
        studentService.getUser();
    }
}
- 创建spring-controller.xml
<?xml version="1.0" encoding="UTF-8"?>
<beans xmlns="http://www.springframework.org/schema/beans"
    xmlns:xsi="http://www.w3.org/2001/XMLSchema-instance"
    xmlns:p="http://www.springframework.org/schema/p"
    xmlns:context="http://www.springframework.org/schema/context"
    xsi:schemaLocation="http://www.springframework.org/schema/beans
        http://www.springframework.org/schema/beans/spring-beans.xsd
        http://www.springframework.org/schema/context
        http://www.springframework.org/schema/context/spring-context.xsd">

    <context:component-scan base-package="com.gxa.spring.controller"></context:component-scan>

</beans>
- 修改web.xml
<?xml version="1.0" encoding="UTF-8"?>
<web-app xmlns:xsi="http://www.w3.org/2001/XMLSchema-instance" xmlns="http://xmlns.jcp.org/xml/ns/javaee" xsi:schemaLocation="http://xmlns.jcp.org/xml/ns/javaee http://xmlns.jcp.org/xml/ns/javaee/web-app_3_1.xsd" id="WebApp_ID" version="3.1">
  <display-name>spring</display-name>
  <welcome-file-list>
    <welcome-file>index.html</welcome-file>
    <welcome-file>index.htm</welcome-file>
    <welcome-file>index.jsp</welcome-file>
    <welcome-file>default.html</welcome-file>
    <welcome-file>default.htm</welcome-file>
    <welcome-file>default.jsp</welcome-file>
  </welcome-file-list>

  <context-param>
      <param-name>contextConfigLocation</param-name>
      <param-value>classpath:com/gxa/spring/config/spring-*.xml</param-value>
  </context-param>

  <listener>
      <listener-class>org.springframework.web.context.ContextLoaderListener</listener-class>
  </listener>
</web-app>
整个实现代码已经附上了,大家可以按照上面的方式试试
针对这两天有小伙伴需要这篇博客的源码,我通过附件给大家,大家可以自行下载