K8S网络模型
解决容器在集群之间的互通。
K8S设计了网络模型,但却将它的实现交给了网络插件,CNI网络插件最主要的功能就是实现POD资源能够跨宿主机进行通信。
常见的CNI网络插件
- Flannel(重点):依赖于etcd去存储网络信息的
- Calico:网络限制,网络规则的内容
- Canal:把上面两个结合了,前半部分用F,后半部分用C(没有啥用)
- Contiv:思科开源的
- OpenContrail
- NSX-T
- kube-router:试图取代kube-proxy
集群规划
| 主机名 | 角色 | IP |
|---|---|---|
| HDSS7-21.host.com | flannel | 10.4.7.21 |
| HDSS7-22.host.com | flannel | 10.4.7.22 |
下载软件,解压,做软链接
在HDSS7-21.host.com上
[root@hdss7-21 src]# wget https://github.com/coreos/flannel/releases/download/v0.11.0/flannel-v0.11.0-linux-amd64.tar.gz

[root@hdss7-21 src]# mkdir /opt/flannel-v0.11.0
[root@hdss7-21 src]# tar -zxvf flannel-v0.11.0-linux-amd64.tar.gz -C /opt/flannel-v0.11.0
[root@hdss7-21 src]# ln -s /opt/flannel-v0.11.0/ /opt/flannel
做软链接,方便以后版本升级,只需要移除旧的软链接,创建新的软连接即可。
[root@hdss7-21 opt]# cd flannel
[root@hdss7-21 flannel]# ll
total 34436
-rwxr-xr-x 1 root root 35249016 Jan 29  2019 flannel
-rwxr-xr-x 1 root root     2139 Oct 23  2018 mk-docker-opts.sh
-rw-r--r-- 1 root root     4300 Oct 23  2018 README.md

[root@hdss7-21 flannel]# mkdir cert
[root@hdss7-21 flannel]# scp hdss7-200:/opt/certs/ca.pem .
[root@hdss7-21 flannel]# scp hdss7-200:/opt/certs/client.pem .
[root@hdss7-21 flannel]# scp hdss7-200:/opt/certs/client-key.pem .
创建env配置文件
[root@hdss7-21 cert]# cd ..
[root@hdss7-21 flannel]# vim subnet.env

FLANNEL_NETWORK=172.7.0.0/16
FLANNEL_SUBNET=172.7.21.1/24
FLANNEL_MTU=1500
FLANNEL_IPMASQ=false
创建启动脚本
在HDSS7-21.host.com上
[root@hdss7-21 flannel]# vim flanneld.sh

#!/bin/sh
./flanneld
  --public-ip=10.4.7.21
  --etcd-endpoints=https://10.4.7.12:2379,https://10.4.7.21:2379,https://10.4.7.22:2379
  --etcd-keyfile=./cert/client-key.pem
  --etcd-certfile=./cert/client.pem
  --etcd-cafile=./cert/ca.pem
  --iface=eth0
  --subnet-file=./subnet.env
  --healthz-port=2401
授权
[root@hdss7-21 flannel]# chmod +x flanneld.sh
创建日志目录
[root@hdss7-21 flannel]# mkdir -p /data/logs/flanneld
创建supervisor配置
在HDSS7-21.host.com上
[root@hdss7-21 flannel]# vim /etc/supervisord.d/flannel.ini
[program:flanneld-7-21]
command=/opt/flannel/flanneld.sh                             ; the program (relative uses PATH, can take args)
numprocs=1                                                   ; number of processes copies to start (def 1)
directory=/opt/flannel                                       ; directory to cwd to before exec (def no cwd)
autostart=true                                               ; start at supervisord start (default: true)
autorestart=true                                             ; retstart at unexpected quit (default: true)
startsecs=30                                                 ; number of secs prog must stay running (def. 1)
startretries=3                                               ; max # of serial start failures (default 3)
exitcodes=0,2                                                ; 'expected' exit codes for process (default 0,2)
stopsignal=QUIT                                              ; signal used to kill process (default TERM)
stopwaitsecs=10                                              ; max num secs to wait b4 SIGKILL (default 10)
user=root                                                    ; setuid to this UNIX account to run the program
redirect_stderr=true                                         ; redirect proc stderr to stdout (default false)
stdout_logfile=/data/logs/flanneld/flanneld.stdout.log       ; stderr log path, NONE for none; default AUTO
stdout_logfile_maxbytes=64MB                                 ; max # logfile bytes b4 rotation (default 50MB)
stdout_logfile_backups=4                                     ; # of stdout logfile backups (default 10)
stdout_capture_maxbytes=1MB                                  ; number of bytes in 'capturemode' (default 0)
stdout_events_enabled=false                                  ; emit events on stdout writes (default false)
操作etcd,增加host-gw
[root@hdss7-21 flannel]# cd /opt/etcd/

[root@hdss7-21 etcd]# ./etcdctl set /coreos.com/network/config '{"Network": "172.7.0.0/16", "Backend": {"Type": "host-gw"}}'
{"Network": "172.7.0.0/16", "Backend": {"Type": "host-gw"}}

[root@hdss7-21 etcd]# ./etcdctl get /coreos.com/network/config
{"Network": "172.7.0.0/16", "Backend": {"Type": "host-gw"}}
查看谁是master
[root@hdss7-21 etcd]# ./etcdctl member list
988139385f78284: name=etcd-server-7-22 peerURLs=https://10.4.7.22:2380 clientURLs=http://127.0.0.1:2379,https://10.4.7.22:2379 isLeader=false
5a0ef2a004fc4349: name=etcd-server-7-21 peerURLs=https://10.4.7.21:2380  clientURLs=http://127.0.0.1:2379,https://10.4.7.21:2379 isLeader=true
f4a0cb0a765574a8: name=etcd-server-7-12 peerURLs=https://10.4.7.12:2380 clientURLs=http://127.0.0.1:2379,https://10.4.7.12:2379 isLeader=false
启动服务并检查
[root@hdss7-21 etcd]# supervisorctl status
etcd-server-7-21                 RUNNING   pid 1029, uptime 4 days, 0:41:33
kube-apiserver-7-21              RUNNING   pid 1030, uptime 4 days, 0:41:33
kube-controller-manager-7-21     RUNNING   pid 89625, uptime 1 day, 4:53:09
kube-kubelet-7-21                RUNNING   pid 1027, uptime 4 days, 0:41:33
kube-proxy-7-21                  RUNNING   pid 1032, uptime 4 days, 0:41:33
kube-scheduler-7-21              RUNNING   pid 90832, uptime 1 day, 4:49:07

[root@hdss7-21 etcd]# supervisorctl  update
flanneld-7-21: added process group

[root@hdss7-21 flannel]# supervisorctl  status
etcd-server-7-21                 RUNNING   pid 1029, uptime 4 days, 1:03:48
flanneld-7-21                    RUNNING   pid 50922, uptime 0:01:44
kube-apiserver-7-21              RUNNING   pid 1030, uptime 4 days, 1:03:48
kube-controller-manager-7-21     RUNNING   pid 48165, uptime 0:11:30
kube-kubelet-7-21                RUNNING   pid 1027, uptime 4 days, 1:03:48
kube-proxy-7-21                  RUNNING   pid 1032, uptime 4 days, 1:03:48
kube-scheduler-7-21              RUNNING   pid 48158, uptime 0:11:30
ping
[root@hdss7-22 ~]# ping 172.7.21.2
PING 172.7.21.2 (172.7.21.2) 56(84) bytes of data.
64 bytes from 172.7.21.2: icmp_seq=1 ttl=63 time=0.710 ms
64 bytes from 172.7.21.2: icmp_seq=2 ttl=63 time=0.429 ms
查看路由
[root@hdss7-22 etcd]# route -n
Kernel IP routing table
Destination     Gateway         Genmask         Flags Metric Ref    Use Iface
0.0.0.0         10.4.7.254      0.0.0.0         UG    100    0        0 eth0
10.4.7.0        0.0.0.0         255.255.255.0   U     100    0        0 eth0
172.7.21.0      10.4.7.21       255.255.255.0   UG    0      0        0 eth0
172.7.22.0      0.0.0.0         255.255.255.0   U     0      0        0 docker0
凡是172.7.21.0/24的网络想要通信或者被访问,它的网关是10.4.7.21。
[root@hdss7-21 flannel]# route -n
Kernel IP routing table
Destination     Gateway         Genmask         Flags Metric Ref    Use Iface
0.0.0.0         10.4.7.254      0.0.0.0         UG    100    0        0 eth0
10.4.7.0        0.0.0.0         255.255.255.0   U     100    0        0 eth0
172.7.21.0      0.0.0.0         255.255.255.0   U     0      0        0 docker0
172.7.22.0      10.4.7.22       255.255.255.0   UG    0      0        0 eth0
凡是要去172.7.22.0网络的包,必须要经过10.4.7.22这个网关。同样,凡是要去172.7.21.0的包,必须要通过10.4.7.21这个网关。
宿主机IP是10.4.7.21和10.4.7.22,两台宿主机上的docker的NAT网段分别是10.7.21.0/24和10.7.22.0/24网段。

而flannel其实什么都没干,就是给对应的宿主机加了静态路由。
PS:手动加静态路由
[root@hdss7-21 ~]# route add -net 172.7.22.0/24 gw 10.4.7.21 dev eth0
[root@hdss7-22 ~]# route add -net 172.7.21.0/24 gw 10.4.7.22 dev eth0
Flannel的host-gw静态路由模型非常重要的前提条件——所有的宿主机要同处在一个二层网络下,也就是说他们要指向同一个网关。这样才能用host-gw模型,才能通过维护静态路由表的方式去让docker能够跨宿主机通信。CNI网络模型,效率最高的就是Flannel模型。因为是通过内核转发,只需要在宿主机上维护一张路由表即可,没有任何额外的资源开销。
Flannel的VxLAN模型
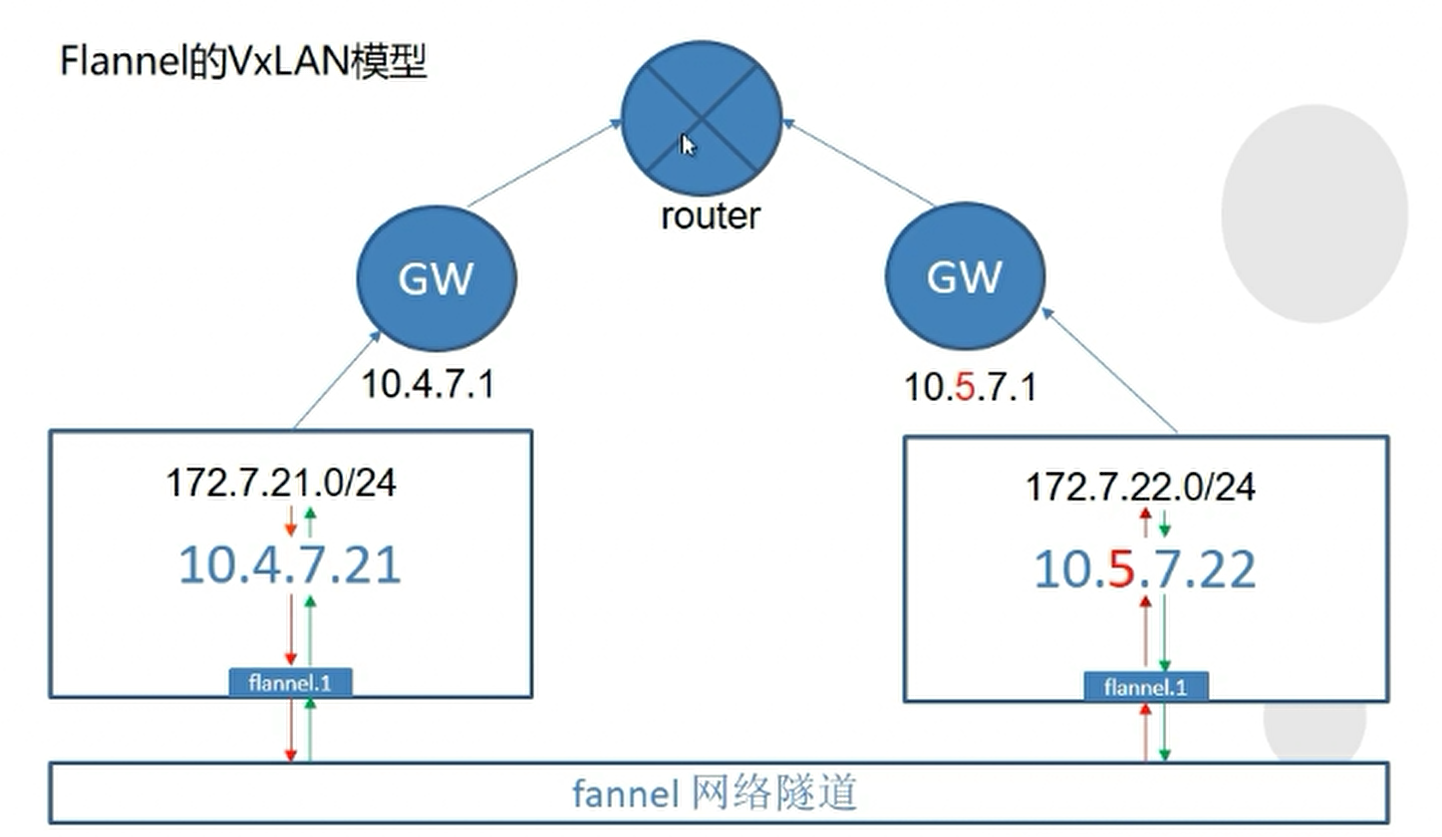
可以看到两个宿主机在不通的二层网络下,用host-gw模型就不能解决问题了。只能使用vxlan模型。
如上图,flannel.1相当于是实例化出来的虚拟网卡,就是一个Flannel网络隧道,网络适配。
停止flannel之后,需要再查看一下相关进程是否还依然存在,如果存在,需要强制杀掉进程。
手动删掉静态路由
[root@hdss7-22 ~]# route del -net 172.7.21.0/24 gw 10.4.7.21
[root@hdss7-21 ~]# route del -net 172.7.22.0/24 gw 10.4.7.22
容器网络通了,接下来还要做其他事情。
[root@hdss7-21 ~]# kubectl get pods
NAME             READY   STATUS    RESTARTS   AGE
nginx-ds-nmgjn   1/1     Running   1          11d
nginx-ds-v7hrn   1/1     Running   1          11d

[root@hdss7-21 ~]# kubectl exec -it nginx-ds-nmgjn /bin/bash
root@nginx-ds-nmgjn:/# ping 172.7.22.2
PING 172.7.22.2 (172.7.22.2): 48 data bytes
56 bytes from 172.7.22.2: icmp_seq=0 ttl=62 time=0.854 ms
56 bytes from 172.7.22.2: icmp_seq=1 ttl=62 time=0.289 ms
修改yaml配置文件
apiVersion: extensions/v1beta1
        image: harbor.od.com/public/nginx:curl
进入容器
[root@hdss7-21 ~]# kubectl get pods
NAME             READY   STATUS    RESTARTS   AGE
nginx-ds-nmgjn   1/1     Running   1          11d
nginx-ds-v7hrn   1/1     Running   1          11d

[root@hdss7-21 ~]# kubectl delete pod nginx-ds-nmgjn
pod "nginx-ds-nmgjn" deleted
[root@hdss7-21 ~]# kubectl delete pod nginx-ds-v7hrn
pod "nginx-ds-v7hrn" deleted

[root@hdss7-21 ~]# kubectl get pods
NAME             READY   STATUS    RESTARTS   AGE
nginx-ds-gwswr   1/1     Running   0          7s
nginx-ds-jh2x5   1/1     Running   0          15s

[root@hdss7-21 ~]# kubectl exec -it nginx-ds-jh2x5 /bin/bash
root@nginx-ds-jh2x5:/# curl 172.7.22.2

<!DOCTYPE html>
<html>
<head>
<title>Welcome to nginx!</title>
<style>
    body {
         35em;
        margin: 0 auto;
        font-family: Tahoma, Verdana, Arial, sans-serif;
    }
</style>
</head>
<body>
<h1>Welcome to nginx!</h1>
<p>If you see this page, the nginx web server is successfully installed and
working. Further configuration is required.</p>

<p>For online documentation and support please refer to
<a href="http://nginx.org/">nginx.org</a>.<br/>
Commercial support is available at
<a href="http://nginx.com/">nginx.com</a>.</p>

<p><em>Thank you for using nginx.</em></p>
</body>
</html>
在7-22上查看日志
[root@hdss7-22 ~]# kubectl logs -f nginx-ds-gwswr
10.4.7.21 - - [22/Aug/2020:09:18:01 +0000] "GET / HTTP/1.1" 200 612 "-" "curl/7.38.0" "-"
发现访问的IP地址是10.4.7.21,是宿主机IP,而不是容器的IP地址,说明还是有问题。
在两台机器都做如下操作
[root@hdss7-22 ~]# yum install iptables-services -y
[root@hdss7-22 ~]# systemctl start iptables && systemctl enable iptables
[root@hdss7-21 ~]# systemctl start iptables && systemctl enable iptables
查看iptable规则
[root@hdss7-21 ~]# iptables-save |grep -i postrouting
:POSTROUTING ACCEPT [19:1155]
:KUBE-POSTROUTING - [0:0]
-A POSTROUTING -m comment --comment "kubernetes postrouting rules" -j KUBE-POSTROUTING
-A POSTROUTING -s 172.7.21.0/24 ! -o docker0 -j MASQUERADE
-A KUBE-POSTROUTING -m comment --comment "kubernetes service traffic requiring SNAT" -m mark --mark 0x4000/0x4000 -j MASQUERADE
重点是这个
-A POSTROUTING -s 172.7.21.0/24 ! -o docker0 -j MASQUERADE
把规则删掉
[root@hdss7-21 ~]# iptables -t nat -D POSTROUTING -s 172.7.21.0/24 ! -o docker0 -j MASQUERADE
插入一条新的规则
[root@hdss7-21 ~]# iptables -t nat -I POSTROUTING -s 172.7.21.0/24 ! -d 172.7.0.0/16 ! -o docker0 -j MASQUERADE
原地址是172.7.21.0/24,不是(!)从docker0这个出口出去的,目标地址(-d)不是172.7.0.0/16的网络,才做snat地址转换。
保存
[root@hdss7-21 ~]# iptables-save > /etc/sysconfig/iptables
如果不通
[root@hdss7-21 ~]# kubectl exec -it nginx-ds-jh2x5 /bin/bash
root@nginx-ds-jh2x5:/# curl 172.7.22.2
curl: (7) Failed to connect to 172.7.22.2 port 80: No route to host
查看reject
[root@hdss7-21 ~]# iptables-save | grep -i reject
-A INPUT -j REJECT --reject-with icmp-host-prohibited
-A FORWARD -j REJECT --reject-with icmp-host-prohibited
两台机器的规则都要删掉
[root@hdss7-21 ~]# iptables -t filter -D INPUT -j REJECT --reject-with icmp-host-prohibited
[root@hdss7-21 ~]# iptables -t filter -D FORWARD -j REJECT --reject-with icmp-host-prohibited
[root@hdss7-22 ~]# iptables -t filter -D INPUT -j REJECT --reject-with icmp-host-prohibited
[root@hdss7-22 ~]# iptables -t filter -D FORWARD -j REJECT --reject-with icmp-host-prohibited
再保存一次
[root@hdss7-21 ~]# iptables-save > /etc/sysconfig/iptables
[root@hdss7-22 ~]# iptables-save > /etc/sysconfig/iptables
再curl一次
[root@hdss7-21 ~]# kubectl exec -it nginx-ds-jh2x5 /bin/bash
root@nginx-ds-jh2x5:/# curl 172.7.22.2
<!DOCTYPE html>
<html>
<head>
<title>Welcome to nginx!</title>
<style>
    body {
         35em;
        margin: 0 auto;
        font-family: Tahoma, Verdana, Arial, sans-serif;
    }
</style>
</head>
<body>
<h1>Welcome to nginx!</h1>
<p>If you see this page, the nginx web server is successfully installed and
working. Further configuration is required.</p>

<p>For online documentation and support please refer to
<a href="http://nginx.org/">nginx.org</a>.<br/>
Commercial support is available at
<a href="http://nginx.com/">nginx.com</a>.</p>

<p><em>Thank you for using nginx.</em></p>
</body>
</html>
查看7-22的日志
[root@hdss7-22 ~]# kubectl logs -f nginx-ds-gwswr
10.4.7.21 - - [22/Aug/2020:09:18:01 +0000] "GET / HTTP/1.1" 200 612 "-" "curl/7.38.0" "-"
172.7.21.2 - - [22/Aug/2020:09:46:18 +0000] "GET / HTTP/1.1" 200 612 "-" "curl/7.38.0" "-"
在7-22也删除并新建规则
[root@hdss7-22 ~]# iptables-save |grep -i postrouting
:POSTROUTING ACCEPT [16:972]
:KUBE-POSTROUTING - [0:0]
-A POSTROUTING -s 172.7.22.0/24 ! -o docker0 -j MASQUERADE
-A POSTROUTING -m comment --comment "kubernetes postrouting rules" -j KUBE-POSTROUTING
-A KUBE-POSTROUTING -m comment --comment "kubernetes service traffic requiring SNAT" -m mark --mark 0x4000/0x4000 -j MASQUERADE

[root@hdss7-22 ~]# iptables -t nat -D POSTROUTING -s 172.7.22.0/24 ! -o docker0 -j MASQUERADE
[root@hdss7-22 ~]# iptables -t nat -I POSTROUTING -s 172.7.22.0/24 ! -d 172.7.0.0/16 ! -o docker0 -j MASQUERADE
同样,在7-22执行curl命令
[root@hdss7-22 ~]# kubectl exec -it nginx-ds-gwswr /bin/bash
root@nginx-ds-gwswr:/# curl 172.7.21.2

# 在宿主机上curl
[root@hdss7-22 ~]# curl 172.7.21.2
查看7-21容器的日志
[root@hdss7-21 ~]# kubectl logs -f nginx-ds-jh2x5
172.7.22.2 - - [22/Aug/2020:10:02:30 +0000] "GET / HTTP/1.1" 200 612 "-" "curl/7.38.0" "-"
10.4.7.22 - - [22/Aug/2020:10:04:30 +0000] "GET / HTTP/1.1" 200 612 "-" "curl/7.29.0" "-"
总结:
- 在集群内部根本不需要nat转换,如果在集群内部也做转换的话,查看日志会发现全是宿主机IP,而不是对应容器的IP,排查问题根本无从下手。
- 因此一定要做snat规则优化,让容器互相看到对方真实的IP,而不是宿主机IP。