GitLab的安装方式
GitLab的两种安装方法:
-
编译安装
-
优点:可定制性强。数据库既可以选择MySQL,也可以选择PostgreSQL;服务器既可以选择Apache,也可以选择Nginx。
-
缺点:国外的源不稳定,被墙时,依赖软件包难以下载。配置流程繁琐、复杂,容易出现各种各样的问题。依赖关系多,不容易管理,卸载GitLab相对麻烦。
-
-
通过rpm包安装
-
优点:安装过程简单,安装速度快。采用rpm包安装方式,安装的软件包便于管理。
-
缺点:数据库默认采用PostgreSQL,服务器默认采用Nginx,不容易定制。
-
由于公司只配备了一台阿里云服务器,并且没有分配任何的域名。该服务器上需要运行版本控制软件、bug管理软件、知识库等多套程序,只能采用ip的方式访问。原先采用GitLab+Apache+MySQL编译安装的方式,并且将GitLab配置为可通过xxx.xx.xxx.xx/gitlab的形式访问,由于bug管理软件(禅道)也运行于Apache之上,两套软件之间彼此有互斥的影响,找不到解决方法。同时,GitLab的注册需要邮箱验证,由于网上提供的配置方法都是基于域名的,在阿里云上多次进行配置都无法正常使用。
因此,只能放弃编译安装的方式,而采取rpm包的方式重新进行安装。
安装GitLab CE Omnibus包
yum install curl policycoreutils openssh-server openssh-clients postfix
systemctl enable sshd
systemctl start sshd
systemctl enable postfix
systemctl start postfix
2. Add the GitLab package server and install the package
curl -sS https://packages.gitlab.com/install/repositories/gitlab/gitlab-ce/script.rpm.sh | sudo bash
sudo yum install gitlab-ce
If you are not comfortable installing the repository through a piped script, you can find the entire script here and select and download the package manually and install using
curl -LJO https://packages.gitlab.com/gitlab/gitlab-ce/packages/el/7/gitlab-ce-XXX.rpm/download
rpm -i gitlab-ce-XXX.rpm
3. Configure and start GitLab
sudo gitlab-ctl reconfigure
配置文件 cat /etc/gitlab/gitlab.rb
[root@git gitlab]# grep -v "#" gitlab.rb | sed '/^$/d'
external_url 'http://git.cinyi.com'
gitlab_rails['gitlab_email_from'] = 'fengjian1585@163.com'
gitlab_rails['backup_path'] = "/data/gitlab/backups"
gitlab_rails['smtp_enable'] = true
gitlab_rails['smtp_address'] = "smtp.163.com"
gitlab_rails['smtp_port'] = 25
gitlab_rails['smtp_user_name'] = "fengjian1585@163.com"
gitlab_rails['smtp_password'] = "123456"
gitlab_rails['smtp_domain'] = "163.com"
gitlab_rails['smtp_authentication'] = "login"
gitlab_rails['smtp_enable_starttls_auto'] = true
user['git_user_name'] = "Git_Senyint_Admin"
user['git_user_email'] = "fengjian1585@163.com"
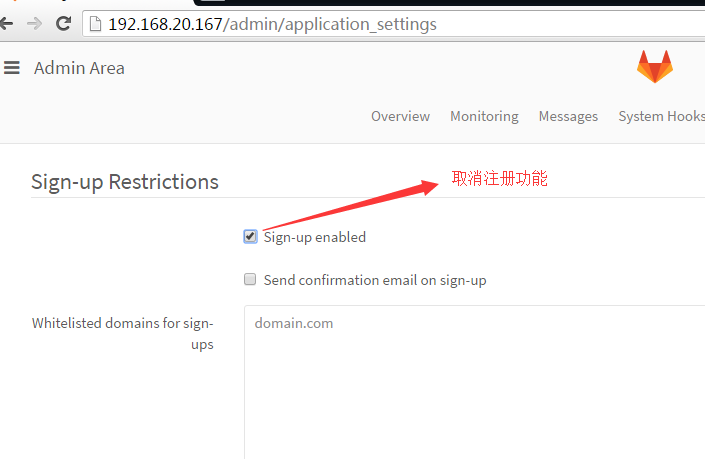
为了更好的管理起来我们关闭开放注册
用户注册

Gitlab 修改备份文件默认目录
你也可以通过修改/etc/gitlab/gitlab.rb来修改默认存放备份文件的目录:
gitlab_rails['backup_path'] = '/data/gitlab/backups'
/mnt/backups修改为你想存放备份的目录即可, 修改完成之后使用gitlab-ctl reconfigure命令重载配置文件即可.
Gitlab 自动备份
加入以下, 实现每天凌晨2点进行一次自动备份:
0 2 * * * /opt/gitlab/bin/gitlab-rake gitlab:backup:createGitlab 恢复
同样, Gitlab的从备份恢复也非常简单:
# 停止相关数据连接服务
gitlab-ctl stop unicorn
gitlab-ctl stop sidekiq

# 从1393513186编号备份中恢复

gitlab-rake gitlab:backup:restore BACKUP=1393513186

# 启动Gitlab
sudo gitlab-ctl start
1. 保证恢复的gitlab版本是相同的
2. 保证/etc/gitlab/gitlab.rb  相同
3. 备份的路径是相同的/data/gitlab/backups

chown git.root  /data/gitlab/backups
chmod  700   /data/gitlab/backups
chown git.git -R /data/gitlab/backups/*
cd /data/gitlab/backups/
ls
gitlab-ctl stop unicorn
gitlab-ctl stop sidekiq

gitlab-ctl status
gitlab-rake gitlab:backup:restore BACKUP=1510250560
gitlab-ctl start
gitlab-ctl status
还原写在脚本中,新版和老板有区别[root@gitlab data]# cat restore-gitlab.sh
#!/bin/bash
cd /data/gitlab/backups/
restorename=`find /data/gitlab/backups/ -mtime -1 -name "*.tar" | awk -F "/" '{print $5}' | cut -d '_' -f 1-5`
gitlab-ctl stop unicorn
gitlab-ctl stop sidekiq
chown git.root /data/gitlab/backups
chmod 700 /data/gitlab/backups
chown git.git -R /data/gitlab/backups/*
gitlab-rake gitlab:backup:restore BACKUP=${restorename}
gitlab-ctl start
#恢复后,可以使用check检查
gitlab-rake gitlab:check SANITIZE=true
当恢复检查是,会出现一下问题
Running /opt/gitlab/embedded/service/gitlab-shell/bin/check
Check GitLab API access: FAILED: Failed to connect to internal API
gitlab-shell self-check failed
  Try fixing it:
  Make sure GitLab is running;
  Check the gitlab-shell configuration file:
  sudo -u git -H editor /opt/gitlab/embedded/service/gitlab-shell/config.yml
  Please fix the error above and rerun the checks.

Checking GitLab Shell ... Finished

Checking Gitaly ...

default ... OK

Checking Gitaly ... Finished

Checking Sidekiq ...

Running? ... no
  Try fixing it:
  sudo -u git -H RAILS_ENV=production bin/background_jobs start
  For more information see:
  doc/install/installation.md in section "Install Init Script"
  see log/sidekiq.log for possible errors
  Please fix the error above and rerun the checks.
修改 vim /opt/gitlab/embedded/service/gitlab-shell/config.yml gitlab_url 变成 0.0.0.0
# GitLab user. git by default
user: git

# Url to gitlab instance. Used for api calls. Should end with a slash.
gitlab_url: "http://0.0.0.0:8080"
#gitlab_url: "http://127.0.0.1:8080"
gitlab配置文件
[root@gitlab data]# grep -v "#" /etc/gitlab/gitlab.rb  | sed '/^$/d'
external_url 'http://git.senyint.com'
gitlab_rails['gitlab_email_reply_to'] = 'fengjian1585@163.com'
gitlab_rails['gitlab_default_can_create_group'] = false    #禁止在自己账户建立工程
gitlab_rails['backup_path'] = "/data/gitlab/backups"
gitlab_rails['smtp_enable'] = true
gitlab_rails['smtp_address'] = "smtp.qiye.163.com"
gitlab_rails['smtp_port'] = 465
gitlab_rails['smtp_user_name'] = "fengjian@qq.com"
gitlab_rails['smtp_password'] = "111111111111"
gitlab_rails['smtp_domain'] = "qiye.163.com"
gitlab_rails['smtp_authentication'] = :login
gitlab_rails['smtp_enable_starttls_auto'] = true
gitlab_rails['smtp_tls'] = true
gitlab_rails['gitlab_email_from'] = 'fengjian@senyint.com'