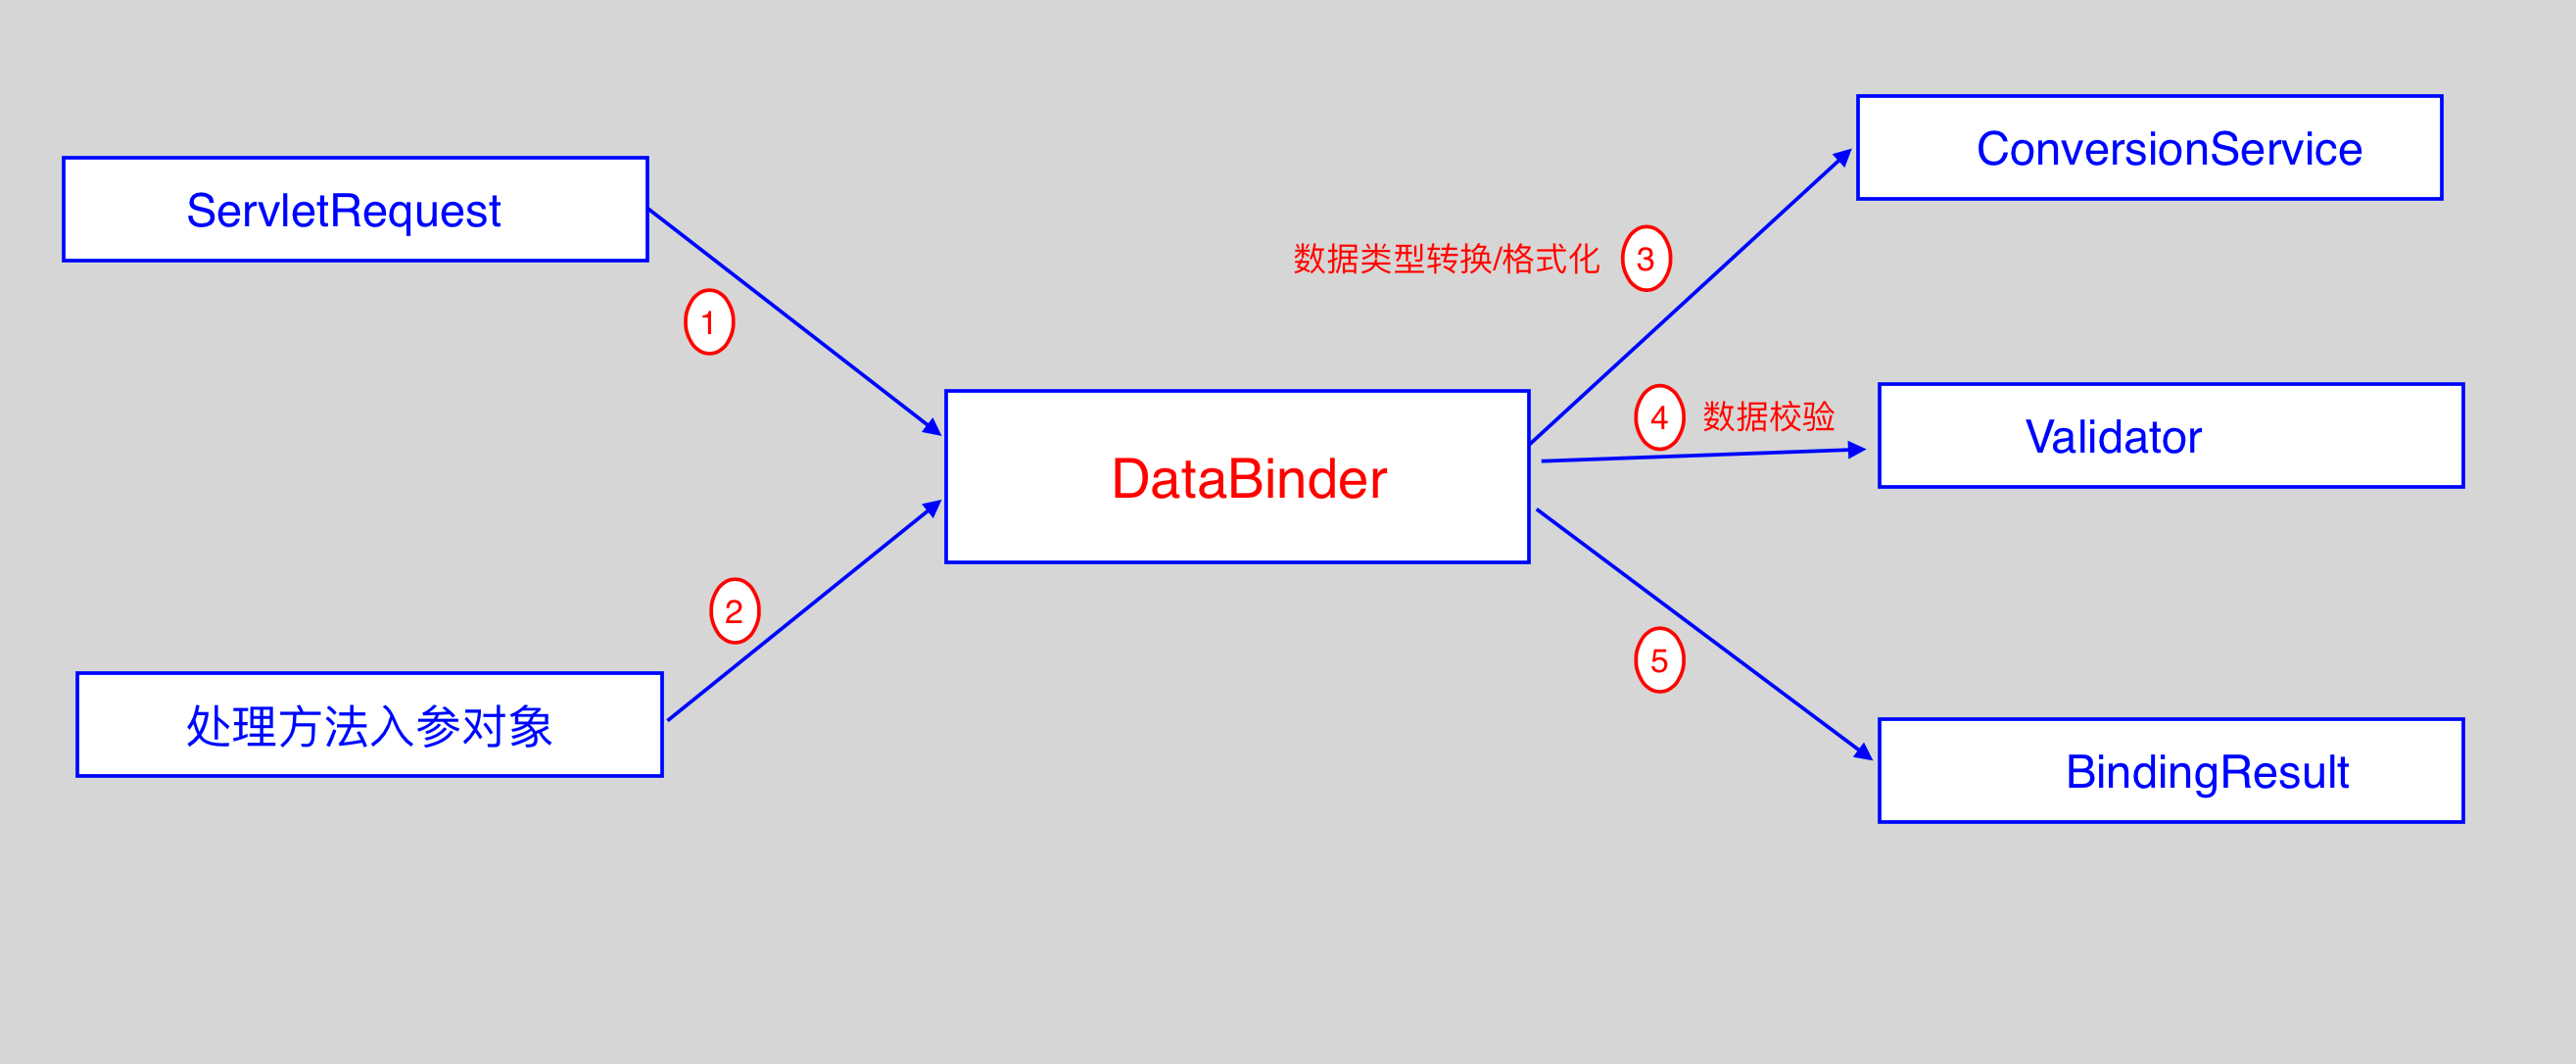
1. 数据绑定流程
- SpringMVC 主框架将 ServletRequest 对象及目标方法的入参实例传递给 WebDataBinderFactory
实例,以创建 DataBinder 实例对象; - DataBinder 调用装配在 SpringMVC 上下文中的 ConversionService 组件进行数据类型转换,
数据格式化工作; 将 Servlet 中的请求信息填充到入参对象中; - 调用 Validator 组件对已经绑定了请求消息的入参对象进行数据合法性校验,并最终生成数据绑定结果
BindingData 对象; - Spring MVC 抽取 BindingResult 中的入参对象和校验错误对象,将它们赋给处理方法的响应入参;
- 总结: Spring MVC 通过反射机制对目标处理方法进行解析,将请求消息绑定到处理方法的入参中.
数据绑定的核心部件是 DataBinder.
2. Spring 支持的转换器
- Spring 定义了三种类型的转换器接口,实现任意一个转换接口都可以作为自定义转换器注册到
ConversionServiceFacotoryBean 中:Converter<S,T>: 将 S 类型的对象转换为 T 类型对象;ConverterFactory: 将相同系列多个"同质"Converter封装在一起; 将一种类型的对象转换为
另一种类型及其子类的对象.例如,将String转换为 Number 及 Number 子类Integer,Long,
Double等对象;GenericConverter: 会根据源类对象及目标类对象所在的宿主类中的上下文信息进行类型转换;
2.1 自定义类型转换器
- ConversionService 是 Spring 类型转换体系的核心接口;
- 可以利用 ConversionServiceFatoryBean 在 Spring 的 IOC 容器中定义一个 ConversionService;
Spring 将自动识别出 IOC 容器中的 ConversionService, 并在 Bean 属性配置及 SpringMVC
处理方法入参绑定等场合使用它进行数据的转换; - 可通过 ConversionServiceFactoryBean 的 converters 属性注册自定义的类型转换器;
// 从 java.lang.String 转换为 POJO 类

// index.jsp
<form action="${pageContext.request.contextPath}/empConvert" method="post">
    <!-- 姓名;邮箱;性别;部门 -->
    <input type="text" name="employee" value="lisi;lisi@163.com;1;105"/>
    <input type="submit" value="类型转换"/>
</form>

// EmployeeHanlder.java
@RequestMapping(value="/empConvert",method=RequestMethod.POST)
public String empConvert(@RequestParam("employee") Employee employee){
    employeeService.save(employee);
    return "redirect:/emps";
}

// EmployeeConverter.java
// 类型转换,将String类型转换为 Employee, 即自定义类型转换器
@Component
public class EmployeeConverter implements Converter<String,Employee>{
    public Employee convert(String source){
        Employee result = null;
        if(null != resource){
            // 将字符串分割
            String[] empInfos = source.split(";");
            if(null != empInfos && empInfos.length == 4){
                result = new Employee();
                result.setLastName(empInfos[0]);
                result.setEmail(empInfos[1]);

                // 将String 类型转换为 Integer 类型
                result.setGender(Integer.parseInt(empInfos[2]));

                Department department = new Department();
                department.setId(Integer.parseInt(empInfos[3]));
                result.setDepartment(department);
            }
        }
        return result;
    }
}

// SpringDispatcherServlet-servlet.xml
// 在SpringMVC配置文件中,注册自定义类型转换器

<!-- 引用转换器 -->
<mvc:annotation-driven conversion-service="conversionServiceFactoryBean">
</mvc:annotation-driven>

<!-- 注册 -->
<bean id="conversionServiceFactoryBean"
        class="org.springframework.context.support.ConversionServiceFactoryBean">

    <property name="converters">
        <!-- 第一种写法: 首字母小写Bean -->
        <list>
            <ref bean="employeeConverter"/>
        </list>

        <!-- 第二种写法: 全类名的写法
            <list>
                <bean class="cn.itcast.springmvc.converts.EmployeeConvert"></bean>
            </list>
        -->
    </perperty>
</bean>
2.2 mvc:annotation-driven
<mvc:annotation-driven/>会自动注册RequestMappingHandlerMapping,
RequestMappingHandlerAdapter与ExceptionHandlerExceptionResolver三个Bean;- 还提供以下支持:
- 支持使用
ConversionService实例对表单参数进行类型转换; - 支持使用
@NumberFormatannotation,@DataTimeFormat注解完成数据类型的格式化; - 支持使用
@Valie注解对 JavaBean 实例进行 JSR 303 验证; - 支持使用
@RequestBody和@ResponseBody注解;
- 支持使用
2.3 @InitBinder
- 由
@InitBinder标识的方法,可以对 WebDataBinder 对象进行初始化,WebDataBinder 是 DataBinder
的子类,用于完成由表单字段到 JavaBean 属性的绑定; @InitBinder方法不能有返回值,它必须声明为 void;@InitBinder方法的参数通常是 WebDataBinder
@InitBinder
public void initBinder(WebDataBinder webDataBinder){
    // 不自动绑定对象中的 email 属性
    webDataBinder.setDisallowedFields("email");
}

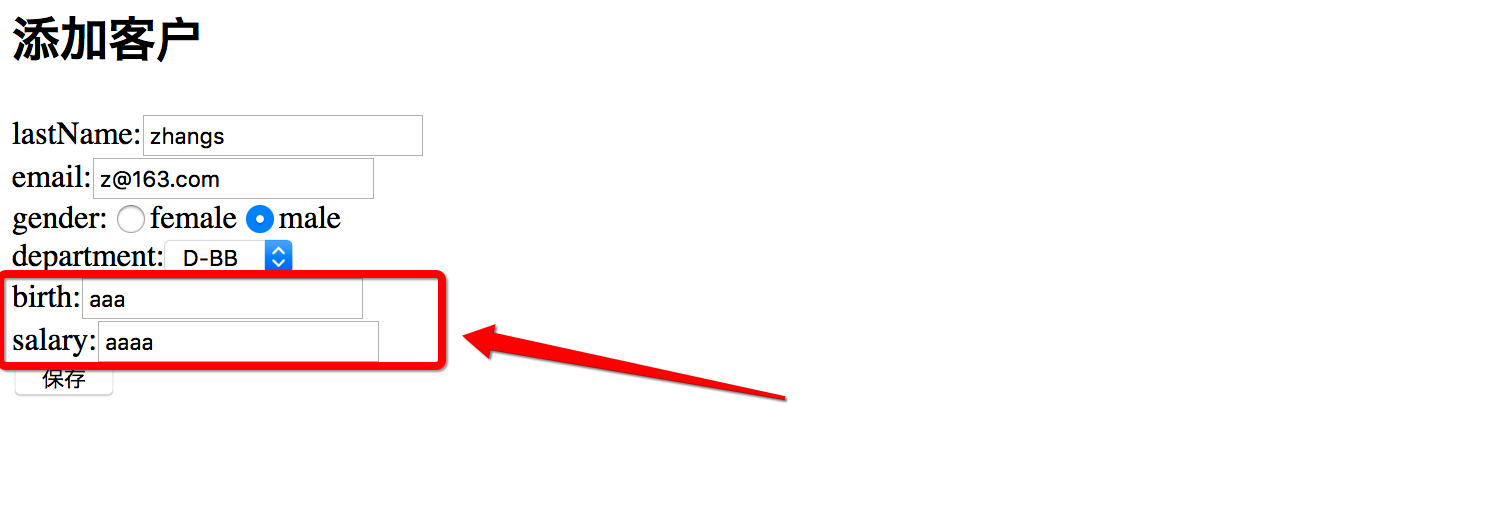
3. 数据格式化
- 对属性对象的输入/输出进行格式化,从其本质上讲依然属于"类型转换"的范畴;
- Spring 在格式化模块中定义了一个实现了
ConversionService接口的FormattingConversionService
实现类,该实现类扩展了GenericConversionService,因此它既具有类型转换的功能,也具有格式化
的功能; FormattingConversionService拥有一个FormattingConversionServiceFactoryBean工
厂类,后者用于在 Spring上下文中构造前者;FormattingConversionServiceFactoryBean与ConversionServiceFactoryBean比较ConversionService只有数据转换功能,与ConversionServiceFactoryBean对应;FormattingConversionService具有数据转换和数据格式化功能,FormattingConversionServiceFactoryBean既可以注册自定义的转换器,也可以注册自定义
的注解驱动器逻辑;
<mvc:annotation-driven>标签内部默认创建的一个 conversionService 实例就是一个
FormattingConversionServiceFactoryBean;
// 日期类: @DateTimeFormat
// 数字类: @NumberFormat

public class Employee{
    private Integer id;
    private String lastName;
    private String email;

    // 更改输入的日期格式, 默认格式为 yyyy/MM/dd
    @DateTimeFormat(pattern="yyyy-MM-dd")
    private Date birth;

    @NumberFormat(patter="#,###.##")
    private Double salary;

    get和set 方法
}


// SpringDispatcherServlet-servlet.xml

// 配置 FormattingConversionServiceFacotryBean
<mvc:annotation-driven conversion-service="conversionService"/>

<bean id="conversionService"
    class="org.springframework.format.support.FormattingConversionServiceFactoryBean">

    <!-- 自定义转换器 -->
    <property name="converters">
        <list>
            <ref bean='employeeConverter'/>
        </list>
    </property>
</bean>
3.1 BindingResult
- BindingResult 是接口,继承Errors;
// 保存客户
@RequestMapping(value="/emp",method=RequestMethod.POST)
public String save(Employee employee,BindingResult bindingResult){
    if(bindingResult.getErrorCount()>0){
        List<FieldError> list = bindingResult.getFieldErrors();
        for(FieldError fieldError : list){
            System.out.println(fieldError.getField()+"	"+fieldError.getCode());
        }
        throw new RuntimeException("录入信息出错!");
    }

    employeeService.save(employee);
    return "redirect:/emps";
}


3.2 JSR 303 数据验证
- JSR303 是Java为Bean数据合法性校验提供的标准框架,它已经包含在 JavaEE6.0 中;
- JSR303 通过在 Bean 属性上标注类似于
@NotNull,@Max等标准的注解指定校验规则,并通过
标准的验证接口对 Bean 进行验证; - Hibernate Validator 是 JSR303 的一个具体实现,除支持所有标准的校验注解外,它还支持以下的
扩展注解@Email: 被注释的元素必须是邮箱地址;@Length: 被注释的字符串大小必须在指定的范围内;@NotEmpty: 被注释的字符串必须非空;@Range: 被注释的元素必须在合适的范围内;
- 在 SpringMVC 中,可直接通过注解驱动的方式进行数据校验;
- Spring 的 LocalValidatorFactoryBean, 既实现了 Spring 的 Validator 接口,也实现了
JSR303 的 Validator 接口.只要在 Spring 容器中定义了一个 LocalValidatorFactoryBean,
即可将其注入到需要数据校验的Bean中; - Spring 本身并没有提供JSR303的实现,所以必须将JSR的实现者的jar包放到类路径下;
// 步骤:
/*
* 1. 导入 HibetnateValidator 验证框架的 jar 包(5个):
* classmate-0.8.0.jar, hibernate-validator-5.0.0.CR2.jar,
* hibernate-validator-annotation-processor-5.0.0.CR2.jar,
* jboss-logging-3.1.1.GA.jar, validation-api-1.1.0.CR1.jar
*
* 2. 添加注解 <mvc:annotation-driven></mvc:annotation-driven>, 会默认装配好一个
* LocalValicatorFactoryBean
* 3. Employee.java 中添加 Field 验证要求的相关注解;比如名字不为空, Email格式要合法等;
* 4. Save 方法对应的 POJO 参数前面添加 @Valid;
* 5. 发生异常后,重新回到录入页面;
*/
// Employee.java
pubic class Employee{
private Integer id;
@NotEmpty
private String lastName; // 名字不能为空
@Email
private String email; // 校验Email格式
.....(略)
}
// EmployeeHandler.java
public String save(@Valid Employee employee,BindingResult bindingResult,
Map<String,Object> map){
if(bindingResult.getErrorCount()>0){
List<FieldError> list = bindingResult.getFieldErrors();
for(FieldError fieldError : list){
System.out.println(fieldError.getField()+" "
+fieldError.getDefaultMessage());
}
// 返回到登录页面
// 1. 查询出全部部门
map.put("departments",departmentService.getDepartments());
// 2. 查询出性别
map.put("genders",getGenderUtils());
return "input";
}
employeeService.save(employee);
return "redirect:/emps";
}
// 页面显示错误信息
// index.jsp
<form:form action="${pageContext.request.contextPath}/emp" method="post"
modelAttribute="employee">
lastName:<form:input path="lastName"/>
<form:errors path="lastName"></form:errors><br/>
email:<form:input path="email"/>
<form:errors path="email"></form:errors><br/>
<input type="submit" value="添加"/>
</form:form>
// 自定义错误信息
// SpringDispatcherServlet-servlet.xml 配置 国际化信息
<bean id="messageSource"
class="org.springframework.context.support.ResourceBundleMessageSource">
<property name="basename" value="i18n"></property>
</bean>
// 在src目录下,新建 i18n.properties
// 命名规则: 注解名+类名+需要限制的field
NotEmpty.employee.lastName=用户名不能为空
Email.employee.email=邮件地址格式不正确
3.3 SpringMVC 数据校验
- 需校验的 Bean 对象和其绑定结果对象或错误对象是成对出现的,它们之间不允许声明其他的参数;
- Errors 接口提供了获取错误信息的方法, 如
getErrorCount()和getFieldErrors(String field) - BindingResult 扩展了 Errors 接口;

4. 处理JSON
- 导入 jar 包:
jackson-annotations-2.7.0.jarjackson-core-2.7.0.jarjackson-databind-2.7.0.jar
- 编写目标方法,使其返回 JSON 对应的对象(POJO)或集合(Map);
- 在方法上添加
@ResponseBody注解;
// 需求: 查询所有员工

// Demo.java
public class Demo{

    @Autowired
    private EmployeeService employeeService;

    // 导入 jackson 的jar包,并且标注 @ResponseBody
    // HttpConverter 会自动识别出以 JSON 格式返回给前台
    @ResponseBody
    @RequestMapping(value="/testJson",method=RequestMethod.GET)
    public Collection<Employee> qryAllEmployee(){

        // 直接返回 Collection 集合
        return employeeService.getAll();
    }
}


// index.jsp

<head>
    <script type="text/javascript">
        $(function(){
            $("#testJson").click(function(){
                var url=$(this).attr("href");
                var args = {name:"zhangsan"};

                $.post(url,args,function(data){
                    for(var i=0; i<data.length; i++){
                        var id = data[i].id;
                        var lastName = data[i].lastName;
                        alert(id+"   "+lastName);
                    }
                });
            });
        })
    </script>
</head>
<body>

JSON 示例: <a id="testJson" href="${pageContext.request.contextPath}/testJson">
            点击这里
          </a>
</body>
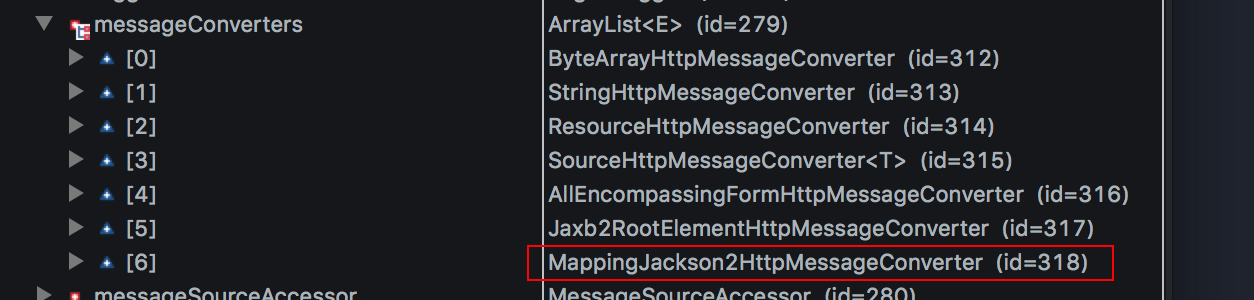
4.1 HttpMessageConverter
HttpMessageConverter<T>接口负责将请求信息转换为一个对象(类型为 T),或者将对象(类型为 T)
输出为响应信息;HttpMessageConverter<T>接口定义的方法:- Boolean canRead(Class<?>clazz, MediaType mediaType): 表示转换器是否可以将请求信息
转换为 clazz 类型的对象,同时,指定支持 MIME 类型(text/html,application/json等); - Boolean canWrite(Class<?>clazz, MediaType mediaType): 表示转换器是否可以将 clazz
类型的对象写入到响应流中; - T read(Class<? extends T>clazz,HttpInputMessage msg): 将请求信息流转换为 T 类型的
对象; - void write(T t, MediaType contentType, HttpOutputMessage msg): 将 T 类型的对象
写到响应流中,同时,指定响应的媒体类型为 contentType;
- Boolean canRead(Class<?>clazz, MediaType mediaType): 表示转换器是否可以将请求信息
- 常见
HttpMessageConverter<T>的实现类StringHttpMessageConverter: 将请求信息转换为字符串;XmlAwareFormHttpMessageConverterByteArrayHttpMessageConverter: 读写二进制数据;SourceHttpMessageConverter: 读写javax.xml.transform.Source类型的数据;
- Spring 中使用
HttpMessageConverter<T>:- 使用
@RequestBody/@ResponseBody对处理方法进行标注; - 使用
HttpEntity<T>/ResponseEntity<T>作为处理方法的入参或返回值;
- 使用
- 当控制处理方法使用到
@RequestBody/@ResponseBody或HttpEntity<T>/ResponseEntity<T>
时, Spring 首先根据请求头或响应头的 Accept 属性选择匹配的 HttpMessageConverter, 进而
根据参数类型或泛型类型的过滤得到匹配的 HttpMessageConverter, 若找不到可用的
HttpMessageConverter, 将报错; @RequestBody和@ResponseBody不需要成对出现;

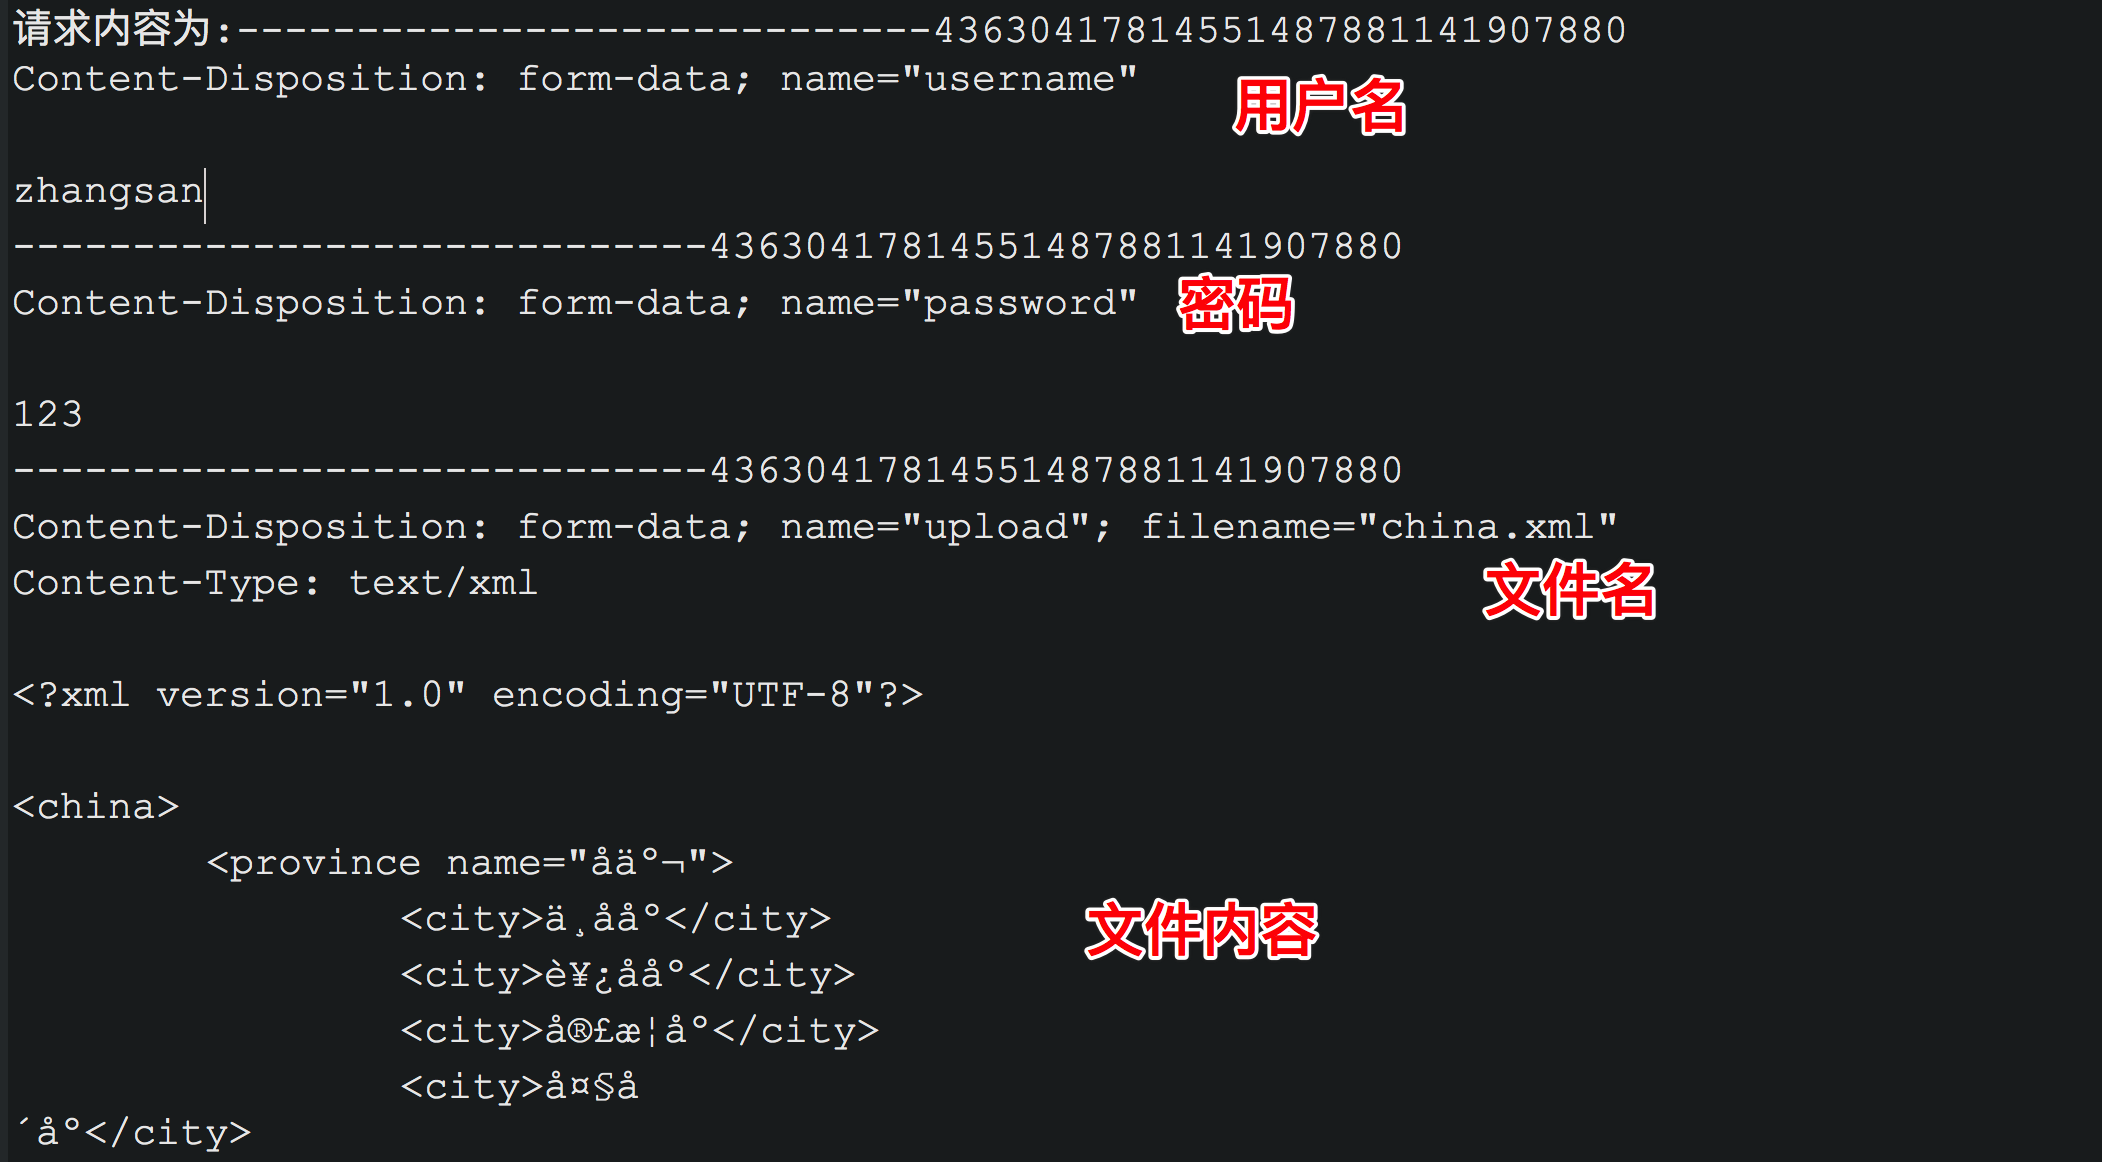
// 示例一: @RequestBody

// index.jsp
<h2>注册</h2>
<form action="${pageContext.request.contextPath}/testRequestBody" method="post"
                                                    enctype="multipart/form-data">
    用户名:<input type="text" name="username"/><br/>
    密码:  <input type="password" name="password"/><br/>
    上传文件: <input type="file" name="upload"/><br/>
    <input type="submit" value="上传"/><br/>
</form>

// Demo.java
@RequestMapping(value="/testRequestBody",method=RequestMethod.POST)
public String testRequestBody(@RequestBody String content){
    System.out.println("请求内容为:"+content);

    return "ok";
}
// 示例二: 下载 @ResponseEntity<byte[]>

// index.jsp
下载示例: <a href="${pageContext.request.contextPath}/testDownload">下载</a>

// Demo.java
@RequestMapping(value="/testDownload", method=RequestMethod.GET)
public ReponseEntity<byte[]> testDownload() throws IOException{

    byte[] body = null;
  FileInputStream input = new FileInputStream(new File("/Users/用户名/Documents/a.js"));
    body = new byte[input.available()];
    input.read(body);
    input.close();

    HttpHeaders headers = new HttpHeaders();
    headers.add("Content-Disposition","attachment;filename=a.js");

    HttpStatus statusCode = HttpStatus.OK;

ResponseEntity<byte[]> result = new ResponseEntity<byte[]>(body,headers,statusCode);

    return result;
}
5. 国际化
AcceptHeaderLocaleResolver: 根据 HTTP 请求头的Accept-Language参数确定本地化类型,
如果没有显示定义本地化解析器,SpringMVC默认使用该解析器;CookieLocaleResolver: 根据指定的 Cookie 值确定本地化类型;SessionLocaleResolver: 根据 Session 中特定的属性确定本地化类型;LocaleChangeInterceptor: 从请求参数中获取本次请求对应的本地化类型;
// 第一种方式
// src 目录下,新建 i18n.properties, i18n_en_US.properties, i18n_zh_CN.properties

// i18n.properties 和 i18n_en_US.properties
i18n.username=username
i18n.password=password

// i18n_zh_CN.properties
i18n.username=用户名
i18n.password=密码

// index.jsp
国际化:<a href="${pageContext.request.contextPath}/i18n"></a>

// ok.jsp
用户名: <fmt:message key="i18n.username"></fmt:message><br/>
密  码: <fmt:message key="i18n.password"></fmt:message><br/>

// SpringDispatcherServlet-servlet.xml 配置
<!-- 国际化配置 -->
<bean id="messageSource"
            class="org.springframework.context.support.ResourceBundleMessageSource">
    <property name="basename" value="i18n"></property>
</bean>

// Demo.java

@RequestMapping(value="/i18n",method=RequestMethod.GET)
public String test(){
    return "ok";
}


// 第二种方式: 注入ResourceBundleMessageSource
// Demo.java
public class Demo{

    @Autowired
    private ResourceBundleMessageSource messageSource;

    @RequestMapping(value="/i18n2",method=RequestMethod.GET)
    public String test2(Locale locale){
        String v1 = messageSource.getMessage("i18n.username",null,locale);
        String v2 = messageSource.getMessage("i18n.password",null,locale);

        System.out.println(v1+"...."+v2);
        return "ok";
    }
}


// 第三种方式, 配置 SessionLocalResolver + LocaleChangeInterceptor

// springDispatcherServlet-servlet.xml
<!-- 配置 SessionLocaleResolver -->
<bean id="localeResolver"
                class="org.springframework.web.servlet.i18n.SessionLocaleResolver">
</bean>

<mvc:interceptors>
    <bean class="org.springframework.web.servlet.i18n.LocaleChangeInterceptor"/>
</mvc:interceptors>

// index.jsp
<h2>示例</h2>
<a href="${pageContext.request.contextPath}/test3?locale=zh_CN">中文</a><br/>
<a href="${pageContext.request.contextPath}/test3?locale=en_US">英文</a><br/>

// Demo.java
public class Demo{

    @RequestMapping(value="/test3",method=RequestMethod.GET)
    public String test3(){
        return "ok";
    }
}
5.1 SessionLocaleResolver & LocaleChangeInterceptor 的工作原理

参考资料