一、RabbitMQ队列
安装python rabbitMQ module
1 pip install pika
2 or
3 easy_install pika
4 or
5 源码
6
7 https://pypi.python.org/pypi/pika
实现最简单的队列通信

模式一:一对一
说明:在这种模式下,例如你同一个管道同一个队列中,依次启动N个客户端recv,最后启动send发送消息。第一启动的recv先接收到第一条信息,send再发一个信息,这时候会被第二个启动recv收到,依次类推,这样接收到最后一个recv接收完信息的话,就又从头开始。我们称之为轮训(这里让我想起了一个概念,日志轮训)
send
 1 import pika
 2
 3 connection = pika.BlockingConnection(
 4                 pika.ConnectionParameters('localhost')
 5                 )
 6 channel = connection.channel()#申明一个管道
 7
 8 #声明队列名称
 9 channel.queue_declare(queue='path')
10
11 #n RabbitMQ a message can never be sent directly to the queue, it always needs to go through an exchange.
12 channel.basic_publish(exchange='',
13                       routing_key='path',#队列名称
14                       body='Hello path!')#消息内容
15 print(" [x] Sent 'Hello World!'")
16 connection.close()#关闭队列,而不是管道
recv:
 1 import pika
 2
 3 connection = pika.BlockingConnection(
 4                 pika.ConnectionParameters('localhost')
 5                 )
 6 #生命管道
 7 channel = connection.channel()
 8
 9 #生命从哪个队列(注意:因为不知道是send先建立管道和队列,还是recv先建立管道申明队列,所以建议这里必须写)
10 channel.queue_declare(queue='path')
11
12
13 #cn:管道的内存对象。method:  properties:管道基本信息,body:消息内容
14 def callback(ch, method, properties, body):
15     print(" [x] Received %r" % body)
16
17 channel.basic_consume(callback,#代表如果收到消息,就调用callback函数来处理消息
18                       queue='path',#申明从哪个队列收消息
19                       no_ack=True)#不向发送对确认是否收到消息,一般不加
20 21 print(' [*] Waiting for messages. To exit press CTRL+C') 22 channel.start_consuming()#开始接受消息,只要之心就一直收下去,没有就卡住
上面我们加了一句no_ack=True,recv端没收到消息rabbitmq会把队列中的消息删掉,但是如果机器突然断电,我家伙不是扯了吗?
方法是:去掉no_ack=True
send:
 1 import pika
 2
 3 connection = pika.BlockingConnection(
 4                 pika.ConnectionParameters('localhost')
 5                 )
 6 channel = connection.channel()#申明一个管道
 7
 8 #声明队列名称
 9 channel.queue_declare(queue='path')
10
11 #n RabbitMQ a message can never be sent directly to the queue, it always needs to go through an exchange.
12 channel.basic_publish(exchange='',
13                       routing_key='path',#队列名称
14                       body='Hello path!')#消息内容
15 print(" [x] Sent 'Hello World!'")
16 connection.close()#关闭队列,而不是管道
recv:
我们在recv中加上time.sleep睡眠30秒,并去掉no_ack=True,这样的话,要是recv中没有打印出接收到的消息,rabbitmq就会把消息发送到另外同一通道的同一个队列(这里是模拟环境,到30秒,不管你最新启动的是哪个recv端,都会打印消息,这样也实现了消息没接收就不会丢失的功能)
但是这样有个弊病,这样通一个消息就会无穷无尽的循环被recv接收下去,因为rabbitmq的send端并不知道recv是否真的收到,还是没收到。
 1 import pika
 2 import time
 3
 4 connection = pika.BlockingConnection(
 5                 pika.ConnectionParameters('localhost')
 6                 )
 7 #生命管道
 8 channel = connection.channel()
 9
10 #生命从哪个队列(注意:因为不知道是send先建立管道和队列,还是recv先建立管道申明队列,所以建议这里必须写)
11 channel.queue_declare(queue='path')
12
13
14 #cn:管道的内存对象。method:  properties:管道基本信息,body:消息内容
15 def callback(ch, method, properties, body):
16     print(ch,method,properties,body)
17     time.sleep(30)
18     print(" [x] Received %r" % body)
19
20 channel.basic_consume(callback,#代表如果收到消息,就调用callback函数来处理消息
21                       queue='path')#申明从哪个队列收消息
22                       #no_ack=True#不向发送对确认是否收到消息,
23
24 print(' [*] Waiting for messages. To exit press CTRL+C')
25 channel.start_consuming()#开始接受消息,只要之心就一直收下去,没有就卡住
让recv端收到消息后给send端发送一个确认信息,这样就不会循环接收下去。
callback回调函数中接收完手动加一个条确认消息
ch.basic_ack(delivery_tag = method.delivery_tag)
send:
 1 import pika
 2
 3 connection = pika.BlockingConnection(
 4                 pika.ConnectionParameters('localhost')
 5                 )
 6 channel = connection.channel()#申明一个管道
 7
 8 #声明队列名称
 9 channel.queue_declare(queue='path')
10
11 #n RabbitMQ a message can never be sent directly to the queue, it always needs to go through an exchange.
12 channel.basic_publish(exchange='',
13                       routing_key='path',#队列名称
14                       body='Hello path!')#消息内容
15 print(" [x] Sent 'Hello World!'")
16 connection.close()#关闭队列,而不是管道
recv:
 1 import pika
 2 import time
 3
 4 connection = pika.BlockingConnection(
 5                 pika.ConnectionParameters('localhost')
 6                 )
 7 #生命管道
 8 channel = connection.channel()
 9
10 #生命从哪个队列(注意:因为不知道是send先建立管道和队列,还是recv先建立管道申明队列,所以建议这里必须写)
11 channel.queue_declare(queue='path')
12
13
14 #cn:管道的内存对象。method:  properties:管道基本信息,body:消息内容
15 def callback(ch, method, properties, body):
16     print(ch,method,properties,body)
17     # time.sleep(30)
18     print(" [x] Received %r" % body)
19     ch.basic_ack(delivery_tag = method.delivery_tag)#recv端收到发消息给send端确认已经收到,就不会循环下去
20
21 channel.basic_consume(callback,#代表如果收到消息,就调用callback函数来处理消息
22                       queue='path')#申明从哪个队列收消息
23                       #no_ack=True#不向发送对确认是否收到消息,
24
25 print(' [*] Waiting for messages. To exit press CTRL+C')
26 channel.start_consuming()#开始接受消息,只要之心就一直收下去,没有就卡住
方法二:消息持久化
注意:以上这种模式中,消息都是存在计算机内存中的,万一服务器重启了,完蛋了,消息全没有,连队列都没了。。。。。。别担心,下面我们开始做消息持久化(主要分为队列持久化和消息持久化)
提示:windows中安装目录下有个rabbitmqctl.bat list_queues文件执行它就可以看到目前有几个队列,对应的队列中有几个消息
1、(durable=True只是把队列持久化,要是rabbitmq重启了,消息照样丢,不丢的只是队列而已):
send:
 1 import pika
 2
 3 connection = pika.BlockingConnection(
 4                 pika.ConnectionParameters('localhost')
 5                 )
 6 channel = connection.channel()#申明一个管道
 7
 8 #声明队列名称
 9 channel.queue_declare(queue='path', durable=True)#durable=True消息持久化(duiable只是把队列持久化,消息照样丢)
10
11 #n RabbitMQ a message can never be sent directly to the queue, it always needs to go through an exchange.
12 channel.basic_publish(exchange='',
13                       routing_key='path',#队列名称
14                       body='Hello path!')#消息内容
15 print(" [x] Sent 'Hello World!'")
16 connection.close()#关闭队列,而不是管道
recv:
 1 import pika
 2 import time
 3
 4 connection = pika.BlockingConnection(
 5                 pika.ConnectionParameters('localhost')
 6                 )
 7 #生命管道
 8 channel = connection.channel()
 9
10 #生命从哪个队列(注意:因为不知道是send先建立管道和队列,还是recv先建立管道申明队列,所以建议这里必须写)
11 channel.queue_declare(queue='path', durable=True)#durable=True消息持久化(duiable只是把队列持久化,消息照样丢)
12
13
14 #cn:管道的内存对象。method:  properties:管道基本信息,body:消息内容
15 def callback(ch, method, properties, body):
16     print(ch,method,properties,body)
17     # time.sleep(30)
18     print(" [x] Received %r" % body)
19     ch.basic_ack(delivery_tag = method.delivery_tag)#recv端收到发消息给send端确认已经收到,就不会循环下去
20
21 channel.basic_consume(callback,#代表如果收到消息,就调用callback函数来处理消息
22                       queue='path')#申明从哪个队列收消息
23                       #no_ack=True#不向发送对确认是否收到消息,
24
25 print(' [*] Waiting for messages. To exit press CTRL+C')
26 channel.start_consuming()#开始接受消息,只要之心就一直收下去,没有就卡住
2、(队列和消息都能持久化):
send:
 1 import pika
 2
 3 connection = pika.BlockingConnection(
 4                 pika.ConnectionParameters('localhost')
 5                 )
 6 channel = connection.channel()#申明一个管道
 7
 8 #声明队列名称
 9 channel.queue_declare(queue='path',durable=True)#durable=True消息持久化(duiable只是把队列持久化,消息照样丢)
10
11 #n RabbitMQ a message can never be sent directly to the queue, it always needs to go through an exchange.
12 channel.basic_publish(exchange='',
13                       routing_key='path',#队列名称
14                       body='Hello path!',
15                       properties=pika.BasicProperties(
16                       delivery_mode = 2))#properties真正意义上的消息持久化
17
18 print(" [x] Sent 'Hello World!'")
19 connection.close()#关闭队列,而不是管道
recv:
 1 import pika
 2 import time
 3
 4 connection = pika.BlockingConnection(
 5                 pika.ConnectionParameters('localhost')
 6                 )
 7 #生命管道
 8 channel = connection.channel()
 9
10 #生命从哪个队列(注意:因为不知道是send先建立管道和队列,还是recv先建立管道申明队列,所以建议这里必须写)
11 channel.queue_declare(queue='path',durable=True)#durable=True消息持久化(duiable只是把队列持久化,消息照样丢)
12
13
14 #cn:管道的内存对象。method:  properties:消息持久化。管道基本信息,body:消息内容
15 def callback(ch, method, properties, body):
16     print(ch,method,properties,body)
17     # time.sleep(30)
18     print(" [x] Received %r" % body)
19     ch.basic_ack(delivery_tag = method.delivery_tag)#recv端收到发消息给send端确认已经收到,就不会循环下去
20
21 channel.basic_consume(callback,#代表如果收到消息,就调用callback函数来处理消息
22                       queue='path')#申明从哪个队列收消息
23                       #no_ack=True#不向发送对确认是否收到消息,
24
25 print(' [*] Waiting for messages. To exit press CTRL+C')
26 channel.start_consuming()#开始接受消息,只要之心就一直收下去,没有就卡住
3、带消息持久化+公平分发的完整代码
channel.basic_qos(prefetch_count=1)#公平分发消息,避免撑死一个机器(通过在消费端加上这一条,就实现了能者多劳的功能)
send:
 1 import pika
 2
 3 connection = pika.BlockingConnection(
 4                 pika.ConnectionParameters('localhost')
 5                 )
 6 channel = connection.channel()#申明一个管道
 7
 8 #声明队列名称
 9 channel.queue_declare(queue='path',durable=True)#durable=True消息持久化(duiable只是把队列持久化,消息照样丢)
10
11 #n RabbitMQ a message can never be sent directly to the queue, it always needs to go through an exchange.
12 channel.basic_publish(exchange='',
13                       routing_key='path',#队列名称
14                       body='Hello path!',
15                       properties=pika.BasicProperties(
16                       delivery_mode = 2))#properties真正意义上的消息持久化
17
18 print(" [x] Sent 'Hello World!'")
19 connection.close()#关闭队列,而不是管道
recv:
 1 import pika
 2 import time
 3
 4 connection = pika.BlockingConnection(
 5                 pika.ConnectionParameters('localhost')
 6                 )
 7 #生命管道
 8 channel = connection.channel()
 9
10 #生命从哪个队列(注意:因为不知道是send先建立管道和队列,还是recv先建立管道申明队列,所以建议这里必须写)
11 channel.queue_declare(queue='path',durable=True)#durable=True消息持久化(duiable只是把队列持久化,消息照样丢)
12
13
14 #cn:管道的内存对象。method:  properties:消息持久化。管道基本信息,body:消息内容
15 def callback(ch, method, properties, body):
16     print(ch,method,properties,body)
17     # time.sleep(30)
18     print(" [x] Received %r" % body)
19     ch.basic_ack(delivery_tag = method.delivery_tag)#recv端收到发消息给send端确认已经收到,就不会循环下去
20
21 channel.basic_qos(prefetch_count=1)#公平分发消息,避免撑死一个机器
22 channel.basic_consume(callback,#代表如果收到消息,就调用callback函数来处理消息
23                       queue='path')#申明从哪个队列收消息
24                       #no_ack=True#不向发送对确认是否收到消息,
25
26 print(' [*] Waiting for messages. To exit press CTRL+C')
27 channel.start_consuming()#开始接受消息,只要之心就一直收下去,没有就卡住
模式二:广播
PublishSubscribe(消息发布订阅)
之前的例子都基本都是1对1的消息发送和接收,即消息只能发送到指定的queue里,但有些时候你想让你的消息被所有的Queue收到,类似广播的效果,这时候就要用到exchange了,
An exchange is a very simple thing. On one side it receives messages from producers and the other side it pushes them to queues. The exchange must know exactly what to do with a message it receives. Should it be appended to a particular queue? Should it be appended to many queues? Or should it get discarded. The rules for that are defined by the exchange type.
Exchange在定义的时候是有类型的,以决定到底是哪些Queue符合条件,可以接收消息
fanout: 所有bind到此exchange的queue都可以接收消息
direct: 通过routingKey和exchange决定的那个唯一的queue可以接收消息
topic:所有符合routingKey(此时可以是一个表达式)的routingKey所bind的queue可以接收消息
headers: 通过headers 来决定把消息发给哪些queue
1、fanout(广播)
特点:广播是实时的,广播的时候recv端没在就没在,不会给你存着的。
send:
 1 import pika
 2
 3 connection = pika.BlockingConnection(
 4                 pika.ConnectionParameters('localhost')
 5                 )
 6 channel = connection.channel()#申明一个管道
 7
 8 #声明队列名称
 9 channel.exchange_declare(exchange='logs',
10                          type='fanout')
11
12 #n RabbitMQ a message can never be sent directly to the queue, it always needs to go through an exchange.
13 channel.basic_publish(exchange='logs',
14                       routing_key='',#队列名称,因为是广播所以没有队列,但也必须要写
15                       body='Hello logs!')
16
17 print(" [x] Sent 'Hello World!'")
18 connection.close()#关闭队列,而不是管道
recv:
 1 import pika
 2
 3 connection = pika.BlockingConnection(pika.ConnectionParameters(
 4         host='localhost'))
 5 channel = connection.channel()
 6
 7 channel.exchange_declare(exchange='logs',
 8                          type='fanout')
 9
10 result = channel.queue_declare(exclusive=True) #不指定queue名字,rabbit会随机分配一个名字,exclusive=True会在使用此queue的消费者断开后,自动将queue删除
11
12 queue_name = result.method.queue#因为recv端不是直接绑定queue的,再有queues去绑定exchange的,所以这里要自动生成一个queue。
13
14 channel.queue_bind(exchange='logs',
15                    queue=queue_name)
16
17 print(' [*] Waiting for logs. To exit press CTRL+C')
18
19 def callback(ch, method, properties, body):
20     print(" [x] %r" % body)
21
22 channel.basic_consume(callback,
23                       queue=queue_name,
24                       no_ack=True)
25
26 channel.start_consuming()
有选择的接收消息(exchange type=direct)
RabbitMQ还支持根据关键字发送,即:队列绑定关键字,发送者将数据根据关键字发送到消息exchange,exchange根据 关键字 判定应该将数据发送至指定队列。
注意:这里也还是广播,所以必须要先启动recv端。
验证方法:在windows命令行下,先启动3个recv端,分别接受info、error、warning。再启动一个send端分别发送前面的这几种状态。
send:python 文件名 info、error、warning#定义要发送什么级别消息
recv:python 文件名 info、error、warning#定义要接受什么级别消息
send:
 1 import pika
 2 import sys
 3
 4 connection = pika.BlockingConnection(pika.ConnectionParameters(
 5         host='localhost'))
 6 channel = connection.channel()
 7
 8 channel.exchange_declare(exchange='direct_logs',
 9                          type='direct')
10
11 severity = sys.argv[1] if len(sys.argv) > 1 else 'info'
12 message = ' '.join(sys.argv[2:]) or 'Hello World!'
13 channel.basic_publish(exchange='direct_logs',
14                       routing_key=severity,
15                       body=message)
16 print(" [x] Sent %r:%r" % (severity, message))
17 connection.close()
recv:
 1 import pika
 2 import sys
 3
 4 connection = pika.BlockingConnection(pika.ConnectionParameters(
 5         host='localhost'))
 6 channel = connection.channel()
 7
 8 channel.exchange_declare(exchange='direct_logs',
 9                          type='direct')
10
11 result = channel.queue_declare(exclusive=True)
12 queue_name = result.method.queue
13
14 severities = sys.argv[1:]
15 if not severities:
16     sys.stderr.write("Usage: %s [info] [warning] [error]
" % sys.argv[0])
17     sys.exit(1)
18
19 for severity in severities:
20     channel.queue_bind(exchange='direct_logs',
21                        queue=queue_name,
22                        routing_key=severity)
23
24 print(' [*] Waiting for logs. To exit press CTRL+C')
25
26 def callback(ch, method, properties, body):
27     print(" [x] %r:%r" % (method.routing_key, body))
28
29 channel.basic_consume(callback,
30                       queue=queue_name,
31                       no_ack=True)
32
33 channel.start_consuming()
更细致的消息过滤
type=topic
上面我们说的只是发送不同级别的消息到recv端,但例如系统日志,不同程序都有一样的日志级别,所以可以更加消息。
验证方法:在windows命令行下,先启动3个recv端,分别接受info、error、warning。再启动一个send端分别发送前面的这几种状态。
send:python 文件名 (例如mysql.error等,基本就是什么日志加上什么级别)#定义要发送什么级别消息
recv:python 文件名 mysql.*、*.error、#定义要接受什么级别消息
send:
 1 import pika
 2 import sys
 3
 4 connection = pika.BlockingConnection(pika.ConnectionParameters(
 5         host='localhost'))
 6 channel = connection.channel()
 7
 8 channel.exchange_declare(exchange='topic_logs',
 9                          type='topic')
10
11 routing_key = sys.argv[1] if len(sys.argv) > 1 else 'anonymous.info'
12 message = ' '.join(sys.argv[2:]) or 'Hello World!'
13 channel.basic_publish(exchange='topic_logs',
14                       routing_key=routing_key,
15                       body=message)
16 print(" [x] Sent %r:%r" % (routing_key, message))
17 connection.close()
recv:
 1 import pika
 2 import sys
 3
 4 connection = pika.BlockingConnection(pika.ConnectionParameters(
 5         host='localhost'))
 6 channel = connection.channel()
 7
 8 channel.exchange_declare(exchange='topic_logs',
 9                          type='topic')
10
11 result = channel.queue_declare(exclusive=True)
12 queue_name = result.method.queue
13
14 binding_keys = sys.argv[1:]
15 if not binding_keys:
16     sys.stderr.write("Usage: %s [binding_key]...
" % sys.argv[0])
17     sys.exit(1)
18
19 for binding_key in binding_keys:
20     channel.queue_bind(exchange='topic_logs',
21                        queue=queue_name,
22                        routing_key=binding_key)
23
24 print(' [*] Waiting for logs. To exit press CTRL+C')
25
26 def callback(ch, method, properties, body):
27     print(" [x] %r:%r" % (method.routing_key, body))
28
29 channel.basic_consume(callback,
30                       queue=queue_name,
31                       no_ack=True)
32
33 channel.start_consuming()
To receive all the logs run:
python receive_logs_topic.py "#"
To receive all logs from the facility "kern":
python receive_logs_topic.py "kern.*"
Or if you want to hear only about "critical" logs:
python receive_logs_topic.py "*.critical"
You can create multiple bindings:
python receive_logs_topic.py "kern.*" "*.critical"
And to emit a log with a routing key "kern.critical" type:
python emit_log_topic.py "kern.critical" "A critical kernel error"
Remote procedure call (RPC)
RPC_Client:
 1 import pika
 2 import uuid
 3
 4 class FibonacciRpcClient(object):
 5     def __init__(self):#连接rabbitmq
 6         self.connection = pika.BlockingConnection(pika.ConnectionParameters(
 7                 host='localhost'))
 8         self.channel = self.connection.channel()
 9         result = self.channel.queue_declare(exclusive=True)
10         self.callback_queue = result.method.queue
11         self.channel.basic_consume(self.on_response, #只要已经收到消息就处理消息
12                                    no_ack=True,
13                                    queue=self.callback_queue)
14
15     def on_response(self, ch, method, props, body):#处理消息方法
16         if self.corr_id == props.correlation_id:
17             self.response = body
18
19     def call(self, n):
20         self.response = None
21         self.corr_id = str(uuid.uuid4())#用uuid生成一串随机数字,每次都不一样
22         self.channel.basic_publish(exchange='',
23                                    routing_key='rpc_queue',#发一个消息到rpc队列
24                                    properties=pika.BasicProperties(
25                                          reply_to = self.callback_queue,#让服务器端执行完命令后返回这个队列(看初始化,随机的)
26                                          correlation_id = self.corr_id,#
27                                          ),
28                                    body=str(n))#传的参数。必须只能传字符串,不能传数字
29
30         while self.response is None:#开始接受消息
31             self.connection.process_data_events()#非阻塞版的start_consum(没有消息不阻塞)
32             #这里可以再执行一条命令
33         return int(self.response)
34
35 fibonacci_rpc = FibonacciRpcClient()#实例化FibonacciRpcClient类
36
37 print(" [x] Requesting fib(30)")
38 response = fibonacci_rpc.call(6)#调用call方法,并传参数进去
39 print(" [.] Got %r" % response)
RPC_Server:
 1 import pika
 2 import time
 3 connection = pika.BlockingConnection(pika.ConnectionParameters(
 4         host='localhost'))
 5
 6 channel = connection.channel()
 7
 8 channel.queue_declare(queue='rpc_queue')
 9
10 def fib(n):
11     if n == 0:
12         return 0
13     elif n == 1:
14         return 1
15     else:
16         return fib(n-1) + fib(n-2)
17
18 def on_request(ch, method, props, body):
19     n = int(body)
20
21     print(" [.] fib(%s)" % n)
22     response = fib(n)#这里其实可以调用命令
23
24     ch.basic_publish(exchange='',
25                      routing_key=props.reply_to,#拿到发过来的随机队列
26                      properties=pika.BasicProperties(correlation_id =
27                                                          props.correlation_id),
28                      body=str(response))
29     ch.basic_ack(delivery_tag = method.delivery_tag)
30
31
32 channel.basic_consume(on_request, queue='rpc_queue')
33
34 print(" [x] Awaiting RPC requests")
35 channel.start_consuming()
二、redis
redis是一个key-value存储系统。和Memcached类似,它支持存储的value类型相对更多,包括string(字符串)、list(链表)、set(集合)、zset(sorted set --有序集合)和hash(哈希类型)。这些数据类型都支持push/pop、add/remove及取交集并集和差集及更丰富的操作,而且这些操作都是原子性的。在此基础上,redis支持各种不同方式的排序。与memcached一样,为了保证效率,数据都是缓存在内存中。区别的是redis会周期性的把更新的数据写入磁盘或者把修改操作写入追加的记录文件,并且在此基础上实现了master-slave(主从)同步。
一、Redis安装和基本使用
wget http://download.redis.io/releases/redis-3.0.6.tar.gztar xzf redis-3.0.6.tar.gzcd redis-3.0.6make启动服务端
在安装包目录下src/下找到redis-server启动服务
src/redis-server
二、Python操作Redis
sudo pip install redis
orsudo easy_install redisor源码安装详见:https://github.com/WoLpH/redis-pyAPI使用
redis-py 的API的使用可以分类为:
- 连接方式
- 连接池
- 操作
- String 操作#其实就是简单的key、values
- Hash 操作
- List 操作
- Set 操作
- Sort Set 操作
- 管道
- 发布订阅
1、操作模式
redis-py提供两个类Redis和StrictRedis用于实现Redis的命令,StrictRedis用于实现大部分官方的命令,并使用官方的语法和命令,Redis是StrictRedis的子类,用于向后兼容旧版本的redis-py。
1 import redis
2
3 r = redis.Redis(host='172.16.5.237', port=6379)#redis服务ip地址和端口
4 r.set('name', 'zhangsan')#key、values
5 print( r.get('name'))#取values
2、连接池
redis-py使用connection pool来管理对一个redis server的所有连接,避免每次建立、释放连接的开销。默认,每个Redis实例都会维护一个自己的连接池。可以直接建立一个连接池,然后作为参数Redis,这样就可以实现多个Redis实例共享一个连接池。
1 import redis
2
3 pool = redis.ConnectionPool(host='172.16.5.237', port=6379)
4
5 r = redis.Redis(connection_pool=pool)
6 r.set('name', 'zhangsan')
7 print(r.get('name'))
3、操作
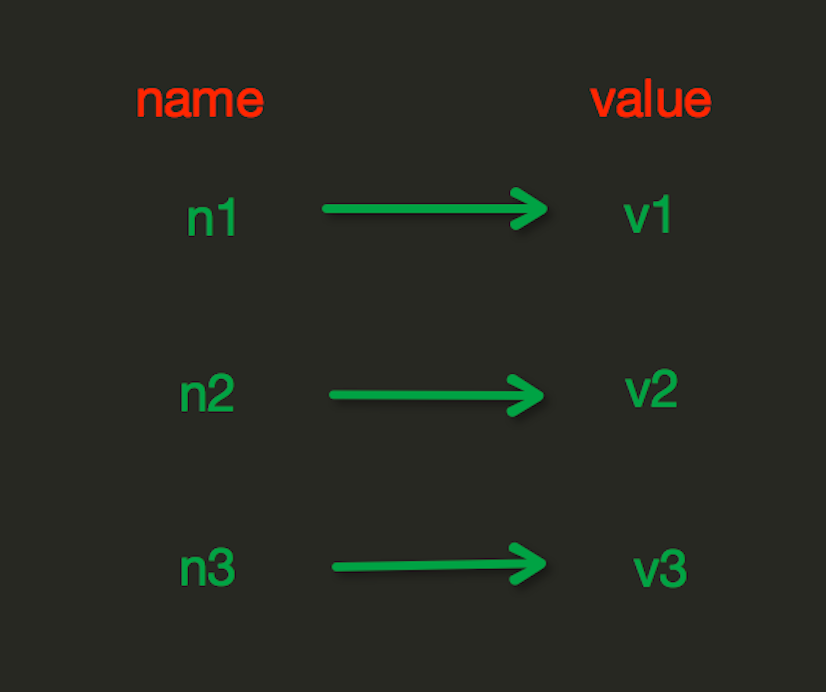
String操作,redis中的String在在内存中按照一个name对应一个value来存储。如图:
set(name, value, ex=None, px=None, nx=False, xx=False)
1 在Redis中设置值,默认,不存在则创建,存在则修改
2 参数:
3      ex,过期时间(秒)
4      px,过期时间(毫秒)
5      nx,如果设置为True,则只有name不存在时,当前set操作才执行#没有就新建
6      xx,如果设置为True,则只有name存在时,岗前set操作才执行#如果之前存在更改,否则不新建1
#nx:没有就新建,有就不新建
127.0.0.1:6379> set name lisi ex 3#三秒后自动删除
2 OK
3 127.0.0.1:6379> get name
4 "lisi"
5 127.0.0.1:6379> get name
6 (nil)
7 127.0.0.1:6379> get name
 #xx:有就更改,没有就不新建
 1 127.0.0.1:6379[3]> set name zhangsan
 2 OK
 3 127.0.0.1:6379[3]> keys *
 4 1) "name"
 5 127.0.0.1:6379[3]> set age 24 nx
 6 OK
 7 127.0.0.1:6379[3]> set name zhangsan nx
 8 (nil)
 9 127.0.0.1:6379[3]> keys *
10 1) "age"
11 2) "name"
setnx(name, value)
1 设置值,只有name不存在时,执行设置操作(添加)#相当于nx参数
setex(name, value, time)
1 # 设置值
2 # 参数:
3     # time_ms,过期时间(数字毫秒 或 timedelta对象)#相当于ex参数
psetex(name, time_ms, value)
# 设置值
# 参数:
    # time_ms,过期时间(数字毫秒 或 timedelta对象)#相当于px(毫秒)
mset(*args, **kwargs)
127.0.0.1:6379[4]> mset name lisi age 23
OK
127.0.0.1:6379[4]> keys*
(error) ERR unknown command 'keys*'
127.0.0.1:6379[4]> keys *
1) "age"
2) "name"
#按照key、valuse可以同时设定多个
get(name)
1 获取值
mget(keys, *args)
1 同时获取多个key的值
127.0.0.1:6379[4]> mget name age
1) "lisi"
2) "23"
getset(name, value)
1 #例如原来有个值,现在设置了一个新值的时候,它会告诉你原来的值是什么
2 127.0.0.1:6379[4]> mget name age
3 1) "lisi"
4 2) "23"
5 127.0.0.1:6379[4]> getset name zhangsan
6 "lisi"
getrange(key, start, end)
1 #取值得范围,像列表,进行切片
2 127.0.0.1:6379[4]> get name
3 "zhangsan"
4 127.0.0.1:6379[4]> getrange name 0 2
5 "zha"
setrange(name, offset, value)
1 #切片进行替换
2 127.0.0.1:6379[4]> get name
3 "|hangsan"
4 127.0.0.1:6379[4]> setrange name 1 HANGSAN
5 (integer) 8
6 127.0.0.1:6379[4]> get name
7 "|HANGSAN"
setbit(name, offset, value)
 1 127.0.0.1:6379> set name1 leihaidong
 2 OK
 3 127.0.0.1:6379> get name1
 4 "leihaidong"
 5 127.0.0.1:6379> exit
 6
 7
 8 [root@localhost /]# python3
 9 Python 3.5.2rc1 (default, Oct 15 2016, 09:28:43)
10 [GCC 4.4.7 20120313 (Red Hat 4.4.7-17)] on linux
11 Type "help", "copyright", "credits" or "license" for more information.
12 >>> ord('l')#l转成10进制
13 108
14 >>> bin(108)#再把10进制转成二进制
15 '0b1101100'
16
   128  64   32     16   8   4     2    1#二进制对应表
    0   1     1     0    1   1     0   0 #l的二进制,肯定是一共8位,不够8位前面用0补齐
    0   1     2     3    4   5     6   7  #位数从0开始数
    0   1     1     0    1   1     0   1#我们知道上面是l十进制是108,我给它加个1就是109,109时m
127.0.0.1:6379> get name2
"leihaidong"
127.0.0.1:6379> setbit name2 7 1
(integer) 0
127.0.0.1:6379> get name2
"meihaidong"
20 英文字符表 a b c d e f g h i g k l m n......
Hash操作,redis中Hash在内存中的存储格式如下图:

hset(name, key, value)
 1 hget:如上图所示,info相当于一个字典的名字,可以设置多个key和values
 2
 3
 4 127.0.0.1:6379> hset info name zhangsan
 5 (integer) 0
 6 127.0.0.1:6379> hset info age 24
 7 (integer) 0
 8 127.0.0.1:6379> hset info id 6666
 9 (integer) 1
10 127.0.0.1:6379> hgetall info
11 1) "name"
12 2) "zhangsan"
13 3) "age"
14 4) "24"
15 5) "id"
16 6) "6666"
17 127.0.0.1:6379> hget info name
18 "zhangsan"
hmset(name, mapping)
可以同时将类似一个字典生成
127.0.0.1:6379> hmset info1 name leihaidong age 22 id 5555
OK


127.0.0.1:6379> hgetall  info1
1) "name"
2) "leihaidong"
3) "age"
4) "22"
5) "id"
6) "5555"
hget(name,key)
#同时只能获取一个字典中的一个key的values
127.0.0.1:6379> hget info1 name
"leihaidong"
hmget(name, keys, *args)
 1 127.0.0.1:6379> hgetall info1
 2 1) "name"
 3 2) "leihaidong"
 4 3) "age"
 5 4) "22"
 6 5) "id"
 7 6) "5555"
 8 127.0.0.1:6379> help hmget
 9
10   HMGET key field [field ...]
11   summary: Get the values of all the given hash fields
12   since: 2.0.0
13   group: hash
14
15 #可以只取类似字典中的固定的多个key的值
16 127.0.0.1:6379> hmget info1 name age
17 1) "leihaidong"
18 2) "22"
hgetall(name)
1 #获取一个类似字典的所有key values
2 127.0.0.1:6379> hgetall info1
3 1) "name"
4 2) "leihaidong"
5 3) "age"
6 4) "22"
7 5) "id"
8 6) "5555"
hlen(name)
#获取一个类似字典中有几对key values
127.0.0.1:6379> hgetall info1
1) "name"
2) "leihaidong"
3) "age"
4) "22"
5) "id"
6) "5555"
127.0.0.1:6379> hlen info
(integer) 3#name+age+id(刚好是3对信息)
hkeys(name)
#查一个类似字典中有哪些key
127.0.0.1:6379> hgetall info
1) "name"
2) "zhangsan"
3) "age"
4) "24"
5) "id"
6) "6666"
127.0.0.1:6379> hkeys info
1) "name"
2) "age"
3) "id"
hvals(name)
1 #查看一个类似字典中有个哪些values值
2 127.0.0.1:6379> HVALS info
3 1) "zhangsan"
4 2) "24"
5 3) "6666"
hexists(name, key)
1 #检查一个字典中有没有一个名字的key
2
3 127.0.0.1:6379> HEXISTS info1 name
4 (integer) 1
5 127.0.0.1:6379> HEXISTS info1 name hehele
6 (error) ERR wrong number of arguments for 'hexists' command
hdel(name,*keys)
 1 127.0.0.1:6379> hgetall info1
 2 1) "name"
 3 2) "leihaidong"
 4 3) "age"
 5 4) "22"
 6
 7 127.0.0.1:6379> hdel info1 id
 8 (integer) 1#显示删除了一个,那证明这里有这个key
 9
10
11 127.0.0.1:6379> hdel info1 iddd
12 (integer) 0#显示0表示没有这个key
hincrby(name, key, amount=1)#加几都可以
#说白了就是让这个key的values加几
127.0.0.1:6379> hget info1 age
"25"
127.0.0.1:6379> hincrby info1 age  1
(integer) 26
127.0.0.1:6379> hincrby info1 age  1
(integer) 27
127.0.0.1:6379> hincrby info1 age  1
(integer) 28
127.0.0.1:6379> hget info1 age
"28"
hincrbyfloat(name, key, amount=1.0)#可以加小数
1 #上面的hincyby只能加整数,但是这里可以加小数
2
3 127.0.0.1:6379> HINCRBYFLOAT info1 age 1
4 "57"
5 127.0.0.1:6379> HINCRBYFLOAT info1 age 1.5
6 "58.5"
hscan(name, cursor=0, match=None, count=None)
#如果数据量很大,可以过滤的来查找,下面是找一k开头的key和values
127.0.0.1:6379> hscan info1 0  match  k*
1) "0"
2) 1) "k1"
   2) "v1"
   3) "k2"
   4) "v2"
   5) "k3"
   6) "v3"
1 #可以取所有包含a的key和对应的values
2 127.0.0.1:6379> hscan info1 0  match  *a*
3 1) "0"
4 2) 1) "name"
5    2) "leihaidong"
6    3) "age"
7    4) "58.5"
hscan_iter(name, match=None, count=None)
 1 #通过迭代的方式取到值
 2
 3 # 利用yield封装hscan创建生成器,实现分批去redis中获取数据
 4
 5 # 参数:
 6     # match,匹配指定key,默认None 表示所有的key
 7     # count,每次分片最少获取个数,默认None表示采用Redis的默认分片个数
 8
 9 # 如:
10     # for item in r.hscan_iter('xx'):
11     #     print item
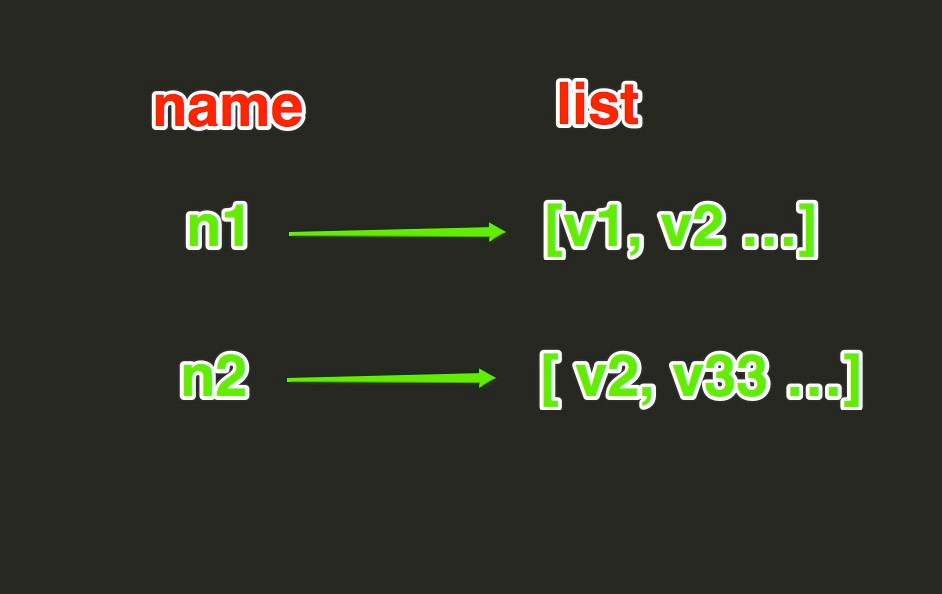
List操作,redis中的List在在内存中按照一个name对应一个List来存储。如图:
lpush(name,values)
1 #类似列表的用法(注意取值的时候取出的值顺序倒着来的)
2 127.0.0.1:6379> lpush info2 zhangsan 22 44
3 (integer) 3
4 127.0.0.1:6379> lrange info2 0 -1
5 1) "44"
6 2) "22"
7 3) "zhangsan"
lpushx(name,value)
1 #看看上面,再看看这,顺序就从前往后了
2 127.0.0.1:6379> RPUSH info4 lisi 33 55
3 (integer) 3
4 127.0.0.1:6379> lrange info4 0 -1
5 1) "lisi"
6 2) "33"
7 3) "55"
llen(name)
1 #len是长度,但是这里是看这个info4的列表名里有几个值
2 127.0.0.1:6379> llen info4
3 (integer) 3
linsert(name, where, refvalue, value))
127.0.0.1:6379> HELP LINSERT

  LINSERT key BEFORE|AFTER pivot value

  summary: Insert an element before or after another element in a list
  since: 2.2.0
  group: list


127.0.0.1:6379> lrange info4 0 -1
1) "lisi"
2) "33"
3) "55"

#语法解析: linsert info4(列表名) BEFORE(前)|AFTER(后)  标杆值(列表中的那个值得前面还是后面)  插入内容
127.0.0.1:6379> LINSERT info4 BEFORE 33 22
(integer) 4
127.0.0.1:6379> lrange info4 0 -1
1) "lisi"
2) "22"
3) "33"
4) "55"
r.lset(name, index, value)
 1 #修改,找到下标值改名
 2
 3 127.0.0.1:6379> lrange info4 0 -1
 4 1) "lisi"
 5 2) "22"
 6 3) "33"
 7 4) "55"
 8
 9 127.0.0.1:6379> lset info4  0 LISI
10 OK
11
12 127.0.0.1:6379> lrange info4 0 -1
13 1) "LISI"
14 2) "22"
15 3) "33"
16 4) "55"
r.lrem(name, num,value)
1 #删除几个值
2 下面操作解释:info4(表名) 删几个  内容
3 127.0.0.1:6379> LREM info4 1 22
4 (integer) 1
5 127.0.0.1:6379> lrange info4 0 -1
6 1) "LISI"
7 2) "33"
8 3) "55"
lpop(name)
1 #这里可不是列表中的从后往前删,这里是从左往右删。删除并返回删除的值
2 127.0.0.1:6379> lpop info4
3 "LISI"
4 127.0.0.1:6379> lrange info4 0 -1
5 1) "33"
6 2) "55"
lindex(name, index)
1 #通过下标取出对应的值
2 127.0.0.1:6379> lrange info4 0 -1
3 1) "33"
4 2) "55"
5
6 127.0.0.1:6379> lindex info4 1
7 "55"
lrange(name, start, end)
#取值
127.0.0.1:6379> lrange info4 0 -1
1) "33"
2) "55"
ltrim(name, start, end)
 1 #只保留下标几到几
 2
 3 127.0.0.1:6379> lrange info5 0 -1
 4 1) "11"
 5 2) "22"
 6 3) "33"
 7 4) "44"
 8 5) "55"
 9
10 127.0.0.1:6379> LTRIM info5 1 3#只保留了22、33、44(其它的都删除)
11 OK
12
13 127.0.0.1:6379> lrange info5 0 -1
14 1) "22"
15 2) "33"
16 3) "44"
rpoplpush(src, dst)
 1 #把一个列表的最后一个值拿出来(并删掉),插入另外一个表的最前面
 2
 3 127.0.0.1:6379> lrange info4 0 -1
 4 1) "33"
 5 2) "55"
 6
 7 127.0.0.1:6379> lrange info5 0 -1
 8 1) "22"
 9 2) "33"
10 3) "44"
11
12 #把info4中的最后一个值55取出并在info4中删除,然后存放到info5的的最前面
13 127.0.0.1:6379> RPOPLPUSH info4 info5
14 "55"
15
16 127.0.0.1:6379> lrange info4 0 -1
17 1) "33"
18
19 127.0.0.1:6379> lrange info5 0 -1
20 1) "55"
21 2) "22"
22 3) "33"
23 4) "44"
blpop(keys, timeout)
 1 #删除列表中的第一个元素,当列表中所有数据都删除完以后,等3秒,如果还没有就不阻塞了
 2 127.0.0.1:6379> lrange info5 0 -1
 3 1) "22"
 4 2) "33"
 5 3) "44"
 6 127.0.0.1:6379> BLPOP info5 3
 7 1) "info5"
 8 2) "22"
 9 127.0.0.1:6379> lrange info5 0 -1
10 1) "33"
11 2) "44"
12 127.0.0.1:6379> BLPOP info5 3
13 1) "info5"
14 2) "33"
15 127.0.0.1:6379> BLPOP info5 3
16 1) "info5"
17 2) "44"
18 127.0.0.1:6379> lrange info5 0 -1
19 (empty list or set)
20 127.0.0.1:6379> BLPOP info5 3
21 (nil)
22 (3.08s)
1 # 将多个列表排列,按照从左到右去pop对应列表的元素
2
3 # 参数:
4     # keys,redis的name的集合
5     # timeout,超时时间,当元素所有列表的元素获取完之后,阻塞等待列表内有数据的时间(秒), 0 表示永远阻塞
6
7 # 更多:
8     # r.brpop(keys, timeout),从右向左获取数据
brpoplpush(src, dst, timeout=0)
 1 #将一个列表最右侧的值取出并删除,放到另外一个列表的最左侧(一直取前面列表的最右侧的值,如果前面这个列表的值为空了,后面的timeout等于多少就等多久)。
 2
 3 127.0.0.1:6379> lrange info4 0 -1
 4 1) "55"
 5 2) "44"
 6 3) "33"
 7 127.0.0.1:6379> lrange info5 0 -1
 8 1) "id"
 9 2) "age"
10 3) "zhangsan"
11 127.0.0.1:6379> BRPOPLPUSH info4  info5 3
12 "33"
13 127.0.0.1:6379> lrange info5 0 -1
14 1) "33"
15 2) "id"
16 3) "age"
17 4) "zhangsan"
 1 自定义增量迭代
 2
 3 # 由于redis类库中没有提供对列表元素的增量迭代,如果想要循环name对应的列表的所有元素,那么就需要:
 4     # 1、获取name对应的所有列表
 5     # 2、循环列表
 6 # 但是,如果列表非常大,那么就有可能在第一步时就将程序的内容撑爆,所有有必要自定义一个增量迭代的功能:
 7
 8 def list_iter(name):
 9     """
10     自定义redis列表增量迭代
11     :param name: redis中的name,即:迭代name对应的列表
12     :return: yield 返回 列表元素
13     """
14     list_count = r.llen(name)
15     for index in xrange(list_count):
16         yield r.lindex(name, index)
17
18 # 使用
19 for item in list_iter('pp'):
20     print item
Set操作,Set集合就是不允许重复的列表
sadd(name,values)
1 #集合是无序的
2 添加集合
3 127.0.0.1:6379[10]> sadd name1 zhangsan lisi wanger
4 (integer) 3
5 127.0.0.1:6379[10]> sadd name2 lisi wanger zhaosi
6 (integer) 3
scard(name)#获取一个集合里面元素的个数
1 127.0.0.1:6379[10]> scard name1
2 (integer) 3
sdiff(keys, *args)#差集
#name1中有name2里面没有的

127.0.0.1:6379[10]> sadd name1 zhangsan lisi wanger
(integer) 3
127.0.0.1:6379[10]> sadd name2 lisi wanger zhaosi
(integer) 3
127.0.0.1:6379[10]> sdiff name1 name2
1) "zhangsan"
sdiffstore(dest, keys, *args)
 1 #获取一个集合中有的,另外一个集合中没有的,放到一个新的集合中
 2
 3 127.0.0.1:6379[10]> SDIFFSTORE  gaosi name1 name2
 4 (integer) 1
 5 127.0.0.1:6379[10]> SMEMBERS gaosi
 6 1) "zhangsan"
 7 127.0.0.1:6379[10]> SMEMBERS name1
 8 1) "zhangsan"
 9 2) "wanger"
10 3) "lisi"
11 127.0.0.1:6379[10]> SMEMBERS name2
12 1) "zhaosi"
13 2) "wanger"
14 3) "lisi"
sinter(keys, *args)
 1 #交集
 2
 3 127.0.0.1:6379[10]> sadd name1 zhangsan lisi wanger
 4 (integer) 3
 5 127.0.0.1:6379[10]> sadd name2 lisi wanger zhaosi
 6 (integer) 3
 7
 8 127.0.0.1:6379[10]> sinter name1 name2
 9 1) "wanger"
10 2) "lisi"
sinterstore(dest, keys, *args)
1 # 获取多一个name对应集合的并集,再讲其加入到dest对应的集合中
2
3 127.0.0.1:6379[10]> sinterstore gaosi2 name1 name2
4 (integer) 2
5 127.0.0.1:6379[10]> SMEMBERS gaosi2
6 1) "lisi"
7 2) "wanger"
smembers(name)
1 #获取一个集合中有没有一个元素
2
3 127.0.0.1:6379[10]> sismember name1 zhangsan
4 (integer) 1
smove(src, dst, value)
 1 #从一个集合中把一个元素剪切到另外一个集合中
 2 127.0.0.1:6379[10]> SMEMBERS name1
 3 1) "zhangsan"
 4 2) "wanger"
 5 3) "lisi"
 6 127.0.0.1:6379[10]> SMEMBERS name2
 7 1) "zhaosi"
 8 2) "wanger"
 9 3) "lisi"
10 127.0.0.1:6379[10]> smove name1 name2 zhangsan
11 (integer) 1
12 127.0.0.1:6379[10]> SMEMBERS name2
13 1) "zhangsan"
14 2) "zhaosi"
15 3) "wanger"
16 4) "lisi"
17 127.0.0.1:6379[10]> SMEMBERS name1
18 1) "wanger"
19 2) "lisi"
spop(name)
 从集合的右侧(尾部)移除一个成员,并将其返回
#是随机删除的
127.0.0.1:6379[10]> spop name1
"wanger"
srandmember(name, numbers)
#获取随机数

127.0.0.1:6379[10]> SRANDMEMBER name2
"wanger"
127.0.0.1:6379[10]> SRANDMEMBER name2
"lisi"
127.0.0.1:6379[10]> SRANDMEMBER name2
"lisi"
127.0.0.1:6379[10]> SRANDMEMBER name2
"zhaosi"
srem(name, values)
 1 #删除一个集合中指定的一个元素
 2 127.0.0.1:6379[10]> SMEMBERS name2
 3 1) "zhaosi"
 4 2) "wanger"
 5 3) "lisi"
 6 127.0.0.1:6379[10]> SREM name2 wanger
 7 (integer) 1
 8 127.0.0.1:6379[10]> SMEMBERS name2
 9 1) "zhaosi"
10 2) "lisi"
sunion(keys, *args)
 1 #获取多个集合中元素的并集
 2 127.0.0.1:6379[10]> SMEMBERS name1
 3 1) "zhangsan"
 4 2) "lisi"
 5 127.0.0.1:6379[10]> SMEMBERS name2
 6 1) "zhaosi"
 7 2) "lisi"
 8 127.0.0.1:6379[10]> SUNION name1 name2
 9 1) "zhaosi"
10 2) "zhangsan"
11 3) "lisi"
sunionstore(dest,keys, *args)
#获取多一个name对应的集合的并集,并将结果保存到dest对应的集合中

127.0.0.1:6379[10]> SUNIONSTORE gao name1 name2
(integer) 4
127.0.0.1:6379[10]> SMEMBERS name1
1) "zhangsan"
2) "lisi"
3) "wanger"
127.0.0.1:6379[10]> SMEMBERS name2
1) "zhaosi"
2) "lisi"
127.0.0.1:6379[10]> SMEMBERS gao
1) "zhaosi"
2) "zhangsan"
3) "wanger"
4) "lisi"
sscan(name, cursor=0, match=None, count=None)
 1 #关键字查找
 2 127.0.0.1:6379[10]> SMEMBERS gao
 3 1) "zhaosi"
 4 2) "zhangsan"
 5 3) "wanger"
 6 4) "lisi"
 7 127.0.0.1:6379[10]> sscan gao 0 match z
 8 1) "0"
 9 2) (empty list or set)
10 127.0.0.1:6379[10]> sscan gao 0 match z*
11 1) "0"
12 2) 1) "zhaosi"
13    2) "zhangsan"
sscan_iter(name, match=None, count=None)
# 同字符串的操作,用于增量迭代分批获取元素,避免内存消耗太大
有序集合,在集合的基础上,为每元素排序;元素的排序需要根据另外一个值来进行比较,所以,对于有序集合,每一个元素有两个值,即:值和分数,分数专门用来做排序。
zadd(name, *args, **kwargs)
1 #权重数字越小,权利越大,也就是越靠前
2 127.0.0.1:6379[15]> zadd name1 10 zhangsan   8 lisi  6 wanger
3 (integer) 3
4 127.0.0.1:6379[15]> ZRANGE name1 0 -1
5 1) "wanger"
6 2) "lisi"
7 3) "zhangsan"
1 #显示权重
2 127.0.0.1:6379[15]> ZRANGE name1 0 -1 withscores
3 1) "wanger"
4 2) "6"
5 3) "lisi"
6 4) "8"
7 5) "zhangsan"
8 6) "10"
zcard(name)
1 # 获取name对应的有序集合元素的数量
2 127.0.0.1:6379[15]> zcard name1
3 (integer) 3
zcount(name, min, max)
 1 #获取集合中权重多少到多少有几个。
 2 127.0.0.1:6379[15]> ZRANGE name1 0 -1 withscores
 3 1) "wanger"
 4 2) "6"
 5 3) "lisi"
 6 4) "8"
 7 5) "zhangsan"
 8 6) "10"
 9 127.0.0.1:6379[15]> zcount name1 6 8
10 (integer) 2
zincrby(name, value, amount)
1 # 自增name对应的有序集合的 name 对应的分数
r.zrange( name, start, end, desc=False, withscores=False, score_cast_func=float)
 1 # 按照索引范围获取name对应的有序集合的元素
 2
 3 # 参数:
 4     # name,redis的name
 5     # start,有序集合索引起始位置(非分数)
 6     # end,有序集合索引结束位置(非分数)
 7     # desc,排序规则,默认按照分数从小到大排序
 8     # withscores,是否获取元素的分数,默认只获取元素的值
 9     # score_cast_func,对分数进行数据转换的函数
10
11 # 更多:
12     # 从大到小排序
13     # zrevrange(name, start, end, withscores=False, score_cast_func=float)
14
15     # 按照分数范围获取name对应的有序集合的元素
16     # zrangebyscore(name, min, max, start=None, num=None, withscores=False, score_cast_func=float)
17     # 从大到小排序
18     # zrevrangebyscore(name, max, min, start=None, num=None, withscores=False, score_cast_func=float)
zrank(name, value)
1 #获取一个集合中一个元素从左往右占得位置
# 获取某个值在 name对应的有序集合中的排行(从 0 开始)

2 127.0.0.1:6379[15]> zrank name1 zhangsan
3 (integer) 3
zrangebylex(name, min, max, start=None, num=None)
 1 # 当有序集合的所有成员都具有相同的分值时,有序集合的元素会根据成员的 值 (lexicographical ordering)来进行排序,而这个命令则可以返回给定的有序集合键 key 中, 元素的值介于 min 和 max 之间的成员
 2 # 对集合中的每个成员进行逐个字节的对比(byte-by-byte compare), 并按照从低到高的顺序, 返回排序后的集合成员。 如果两个字符串有一部分内容是相同的话, 那么命令会认为较长的字符串比较短的字符串要大
 3
 4 # 参数:
 5     # name,redis的name
 6     # min,左区间(值)。 + 表示正无限; - 表示负无限; ( 表示开区间; [ 则表示闭区间
 7     # min,右区间(值)
 8     # start,对结果进行分片处理,索引位置
 9     # num,对结果进行分片处理,索引后面的num个元素
10
11 # 如:
12     # ZADD myzset 0 aa 0 ba 0 ca 0 da 0 ea 0 fa 0 ga
13     # r.zrangebylex('myzset', "-", "[ca") 结果为:['aa', 'ba', 'ca']
14
15 # 更多:
16     # 从大到小排序
17     # zrevrangebylex(name, max, min, start=None, num=None)
zrem(name, values)
1 # 删除name对应的有序集合中值是values的成员
zremrangebyrank(name, min, max)
1 # 根据排行范围删除
zremrangebyscore(name, min, max)
1 # 根据分数范围删除
zremrangebylex(name, min, max)
1 # 根据值返回删除
zscore(name, value)
# 获取name对应有序集合中 value 对应的分数
zinterstore(dest, keys, aggregate=None)
1 # 获取两个有序集合的交集,如果遇到相同值不同分数,则按照aggregate进行操作
2 # aggregate的值为:  SUM  MIN  MAX
zunionstore(dest, keys, aggregate=None)
1 # 获取两个有序集合的并集,如果遇到相同值不同分数,则按照aggregate进行操作
2 # aggregate的值为:  SUM  MIN  MAX
zscan(name, cursor=0, match=None, count=None, score_cast_func=float)
zscan_iter(name, match=None, count=None,score_cast_func=float)
1 # 同字符串相似,相较于字符串新增score_cast_func,用来对分数进行操作
其他常用操作
delete(*names)
1 # 根据删除redis中的任意数据类型
exists(name)
1 # 检测redis的name是否存在
keys(pattern='*')
1 # 根据模型获取redis的name
2
3 # 更多:
4     # KEYS * 匹配数据库中所有 key 。
5     # KEYS h?llo 匹配 hello , hallo 和 hxllo 等。
6     # KEYS h*llo 匹配 hllo 和 heeeeello 等。
7     # KEYS h[ae]llo 匹配 hello 和 hallo ,但不匹配 hillo
expire(name ,time)
1 # 为某个redis的某个name设置超时时间
rename(src, dst)
1 # 对redis的name重命名为
move(name, db))
1 # 将redis的某个值移动到指定的db下
randomkey()
1 # 随机获取一个redis的name(不删除)
type(name)
1 # 获取name对应值的类型
scan(cursor=0, match=None, count=None)
scan_iter(match=None, count=None)
1 # 同字符串操作,用于增量迭代获取key
4、管道
redis-py默认在执行每次请求都会创建(连接池申请连接)和断开(归还连接池)一次连接操作,如果想要在一次请求中指定多个命令,则可以使用pipline实现一次请求指定多个命令,并且默认情况下一次pipline 是原子性操作。
 1 import redis
 2
 3 pool = redis.ConnectionPool(host='172.16.5.237', port=6379)
 4
 5 r = redis.Redis(connection_pool=pool)
 6
 7 # pipe = r.pipeline(transaction=False)
 8 pipe = r.pipeline(transaction=True)
 9
10 r.set('name', 'zhangsan')
11 r.set('role', 'niubi')
12
13 pipe.execute()
5、发布订阅

发布者:服务器
订阅者:Dashboad和数据处理
演示如下:
 1 import redis
 2
 3
 4 class RedisHelper:
 5
 6     def __init__(self):
 7         self.__conn = redis.Redis(host='10.211.55.4')
 8         self.chan_sub = 'fm104.5'
 9         self.chan_pub = 'fm104.5'
10
11     def public(self, msg):
12         self.__conn.publish(self.chan_pub, msg)
13         return True
14
15     def subscribe(self):
16         pub = self.__conn.pubsub()
17         pub.subscribe(self.chan_sub)
18         pub.parse_response()
19         return pub
更多参见:https://github.com/andymccurdy/redis-py/
http://doc.redisfans.com/