问题提出
生活中有很多事物集合,设为A1,A2......Am ,而每个事物都有功能F1,F2....Fn.
例如邮局的发送业务。简单模拟有两类事物:信件和包裹,均有平邮和挂号邮寄功能。程序设计中如何来描述这些功能呢?或许一般会与下面代码相似。
public class A1 {
    void F1(){}
    void F2(){}
}
public class A2 {
    void F1(){}
    void F2(){}
}
很明显,若有m个事物,n个功能,按照这个方法,一共要写m个类,功能方法累积起来有m*n个。这样明显不太可取。那么为了更好地解决上面的问题,桥接模式就是一种重要的方法之一。
桥接模式是关于怎样将抽象部分与它的实现部分相分离,使它们都可以独立地变化的成熟模式。上面的方法的根本缺陷就是在具体类中封装了F1()或是F2()方法。因此必定会有重复的代码。解决这个问题的重要策略就是利用“语义”,通过接口或者抽象类进行抽象。
对面上面的例子,可以描述为:
1)邮局有发送功能;发送功能有两种方式,平邮和挂号。
public interface IPost {    // 邮局
    public void post();     //发送功能
}
public class SimplePost implements IPost {      //平信发送
    public void post(){
        System.out.println("This is simplePost");
    }
}


public class MarkPost implements IPost {        //挂号发送
    public void post(){
        System.out.println("This is Mark post");
    }
}
2)邮局发送的物品有两种:信件和包裹
public abstract class AbstractThing {       //抽象事物
    private IPost obj;                      //有抽象发送功能
    public AbstractThing(IPost obj){
        this.obj = obj;
    }
    public void post(){
        obj.post();
    }
}
public class Letter extends AbstractThing {
    public Letter(IPost obj){
        super(obj);
    }
}
public class Parcel extends AbstractThing {
    public Parcel(IPost obj){
        super(obj);
    }
}
其实这种设计是与现实生活中的描述是一致的,“邮局有邮寄功能”,“邮局可以邮寄信件和包裹”。信件和包裹是两个不同的事务,但是它们又有共享的功能,也可能有相异的功能。共享的功能能封装在一个类,但由于该类不能代表一个具体事物,所以定义为Abstract抽象类是最合适的。该类共享多态成员obj,表明了事物共享平邮和挂号发送功能,所以该类是桥接模式的核心!
具体UML图
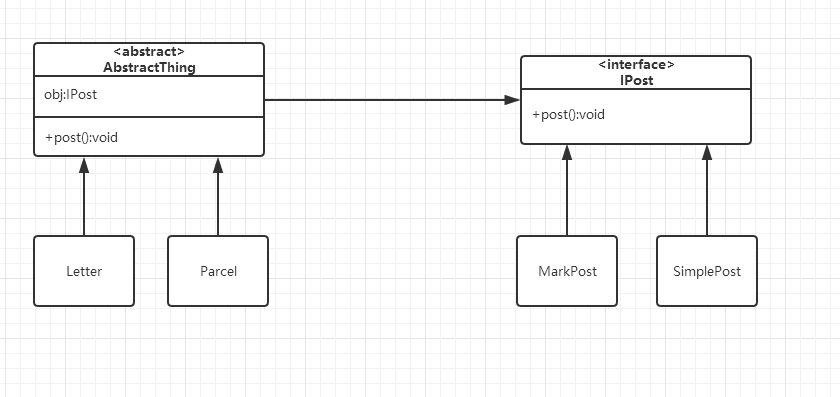
大概是因为AbstractThing类中的成员obj,它像是桥梁一样,使事物类和功能类联系起来,所以这种模式被叫做桥接模式。
从上面的UML图可以看出来,创建一个具体事物类我们必须先选择一个具体的发送功能,再选择一个事物类,最后才完成真正发送过程。总结来说,桥接模式是一个多条件选择问题,而这些条件或有次序先后,或是没有。比如人们在买衣服的时候,分别再上衣和裤子中各自挑选,先挑裤子或是先挑衣服。再比如人们要从广州坐火车去西安,在北京中转。那么我们会先从广州到北京的火车挑选一班车,再从北京到西安挑选一班车。其实我们大多数下意识地处理这类问题的方法与桥接模式的设计很是相似。
而对于需求变化,对于事物,只需要删除或者添加Abstract派生的类即可。邮寄方式同理也是如此。
public class NewThing extends AbstractThing {
    public NewThing(IPost obj){
        super(obj);
    }
}
看到这里,桥接模式的基本概念就这么简单,但是实际应用中却很多细节需要注意和处理。上面只是开胃菜,下面让我们品尝桥接模式的主菜!
1.桥接模式强调“包含”代替“继承”
日志是一类非常重要的文件,现在要求实现两个功能 1)将信息字符串字节保存到日志 2)将加密后的字符串保存到文件中
方法1 继承
public class LogFile {              //将信息直接保存到日志文件中
    public void save(String msg){
    }
}
public class Encrypt extends LogFile {
    public void save(String msg){       //加密信息保存到文件
        msg = encrypt(msg);
        super.save(msg);
    }
    public String encrypt(String msg){
        //加密处理
        return msg;
    }
}
方法2 包含
public class Encrypt2 {
    LogFile lf;
    public Encrypt2(LogFile lf){
        this.lf = lf;
    }
    public void save(String msg){
        msg = encrypt(msg);
        lf.save(msg);
    }
    public String encrypt(String msg){
        return msg;
    }
}
那究竟方法1和方法2,哪种方法比较合适呢?对比邮递那个demo,不难看出方法2才是桥接模式的设计体现。为什么使用继承不恰当?因为当父类更改时,有可能会影响到Encrypt子类;而方法2中LogFile类,Encrypt类之间是包含关系。当LogFile类改变时,只要接口方法不改变,就不会影响Encrypt类。这是体现桥接模式的最基本思想!
2.JDK中的桥接模式
JDK中有很多应用桥接模式的地方,例如Collections类中的sort()方法。具体源码如下
Public static<T extends Comparable<? Super T>> voidsort(List<T> list){
    Object[] a = list.toArray();
    Arrays.sort(a);
    ListIterator<T> i = list.listIterator();
    for(int j=0;j<a.length;j++{
        I.next();
        i.set((T)a[j]);
    }
}
这里或许有点难理解,集合和数组都需要排序,但是集合中的排序是通过使用数组的排序实现的。为什么呢?因为集合和数组没必要都实现排序,没必要去写重复的方法。于是使集合类中都包含了数组成员,通过先转换为数组进行排序,后再填充为集合对象,这种结构类似于桥接模式的结构。
3.桥接模式中利用反射机制
1)反射机制获得功能类
public abstract class ReflectAbstractThing {
    IPost obj;
    public ReflectAbstractThing(String reflectName) throws Exception{
        //利用反射机制加载功能类
        //注意类名必须是完整路径
        obj = (IPost)Class.forName(reflectName).newInstance();
    }
    public void post(){
        obj.post();
    }
}
2)反射机制获得功能类和事物类
public abstract class AbstractThing {
    IPost obj ;
    public void createPost(String funcName) throws Exception{
        //利用反射机制加载功能类
        obj = (IPost)Class.forName(funcName).newInstance();
    }
    public void post(){
        obj.post();
    }
}
public class ThingManage {
    AbstractThing thing;
    AbstractThing createThing(String thingName) throws Exception{
        //反射机制加载事物类对象
        thing = (AbstractThing)Class.forName(thingName).newInstance();
        return thing;
    }
}
若使用反射机制加载事物类对象,需要增加事物管理类ThingManage来创建事物类实例,另外还要注意这时候AbstractThing中并不是通过构造方法来加载功能类对象,而是普通的类方法。因为这时候需要先加载事物类对象,再加载功能类对象,而不能同时加载。
应用场景:编写功能类,要求能读本地或远程URL文件,文件类型是文本文件或是图像文件。
该功能可由桥接模式完成。事物类指本地文件以及URL文件类;功能类指读文本文件,读图像文件。下面提出两种实现方法
方法1
1)抽象功能类AbstractRead
public abstract class AbstractRead<T> {
    public abstract T read(String strPath) throws Exception;
}
2)具体功能实现类
public class ImgRead extends AbstractRead<byte[]> {
    public byte[] read(String strPath) throws Exception{
        return null;
    }
}
public class TextRead extends AbstractRead<String > {
    public String read(String strPath) throws Exception{
        return null;
    }
}
3)抽象事物类
public class AbstractThing{
    AbstractRead reader;
    public AbstractThing(AbstractRead reader){
        this.reader = reader;
    }
    Object read() throws Exception{
        return reader.read("s");
    }
}
这是按照上面桥接模式UML图转化过来写的。但是仔细分析,难免就发生问题了。在具体实现类TextRead和ImgRead中无法写代码。在TextRead中,多态方法read()参数是文件路径strPath。常规思路是必须根据strPath获得字节输入流InputStream对象,但是对于本地文件,URL文件获得InputStream对象是不一样的。
本地文件获取:InputStream in = new FileInputStream(strPath);
URL:URL u = new URL(strPath); InputStream in = u.openStream();
有人会觉得,直接在多态方法read()再添加一个标志位就可以了。如下
public String read(String strPath,int type) throws Exception{
        InputStream in = null;
        switch(type){
            case 1:
                in = new FileInputStream(strPath);break;
            case 2:
                URL u = new URL(strPath);
                in = u.openStream();
        }

        //其他代码
        return "";
    }
这样看起来好像真的解决了上面提到的问题,但是这样修改的话,老生常谈的道理就是那么在每个实现类(ImageRead)都需要重写一遍这样的代码。毋庸置疑,这种解决方法实不可取的。
又有人觉得既然本地读写文本,图像和URL上是不同,那么直接封装四个类不就可以吗? 如下
class TextRead extends AbstractRead<String>{}
class URLTextRead extends AbstractRead<String>{}
class ImgRead extends AbstractRead<String>{}
class URLImgRead extends AbstractRead<String>{}
出现这些代码根本原因是对桥接模式的理解不够深入。本文前面提到的邮局等样例只是为了更好的理解桥接模式的基本思想,但是在具体程序设计中需要根据细节仔细考虑。记住,功能类的抽取至关重要!!!必须把多个事物类完成某个功能类的共性部分抽取出来,才能作为桥接模式的功能类,这是理解桥接模式最重要的地方。
回到问题的最初,关键思路是弄清楚本地读文件,URL读文件功能类有什么异同之处。读文件一般有三步:打开文件,读文件,关闭文件。打开文件为了获取InputStream对象in,只有这一步与URL不同。另外,如果缓冲区大小与文件大小一致的,读文件的效率就搞,因此必须获得文件长度,这对本地,URL文件获取方法也是不一样的。
1)抽象功能类
public interface IRead<T> {
    public T read() throws Exception;
}
2)具体功能实现类
package BridgeModel.Example.ReadFileRight;

/**
 * Created by lenovo on 2017/4/20.
 */
public class TextRead implements IRead<String> {
    AbstractStream stream;
    public TextRead(AbstractStream stream){
        this.stream = stream;
    }
    public String read() throws Exception{
        byte buf[] = stream.readBytes();
        String s = new String(buf);
        return s;
    }
}
public class ImgRead implements IRead<byte[]> {
    AbstractStream stream;
    public ImgRead(AbstractStream stream){
        this.stream = stream;
    }
    public byte[] read() throws Exception{
        return stream.readBytes();
    }
}
这里内部封装自定义流类AbstractStream,它是动态变化的,可以指向本地文件,也可以指向URL文件。
public class AbstractStream {
    protected InputStream in;
    protected int size;
    protected byte[] readBytes() throws Exception{
        byte buf[] = new byte[size];
        in.read(buf);
        return buf;
    }
    public void close() throws Exception{
        in.close();
    }
}
package BridgeModel.Example.ReadFileRight;

import java.io.File;
import java.io.FileInputStream;

/**
 * Created by lenovo on 2017/4/20.
 */
public class NativeStream extends AbstractStream {
    //指向本地文件流
    public NativeStream(String strFile) throws Exception{
        File f = new File(strFile);
        size = (int)f.length();
        in = new FileInputStream(f);
    }
}
package BridgeModel.Example.ReadFileRight;

import java.net.HttpURLConnection;
import java.net.URL;

/**
 * Created by lenovo on 2017/4/20.
 */
public class URLStream extends AbstractStream {
    //指向URL文件流
    public URLStream(String strFile) throws Exception{
        URL url = new URL(strFile);
        in = url.openStream();
        HttpURLConnection urlcon = (HttpURLConnection)url.openConnection();
        size = urlcon.getContentLength();
    }
}
3)抽象事物类
public class AbstractThing {
    IRead read;
    public AbstractThing(IRead read){
        this.read = read;
    }
    Object read() throws Exception{
        return read.read();
    }
}
4)具体事物类
package BridgeModel.Example.ReadFileRight;

/**
 * Created by lenovo on 2017/4/20.
 */
public class NativeFile extends AbstractThing {
    public NativeFile(IRead read){
        super(read);
    }

}
public class URLFile extends AbstractThing {
    IRead read;
    public URLFile(IRead read){
        super(read);
    }
}
5)简单测试代码(record.txt自己随便写吧哈哈)
package BridgeModel.Example.ReadFileRight;

/**
 * Created by lenovo on 2017/4/20.
 */
public class Test {
    public static void main(String[] args) throws Exception{
        AbstractStream in = new NativeStream("record.txt");
        TextRead textRead = new TextRead(in);
        AbstractThing thing = new NativeFile(textRead);
        String s = (String)thing.read();
        in.close();
        System.out.println(s);
    }
}