引子
到目前为止,我们已经学了网络并发编程的2个套路, 多进程,多线程,这哥俩的优势和劣势都非常的明显,我们一起来回顾下
协程
协程,又称微线程,纤程。英文名Coroutine。一句话说明什么是线程:协程是一种用户态的轻量级线程。
协程拥有自己的寄存器上下文和栈。协程调度切换时,将寄存器上下文和栈保存到其他地方,在切回来的时候,恢复先前保存的寄存器上下文和栈。因此:
协程能保留上一次调用时的状态(即所有局部状态的一个特定组合),每次过程重入时,就相当于进入上一次调用的状态,换种说法:进入上一次离开时所处逻辑流的位置。
协程的好处:
- 无需线程上下文切换的开销
- 无需原子操作锁定及同步的开销
- "原子操作(atomic operation)是不需要synchronized",所谓原子操作是指不会被线程调度机制打断的操作;这种操作一旦开始,就一直运行到结束,中间不会有任何 context switch (切换到另一个线程)。原子操作可以是一个步骤,也可以是多个操作步骤,但是其顺序是不可以被打乱,或者切割掉只执行部分。视作整体是原子性的核心。
- 方便切换控制流,简化编程模型
- 高并发+高扩展性+低成本:一个CPU支持上万的协程都不是问题。所以很适合用于高并发处理。
缺点:
- 无法利用多核资源:协程的本质是个单线程,它不能同时将 单个CPU 的多个核用上,协程需要和进程配合才能运行在多CPU上.当然我们日常所编写的绝大部分应用都没有这个必要,除非是cpu密集型应用。
- 进行阻塞(Blocking)操作(如IO时)会阻塞掉整个程序
什么是协程
- 必须在只有一个单线程里实现并发
- 修改共享数据不需加锁
- 用户程序里自己保存多个控制流的上下文栈
- 一个协程遇到IO操作自动切换到其它协程
import time import queue def consumer(name): print("--->starting eating baozi...") while True: new_baozi = yield print("[%s] is eating baozi %s" % (name, new_baozi)) time.sleep(1) #此处类似于IO输出,就会出现卡顿 def producer(): r = con.__next__() r = con2.__next__() n = 0 while n < 5000: n += 1 con.send(n) con2.send(n) print("�33[32;1m[producer]�33[0m is making baozi %s" % n) if __name__ == '__main__': con = consumer("c1") con2 = consumer("c2") p = producer()
Greenlet
greenlet是一个用C实现的协程模块,相比与python自带的yield,它可以使你在任意函数之间随意切换,而不需把这个函数先声明为generator
from greenlet import greenlet
def test1():
    print(12)
    gr2.switch()
    print(34)
    gr2.switch()
def test2():
    print(56)
    gr1.switch()
    print(78)
gr1 = greenlet(test1)     #相当于启动一个协程
gr2 = greenlet(test2)
gr1.switch()
gr2.switch()              #如果此时再执行的话,test2已经在最后,所以无法再执行,(协程会自动保存上下文)
from greenlet import greenlet
import time
def test1():
    print(12)
    time.sleep(1)      #并没有结果阻塞
    gr2.switch()
    print(34)
    gr2.switch()
def test2():
    print(56)
    gr1.switch()
    print(78)
gr1 = greenlet(test1)     #相当于启动一个协程
gr2 = greenlet(test2)
gr1.switch()
gr2.switch()              #如果此再执行的话,test2已经在最后,所以无法再执行,(协程会自动保存上下文)
感觉确实用着比generator还简单了呢,但好像还没有解决一个问题,就是遇到IO操作,自动切换,对不对?
那么,接下来就引入一个模块
Gevent
Gevent 是一个第三方库,可以轻松通过gevent实现并发同步或异步编程,在gevent中用到的主要模式是Greenlet, 它是以C扩展模块形式接入Python的轻量级协程。 Greenlet全部运行在主程序操作系统进程的内部,但它们被协作式地调度。
#实现IO切换 import gevent def func1(): print('�33[31;1m李闯在跟海涛搞�33[0m') gevent.sleep(2) print('�33[31;1m李闯又回去跟继续跟海涛搞...�33[0m') def func2(): print('�33[32;1m李闯切换到了跟海龙搞...�33[0m') gevent.sleep(1) print('�33[32;1m李闯搞完了海涛,回来继续跟海龙搞...�33[0m') def func3(): print(3333) gevent.sleep(1) print(44444) gevent.joinall([gevent.spawn(func1),gevent.spawn(func2),gevent.spawn(func3)]) #生成一个协程
输出结果:
李闯在跟海涛搞
李闯切换到了跟海龙搞...
3333
李闯搞完了海涛,回来继续跟海龙搞...
44444
李闯又回去跟继续跟海涛搞...
同步与异步的性能区别
import gevent
def task(pid):
    """
    Some non-deterministic task
    """
    gevent.sleep(0.5)
    print('Task %s done' % pid)
def synchronous():
    for i in range(1, 10):
        task(i)
def asynchronous():
    threads = [gevent.spawn(task, i) for i in range(10)]
    # threads = []
    # for i in range(10)
    #     threads.append(gevent.spawn(task,i))     与上面执行结果一致
    gevent.joinall(threads)
print('Synchronous:')
synchronous()
print('Asynchronous:')
asynchronous()
上面程序的重要部分是将task函数封装到Greenlet内部线程的gevent.spawn。 初始化的greenlet列表存放在数组threads中,此数组被传给gevent.joinall 函数,后者阻塞当前流程,并执行所有给定的greenlet。执行流程只会在 所有greenlet执行完后才会继续向下走。
网页爬虫,遇到阻塞,自动切换
import gevent
from gevent import monkey
monkey.patch_all()
from  urllib.request import urlopen      #urllib不支持异步,只能通过monkey这个插件来实现
import time

def pa_web_page(url):
    print("GET url",url)
    req = urlopen(url)
    data =req.read()
    print(data)
    print('%d bytes received from %s.' % (len(data), url))

t_start = time.time()
pa_web_page("http://www.autohome.com.cn/beijing/")
pa_web_page("http://www.xiaohuar.com/")
print("time cost:",time.time()-t_start)

t2_start = time.time()
gevent.joinall([
        #gevent.spawn(pa_web_page, 'https://www.python.org/'),
        gevent.spawn(pa_web_page, 'http://www.autohome.com.cn/beijing/'),
        gevent.spawn(pa_web_page, 'http://www.xiaohuar.com/'),
        #gevent.spawn(pa_web_page, 'https://github.com/'),
])
print("time cost t2:",time.time()-t2_start)
通过gevent实现单线程下的多socket并发
server side
import sys
import socket
import time
import gevent
from gevent import socket, monkey
monkey.patch_all()
def server(port):
    s = socket.socket()
    s.bind(('0.0.0.0', port))
    s.listen(500)
    while True:
        cli, addr = s.accept()
        gevent.spawn(handle_request, cli)
def handle_request(conn):
    try:
        while True:
            data = conn.recv(1024)
            print("recv:", data)
            conn.send(data)
            if not data:
                conn.shutdown(socket.SHUT_WR)
    except Exception as  ex:
        print(ex)
    finally:
        conn.close()
if __name__ == '__main__':
    server(8001)
client side
import socket
import threading

def sock_conn():

    client = socket.socket()

    client.connect(("localhost",8001))
    count = 0
    while True:
        #msg = input(">>:").strip()
        #if len(msg) == 0:continue
        client.send( ("hello %s" %count).encode("utf-8"))

        data = client.recv(1024)

        print("[%s]recv from server:" % threading.get_ident(),data.decode()) #结果
        count +=1
    client.close()


for i in range(100):
    t = threading.Thread(target=sock_conn)
    t.start()
论事件驱动与异步IO
看图说话讲事件驱动模型
在UI编程中,常常要对鼠标点击进行相应,首先如何获得鼠标点击呢?
方式一:创建一个线程,该线程一直循环检测是否有鼠标点击,那么这个方式有以下几个缺点:
1. CPU资源浪费,可能鼠标点击的频率非常小,但是扫描线程还是会一直循环检测,这会造成很多的CPU资源浪费;如果扫描鼠标点击的接口是阻塞的呢?
2. 如果是堵塞的,又会出现下面这样的问题,如果我们不但要扫描鼠标点击,还要扫描键盘是否按下,由于扫描鼠标时被堵塞了,那么可能永远不会去扫描键盘;
3. 如果一个循环需要扫描的设备非常多,这又会引来响应时间的问题;
所以,该方式是非常不好的。
方式二:就是事件驱动模型
目前大部分的UI编程都是事件驱动模型,如很多UI平台都会提供onClick()事件,这个事件就代表鼠标按下事件。事件驱动模型大体思路如下:
1. 有一个事件(消息)队列;
2. 鼠标按下时,往这个队列中增加一个点击事件(消息);
3. 有个循环,不断从队列取出事件,根据不同的事件,调用不同的函数,如onClick()、onKeyDown()等;
4. 事件(消息)一般都各自保存各自的处理函数指针,这样,每个消息都有独立的处理函数;

事件驱动编程是一种编程范式,这里程序的执行流由外部事件来决定。它的特点是包含一个事件循环,当外部事件发生时使用回调机制来触发相应的处理。另外两种常见的编程范式是(单线程)同步以及多线程编程。
让我们用例子来比较和对比一下单线程、多线程以及事件驱动编程模型。下图展示了随着时间的推移,这三种模式下程序所做的工作。这个程序有3个任务需要完成,每个任务都在等待I/O操作时阻塞自身。阻塞在I/O操作上所花费的时间已经用灰色框标示出来了。
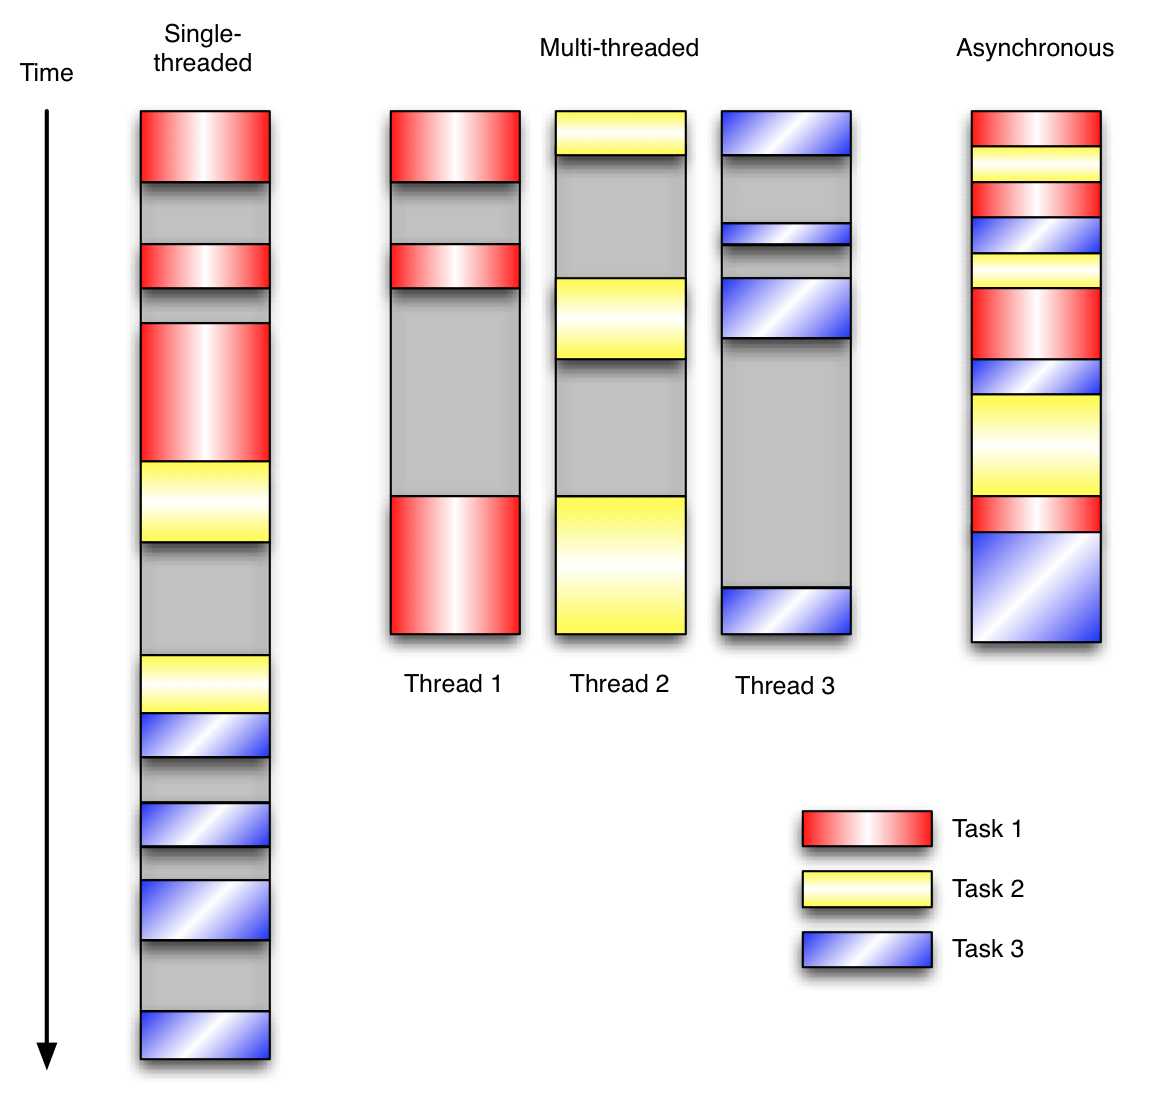
在单线程同步模型中,任务按照顺序执行。如果某个任务因为I/O而阻塞,其他所有的任务都必须等待,直到它完成之后它们才能依次执行。这种明确的执行顺序和串行化处理的行为是很容易推断得出的。如果任务之间并没有互相依赖的关系,但仍然需要互相等待的话这就使得程序不必要的降低了运行速度。
在多线程版本中,这3个任务分别在独立的线程中执行。这些线程由操作系统来管理,在多处理器系统上可以并行处理,或者在单处理器系统上交错执行。这使得当某个线程阻塞在某个资源的同时其他线程得以继续执行。与完成类似功能的同步程序相比,这种方式更有效率,但程序员必须写代码来保护共享资源,防止其被多个线程同时访问。多线程程序更加难以推断,因为这类程序不得不通过线程同步机制如锁、可重入函数、线程局部存储或者其他机制来处理线程安全问题,如果实现不当就会导致出现微妙且令人痛不欲生的bug。
在事件驱动版本的程序中,3个任务交错执行,但仍然在一个单独的线程控制中。当处理I/O或者其他昂贵的操作时,注册一个回调到事件循环中,然后当I/O操作完成时继续执行。回调描述了该如何处理某个事件。事件循环轮询所有的事件,当事件到来时将它们分配给等待处理事件的回调函数。这种方式让程序尽可能的得以执行而不需要用到额外的线程。事件驱动型程序比多线程程序更容易推断出行为,因为程序员不需要关心线程安全问题。
当我们面对如下的环境时,事件驱动模型通常是一个好的选择:
- 程序中有许多任务,而且…
- 任务之间高度独立(因此它们不需要互相通信,或者等待彼此)而且…
- 在等待事件到来时,某些任务会阻塞。
当应用程序需要在任务间共享可变的数据时,这也是一个不错的选择,因为这里不需要采用同步处理。
网络应用程序通常都有上述这些特点,这使得它们能够很好的契合事件驱动编程模型。
此处要提出一个问题,就是,上面的事件驱动模型中,只要一遇到IO就注册一个事件,然后主程序就可以继续干其它的事情了,只到io处理完毕后,继续恢复之前中断的任务,这本质上是怎么实现的呢?哈哈,下面我们就来一起揭开这神秘的面纱。。。。
同步IO和异步IO,阻塞IO和非阻塞IO分别是什么,到底有什么区别?不同的人在不同的上下文下给出的答案是不同的。所以先限定一下本文的上下文。
本文讨论的背景是Linux环境下的network IO。一 概念说明
在进行解释之前,首先要说明几个概念: - 用户空间和内核空间 - 进程切换 - 进程的阻塞 - 文件描述符 - 缓存 I/O
用户空间与内核空间
现在操作系统都是采用虚拟存储器,那么对32位操作系统而言,它的寻址空间(虚拟存储空间)为4G(2的32次方)。操作系统的核心是内核,独立于普通的应用程序,可以访问受保护的内存空间,也有访问底层硬件设备的所有权限。为了保证用户进程不能直接操作内核(kernel),保证内核的安全,操心系统将虚拟空间划分为两部分,一部分为内核空间,一部分为用户空间。针对linux操作系统而言,将最高的1G字节(从虚拟地址0xC0000000到0xFFFFFFFF),供内核使用,称为内核空间,而将较低的3G字节(从虚拟地址0x00000000到0xBFFFFFFF),供各个进程使用,称为用户空间。
进程切换
为了控制进程的执行,内核必须有能力挂起正在CPU上运行的进程,并恢复以前挂起的某个进程的执行。这种行为被称为进程切换。因此可以说,任何进程都是在操作系统内核的支持下运行的,是与内核紧密相关的。
从一个进程的运行转到另一个进程上运行,这个过程中经过下面这些变化: 1. 保存处理机上下文,包括程序计数器和其他寄存器。 2. 更新PCB信息。
3. 把进程的PCB移入相应的队列,如就绪、在某事件阻塞等队列。 4. 选择另一个进程执行,并更新其PCB。 5. 更新内存管理的数据结构。 6. 恢复处理机上下文。
总而言之就是很耗资源,具体的可以参考这篇文章:进程切换
注:进程控制块(Processing Control Block),是操作系统核心中一种数据结构,主要表示进程状态。其作用是使一个在多道程序环境下不能独立运行的程序(含数据),成为一个能独立运行的基本单位或与其它进程并发执行的进程。或者说,OS是根据PCB来对并发执行的进程进行控制和管理的。 PCB通常是系统内存占用区中的一个连续存区,它存放着操作系统用于描述进程情况及控制进程运行所需的全部信息
进程的阻塞
正在执行的进程,由于期待的某些事件未发生,如请求系统资源失败、等待某种操作的完成、新数据尚未到达或无新工作做等,则由系统自动执行阻塞原语(Block),使自己由运行状态变为阻塞状态。可见,进程的阻塞是进程自身的一种主动行为,也因此只有处于运行态的进程(获得CPU),才可能将其转为阻塞状态。当进程进入阻塞状态,是不占用CPU资源的。
文件描述符fd
文件描述符(File descriptor)是计算机科学中的一个术语,是一个用于表述指向文件的引用的抽象化概念。
文件描述符在形式上是一个非负整数。实际上,它是一个索引值,指向内核为每一个进程所维护的该进程打开文件的记录表。当程序打开一个现有文件或者创建一个新文件时,内核向进程返回一个文件描述符。在程序设计中,一些涉及底层的程序编写往往会围绕着文件描述符展开。但是文件描述符这一概念往往只适用于UNIX、Linux这样的操作系统。
缓存 I/O
缓存 I/O 又被称作标准 I/O,大多数文件系统的默认 I/O 操作都是缓存 I/O。在 Linux 的缓存 I/O 机制中,操作系统会将 I/O 的数据缓存在文件系统的页缓存( page cache )中,也就是说,数据会先被拷贝到操作系统内核的缓冲区中,然后才会从操作系统内核的缓冲区拷贝到应用程序的地址空间。
缓存 I/O 的缺点: 数据在传输过程中需要在应用程序地址空间和内核进行多次数据拷贝操作,这些数据拷贝操作所带来的 CPU 以及内存开销是非常大的。
二 IO模式
刚才说了,对于一次IO访问(以read举例),数据会先被拷贝到操作系统内核的缓冲区中,然后才会从操作系统内核的缓冲区拷贝到应用程序的地址空间。所以说,当一个read操作发生时,它会经历两个阶段: 1. 等待数据准备 (Waiting for the data to be ready) 2. 将数据从内核拷贝到进程中 (Copying the data from the kernel to the process)
正式因为这两个阶段,linux系统产生了下面五种网络模式的方案。 - 阻塞 I/O(blocking IO) - 非阻塞 I/O(nonblocking IO) - I/O 多路复用( IO multiplexing) - 信号驱动 I/O( signal driven IO) - 异步 I/O(asynchronous IO)
注:由于signal driven IO在实际中并不常用,所以我这只提及剩下的四种IO Model。
阻塞 I/O(blocking IO)
在linux中,默认情况下所有的socket都是blocking,一个典型的读操作流程大概是这样:

当用户进程调用了recvfrom这个系统调用,kernel就开始了IO的第一个阶段:准备数据(对于网络IO来说,很多时候数据在一开始还没有到达。比如,还没有收到一个完整的UDP包。这个时候kernel就要等待足够的数据到来)。这个过程需要等待,也就是说数据被拷贝到操作系统内核的缓冲区中是需要一个过程的。而在用户进程这边,整个进程会被阻塞(当然,是进程自己选择的阻塞)。当kernel一直等到数据准备好了,它就会将数据从kernel中拷贝到用户内存,然后kernel返回结果,用户进程才解除block的状态,重新运行起来。
所以,blocking IO的特点就是在IO执行的两个阶段都被block了。
非阻塞 I/O(nonblocking IO)
linux下,可以通过设置socket使其变为non-blocking。当对一个non-blocking socket执行读操作时,流程是这个样子:

当用户进程发出read操作时,如果kernel中的数据还没有准备好,那么它并不会block用户进程,而是立刻返回一个error。从用户进程角度讲 ,它发起一个read操作后,并不需要等待,而是马上就得到了一个结果。用户进程判断结果是一个error时,它就知道数据还没有准备好,于是它可以再次发送read操作。一旦kernel中的数据准备好了,并且又再次收到了用户进程的system call,那么它马上就将数据拷贝到了用户内存,然后返回。
所以,nonblocking IO的特点是用户进程需要不断的主动询问kernel数据好了没有。
I/O 多路复用( IO multiplexing)
IO multiplexing就是我们说的select,poll,epoll,有些地方也称这种IO方式为event driven IO。select/epoll的好处就在于单个process就可以同时处理多个网络连接的IO。它的基本原理就是select,poll,epoll这个function会不断的轮询所负责的所有socket,当某个socket有数据到达了,就通知用户进程。

当用户进程调用了select,那么整个进程会被block,而同时,kernel会“监视”所有select负责的socket,当任何一个socket中的数据准备好了,select就会返回。这个时候用户进程再调用read操作,将数据从kernel拷贝到用户进程。
所以,I/O 多路复用的特点是通过一种机制一个进程能同时等待多个文件描述符,而这些文件描述符(套接字描述符)其中的任意一个进入读就绪状态,select()函数就可以返回。
这个图和blocking IO的图其实并没有太大的不同,事实上,还更差一些。因为这里需要使用两个system call (select 和 recvfrom),而blocking IO只调用了一个system call (recvfrom)。但是,用select的优势在于它可以同时处理多个connection。
所以,如果处理的连接数不是很高的话,使用select/epoll的web server不一定比使用multi-threading + blocking IO的web server性能更好,可能延迟还更大。select/epoll的优势并不是对于单个连接能处理得更快,而是在于能处理更多的连接。)
在IO multiplexing Model中,实际中,对于每一个socket,一般都设置成为non-blocking,但是,如上图所示,整个用户的process其实是一直被block的。只不过process是被select这个函数block,而不是被socket IO给block。
异步 I/O(asynchronous IO)
inux下的asynchronous IO其实用得很少。先看一下它的流程:

用户进程发起read操作之后,立刻就可以开始去做其它的事。而另一方面,从kernel的角度,当它受到一个asynchronous read之后,首先它会立刻返回,所以不会对用户进程产生任何block。然后,kernel会等待数据准备完成,然后将数据拷贝到用户内存,当这一切都完成之后,kernel会给用户进程发送一个signal,告诉它read操作完成了。
总结
blocking和non-blocking的区别
调用blocking IO会一直block住对应的进程直到操作完成,而non-blocking IO在kernel还准备数据的情况下会立刻返回。
synchronous IO和asynchronous IO的区别
在说明synchronous IO和asynchronous IO的区别之前,需要先给出两者的定义。POSIX的定义是这样子的: - A synchronous I/O operation causes the requesting process to be blocked until that I/O operation completes; - An asynchronous I/O operation does not cause the requesting process to be blocked;
两者的区别就在于synchronous IO做”IO operation”的时候会将process阻塞。按照这个定义,之前所述的blocking IO,non-blocking IO,IO multiplexing都属于synchronous IO。
有人会说,non-blocking IO并没有被block啊。这里有个非常“狡猾”的地方,定义中所指的”IO operation”是指真实的IO操作,就是例子中的recvfrom这个system call。non-blocking IO在执行recvfrom这个system call的时候,如果kernel的数据没有准备好,这时候不会block进程。但是,当kernel中数据准备好的时候,recvfrom会将数据从kernel拷贝到用户内存中,这个时候进程是被block了,在这段时间内,进程是被block的。
而asynchronous IO则不一样,当进程发起IO 操作之后,就直接返回再也不理睬了,直到kernel发送一个信号,告诉进程说IO完成。在这整个过程中,进程完全没有被block。
各个IO Model的比较如图所示:

通过上面的图片,可以发现non-blocking IO和asynchronous IO的区别还是很明显的。在non-blocking IO中,虽然进程大部分时间都不会被block,但是它仍然要求进程去主动的check,并且当数据准备完成以后,也需要进程主动的再次调用recvfrom来将数据拷贝到用户内存。而asynchronous IO则完全不同。它就像是用户进程将整个IO操作交给了他人(kernel)完成,然后他人做完后发信号通知。在此期间,用户进程不需要去检查IO操作的状态,也不需要主动的去拷贝数据。
通过一个select例子来了解一下,select 是如何通过单进程实现同时处理多个非阻塞的socket连接的
socket_server
import socket
import select
import queue
server = socket.socket()
server.bind(('localhost',9999))
server.listen(5)
server.setblocking(0)    #非阻塞,reve时不卡

inputs = [server]    #让select帮我检测server这个对面 ,如果活跃,表示有链接
msg_queues = {}
outputs = []
while True:
    r_list,w_list,exception_list = select.select(inputs,outputs,inputs) #
    #r_list只要有数据,就是就绪的
    for s in r_list:
        if s is server:     #新连接来了
            conn,addr = s.accept()
            print('got new conn',conn,addr)
            inputs.append(conn)
            msg_queues[conn] = queue.Queue()     #初始化队列,将
        else:
            try:
                data = s.recv(1024)
                print('recv data from [%s]:[%s]'%(s.getpeername(),data.decode()))#此处getpeername是获取ip和端口
                msg_queues[s].put(data)
                if s not in outputs:
                    outputs.append(s)    #等下次select的时候,确保w_list的数据返回给客户端
            except ConnectionResetError as e:               #当连接出问题了,从select里清空这个socket对象
                print('conn closed.',s.getpeername(),e)
                inputs.remove(s)
                if s in outputs:
                    outputs.remove(s)
                del msg_queues[s]
    for s in w_list:
        try:
            data = msg_queues[s].get_nowait()
            s.send(data.upper())
        except queue.Empty as e:
            outputs.remove(s)
soclet_client
import socket

HOST = 'localhost'  # The remote host
PORT = 9999  # The same port as used by the server
s = socket.socket(socket.AF_INET, socket.SOCK_STREAM)
s.connect((HOST, PORT))
while True:
    msg = bytes(input(">>:"), encoding="utf8")
    s.sendall(msg)
    data = s.recv(1024)
    # print(data)

    print('Received', repr(data))
s.close()
select()方法接收并监控3个通信列表, 第一个是所有的输入的data,就是指外部发过来的数据,第2个是监控和接收所有要发出去的data(outgoing data),第3个监控错误信息,接下来我们需要创建2个列表来包含输入和输出信息来传给select().
# Sockets from which we expect to read
inputs = [ server ]

# Sockets to which we expect to write
outputs = [ ]
所有客户端的进来的连接和数据将会被server的主循环程序放在上面的list中处理,我们现在的server端需要等待连接可写(writable)之后才能过来,然后接收数据并返回(因此不是在接收到数据之后就立刻返回),因为每个连接要把输入或输出的数据先缓存到queue里,然后再由select取出来再发出去。
Connections are added to and removed from these lists by the server main loop. Since this version of the server is going to wait for a socket to become writable before sending any data (instead of immediately sending the reply), each output connection needs a queue to act as a buffer for the data to be sent through it.
# Outgoing message queues (socket:Queue)
message_queues = {}
The main portion of the server program loops, calling select() to block and wait for network activity.
下面是此程序的主循环,调用select()时会阻塞和等待直到新的连接和数据进来
while inputs:

    # Wait for at least one of the sockets to be ready for processing
    print >>sys.stderr, '
waiting for the next event'
    readable, writable, exceptional = select.select(inputs, outputs, inputs)
当你把inputs,outputs,exceptional(这里跟inputs共用)传给select()后,它返回3个新的list,我们上面将他们分别赋值为readable,writable,exceptional, 所有在readable list中的socket连接代表有数据可接收(recv),所有在writable list中的存放着你可以对其进行发送(send)操作的socket连接,当连接通信出现error时会把error写到exceptional列表中。
select() returns three new lists, containing subsets of the contents of the lists passed in. All of the sockets in the readable list have incoming data buffered and available to be read. All of the sockets in the writable list have free space in their buffer and can be written to. The sockets returned in exceptional have had an error (the actual definition of “exceptional condition” depends on the platform).
Readable list 中的socket 可以有3种可能状态,第一种是如果这个socket是main "server" socket,它负责监听客户端的连接,如果这个main server socket出现在readable里,那代表这是server端已经ready来接收一个新的连接进来了,为了让这个main server能同时处理多个连接,在下面的代码里,我们把这个main server的socket设置为非阻塞模式。
The “readable” sockets represent three possible cases. If the socket is the main “server” socket, the one being used to listen for connections, then the “readable” condition means it is ready to accept another incoming connection. In addition to adding the new connection to the list of inputs to monitor, this section sets the client socket to not block.
第二种情况是这个socket是已经建立了的连接,它把数据发了过来,这个时候你就可以通过recv()来接收它发过来的数据,然后把接收到的数据放到queue里,这样你就可以把接收到的数据再传回给客户端了。
The next case is an established connection with a client that has sent data. The data is read with recv(), then placed on the queue so it can be sent through the socket and back to the client.
第三种情况就是这个客户端已经断开了,所以你再通过recv()接收到的数据就为空了,所以这个时候你就可以把这个跟客户端的连接关闭了。
A readable socket without data available is from a client that has disconnected, and the stream is ready to be closed.
对于writable list中的socket,也有几种状态,如果这个客户端连接在跟它对应的queue里有数据,就把这个数据取出来再发回给这个客户端,否则就把这个连接从output list中移除,这样下一次循环select()调用时检测到outputs list中没有这个连接,那就会认为这个连接还处于非活动状态
There are fewer cases for the writable connections. If there is data in the queue for a connection, the next message is sent. Otherwise, the connection is removed from the list of output connections so that the next time through the loop select() does not indicate that the socket is ready to send data.
最后,如果在跟某个socket连接通信过程中出了错误,就把这个连接对象在inputsoutputsmessage_queue中都删除,再把连接关闭掉
selectors模块
import selectors
import socket
sel = selectors.DefaultSelector()
def accept(sock, mask):
    conn, addr = sock.accept()  # Should be ready
    print('accepted', conn, 'from', addr)
    conn.setblocking(False)
    sel.register(conn, selectors.EVENT_READ, read)

def read(conn, mask):
    data = conn.recv(1000)  # Should be ready
    if data:
        print('echoing', repr(data), 'to', conn)
        conn.send(data)  # Hope it won't block
    else:
        print('closing', conn)
        sel.unregister(conn)
        conn.close()

sock = socket.socket()
sock.bind(('localhost', 10000))
sock.listen(100)
sock.setblocking(False)
sel.register(sock, selectors.EVENT_READ, accept)

while True:
    events = sel.select()
    for key, mask in events:
        callback = key.data
        callback(key.fileobj, mask)
RabbitMQ队列
一.先安装erlang
1.去erlang官网或百度云盘下载安装包
2.解压 unzip otp-OTP-19.1.zip 到/ 目录下
3.安装依赖环境
yum install -y gcc* ncurses-devel openssl-devel unixODBC-devel (Java编译器,有问题再安装)
4.cd /otp-OTP-19.1
export ERL_TOP = 'pwd'
./configure (我的包是在github上下载的,需先执行./otp_build autoconf产生一个configure脚本,再执行./configure)
make
make install
5.测试是否安装成功
[root@bogon ~]#erl
Erlang/OTP 19 [erts-8.1] [source] [64-bit] [async-threads:10] [hipe] [kernel-poll:false]
Eshell V8.1 (abort with ^G)
1> EvenN = lists:filter (fun (N) -> N rem 2 == 0 end, lists:seq(1,100)).
输出:[2,4,6,8,10,12,14,16,18,20,22,24,26,28,30,32,34,36,38,40,42,
44,46,48,50,52,54,56,58|...]
有几种退出Erlang Shell的方法
快捷键方式1:Control+C 然后选a 快捷键方式2:Control+G 然后按q
二、安装rabbitmq
1.下载安装包
去官网或我的分享百度网盘,我下载的是rpm包
2.rpm -ivh --nodeps rabbitmq-server-3.6.5-1.noarch.rpm
3.RPM安装的,启动控制台插件就可以了
cd /usr/lib/rabbimq/bin
./rabbitmq-server –detached 后台启动
./rabbitmqctl status查看状态
./rabbitmqctl stop关闭服务
4.安装web监控界面
启动 控制台插件
1. ./rabbitmq-plugins enable rabbitmq_management
2.然后新建一个用户:
新建用户:./rabbitmqctl add_user 用户名 密码
删除用户: rabbitmqctl delete_user 用户名
改密码: ./rabbimqctl change_password {username} {newpassword}
设置用户角色:./rabbitmqctl set_user_tags {username} {tag ...}
Tag可以为 administrator,monitoring, management
3.重启服务
cd /usr/lib/rabbimq/bin
./rabbitmqctl stop关闭服务
./rabbitmq-server –detached 后台启动
./rabbitmqctl status查看状态
4.关闭防火墙,在浏览器访问192.168.0.107:15672 (ip地址是安装rabbitmq的机器的ip,端口号是固定的15672),输入用户名密码即可。
三、rabbitmq常用命令
./rabbitmq-server start #启动rabbitmq
./rabbitmqctl list_exchanges
./rabbitmqctl list_bindings
./rabbitmqctl list_queues #分别查看当前系统种存在的Exchange和Exchange上绑定的Queue信息。
./rabbitmqctl status #查看运行信息
./rabbitmqctl stop #停止运行rabbitmq
./rabbitmq-plugins enable rabbitmq_management
实现最简单的队列通信

rabbitmq中文文档
http://rabbitmq.mr-ping.com/
收消息端
import pika
username = 'lwq'
pwd = '111111'
user_pwd = pika.PlainCredentials(username, pwd)
connection = pika.BlockingConnection(pika.ConnectionParameters('192.168.1.15',credentials=user_pwd))
channel = connection.channel()
channel.queue_declare(queue='hello')
def callback(ch,method,properties,body):
    print(ch,method,properties)
    print("[x] Received %r" %body)

channel.basic_consume (callback,queue='hello',no_ack=True)
print('[*] Waiting for message . To exit press ')
channel.start_consuming()
发消息端
import pika
username = 'lwq'
pwd = '111111'
user_pwd = pika.PlainCredentials(username, pwd)
connection = pika.BlockingConnection(pika.ConnectionParameters('192.168.1.15',credentials=user_pwd))
#声明
channel = connection.channel()
channel.queue_declare(queue='hello')
channel.basic_public(exchange='',routing_key='hello',body='Hello World')
print("[X] Sent 'hello world'")
Work Queues
在这种模式下,RabbitMQ会默认把p发的消息依次分发给各个消费者(c),跟负载均衡差不多
import pika
import time
connection = pika.BlockingConnection(pika.ConnectionParameters(
    'localhost'))
channel = connection.channel()
# 声明queue
channel.queue_declare(queue='task_queue')
# n RabbitMQ a message can never be sent directly to the queue, it always needs to go through an exchange.
import sys
message = ' '.join(sys.argv[1:]) or "Hello World! %s" % time.time()
channel.basic_publish(exchange='',
                      routing_key='task_queue',
                      body=message,
                      properties=pika.BasicProperties(
                          delivery_mode=2,  # make message persistent
                      )
                      )
print(" [x] Sent %r" % message)
connection.close()
消费者代码
|
1
2
3
4
5
6
7
8
9
10
11
12
13
14
15
16
17
18
19
20
21
22
23
24
|
#_*_coding:utf-8_*_import pika, timeconnection = pika.BlockingConnection(pika.ConnectionParameters( 'localhost'))channel = connection.channel()def callback(ch, method, properties, body): print(" [x] Received %r" % body) time.sleep(20) print(" [x] Done") print("method.delivery_tag",method.delivery_tag) ch.basic_ack(delivery_tag=method.delivery_tag)channel.basic_consume(callback, queue='task_queue', no_ack=True )print(' [*] Waiting for messages. To exit press CTRL+C')channel.start_consuming() |
此时,先启动消息生产者,然后再分别启动3个消费者,通过生产者多发送几条消息,你会发现,这几条消息会被依次分配到各个消费者身上
Doing a task can take a few seconds. You may wonder what happens if one of the consumers starts a long task and dies with it only partly done. With our current code once RabbitMQ delivers message to the customer it immediately removes it from memory. In this case, if you kill a worker we will lose the message it was just processing. We'll also lose all the messages that were dispatched to this particular worker but were not yet handled.
But we don't want to lose any tasks. If a worker dies, we'd like the task to be delivered to another worker.
In order to make sure a message is never lost, RabbitMQ supports message acknowledgments. An ack(nowledgement) is sent back from the consumer to tell RabbitMQ that a particular message had been received, processed and that RabbitMQ is free to delete it.
If a consumer dies (its channel is closed, connection is closed, or TCP connection is lost) without sending an ack, RabbitMQ will understand that a message wasn't processed fully and will re-queue it. If there are other consumers online at the same time, it will then quickly redeliver it to another consumer. That way you can be sure that no message is lost, even if the workers occasionally die.
There aren't any message timeouts; RabbitMQ will redeliver the message when the consumer dies. It's fine even if processing a message takes a very, very long time.
Message acknowledgments are turned on by default. In previous examples we explicitly turned them off via the no_ack=True flag. It's time to remove this flag and send a proper acknowledgment from the worker, once we're done with a task.
|
1
2
3
4
5
6
7
8
|
def callback(ch, method, properties, body): print " [x] Received %r" % (body,) time.sleep( body.count('.') ) print " [x] Done" ch.basic_ack(delivery_tag = method.delivery_tag)channel.basic_consume(callback, queue='hello') |
Using this code we can be sure that even if you kill a worker using CTRL+C while it was processing a message, nothing will be lost. Soon after the worker dies all unacknowledged messages will be redelivered
消息持久化
We have learned how to make sure that even if the consumer dies, the task isn't lost(by default, if wanna disable use no_ack=True). But our tasks will still be lost if RabbitMQ server stops.
When RabbitMQ quits or crashes it will forget the queues and messages unless you tell it not to. Two things are required to make sure that messages aren't lost: we need to mark both the queue and messages as durable.
First, we need to make sure that RabbitMQ will never lose our queue. In order to do so, we need to declare it as durable:
|
1
|
channel.queue_declare(queue='hello', durable=True) |
Although this command is correct by itself, it won't work in our setup. That's because we've already defined a queue called hello which is not durable. RabbitMQ doesn't allow you to redefine an existing queue with different parameters and will return an error to any program that tries to do that. But there is a quick workaround - let's declare a queue with different name, for exampletask_queue:
|
1
|
channel.queue_declare(queue='task_queue', durable=True) |
This queue_declare change needs to be applied to both the producer and consumer code.
At that point we're sure that the task_queue queue won't be lost even if RabbitMQ restarts. Now we need to mark our messages as persistent - by supplying a delivery_mode property with a value 2.
|
1
2
3
4
5
6
|
channel.basic_publish(exchange='', routing_key="task_queue", body=message, properties=pika.BasicProperties( delivery_mode = 2, # make message persistent )) |
消息公平分发
如果Rabbit只管按顺序把消息发到各个消费者身上,不考虑消费者负载的话,很可能出现,一个机器配置不高的消费者那里堆积了很多消息处理不完,同时配置高的消费者却一直很轻松。为解决此问题,可以在各个消费者端,配置perfetch=1,意思就是告诉RabbitMQ在我这个消费者当前消息还没处理完的时候就不要再给我发新消息了。
|
1
|
channel.basic_qos(prefetch_count=1) |
带消息持久化+公平分发的完整代码
生产者端
import pika

import sys

connection = pika.BlockingConnection(pika.ConnectionParameters(

    host='localhost'))

channel = connection.channel()

channel.queue_declare(queue='task_queue', durable=True)

message = ' '.join(sys.argv[1:]) or "Hello World!"

channel.basic_publish(exchange='',

                      routing_key='task_queue',

                      body=message,

                      properties=pika.BasicProperties(

                          delivery_mode=2,  # make message persistent

                      ))

print(" [x] Sent %r" % message)

connection.close()
消费者端
import pika
import time
connection = pika.BlockingConnection(pika.ConnectionParameters(
    host='localhost'))
channel = connection.channel()
channel.queue_declare(queue='task_queue', durable=True)
print(' [*] Waiting for messages. To exit press CTRL+C')
def callback(ch, method, properties, body):
    print(" [x] Received %r" % body)
    time.sleep(body.count(b'.'))
    print(" [x] Done")
    ch.basic_ack(delivery_tag=method.delivery_tag)
channel.basic_qos(prefetch_count=1)
channel.basic_consume(callback,
                      queue='task_queue')
channel.start_consuming()
PublishSubscribe(消息发布订阅)
之前的例子都基本都是1对1的消息发送和接收,即消息只能发送到指定的queue里,但有些时候你想让你的消息被所有的Queue收到,类似广播的效果,这时候就要用到exchange了,
An exchange is a very simple thing. On one side it receives messages from producers and the other side it pushes them to queues. The exchange must know exactly what to do with a message it receives. Should it be appended to a particular queue? Should it be appended to many queues? Or should it get discarded. The rules for that are defined by the exchange type.
Exchange在定义的时候是有类型的,以决定到底是哪些Queue符合条件,可以接收消息
fanout: 所有bind到此exchange的queue都可以接收消息
direct: 通过routingKey和exchange决定的那个唯一的queue可以接收消息
topic:所有符合routingKey(此时可以是一个表达式)的routingKey所bind的queue可以接收消息
表达式符号说明:#代表一个或多个字符,*代表任何字符
例:#.a会匹配a.a,aa.a,aaa.a等
*.a会匹配a.a,b.a,c.a等
注:使用RoutingKey为#,Exchange Type为topic的时候相当于使用fanout
headers: 通过headers 来决定把消息发给哪些queue

消息publisher
import pika
import sys
credentials = pika.PlainCredentials('alex','alex3714')
connection = pika.BlockingConnection(pika.ConnectionParameters(host='192.168.184.128',credentials=credentials))
channel = connection.channel()
channel.exchange_declare(exchange='log',type='fanout')
message = ' '.join(sys.argv[1:]) or 'info:Hello World!'
channel.basic_public(exchange='log',routing_key='',body=message)
print('[x] Sent %r' %message)
connection.close()
消息subscriber
import pika
credentials = pika.PlainCredentials('alex','alex3714')
connection = pika.BlockingConnection(pika.ConnectionParameters(host='192.168.184.128',credentials=credentials))
channel = connection.channel()
channel.exchange_declare(exchange='log',type='fanout')
result = channel.queue_declare(exclusive=True) #不指定queue名字,rabbit随机分配名字,exclusive会在使用完以后,删除这个queue,
queue_name = result.method.queue
channel.queue_bind(exchange='log',queue=queue_name)
print('[*] Waiting for logs. To exit press CTRL +C')
def callback(ch,method,properties,body):
    print('[x] %r' %body)

channel.basic_consume(callback,queue=queue_name,)
channel.start_consuming()
有选择的接收消息(exchange type=direct)
RabbitMQ还支持根据关键字发送,即:队列绑定关键字,发送者将数据根据关键字发送到消息exchange,exchange根据 关键字 判定应该将数据发送至指定队列。

publisher
import pika

import sys

connection = pika.BlockingConnection(pika.ConnectionParameters(

    host='192.168.184.128'))

channel = connection.channel()

channel.exchange_declare(exchange='direct_logs',

                         type='direct')

severity = sys.argv[1] if len(sys.argv) > 1 else 'info'

message = ' '.join(sys.argv[2:]) or 'Hello World!'

channel.basic_publish(exchange='direct_logs',

                      routing_key=severity,

                      body=message)

print(" [x] Sent %r:%r" % (severity, message))

connection.close()


#发送消息  执行这个py+error  +内容
subscriber
import pika

import sys

connection = pika.BlockingConnection(pika.ConnectionParameters(

    host='192.168.184.128'))

channel = connection.channel()

channel.exchange_declare(exchange='direct_logs',

                         type='direct')

result = channel.queue_declare(exclusive=True)

queue_name = result.method.queue

severities = sys.argv[1:]

if not severities:
    sys.stderr.write("Usage: %s [info] [warning] [error]
" % sys.argv[0])

    sys.exit(1)

for severity in severities:
    channel.queue_bind(exchange='direct_logs',

                       queue=queue_name,

                       routing_key=severity)

print(' [*] Waiting for logs. To exit press CTRL+C')


def callback(ch, method, properties, body):
    print(" [x] %r:%r" % (method.routing_key, body))


channel.basic_consume(callback,

                      queue=queue_name,

                      no_ack=True)

channel.start_consuming()


#执行py+error
更细致的消息过滤
Although using the direct exchange improved our system, it still has limitations - it can't do routing based on multiple criteria.
In our logging system we might want to subscribe to not only logs based on severity, but also based on the source which emitted the log. You might know this concept from the syslog unix tool, which routes logs based on both severity (info/warn/crit...) and facility (auth/cron/kern...).
That would give us a lot of flexibility - we may want to listen to just critical errors coming from 'cron' but also all logs from 'kern'.

publisher
import pika

import sys

connection = pika.BlockingConnection(pika.ConnectionParameters(

    host='localhost'))

channel = connection.channel()

channel.exchange_declare(exchange='topic_logs',

                         type='topic')

routing_key = sys.argv[1] if len(sys.argv) > 1 else 'anonymous.info'

message = ' '.join(sys.argv[2:]) or 'Hello World!'

channel.basic_publish(exchange='topic_logs',

                      routing_key=routing_key,

                      body=message)

print(" [x] Sent %r:%r" % (routing_key, message))

connection.close()
subscriber
import pika

import sys

connection = pika.BlockingConnection(pika.ConnectionParameters(

    host='localhost'))

channel = connection.channel()

channel.exchange_declare(exchange='topic_logs',

                         type='topic')

result = channel.queue_declare(exclusive=True)

queue_name = result.method.queue

binding_keys = sys.argv[1:]

if not binding_keys:
    sys.stderr.write("Usage: %s [binding_key]...
" % sys.argv[0])

    sys.exit(1)

for binding_key in binding_keys:
    channel.queue_bind(exchange='topic_logs',

                       queue=queue_name,

                       routing_key=binding_key)

print(' [*] Waiting for logs. To exit press CTRL+C')


def callback(ch, method, properties, body):
    print(" [x] %r:%r" % (method.routing_key, body))


channel.basic_consume(callback,

                      queue=queue_name,

                      no_ack=True)

channel.start_consuming()
Remote procedure call (RPC)
To illustrate how an RPC service could be used we're going to create a simple client class. It's going to expose a method named call which sends an RPC request and blocks until the answer is received:
fibonacci_rpc = FibonacciRpcClient()result = fibonacci_rpc.call(4)print("fib(4) is %r" % result)server
import pika

import time

connection = pika.BlockingConnection(pika.ConnectionParameters(

    host='localhost'))

channel = connection.channel()

channel.queue_declare(queue='rpc_queue')


def fib(n):
    if n == 0:

        return 0

    elif n == 1:

        return 1

    else:

        return fib(n - 1) + fib(n - 2)


def on_request(ch, method, props, body):
    n = int(body)

    print(" [.] fib(%s)" % n)

    response = fib(n)

    ch.basic_publish(exchange='',

                     routing_key=props.reply_to,

                     properties=pika.BasicProperties(correlation_id=
                                                         props.correlation_id),

                     body=str(response))

    ch.basic_ack(delivery_tag=method.delivery_tag)


channel.basic_qos(prefetch_count=1)

channel.basic_consume(on_request, queue='rpc_queue')

print(" [x] Awaiting RPC requests")

channel.start_consuming()
client
import pika

import uuid


class FibonacciRpcClient(object):
    def __init__(self):

        self.connection = pika.BlockingConnection(pika.ConnectionParameters(

            host='localhost'))

        self.channel = self.connection.channel()

        result = self.channel.queue_declare(exclusive=True)

        self.callback_queue = result.method.queue

        self.channel.basic_consume(self.on_response, no_ack=True,

                                   queue=self.callback_queue)

    def on_response(self, ch, method, props, body):

        if self.corr_id == props.correlation_id:
            self.response = body

    def call(self, n):

        self.response = None

        self.corr_id = str(uuid.uuid4())

        self.channel.basic_publish(exchange='',

                                   routing_key='rpc_queue',

                                   properties=pika.BasicProperties(

                                       reply_to=self.callback_queue,

                                       correlation_id=self.corr_id,

                                   ),

                                   body=str(n))

        while self.response is None:
            self.connection.process_data_events()

        return int(self.response)


fibonacci_rpc = FibonacciRpcClient()

print(" [x] Requesting fib(30)")

response = fibonacci_rpc.call(30)

print(" [.] Got %r" % response)