一、什么是springboot,有什么用
springboot是一个开发框架,其出现的目的利用约定大于配置的思想来让开发者摆脱spring繁琐的配置,简化开发。其不是spring框架的替代品,是spring框架的另外一种使用形式。
二、springboot的快速使用
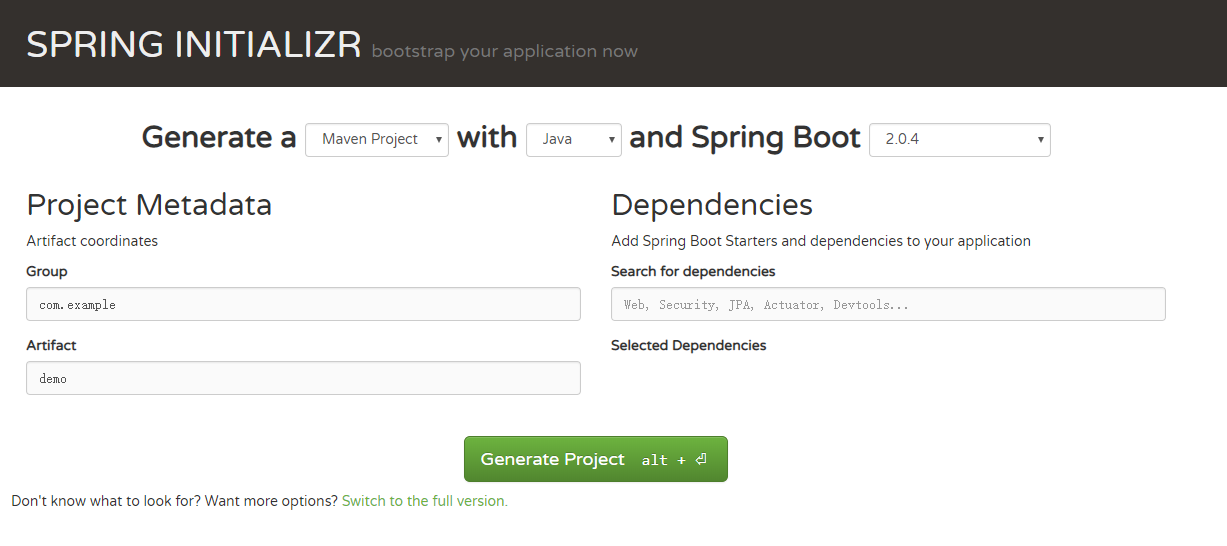
1.登录到spring官网 找到如下页面,然后选择自己想要的开发环境和版本,
2.解压压缩包并导入到eclipse,就可以启动项目了,下面是程序的入口
package com.example.demo;

import org.springframework.boot.SpringApplication;
import org.springframework.boot.autoconfigure.SpringBootApplication;

@SpringBootApplication
public class DemoApplication {

    public static void main(String[] args) {
        SpringApplication.run(DemoApplication.class, args);
    }
}
三、springboot使用
1.配置文件properties的加载
#myconfig.properties配置文件
com.kyle.name=邓zm
com.kyle.age=27
/**
 * 自定义配置文件的加载,需要加上下面的注解,并导入相关的包
 * 如果是主配置文件application.properties加载,则只需要@Value就能获取数据
 */
@Component
@ConfigurationProperties
@PropertySource("classpath:myconfig.properties")
public class UserInfo {

    @Value("${com.kyle.name}")
    private String name;

    @Value("${com.kyle.age}")
    private int age;

    public String getName() {
        return name;
    }

    public void setName(String name) {
        this.name = name;
    }

    public int getAge() {
        return age;
    }

    public void setAge(int age) {
        this.age = age;
    }
}
2.springboot集成mybatis(只说和spring框架的差别)
        <!-- 引入jar包 -->
        <dependency>
          <groupId>mysql</groupId>
          <artifactId>mysql-connector-java</artifactId>
        </dependency>
        <dependency>
            <groupId>org.mybatis.spring.boot</groupId>
            <artifactId>mybatis-spring-boot-starter</artifactId>
            <version>1.3.2</version>
        </dependency>
#application.properties文件中引入配置文件和映射文件,
#没有配置文件也可以不引入
mybatis.config-locations=classpath:mybatis-config.xml
mybatis.mapper-locations=classpath:mapper/*.xml
3.springboot集成redis集群
<!--引入相关jar包-->
<dependency>
    <groupId>org.springframework.boot</groupId>
    <artifactId>spring-boot-starter-redis</artifactId>
</dependency>
#redis集群配置 redis.properties
spring.redis.cluster.nodes=111.230.239.152:7000,111.230.239.152:7001,111.230.239.152:7002,111.230.239.152:8000,111.230.239.152:8001,111.230.239.152:8002
spring.redis.password=12345
spring.redis.pool.max-active=8
spring.redis.pool.max-wait=-1
spring.redis.pool.max-idle=8
spring.redis.pool.min-idle=0
spring.redis.timeout=1000
spring.redis.commandTimeout=5000
@Component
@Configuration
@PropertySource("classpath:redis.properties")
public class RedisConfig {

    /**
     * 设置数据存入redis 的序列化方式
     *</br>redisTemplate序列化默认使用的jdkSerializeable,存储二进制字节码,导致key会出现乱码,所以自定义
     *序列化类
     */
    @Bean
    @SuppressWarnings({ "rawtypes", "unchecked" })
    public RedisTemplate<Object,Object> redisTemplate(RedisConnectionFactory redisConnectionFactory)throws UnknownHostException {

        RedisTemplate<Object,Object> redisTemplate = new RedisTemplate<>();
        redisTemplate.setConnectionFactory(redisConnectionFactory);

        Jackson2JsonRedisSerializer serializer =new Jackson2JsonRedisSerializer(Object.class);
        ObjectMapper objectMapper =new ObjectMapper();
        objectMapper.setVisibility(PropertyAccessor.ALL,JsonAutoDetect.Visibility.ANY);
        objectMapper.enableDefaultTyping(ObjectMapper.DefaultTyping.NON_FINAL);
        serializer.setObjectMapper(objectMapper);

        redisTemplate.setValueSerializer(serializer);
        redisTemplate.setKeySerializer(new StringRedisSerializer());

        redisTemplate.afterPropertiesSet();

        return redisTemplate;
    }

}
@Service
public class UserServiceImpl implements UserService {

    @Autowired
    private UserMapper userMapper;

    @Resource
    private RedisTemplate<String,Object> redisTemplate;

    @Override
    public User getUserInfoById(Long id) {
        User user = (User)redisTemplate.opsForValue().get("user:"+id);
        if(user == null ){
            user = userMapper.getUserInfoById(id);
            redisTemplate.opsForValue().set("user:"+id, user);
        }
        return user;
    }
}
4.springboot开启定时任务
@MapperScan("com.example.demo.dao")
@SpringBootApplication
@EnableScheduling //开启定时任务
public class DemoApplication {

    public static void main(String[] args) {
        SpringApplication.run(DemoApplication.class, args);
    }
}
@Component
public class SchedulerTask {

    private int count=0;

    @Scheduled(cron="*/1 * * * * ?")
    private void process(){

        System.out.println("this is scheduler task runing  "+(count++));
    }

}
5.springboot的事务
@MapperScan("com.example.demo.dao")
@SpringBootApplication
@EnableScheduling
@EnableTransactionManagement //事务管理
public class DemoApplication {

    public static void main(String[] args) {
        SpringApplication.run(DemoApplication.class, args);
    }
}
@Override
    @Transactional(readOnly=false,propagation=Propagation.REQUIRED)
    public void updateUser(User user) {

        User user1 = new User();
        user1.setUserId(1);
        user1.setName("yao1");

        User user2 = new User();
        user2.setUserId(2);
        user2.setName("Xiaoxiao1");

        userMapper.updateUser(user1);
        int i = 1/0;
        userMapper.updateUser(user2);
    }