SpringAOP学习笔记【汇总】
静态代理设计模式
1. 为什么需要代理设计模式
在 JavaEE 分层开发开发中,哪个层次对于我们来讲最重要?Service 层
Service 层中包含了哪些代码?
- 核心功能(代码量较多):业务运算,DAO 调用
- 额外功能(附加功能,不属于业务,可有可无,代码量小):事务、日志、性能 …
额外功能书写在 Service 层好不好?
- Service 层的调用者的角度(Controller):需要在 Service 层书写额外功能。
- 软件设计者:Service 层不需要额外功能。
拿现实生活中的例子来做对比,解决方案是 引入一个代理。
2. 代理设计模式
概念:通过代理类,为原始类(⽬标类)增加额外的功能
好处:利于原始类(目标类)的维护
名词解释
目标类 / 原始类:指的是 业务类 (核心功能 --> 业务运算、DAO调用)
目标方法 / 原始方法:目标类(原始类)中的方法就是目标方法(原始方法)
额外功能 / 附加功能:日志、事务、性能 …
代理开发的核心要素
代理类 = 目标类(原始类) + 额外功能 + 原始类(目标类)实现相同的接口

房东 --- 目标类
public interface UserService {
    m1
    m2
}
public UserServiceImpl implements UserServiceImpl {
    m1 ---> 业务运算、调用DAO
    m2
}
----------------------------------------------------
中介 --- 代理类:要实现目标类相同的接口
public UserServiceProxy implements UserService {
    m1
    m2
}
静态代理编码
静态代理:为每⼀个原始类,手工编写⼀个代理类(.java .class)
public class User {}
public interface UserService {
    void register(User user);
    boolean login(String name, String password);
}
 1 public class UserServiceImpl implements UserService {
 2     @Override
 3     public void register(User user) {
 4         System.out.println("UserServiceImpl.register 业务运算 + DAO");
 5     }
 6
 7     @Override
 8     public boolean login(String name, String password) {
 9         System.out.println("UserServiceImpl.login 业务运算 + DAO");
10         return true;
11     }
12 }
 1 /**
 2  * 静态代理类编码实现
 3  */
 4 public class UserServiceProxy implements UserService { // 实现原始类相同的接口
 5     private UserService userService = new UserServiceImpl(); // 代理类中必须有原始类
 6     @Override
 7     public void register(User user) {
 8         System.out.println("---log---"); // 额外功能
 9         userService.register(user);
10     }
11     @Override
12     public boolean login(String name, String password) {
13         System.out.println("---log---"); // 额外功能
14         return userService.login(name, password);
15     }
16 }
静态代理存在的问题
- 静态类文件数量过多,不利于项目管理
UserServiceImpl、UserServiceProxyOrderServiceImpl、OrderServiceProxy
… - 额外功能维护性差:在代理类中修改额外功能较为麻烦
Spring 动态代理开发
概念:通过代理类为原始类(目标类)增加额外功能
好处:利于原始类(目标类)的维护
搭建开发环境
<dependency>
  <groupId>org.springframework</groupId>
  <artifactId>spring-aop</artifactId>
  <version>5.1.14.RELEASE</version>
</dependency>
<dependency>
  <groupId>org.aspectj</groupId>
  <artifactId>aspectjrt</artifactId>
  <version>1.8.9</version>
</dependency>
<dependency>
  <groupId>org.aspectj</groupId>
  <artifactId>aspectjweaver</artifactId>
  <version>1.8.13</version>
</dependency>
Spring 动态代理的开发步骤(5步)
- 创建原始对象(目标对象)
public interface UserService {
    void register(User user);
    boolean login(String name, String password);
}
public class UserServiceImpl implements UserService {
    @Override
    public void register(User user) {
        System.out.println("UserServiceImpl.register 业务运算 + DAO");
    }

    @Override
    public boolean login(String name, String password) {
        System.out.println("UserServiceImpl.login 业务运算 + DAO");
        return true;
    }
}
- 额外功能
MethodBeforeAdvice接口
public class Before implements MethodBeforeAdvice {
    /**
     * 作用: 把需要运行在原始方法执行之前运行的额外功能, 书写在 before 方法中
     */
    @Override
    public void before(Method method, Object[] objects, Object o) throws Throwable {
        System.out.println("---method before advice log---");
    }
}
<!-- 额外功能 -->
<bean id="before" class="com.yusael.aop.Before"/>
- 定义 切入点:额外功能的加入
⽬的: 由程序员根据⾃⼰的需要,决定额外功能加入给哪个原始方法(register、login)
 <!--切入点:额外功能的加入-->
    <!--⽬的: 由程序员根据⾃⼰的需要,决定额外功能加入给哪个原始方法(register、login)-->
   <!-- 简单的测试:所有方法都做为切入点,都加入额外的功能-->
    <aop:config>
        <aop:pointcut id="pc" expression="execution(* * (..))"/>
    </aop:config>
- 组装(2、3 整合)
<beans xmlns="http://www.springframework.org/schema/beans"
       xmlns:xsi="http://www.w3.org/2001/XMLSchema-instance"
       xmlns:aop="http://www.springframework.org/schema/aop"
       xsi:schemaLocation="http://www.springframework.org/schema/beans
                           http://www.springframework.org/schema/beans/spring-beans.xsd
                           http://www.springframework.org/schema/aop
                           https://www.springframework.org/schema/aop/spring-aop.xsd">

    <bean id="userService" class="com.yusael.aop.UserServiceImpl"/>
    <!-- 额外功能 -->
    <bean id="before" class="com.yusael.aop.Before"/>

    <!--切入点:额外功能的加入-->
    <!--⽬的:由程序员根据⾃⼰的需要,决定额外功能加入给哪个原始方法(register、login)-->
   <!-- 简单的测试:所有方法都做为切入点,都加入额外的功能-->
    <aop:config>
        <aop:pointcut id="pc" expression="execution(* * (..))"/>
        <!--表达的含义: 所有的方法 都加入before的额外功能-->
        <aop:advisor advice-ref="before" pointcut-ref="pc"/>
    </aop:config>

</beans>
调用
目的:获得 Spring 工厂创建的动态代理对象,并进行调用
注意:
- Spring 的工厂通过原始对象的 id 值获得的是代理对象
- 获得代理对象后,可以通过声明接口类型,进行对象的存储
/**
 * 用于测试动态代理
 */
@Test
public void test1() {
    ClassPathXmlApplicationContext ctx = new ClassPathXmlApplicationContext("/applicationContext.xml");
    UserService userService = (UserService) ctx.getBean("userService");
    userService.login("admin", "1234");
    userService.register(new User());
}
动态代理细节分析
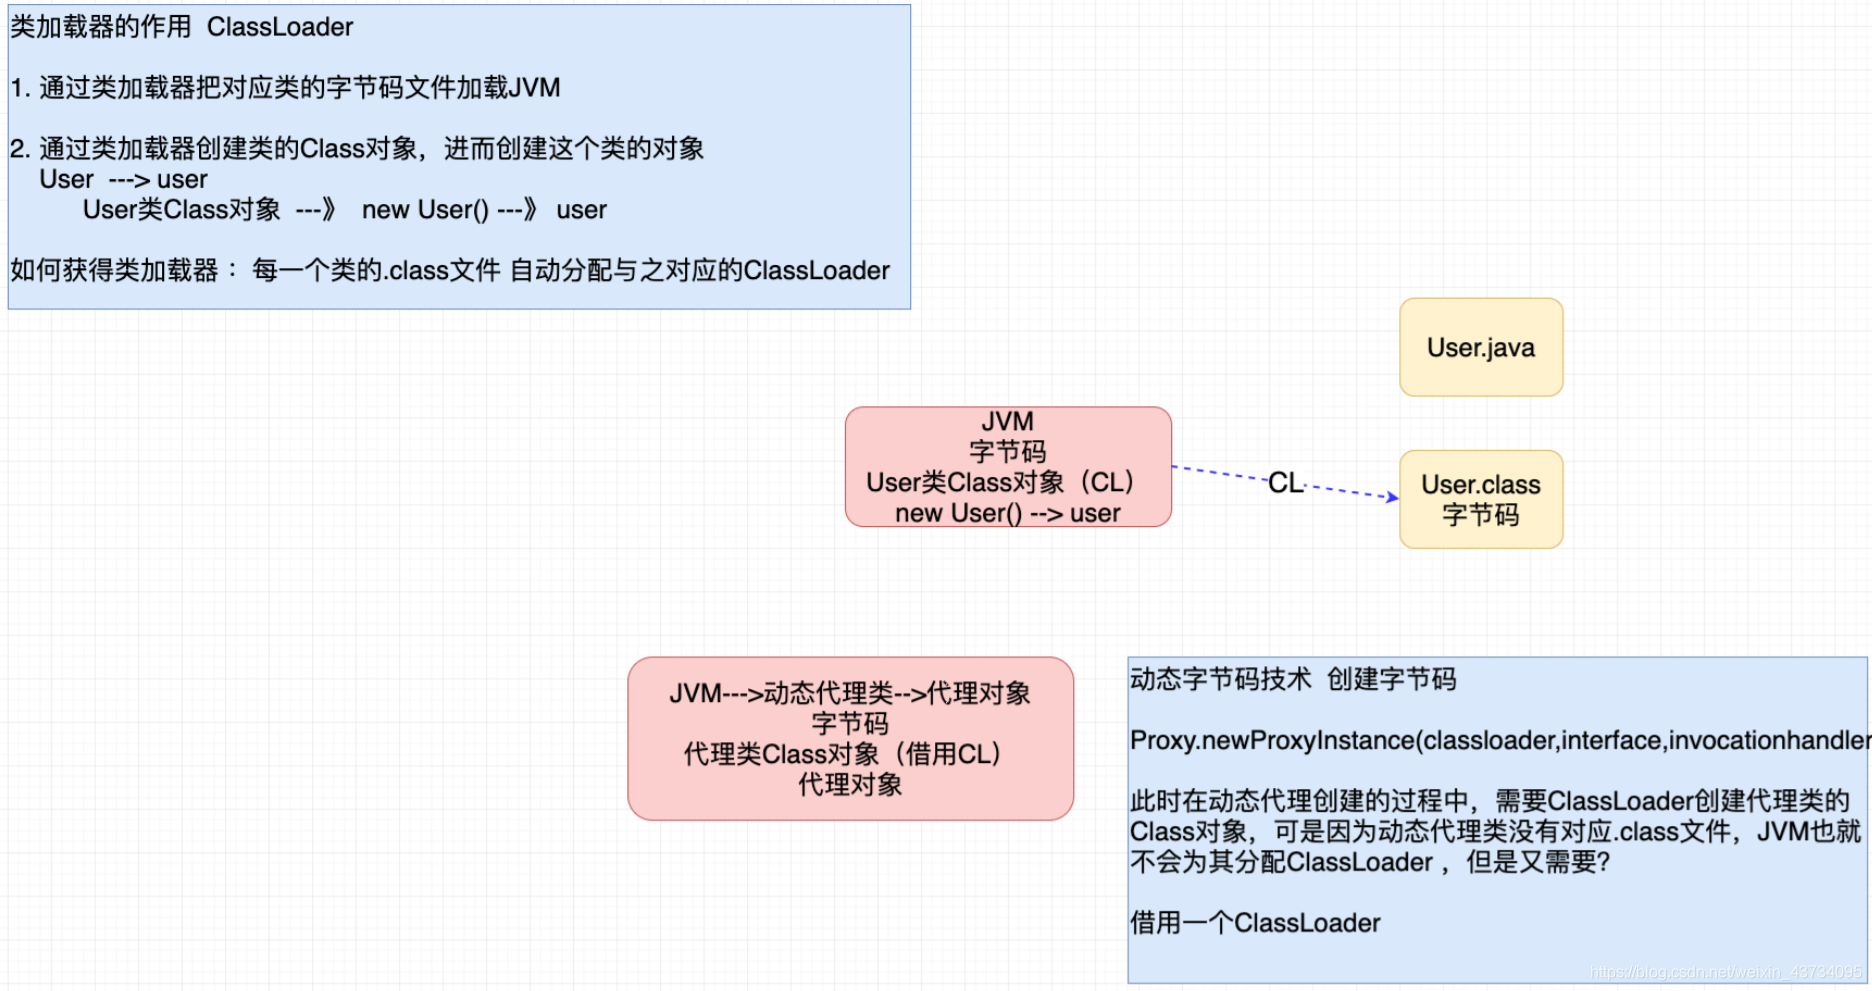
Spring 创建的动态代理类在哪里?
- Spring 框架在运行时,通过动态字节码技术,在 JVM 创建的,运行在 JVM 内部,等程序结束后,会和 JVM 一起消失。
什么是 动态字节码技术?
- 通过第三方动态字节码框架,在 JVM 中创建对应类的字节码,进而创建对象,当虚拟机结束,动态字节码跟着消失。
结论:
- 动态代理不需要定义类文件,都是 JVM 运行过程中动态创建的;
所以不会造成静态代理的缺点:类⽂件数量过多,影响项目管理的问题。
动态代理编程简化代理的开发
- 在额外功能不改变的前提下,创建其他目标类(原始类)的代理对象时,只需要指定原始(目标)对象即可。
动态代理使得 额外功能的维护性大大增强。
动态代理开发详解
额外功能的详解
MethodBeforeAdvice 分析
MethodBeforeAdvice接口作用:额外功能运行在原始方法执行之前,进行额外功能操作。
 1 public class Before implements MethodBeforeAdvice {
 2     /**
 3      * 作用: 把需要运行在原始方法执行之前运行的额外功能, 书写在 before 方法中
 4      *
 5      * Method: 额外功能所增加给的那个原始方法
 6      *                          login
 7      *                          register
 8      *                          --------
 9      *                          showOrder
10      *
11      * Object[]:  额外功能所增加给的那个原始方法的参数
12      *                          String name,String password
13      *                          User
14      *                          --------
15      *
16      * Object: 额外功能所增加给的那个原始对象
17      *                          UserServiceImpl
18      *                          ---------------
19      *                          OrderServiceImpl
20      */
21     @Override
22     public void before(Method method, Object[] objects, Object o) throws Throwable {
23         System.out.println("---new method before advice log---");
24     }
25
26 }
before方法的 3 个参数在实战中,该如何使用?before方法的参数,在实战中,会根据需要进行使用,不⼀定都会用到,也有可能都不用。
孙哥:”我用了 15 年 Spring 一次都没有用到过这个。"
MethodInterceptor(方法拦截器)
methodinterceptor 接口:额外功能可以根据需要运行在原始方法执行 前、后、前后。
- 参数:
MethodInvocation:额外功能所增加给的那个原始方法 (login, register) - 返回值:
Object:原始方法的返回值 (没有就返回 null) invocation.proceed():原始方法运行
额外功能运行在原始方法 之前:
1 public class Around implements MethodInterceptor {
2     @Override
3     public Object invoke(MethodInvocation methodInvocation) throws Throwable {
4         System.out.println("---额外功能运行在原始方法执行之前---");
5         Object ret = methodInvocation.proceed(); // 原始方法运行, 获取原始方法的返回值
6         return ret;
7     }
8 }
额外功能运行在原始方法 之后:
public class Around implements MethodInterceptor {
    @Override
    public Object invoke(MethodInvocation methodInvocation) throws Throwable {
        Object ret = methodInvocation.proceed(); // 原始方法运行, 获取原始方法的返回值
        System.out.println("---额外功能运行在原始方法执行之后---");
        return ret;
    }
}
额外功能运行在原始方法 之前、之后:
1 public class Around implements MethodInterceptor {
2     @Override
3     public Object invoke(MethodInvocation methodInvocation) throws Throwable {
4         System.out.println("---额外功能运行在原始方法执行之前---");
5         Object ret = methodInvocation.proceed(); // 原始方法运行, 获取原始方法的返回值
6         System.out.println("---额外功能运行在原始方法执行之后---");
7         return ret;
8     }
9 }
额外功能运行在原始方法抛出异常的时候:
 1 public class Around implements MethodInterceptor {
 2     @Override
 3     public Object invoke(MethodInvocation methodInvocation) throws Throwable {
 4         Object ret = null;
 5         try {
 6             ret = methodInvocation.proceed(); // 原始方法运行, 获取原始方法的返回值
 7         } catch (Throwable throwable) {
 8             System.out.println("---额外功能运行在原始方法抛异常的时候---");
 9         }
10         return ret;
11     }
12 }
MethodInterceptor 影响原始方法的返回值:
1 public class Around implements MethodInterceptor {
2     @Override
3     public Object invoke(MethodInvocation methodInvocation) throws Throwable {
4         System.out.println("---log---");
5         Object ret = methodInvocation.proceed();
6         return false;
7     }
8 }
切入点详解
切入点决定额外功能加入位置(方法)
<!--execution(* * (..)) 匹配了所有方法-->
<aop:pointcut id="pc" expression="execution(* * (..))"/>
execution():切入点函数* *(..):切入点表达式
切入点表达式
方法切入点
定义一个方法
public void add(int i, int j)
   *               *      (..)
1 * * (..)    --> 所有方法
2
3 *  --->  修饰符 返回值
4 *  --->  方法名
5 () --->  参数表
6 .. --->  对于参数没有要求 (参数有没有,参数有⼏个都行,参数是什么类型的都行)
- 定义
login方法作为切入点:
1 <!-- 定义login作为切入点 -->
2 <aop:pointcut id="pc" expression="execution(* login (..))"/>
3
4 <!-- 定义register作为切入点 -->
5 <aop:pointcut id="pc" expression="execution(* register (..))"/>
- 定义方法名为
login且 有两个字符串类型的参数 作为切入点;
<aop:pointcut id="pc" expression="execution(* login (String,String))"/><

<!-- ⾮ java.lang java.lang 包中的类型, 必须要写全限定名 -->
<aop:pointcut id="pc" expression="execution(* register (com.yusael.proxy.User))"/>

<!--  ..可以和具体的参数类型连用 -->
<aop:pointcut id="pc" expression="execution(* login(String, ..))"/>
<!-- === login(String), login(String,String), login(String,com.baizhi.edu.proxy.User) -->
- 精准方法切入点限定
修饰符 返回值 包 类.方法(参数)
<aop:pointcut id="pc" expression="execution(* com.yusael.proxy.UserServiceImpl.login(..))"/>

<aop:pointcut id="pc" expression="execution(* com.yusael.proxy.UserServiceImpl.login(String, String))"/>
类切入点
指定 特定类作为切入点(额外功能加入的位置),这个类中的所有方法,都会加上对应的额外功能。
- 语法1
# 类中所有的方法加入了额外功能
<aop:pointcut id="pc" expression="execution(* com.yusael.proxy.UserServiceImpl.*(..))"/>
- 语法2
1 # 忽略包
2 1. 类只存在一级包
3 <aop:pointcut id="pc" expression="execution(* *.UserServiceImpl.*(..))"/>
4 2. 类存在多级包
5 <aop:pointcut id="pc" expression="execution(* *..UserServiceImpl.*(..))"/>
包切入点(实战中用的多)
指定包作为额外功能加入的位置,自然包中的所有类及其方法都会加入额外的功能。
- 语法1:
# 切入点包中的所有类,必须在proxy中,不能在proxy包的⼦包中
<aop:pointcut id="pc" expression="execution(* com.yusael.proxy.*.*(..))"/>
- 语法2:
# 切入点当前包及其⼦包都生效
<aop:pointcut id="pc" expression="execution(* com.yusael.proxy..*.*(..))"/>
切入点函数(execution、args、within)
切入点函数:用于执行切入点表达式
exectuion
execution 是最为重要的切入点函数,功能最全;可以执行执行 方法切入点表达式、类切入点表达式、包切入点表达式;
弊端:execution 执⾏切入点表达式 ,书写麻烦
execution(* com.yusael.proxy..*.*(..))
注意:其他的 切入点函数 简化的是 execution 的书写复杂度,功能上完全⼀致。
args
args 作用:主要用于 函数(方法) 参数的匹配;
切入点:方法参数必须得是 2 个字符串类型的参数

# 使用 execution
<aop:pointcut id="pc" expression="execution(* *(String, String))"/>

# 使用 args
<aop:pointcut id="pc" expression="args(String, String)"/>
within
within 作用:主要用于进行 类、包切入点表达式 的匹配。
切入点: UserServiceImpl 这个类

# 使用 execution
<aop:pointcut id="pc" expression="expression(* *..UserServiceImpl.*(..))"/>

# 使用 within
<aop:pointcut id="pc" expression="within(*..UserServiceImpl)"/>
切入点: com.yusael.proxy 这个包

# 使用 execution
<aop:pointcut id="pc" expression="execution(* com.yusael.proxy..*.**(..)"/>

# 使用 within
<aop:pointcut id="pc" expression="within(com.yusael.proxy..*)"/>
@annotation
作用:为具有特殊注解的 方法 加入额外功能。
例如我们自定义了一个注解:Log
@Target(ElementType.METHOD)
@Retention(RetentionPolicy.RUNTIME)
public @interface Log {
}
然后我们要为使用了 Log 注解的方法加入额外功能。
<aop:pointcut id="pc" expression="@annotation(com.yusael.Log)"/>
切入点函数的逻辑运算(and、or)
切入点函数的逻辑运算 指的是:整合多个切入点函数⼀起配合工作,进⽽完成更为复杂的需求。
and 与操作:
案例: 方法名叫 login 同时 参数是 2个字符串
# execution
<aop:pointcut id="pc" expression="execution(* login(String, String))"/>
# execution and args
<aop:pointcut id="pc" expression="execution(* login(..)) and args(String, String))"/>
注意:与操作不同⽤于同种类型的切⼊点函数
以下这个是错误的, 因为不存在同时叫 login 和 register 的方法
<aop:pointcut id="pc" expression="execution(* login(..)) and execution(* register(..))"/>
or 或操作:
案例: 方法名叫 register 或 login 的⽅法作为切⼊点
<aop:pointcut id="pc" expression="execution(* login(..)) or execution(* register(..))"/>
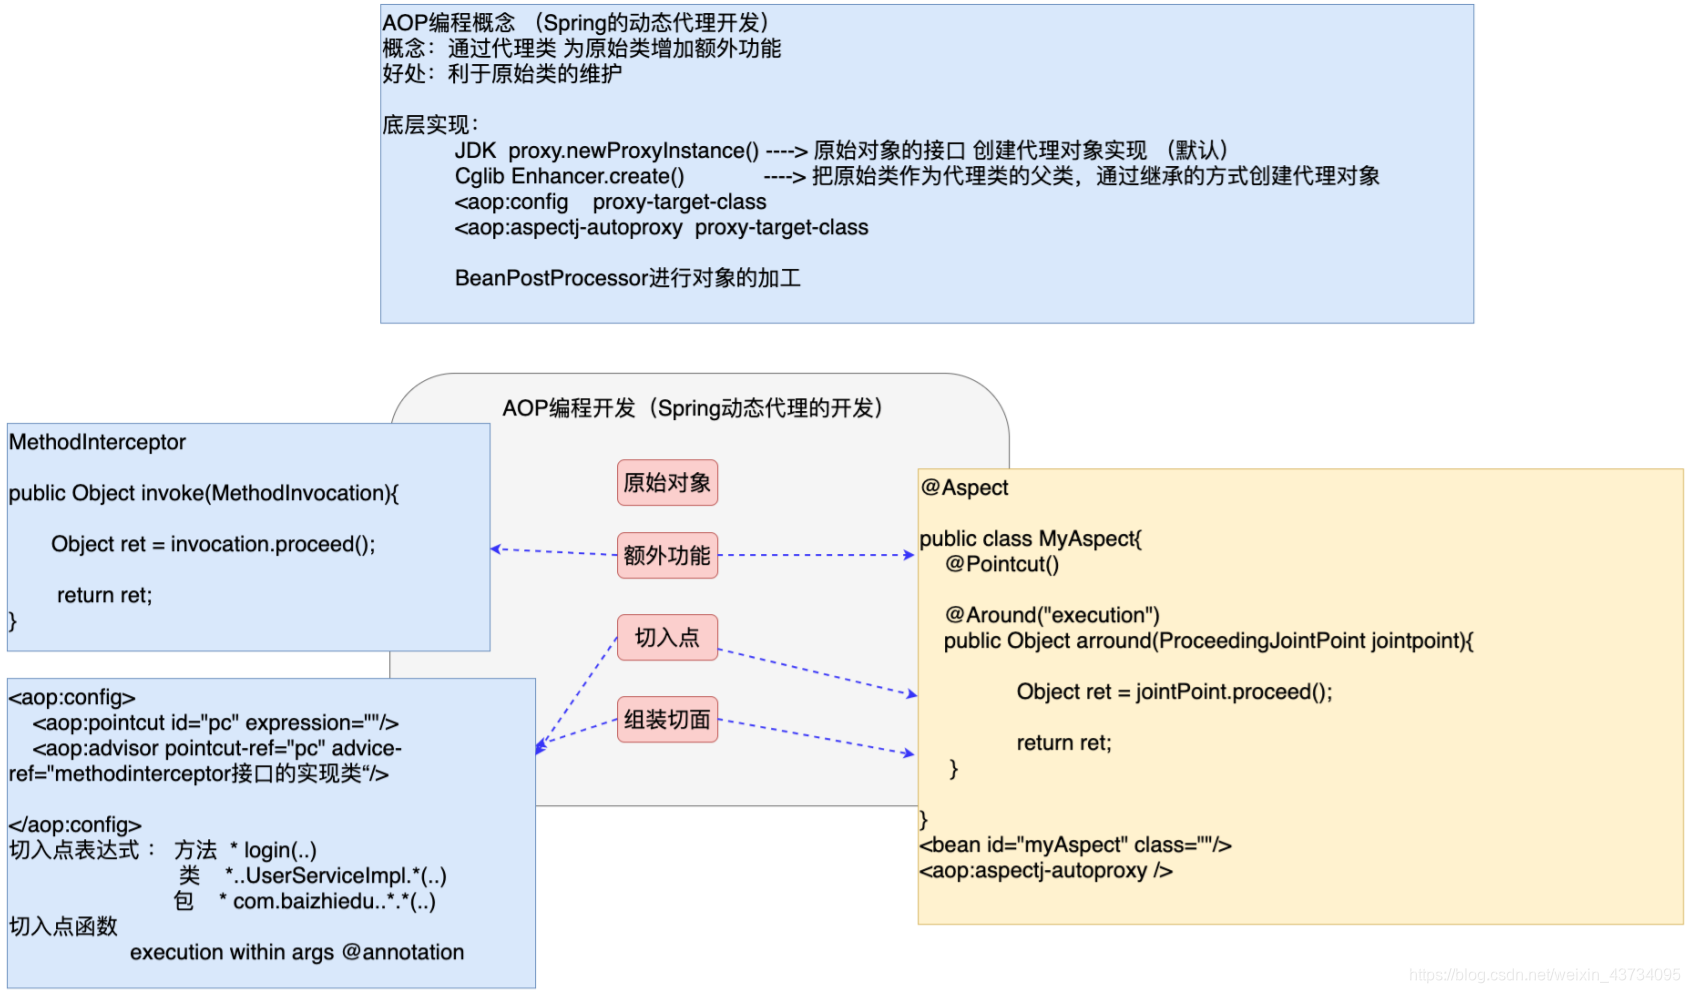
AOP 编程
AOP 概念
POP (Producer Oriented Programing)
- 面向过程(方法、函数)编程 —— C
- 以过程为基本单位的程序开发,通过过程间的彼此协同,相互调用,完成程序的构建。
OOP (Object Oritened Programing)
- 面向对象编程 —— Java
- 以对象为基本单位的程序开发,通过对象间的彼此协同,相互调用,完成程序的构建。
AOP (Aspect Oriented Programing)
- 面向切面编程 = Spring动态代理开发
- 以切面为基本单位的程序开发,通过切面间的彼此协同,相互调用,完成程序的构建。
- 切面 = 切入点 + 额外功能
AOP 的概念:
- 本质就是 Spring 的动态代理开发,通过代理类为原始类增加额外功能。
- 好处:利于原始类的维护
- 注意:AOP 编程不可能取代 OOP,AOP 是 OOP 编程的补充。
AOP 编程的开发步骤
- 原始对象
- 额外功能 (
MethodInterceptor) - 切入点
- 组装切面 (额外功能+切入点)
详情可参见之前的博客:Spring 动态代理开发详解
切面的名词解释
切面 = 切入点 + 额外功能
几何学:面 = 点 + 相同的性质
AOP 的底层实现原理
核心问题:
- AOP 如何创建动态代理类?
动态字节码技术 - Spring 工厂如何加工创建代理对象?
通过原始对象的 id 值,获得的是代理对象
动态代理类的创建
JDK 的动态代理(原理 + 编码)
Proxy.newPorxyInstance方法参数详解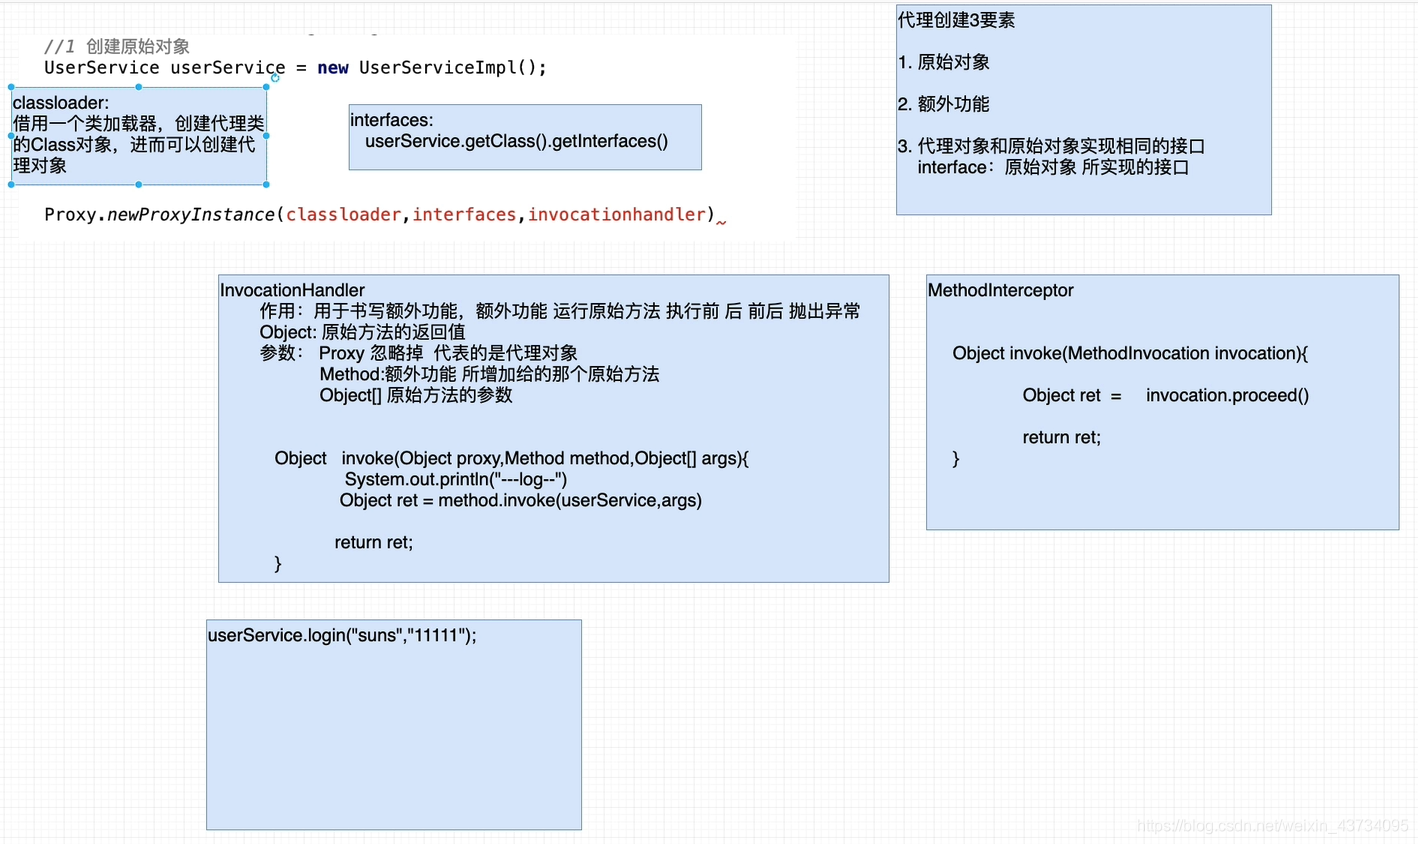
- 编码
 1 public class TestJDKProxy {
 2     /**
 3      1. 借⽤类加载器  TestJDKProxy 或 UserServiceImpl 都可以
 4      2. JDK8.x 前必须加 final
 5      final UserService userService = new UserServiceImpl();
 6      */
 7     public static void main(String[] args) {
 8         // 1. 创建原始对象
 9         UserService userService = new UserServiceImpl();
10
11         // 2. JDK 动态代理
12         InvocationHandler handler = new InvocationHandler() {
13             @Override
14             public Object invoke(Object proxy, Method method, Object[] args) throws Throwable {
15                 System.out.println("---- proxy log ----");
16                 // 原始方法运行
17                 Object ret = method.invoke(userService, args);
18                 return ret;
19             }
20         };
21         UserService userServiceProxy = (UserService) Proxy.
22                 newProxyInstance(TestJDKProxy.class.getClassLoader(),
23                                 userService.getClass().getInterfaces(),
24                                 handler);
25         userServiceProxy.login("zhenyu", "123456");
26
27         userServiceProxy.register(new User());
28     }
29 }
CGlib 的动态代理
CGlib 创建动态代理的原理:通过父子继承关系创建代理对象,原始类作为父类,代理类作为子类,这样既可以保证 2 者方法⼀致,同时在代理类中可以提供新的实现(额外功能+原始方法)。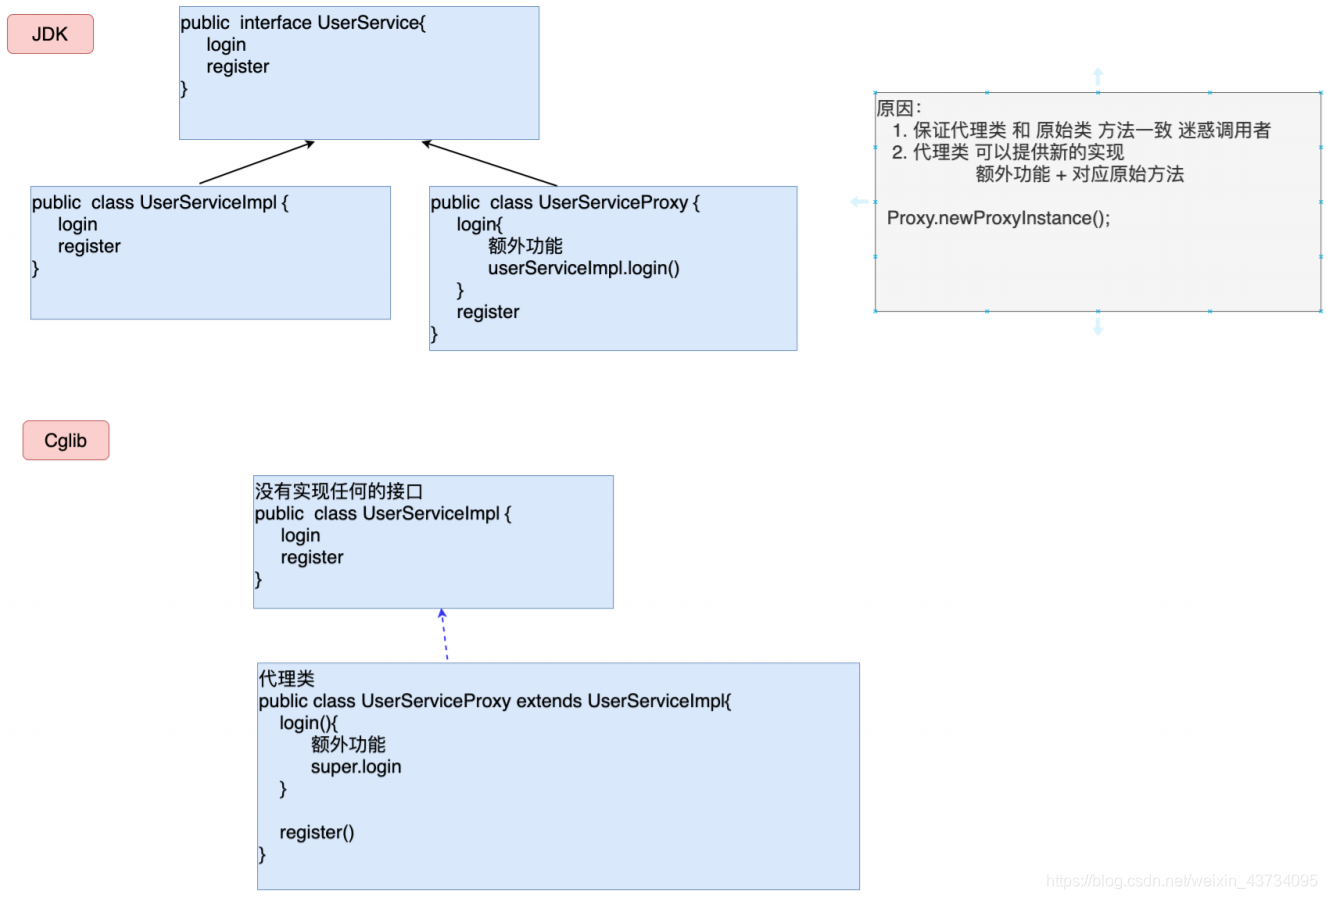
- CGlib 编码
 1 public class TestCglib {
 2     public static void main(String[] args) {
 3         // 1. 创建原始对象
 4         UserService userService = new UserService();
 5
 6         /*
 7          2. 通过 cglib 方式创建动态代理对象
 8          对比 jdk 动态代理 ---> Proxy.newProxyInstance(classLoader, interface, invocationHandler);
 9
10          Enhancer.setClassLoader()
11          Enhancer.setSuperClass()
12          Enhancer.setCallBack() ---> MethodInterceptor(cglib)
13          Enhancer.createProxy() ---> 创建代理对象
14          */
15         Enhancer enhancer = new Enhancer();
16
17         enhancer.setClassLoader(TestCglib.class.getClassLoader());
18         enhancer.setSuperclass(userService.getClass());
19
20         MethodInterceptor interceptor = new MethodInterceptor() {
21             @Override
22             public Object intercept(Object o, Method method, Object[] args, MethodProxy methodProxy) throws Throwable {
23                 System.out.println("--- cglib log ----");
24                 Object ret = method.invoke(userService, args); // 执行原始方法
25                 return ret;
26             }
27         };
28
29         enhancer.setCallback(interceptor);
30         UserService userServiceProxy = (UserService) enhancer.create();
31         userServiceProxy.login("zhenyu", "123456");
32         userServiceProxy.register(new User());
33     }
34 }
总结
- JDK 动态代理
Proxy.newProxyInstance:通过接口创建代理的实现类 - Cglib 动态代理
Enhancer:通过继承⽗类创建的代理类
Spring 工厂如何加工原始对象
- 思路分析:主要通过
BeanPostProcessor将原始对象加工为代理对象
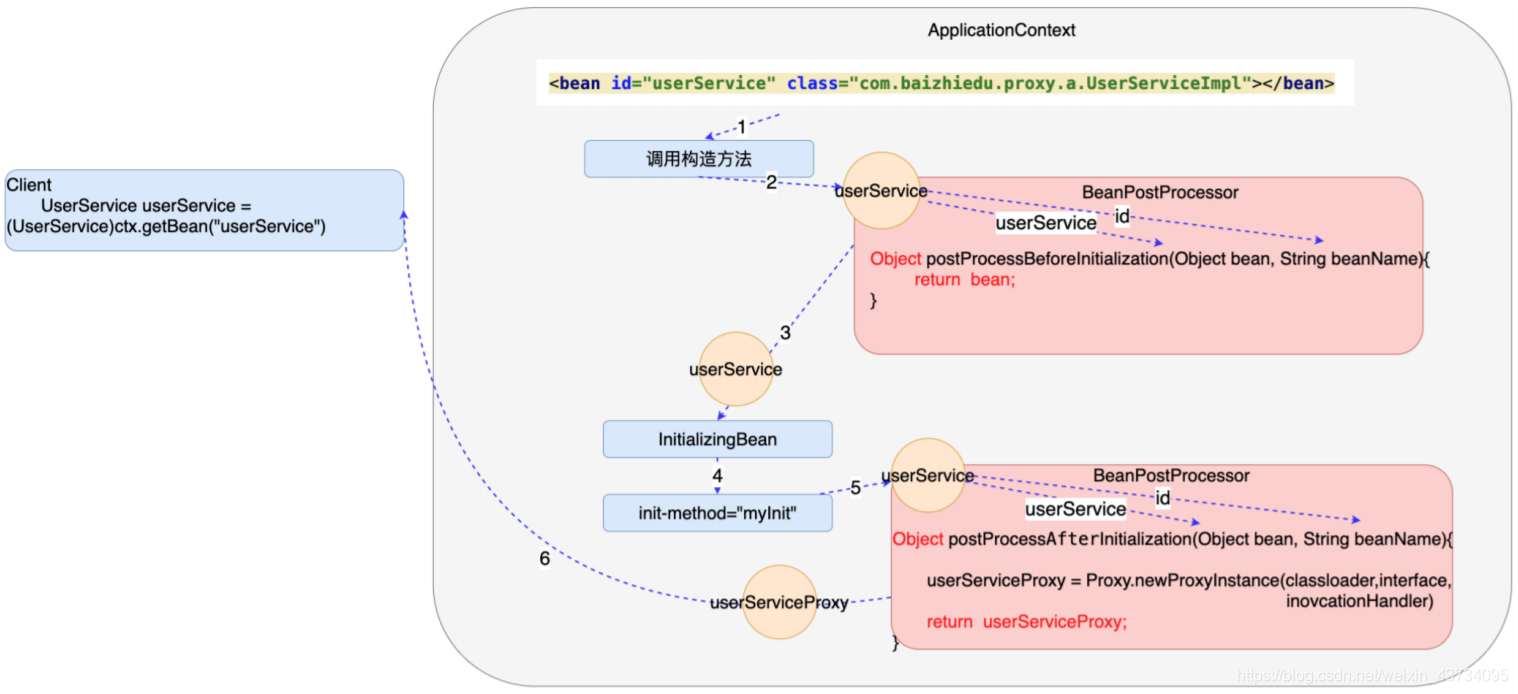
- 编码
 1 public class ProxyBeanPostProcessor implements BeanPostProcessor {
 2     @Override
 3     public Object postProcessBeforeInitialization(Object bean, String beanName) throws BeansException {
 4         return bean;
 5     }
 6
 7     @Override
 8     public Object postProcessAfterInitialization(Object bean, String beanName) throws BeansException {
 9
10         InvocationHandler handler = new InvocationHandler() {
11             @Override
12             public Object invoke(Object proxy, Method method, Object[] args) throws Throwable {
13                 System.out.println("--- new log ---");
14                 Object ret = method.invoke(bean, args);
15                 return ret;
16             }
17         };
18         return Proxy.newProxyInstance(ProxyBeanPostProcessor.class.getClassLoader(), bean.getClass().getInterfaces(), handler);
19     }
20 }
<bean id="userService" class="com.yusael.factory.UserServiceImpl"/>
<!--1. 实现 BeanPostProcessor 进行加工-->
<!--2. 配置文件中对 BeanPostProcessor 进行配置-->
<bean id="proxyBeanPostProcessor" class="com.yusael.factory.ProxyBeanPostProcessor"/>
基于注解的 AOP 编程的开发
开发步骤
- 原始功能
1 public interface UserService {
2     void register(User user);
3     boolean login(String name, String password);
4 }
 1 public class UserServiceImpl implements UserService {
 2     @Override
 3     public void register(User user) {
 4         System.out.println("UserServiceImpl.register 业务运算 + DAO");
 5         // throw new RuntimeException("测试异常");
 6     }
 7
 8     @Log
 9     @Override
10     public boolean login(String name, String password) {
11         System.out.println("UserServiceImpl.login 业务运算 + DAO");
12         return true;
13     }
14 }
- 额外功能
- 切入点
- 组装切面
2、3、4 都放在了 MyAspect 类中完成:
 1 /*
 2     1. 额外功能
 3         public class MyAround implements MethodInterceptor {
 4             public Object invoke(MethodInvocation invocation) {
 5                 Object ret = invocation.invoke();
 6                 return ret;
 7             }
 8         }
 9         <bean id="around" class="com.yusael.dynamic.Around"/>
10
11     2. 切入点
12         <aop:config>
13             <aop:pointcut id="pc" expression="execution(* login(..)))"/>
14             <aop:advisor advice-ref="around" pointcut-ref="pc"/>
15         </aop:config>
16  */
17
18 @Aspect
19 public class MyAspect {
20     @Around("execution(* login(..))")
21     public Object around(ProceedingJoinPoint joinPoint) throws Throwable {
22         System.out.println("---- aspect log ----");
23         Object ret = joinPoint.proceed();
24         return ret;
25     }
26 }
 1 <beans xmlns="http://www.springframework.org/schema/beans"
 2        xmlns:xsi="http://www.w3.org/2001/XMLSchema-instance" xmlns:aop="http://www.springframework.org/schema/aop"
 3        xsi:schemaLocation="http://www.springframework.org/schema/beans
 4                            http://www.springframework.org/schema/beans/spring-beans.xsd http://www.springframework.org/schema/aop https://www.springframework.org/schema/aop/spring-aop.xsd">
 5
 6     <bean id="userService" class="com.yusael.aspect.UserServiceImpl"/>
 7     <!--
 8         切面:
 9             1. 额外功能
10             2. 切入点啊
11             3. 组装切面
12     -->
13     <bean id="around" class="com.yusael.aspect.MyAspect"/>
14     <!--告知 Spring 基于注解进行 AOP 编程-->
15     <aop:aspectj-autoproxy/>
16
17 </beans>
切入点复用
切入点复用:在切面类中定义⼀个函数,上面用 @Pointcut 注解。
通过这种方式定义切入点表达式,后续更加有利于切入点复用。
 1 @Aspect
 2 public class MyAspect {
 3
 4     @Pointcut("execution(* login(..))")
 5     public void myPoincut() {}
 6
 7     @Around(value = "myPoincut()")
 8     public Object around(ProceedingJoinPoint joinPoint) throws Throwable {
 9         System.out.println("---- aspect log ----");
10         Object ret = joinPoint.proceed();
11         return ret;
12     }
13     @Around(value = "myPoincut()")
14     public Object around1(ProceedingJoinPoint joinPoint) throws Throwable {
15         System.out.println("---- aspect transaction ----");
16         Object ret = joinPoint.proceed();
17         return ret;
18     }
19 }
切换动态代理的创建方式(JDK、Cglib)
AOP 底层实现 2 种代理创建方式:
- JDK:通过 实现接口,做新的实现类 创建代理对象
- Cglib:通过 继承父类,做新的子类 创建代理对象
默认情况 AOP 编程 底层应用 JDK动态代理创建方式。
基于注解的 AOP 开发 中切换为 Cglib:
<aop:aspectj-autoproxy proxy-target-class="true"/>
传统的 AOP 开发 中切换为 Cglib:
<aop:config proxy-target-class="true">
    ...
</aop:config>
AOP 开发中的一个坑(业务方法互相调用)
坑!:在同⼀个业务类中,进⾏业务方法间的相互调用,只有最外层的方法,才是加入了额外功能(内部的方法,通过普通的方式调用,都调用的是原始方法)。如果想让内层的方法也调用代理对象的方法,就要实现 AppicationContextAware 获得⼯厂,进而获得代理对象。
 1 public class UserServiceImpl implements UserService, ApplicationContextAware {
 2     private ApplicationContext ctx;
 3     @Override
 4     public void setApplicationContext(ApplicationContext applicationContext) throws BeansException {
 5         ctx = applicationContext;
 6     }
 7     @Override
 8     public void register(User user) {
 9         System.out.println("UserServiceImpl.register 业务运算 + DAO");
10
11         // this.login("zhenyu", "123456"); // 这么写调用的是本类的 login 方法, 即原始对象的 login 方法
12         // 为什么不在这里创建一个工厂获取代理对象呢?
13         // Spring的工厂是重量级资源, 一个应用中应该只创建一个工厂.
14         // 因此我们必须通过 ApplicationContextAware 拿到已经创建好的工厂
15         UserService userService = (UserService) ctx.getBean("userService");
16         userService.login("yusael", "123456");
17     }
18
19     @Override
20     public boolean login(String name, String password) {
21         System.out.println("UserServiceImpl.login 业务运算 + DAO");
22         return true;
23     }
24
25 }
AOP 知识总结