http://www.derekseaman.com/2012/09/vmware-vcenter-51-installation-part-9.html
In this installment of the vCenter 5.1 installation series I’ll show you a few vCenter SSO Configuration changes that you will likely want to make. These steps are optional, but probably nearly everyone will want to implement some form of these changes. The two tweaks are setting the default login domain for SSO and the other is using an AD group to control admin rights to the SSO service and not rely on the default built-in account. Oh and let’s not forget licensing too!
Before we get started, listed below are the other related articles in this series:
Part 1 (SSO Service)
Part 2 (Create vCenter SSL Certificates)
Part 3 (Install vCenter SSO SSL Certificate)
Part 4 (Install Inventory Service)
Part 5 (Install Inventory Service SSL Certificate)
Part 6 (Create vCenter and VUM Databases)
Part 7 (Install vCenter Server)
Part 8 (Install Web Client)
Part 10 (Create VUM DSN)
Part 11 (Install VUM)
Part 12 (VUM SSL Configuration)
Part 13 (VUM Configuration)
Part 14 (Web Client and Log Browser SSL)
Part 15 (ESXi Host SSL Certificate)
vCenter SSO Configuration
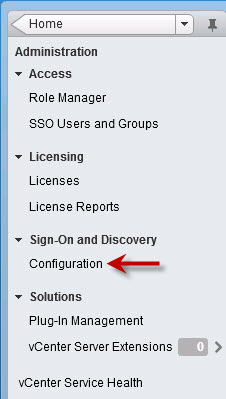
1. Login to the vSphere Web Client with the SSO administrator credentials (admin@System-Domain). In the left pane click on Administration then click on Configuration under Sign-On and Discovery.
2. If you wish to reduce future sign in keystrokes you can add your Active Directory domain to the list of default SSO domains. To do that highlight your AD server URL then click on the blue dot with an arrow, as shown below.

3. Acknowledge any warning about possible locked out accounts, and you should now see your AD domain listed under default domains.

Important! Click on the blue disk icon to save your change, otherwise you will be wondering why it is not working as expected.

4. At this point you may want to add an AD-based group to the SSO administrator group, so you don’t have to remember, or share, the built-in admin account credentials. To do that click on SSO Users and Groups in the left pane. Click on the ___Administrators___ principal name then click on the person icon with the plus sign next to it.
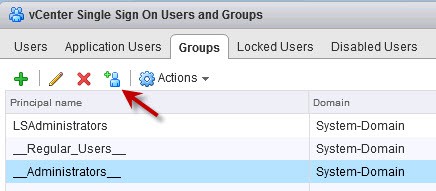
5. Now I created a group in AD called APP_VCTR_SSO_Administrator and added my admin account to it. Use whatever group name suits your needs. Change the identity source to your domain name then enter the name of the AD group and click on Search. After a few seconds it should populate the fields, then click on Add. Finally click OK.

6. Log out of the vSphere web client, logoff Windows if needed to refresh your group membership, then then validate you can access the SSO configuration once you login to the Web Client.
7. You probably want to assign a license key to your vCenter server, otherwise after the grace period is up, it will be non-functional. In the web client, go back to the Home page in the left pane, then click onAdministration.

8. Once that pane opens, click on Licenses. You can now input your licenses for vCenter and ESXi hosts. Don’t forget to assign the licenses to their respective products.
Next up is creating the VUM DSN, which is covered in Part 10.