在上一篇“设定定期执行”之后,我们就需要处理将图片上传到指定服务器上了。
我选择的方式是将图片以post的形式传送到服务器上,这个和浏览器中提交图片是一个道理。
我们的步骤是
========================
1、启动相机,照相。
2、获得相机的照片文件
3、将照片文件post 提交到服务器端
========================
我们知道android 中的程序是可以通过intent来共享的,我们知道相机照相的公开intent,只需要向其访问就ok了
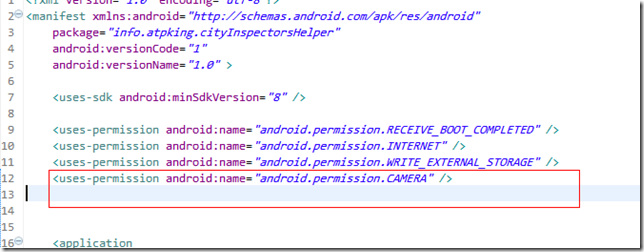
当然,要调用相机,首先得在manifest 中给相机的调用权限(ps:模拟器现在也可以使用相机功能了,老版本不能用,升级下android development tools 即可,模拟器调用相机好像不需要权限)
<uses-permission android:name="android.permission.CAMERA" />
由于我们要获得相机的照片文件,所以需要给相机制定我们存储的路径,
我们可以参看google 官方的Taking photos simply
我在这里做了一个dispatchTalking方法来处理这个事情
private void dispatchTakePictureIntent(int actionCode) throws IOException {
Intent takePictureIntent = new Intent(MediaStore.ACTION_IMAGE_CAPTURE); File f = createImageFile();//生成文件路径takePictureIntent.putExtra(MediaStore.EXTRA_OUTPUT, Uri.fromFile(f));
startActivityForResult(takePictureIntent, actionCode);
}
辅助代码如下所示,其中mCurrentPhotoPath为中间变量
private File createImageFile() throws IOException { // Create an image file nameString timeStamp = new SimpleDateFormat("yyyyMMdd_HHmmss")
.format(new Date()); String imageFileName = JPEG_FILE_PREFIX + timeStamp + "_";File image = File.createTempFile(imageFileName, JPEG_FILE_SUFFIX,
getAlbumDir());
mCurrentPhotoPath = image.getAbsolutePath();
return image;}
private File getAlbumDir() { File storageDir = null; // 检测sd卡是否可以写入 if (Environment.MEDIA_MOUNTED.equals(Environment .getExternalStorageState())) {storageDir = mAlbumStorageDirFactory
.getAlbumStorageDir(getAlbumName());
if (storageDir != null) {
if (!storageDir.mkdirs()) { if (!storageDir.exists()) { Log.d(getString(R.string.app_name), "failed to create directory");return null;
}
}
}
} else { Log.v(getString(R.string.app_name), "External storage is not mounted READ/WRITE.");}
return storageDir;}
private String getAlbumName() {return "InspectorAlbum";
}
ok,准备工作完毕,我们调用的时候只需要调用dispatchTakePictureIntent即可,我这里是绑定在optionsMenu里的
case R.id.TakePhoto:
            try {
                dispatchTakePictureIntent(CAMERA_INTENT_SIGN);
            } catch (IOException e) {
                // TODO Auto-generated catch block
                e.printStackTrace();
                Toast.makeText(getApplicationContext(), "存储照片失败",
                        Toast.LENGTH_SHORT).show();
            }
之后接收图片很简单,只需要指定onActivityResult中处理就ok了
@Override
public void onActivityResult(int requestCode, int resultCode, Intent data) {
Log.v(getString(R.string.app_name), "resultCode=" + resultCode
+ ",requestCode=" + requestCode); if (resultCode == Activity.RESULT_OK && requestCode == CAMERA_INTENT_SIGN) {Log.v(getString(R.string.app_name), "存储的相片地址为" + mCurrentPhotoPath);
//启动服务,上传图片的干活 Intent intent = new Intent(getApplicationContext(), UploadImgService.class); intent.putExtra("storageURI", mCurrentPhotoPath);startService(intent);
}
}
之后就是这个UploadImgService 服务了,我写的这个服务主要的实现目的从名字就可以看的出来:图片的上传
以下是我自己做的service的笔记
---------------------------------------------------------------------------------------
android服务有两种
分为本地service 和 remote service,本地service只调用自己的application 而remote service 可以走其他的application
remote service 使用Android interface definition language (AIDL) 描述自己
什么时候用local service 什么时候用remote service
当一个service 严格的只被同一个程序的模块调用的时候,客户端应该使用Context.startService() 启动一个service,这个service就是local service,因为他的作用是,为这个application做一个后台的任务。
如果说service支持onBind()方法,则他是remote service,他可以被Context.bindService()这个线程间通信请求调用。
一般情况下,我们不把一个程序既做成local 又做成remote service
Local Services
开始 Context.startService()
结束 Context.stopService 或 Service 自身调用stopSelf();
当Context.startService() 被调用但是Service还没有被创建的时候,系统会自动初始化,并且调用service的onStartCommand()方法。
如果说调用Context.startService 的时候Service已经开始了,他会重新执行onStartCommand 但没有重新实例化一个服务
如果说想只做一个Thread 在Service 中,可以考虑将其放入OnCreate 中 保证其只执行一次,但OnCreate 中是无法调用到传来的Intent 的信息的,如果想用Intent 的话,就只有在onStartCommand 用。
AIDL Services
建立一个Remote Service 的步骤
1、写一个向client定义的接口的aidl文件,aidl 文件使用java 语法,以aidl 后缀结尾。使用和Android Project同样的命名空间
2、在Eclipse 的src 下建立此文件,Android Eclipse 插件会调用AIDL 编译器去省城一个java interface
3、实现一个Service 并且 通过onBind() 返回interface
4、在manifest文件中加入服务配置
------------------------------------------------------------------------------------------
我们在这里使用的是 local service,去发起一个post 提交。
值得注意的是,由于service 仍然是在主线程进行的,所以说,受到5秒规则(程序busy时间超过5s会提示用户是否结束该程序),又由于post一张照片的时间很有可能是大于5s的,所以我们需要在这个服务上再开启一个子线程来处理post提交。
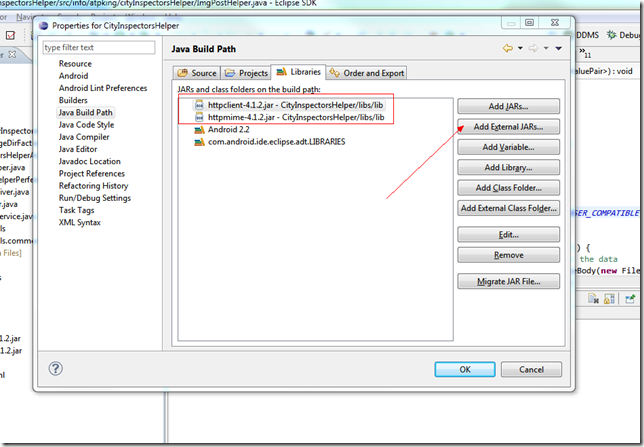
android本身的httpClient 支持post提交,但是对复杂form模型的支持不是很好,这个时候我们需要使用apache的组件httpcomponent来实现,下载地址在这里 下载解压后,我们需要在项目属性的java buildpath 的library添加 httpclient和httpmime ,他们放在下载文件的lib文件夹里。
ok
一步一步来,最先解决如何post一张图片的问题:
我们首先从intent中得到file的地址,之后将其添加到post 提交
List<NameValuePair> params = new ArrayList<NameValuePair>();
params.add(new BasicNameValuePair("image",
intent.getStringExtra("storageURI")));String ServerAddress = settings.getString(
"serverip_preference", "http://10.0.2.2:8888/upload");
ImgPostHelper.post(ServerAddress, params);这里使用了一个自己写的ImgPostHelper 帮助类,代码如下
package info.atpking.cityInspectorsHelper;
import java.io.File;
import java.io.IOException;
import java.util.List;
import org.apache.http.NameValuePair;
import org.apache.http.client.HttpClient;
import org.apache.http.client.methods.HttpPost;
import org.apache.http.entity.mime.HttpMultipartMode;
import org.apache.http.entity.mime.MultipartEntity;
import org.apache.http.entity.mime.content.FileBody;
import org.apache.http.entity.mime.content.StringBody;
import org.apache.http.impl.client.DefaultHttpClient;
import org.apache.http.protocol.BasicHttpContext;
import org.apache.http.protocol.HttpContext;
public class ImgPostHelper {
public static void post(String url, List<NameValuePair> nameValuePairs) {
HttpClient httpClient = new DefaultHttpClient(); HttpContext localContext = new BasicHttpContext(); HttpPost httpPost = new HttpPost(url); try { MultipartEntity entity = new MultipartEntity(HttpMultipartMode.BROWSER_COMPATIBLE);for(int index=0; index < nameValuePairs.size(); index++) {
if(nameValuePairs.get(index).getName().equalsIgnoreCase("image")) {
// If the key equals to "image", we use FileBody to transfer the dataentity.addPart(nameValuePairs.get(index).getName(), new FileBody(new File (nameValuePairs.get(index).getValue())));
} else { // Normal string data entity.addPart(nameValuePairs.get(index).getName(), new StringBody(nameValuePairs.get(index).getValue()));}
}
httpPost.setEntity(entity);
httpClient.execute(httpPost, localContext);
} catch (IOException e) {e.printStackTrace();
}
}
}
这里相当于我们post提交了一个图片,他的key name 为 image
之后我们要实现使用一个线程来处理这个上传
我们在服务的OnStart 中填入一个线程
public void onStart(Intent intent, int startId) {
super.onStart(intent, startId);
Log.v(TAGLOG, "我被启动了");Thread thr = new Thread(null, mTask, "AlarmService_Service");
thr.start();
this.intent = intent;}
之后我们要实现这个mTask
    Runnable mTask = new Runnable() {
        public void run() {
            // 干活的家伙
            if (intent.getExtras().containsKey("storageURI")) {

                Log.v(getString(R.string.app_name), "在这里上传");
                List<NameValuePair> params = new ArrayList<NameValuePair>();

                params.add(new BasicNameValuePair("image",
                        intent.getStringExtra("storageURI")));

                String ServerAddress = settings.getString(
                        "serverip_preference", "http://10.0.2.2:8888/upload");

                ImgPostHelper.post(ServerAddress, params);

            }
            UploadImgService.this.stopSelf();
        }


    };
注意一下,这里的10.0.2.2 是你虚拟机访问你的机器的地址,我在机器上搭建了一个node.js 的接受图片post的小网站。
至此,手机端到这里就完全结束了,下一讲说怎样用node.js 搭建接收端(当然你可以用.net 做一个接收post的页面,什么技术都可以)

