1、拓扑图
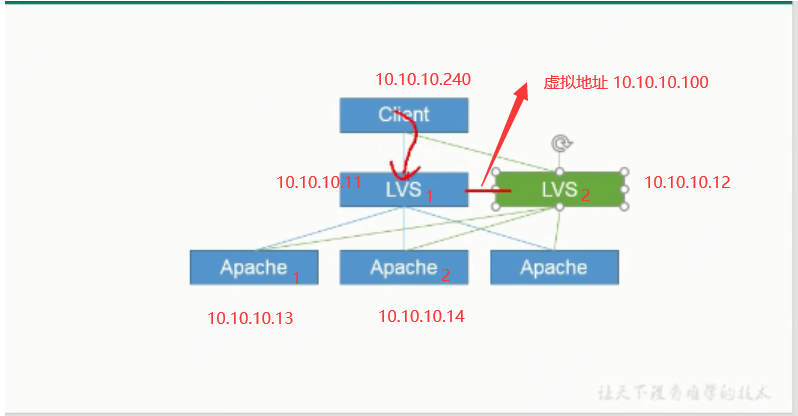
说明:A: LVS1和LVS2 两台负载服务器只需要eth0分别配置10.1010.11和10.10.10.12地址,虚拟地址10.10.10.100只需要在/etc/keepalived/keepalived里面的VIP地址
上面配置就行,心跳是通过两台的eth0 11和12地址自动检测
B:两台LVS服务器都需要安装keepalived和ipvsadm 但是ipvsadm不需要在执行分配任务工作(也就是不需要执行ipvsadm -A -t 20.20.20.11:80 -s rr等几个操作 )
C:两台LVS最好在/etc/sysctl.conf加上“关闭广播的功能”
D:Apache等几台WEB服务器需要添加lo:0网卡并配置10.10.10.100VIP地址,但是这个地址只给本地使用,且/etc/sysctl.conf需要添加arp抑制,为了
防止用户访问VIP地址直接到WEB服务器上
E:任意一台WEB服务down或者网络down掉,主LVS 都会自动判断并去除
任意一台WEB服务up或者网络up,主LVS 都会自动判断添加上
F:主LVSdown掉,所有业务都会自动切换到备LVS,无任何影响
当之前主的LVS起来后,所有业务又会切换到原来的那台主LVS
安装步骤:
1、(4台服务器都需要操作) 临时:service NetworkManager stop (因为开了子接口所有需要关闭网卡守护进程,可能有影响)
永久:chkconfig NetworkManager off
2、yum -y install keepalived 和yum -y install ipvsadm
3、vim /etc/sysctl.conf 关闭广播功能(这一步属于优化步骤,可以不做)
net.ipv4.conf.all.send_redirects= 0
net.ipv4.conf.default.send_redirects= 0
net.ipv4.conf.eth0.send_redirects= 0
4、/etc/keepalived/keepalived.conf配置
LVS1(主的配置)
! Configuration File for keepalived
global_defs {
router_id R1
}
vrrp_instance VI_1 {
state MASTER
interface eth0
virtual_router_id 66
priority 80
advert_int 1
authentication {
auth_type PASS
auth_pass 1111
}
virtual_ipaddress {
10.10.10.100
}
}
virtual_server 10.10.10.100 80 {
delay_loop 2
lb_algo rr
lb_kind DR
protocol TCP
real_server 10.10.10.13 80 {
weight 1
TCP_CHECK {
connect_port 80
connect_timeout 3
nb_get_retry 3
delay_before_retry 4
}
}
real_server 10.10.10.14 80 {
weight 1
TCP_CHECK {
connect_timeout 3
nb_get_retry 3
delay_before_retry 4
}
}
}
LVS2(备的配置)
! Configuration File for keepalived
global_defs {
router_id R2
}
vrrp_instance VI_1 {
state SLAVE
interface eth0
virtual_router_id 66
priority 30
advert_int 1
authentication {
auth_type PASS
auth_pass 1111
}
virtual_ipaddress {
10.10.10.100
}
}
virtual_server 10.10.10.100 80 {
delay_loop 6
lb_algo rr
lb_kind DR
protocol TCP
real_server 10.10.10.13 80 {
weight 1
TCP_CHECK {
connect_port 80
connect_timeout 3
nb_get_retry 3
delay_before_retry 3
}
}
real_server 10.10.10.14 80 {
weight 1
TCP_CHECK {
connect_port 80
connect_timeout 3
nb_get_retry 3
delay_before_retry 3
}
}
}
5、 重启service keepalived start 和service ipvsadm start
6、service ipvsadm save(永久生效)
几台WEB服务器配置:
1、cp -a ifcfg-lo ifcfg-lo:0
vim !$ 删除UUID和MAC地址 更改DEVICE=lo:0 Netmask=255.255.255.0(此地址只是一个标识使用32位没有关系)
2、/etc/sysctl.conf (只发送和接收给对应的网卡的,其他的不管)
#LVS -ARP(通讯行为控制)
net.ipv4.conf.all.arp_ignore = 1
net.ipv4.conf.all.arp_announce = 2
net.ipv4.conf.default.arp_ignore = 1
net.ipv4.conf.default.arp_announce = 2
net.ipv4.conf.eth0.arp_ignore = 1
net.ipv4.conf.eth0.arp_announce = 2
sysctl -p (生效)
3、route add -host 10.10.10.100 dev lo:0(有人访问100的时候交给lo:0)
将以上命令加入/etc/rc.local 保证开机自动启动