1、Centos7系统库中默认是没有nginx的rpm包的,所以我们需要先更新下rpm依赖库
(1):使用yum安装nginx,安装nginx库
rpm -Uvh http://nginx.org/packages/centos/7/noarch/RPMS/nginx-release-centos-7-0.el7.ngx.noarch.rpm
(2):使用下面命令安装nginx
yum -y install nginx
(3):启动nginx
systemctl start nginx   #centos7

查看nginx版本
nginx -v
nginx version: nginx/1.18.0
(4):防火墙允许通过80端口-
(5):重启防火墙
systemctl start firewalld
(6):访问网站,输入服务器ip地址,查看是否出现 'Welcome To Nginx',如果想更改网站根目录,修改地址:vim /etc/nginx/conf.d/default.conf,修改Root 后面的路径

2、安装Mysql,先更新yum源
(1):yum源下载地址,根据自己需要的版本选择相应的源
https://dev.mysql.com/downloads/repo/yum/

(2):我们版本是6.x的,所以选择linux 6 下载
wget https://repo.mysql.com//mysql57-community-release-el6-11.noarch.rpm
(3):安装mysql的yum源
rpm -Uvh mysql57-community-release-el6-11.noarch.rpm
或
yum -y localinstall mysql57-community-release-el6-11.noarch.rpm
(4):查看是否配置mysql源成功
在/etc/yum.repos.d下面

(5):安装Mysql
yum -y install mysql-community-server
#时间有点长,稍微等一下
(6):开始mysql服务
service mysqld start

(7):Mysql安装成功之后,会自动创建root的密码,存储在/var/log/mysqld.log,可以通过以下命令来查看
grep 'temporary password' /var/log/mysqld.log

(8):登录mysql,修改密码
mysql> ALTER USER 'root'@'localhost' IDENTIFIED BY 'Wang123!';
(9):开启远程链接,iptables开放3306端口
firewall-cmd --zone=public --add-port=3306/tcp --permanent

vim /etc/sysconfig/iptables   (我自己没找到这个文件,所以用上面命令开放了80和3306的端口)

(10):重启防火墙使iptables生效
systemctl start firewalld
3、安装PHP(php-5.6)(根据自己要安装的版本进行下载源码包 https://www.php.net/releases/)
(1)cd /usr/local/src/
(2)下载:wget http://cn2.php.net/distributions/php-5.6.36.tar.gz
(3) 解压源码包,创建账号
tar zxf php-5.6.36.tar.gz
useradd -s /sbin/nologin php-fpm
(4) 新建目录:
mkdir /usr/local/php-fpm/etc
(5)配置编译选项:#多了--enable-fpm,如果不加该参数,则不会有php-fpm执行文件生成,更不能启动php-fpm服务
./configure
> --prefix=/usr/local/php-fpm
> --with-config-file-path=/usr/local/php-fpm/etc
> --enable-fpm
> --with-fpm-user=php-fpm
> --with-fpm-group=php-fpm
> --with-mysql=/usr/local/mysql
> --with-mysql-sock=/tmp/mysql.sock
> --with-libxml-dir
> --with-gd
> --with-jpeg-dir
> --with-png-dir
> --with-freetype-dir
> --with-iconv-dir
> --with-zlib-dir
> --with-mcrypt
> --enable-soap
> --enable-gd-native-ttf
> --enable-ftp
> --enable-mbstring
> --enable-exif
> --disable-ipv6
> --with-pear
> --with-curl
> --with-openssl
(6)可能会出现的错误
错误1:
checking for cc... no
checking for gcc... no
configure: error: in `/usr/local/src/php-5.6.36':
configure: error: no acceptable C compiler found in $PATH
See `config.log' for more details

# yum install -y gcc                #这里提示安装gcc
#安装完后继续执行这一步
# ./configure --prefix=/usr/local/php-fpm --with-config-file-path=/usr/local/php-fpm/etc --enable-fpm --with-fpm-user=php-fpm --with-fpm-group=php-fpm --with-mysql=/usr/local/mysql --with-mysql-sock=/tmp/mysql.sock --with-libxml-dir --with-gd --with-jpeg-dir --with-png-dir --with-freetype-dir --with-iconv-dir --with-zlib-dir --with-mcrypt --enable-soap --enable-gd-native-ttf --enable-ftp --enable-mbstring --enable-exif --disable-ipv6 --with-pear --with-curl --with-openssl
错误2:
checking for xml2-config path...
configure: error: xml2-config not found. Please check your libxml2 installation.

# yum list |grep libxml2
libxml2.x86_64                              2.9.1-6.el7_2.3            @anaconda
libxml2.i686                                2.9.1-6.el7_2.3            base
libxml2-devel.i686                          2.9.1-6.el7_2.3            base
libxml2-devel.x86_64                        2.9.1-6.el7_2.3            base
libxml2-python.x86_64                       2.9.1-6.el7_2.3            base
libxml2-static.i686                         2.9.1-6.el7_2.3            base
libxml2-static.x86_64                       2.9.1-6.el7_2.3            base

# yum install -y libxml2-devel.x86_64                #安装libxml-devel
#继续执行这一步
 ./configure --prefix=/usr/local/php-fpm --with-config-file-path=/usr/local/php-fpm/etc --enable-fpm --with-fpm-user=php-fpm --with-fpm-group=php-fpm --with-mysql=/usr/local/mysql --with-mysql-sock=/tmp/mysql.sock --with-libxml-dir --with-gd --with-jpeg-dir --with-png-dir --with-freetype-dir --with-iconv-dir --with-zlib-dir --with-mcrypt --enable-soap --enable-gd-native-ttf --enable-ftp --enable-mbstring --enable-exif --disable-ipv6 --with-pear --with-curl --with-openssl
错误3:
configure: error: Cannot find OpenSSL's <evp.h>

# yum install -y openssl openssl-devel                #安装openssl和openssl-devel
#继续执行这一步
 ./configure --prefix=/usr/local/php-fpm --with-config-file-path=/usr/local/php-fpm/etc --enable-fpm --with-fpm-user=php-fpm --with-fpm-group=php-fpm --with-mysql=/usr/local/mysql --with-mysql-sock=/tmp/mysql.sock --with-libxml-dir --with-gd --with-jpeg-dir --with-png-dir --with-freetype-dir --with-iconv-dir --with-zlib-dir --with-mcrypt --enable-soap --enable-gd-native-ttf --enable-ftp --enable-mbstring --enable-exif --disable-ipv6 --with-pear --with-curl --with-openssl
错误4:
checking for cURL in default path... not found
configure: error: Please reinstall the libcurl distribution -
    easy.h should be in <curl-dir>/include/curl/

# yum install -y libcurl-devel                #安装libcurl-devel

#继续执行这一步
 ./configure --prefix=/usr/local/php-fpm --with-config-file-path=/usr/local/php-fpm/etc --enable-fpm --with-fpm-user=php-fpm --with-fpm-group=php-fpm --with-mysql=/usr/local/mysql --with-mysql-sock=/tmp/mysql.sock --with-libxml-dir --with-gd --with-jpeg-dir --with-png-dir --with-freetype-dir --with-iconv-dir --with-zlib-dir --with-mcrypt --enable-soap --enable-gd-native-ttf --enable-ftp --enable-mbstring --enable-exif --disable-ipv6 --with-pear --with-curl --with-openssl
错误5:
configure: error: jpeglib.h not found.

# yum -y install libjpeg-devel                #安装libjpeg-devel
#继续执行这一步
 ./configure --prefix=/usr/local/php-fpm --with-config-file-path=/usr/local/php-fpm/etc --enable-fpm --with-fpm-user=php-fpm --with-fpm-group=php-fpm --with-mysql=/usr/local/mysql --with-mysql-sock=/tmp/mysql.sock --with-libxml-dir --with-gd --with-jpeg-dir --with-png-dir --with-freetype-dir --with-iconv-dir --with-zlib-dir --with-mcrypt --enable-soap --enable-gd-native-ttf --enable-ftp --enable-mbstring --enable-exif --disable-ipv6 --with-pear --with-curl --with-openssl
错误6:
configure: error: png.h not found.

# yum install -y libpng libpng-devel                #安装libpng-devel
#继续执行这一步
 ./configure --prefix=/usr/local/php-fpm --with-config-file-path=/usr/local/php-fpm/etc --enable-fpm --with-fpm-user=php-fpm --with-fpm-group=php-fpm --with-mysql=/usr/local/mysql --with-mysql-sock=/tmp/mysql.sock --with-libxml-dir --with-gd --with-jpeg-dir --with-png-dir --with-freetype-dir --with-iconv-dir --with-zlib-dir --with-mcrypt --enable-soap --enable-gd-native-ttf --enable-ftp --enable-mbstring --enable-exif --disable-ipv6 --with-pear --with-curl --with-openssl
错误7:
configure: error: freetype-config not found.

# yum install -y freetype freetype-devel                #安装freetype-devel
#继续执行这一步
 ./configure --prefix=/usr/local/php-fpm --with-config-file-path=/usr/local/php-fpm/etc --enable-fpm --with-fpm-user=php-fpm --with-fpm-group=php-fpm --with-mysql=/usr/local/mysql --with-mysql-sock=/tmp/mysql.sock --with-libxml-dir --with-gd --with-jpeg-dir --with-png-dir --with-freetype-dir --with-iconv-dir --with-zlib-dir --with-mcrypt --enable-soap --enable-gd-native-ttf --enable-ftp --enable-mbstring --enable-exif --disable-ipv6 --with-pear --with-curl --with-openssl
错误8:
configure: error: mcrypt.h not found. Please reinstall libmcrypt.

# yum install -y epel-release

# yum install -y libmcrypt-devel                #安装libmcrypt-devel(安装之前要安装epel-release这个扩展源)

#继续执行这一步
 ./configure --prefix=/usr/local/php-fpm --with-config-file-path=/usr/local/php-fpm/etc --enable-fpm --with-fpm-user=php-fpm --with-fpm-group=php-fpm --with-mysql=/usr/local/mysql --with-mysql-sock=/tmp/mysql.sock --with-libxml-dir --with-gd --with-jpeg-dir --with-png-dir --with-freetype-dir --with-iconv-dir --with-zlib-dir --with-mcrypt --enable-soap --enable-gd-native-ttf --enable-ftp --enable-mbstring --enable-exif --disable-ipv6 --with-pear --with-curl --with-openssl
(7)配置成功
+--------------------------------------------------------------------+
| License:                                                           |
| This software is subject to the PHP License, available in this     |
| distribution in the file LICENSE.  By continuing this installation |
| process, you are bound by the terms of this license agreement.     |
| If you do not agree with the terms of this license, you must abort |
| the installation process at this point.                            |
+--------------------------------------------------------------------+

Thank you for using PHP.

config.status: creating php5.spec
config.status: creating main/build-defs.h
config.status: creating scripts/phpize
config.status: creating scripts/man1/phpize.1
config.status: creating scripts/php-config
config.status: creating scripts/man1/php-config.1
config.status: creating sapi/cli/php.1
config.status: creating sapi/fpm/php-fpm.conf
config.status: creating sapi/fpm/init.d.php-fpm
config.status: creating sapi/fpm/php-fpm.service
config.status: creating sapi/fpm/php-fpm.8
config.status: creating sapi/fpm/status.html
config.status: creating sapi/cgi/php-cgi.1
config.status: creating ext/phar/phar.1
config.status: creating ext/phar/phar.phar.1
config.status: creating main/php_config.h
config.status: executing default commands
(8)编译php:
make
(9)安装php
make install
(10)复制php配置文件到安装目录
cp php.ini-production /usr/local/php/etc/php.ini

vim /usr/local/php/etc/php.ini //display_errors = On,显示错误信息
(11)复制启动脚本
cp ./sapi/fpm/init.d.php-fpm /etc/init.d/php-fpm

chmod +x /etc/init.d/php-fpm
(12)修改php-fpm配置文件
cd /usr/local/php/etc

cp php-fpm.conf.default php-fpm.conf

vim php-fpm.conf

 //去掉 pid = run/php-fpm.pid 前面的分号
(13)启动php
/etc/init.d/php-fpm start //启动

/etc/init.d/php-fpm stop //停止

/etc/init.d/php-fpm restart //重启
ps -ef | grep php //查看php启动状态

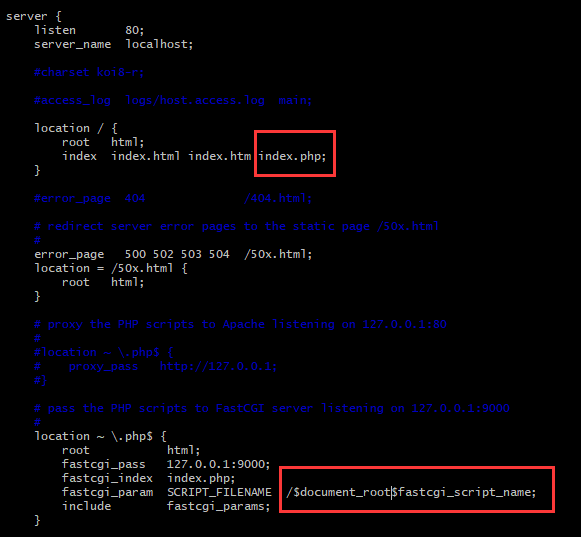
(14)配置nginx.conf
vim /usr/local/nginx/conf/nginx.conf
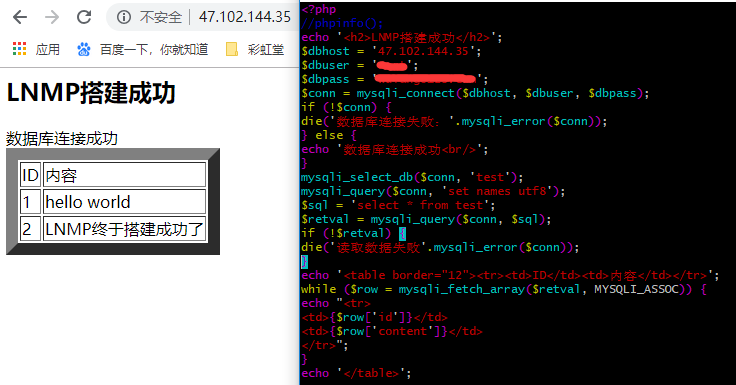
(15)/usr/local/nginx/html中创建index.php,重启php和nginx。
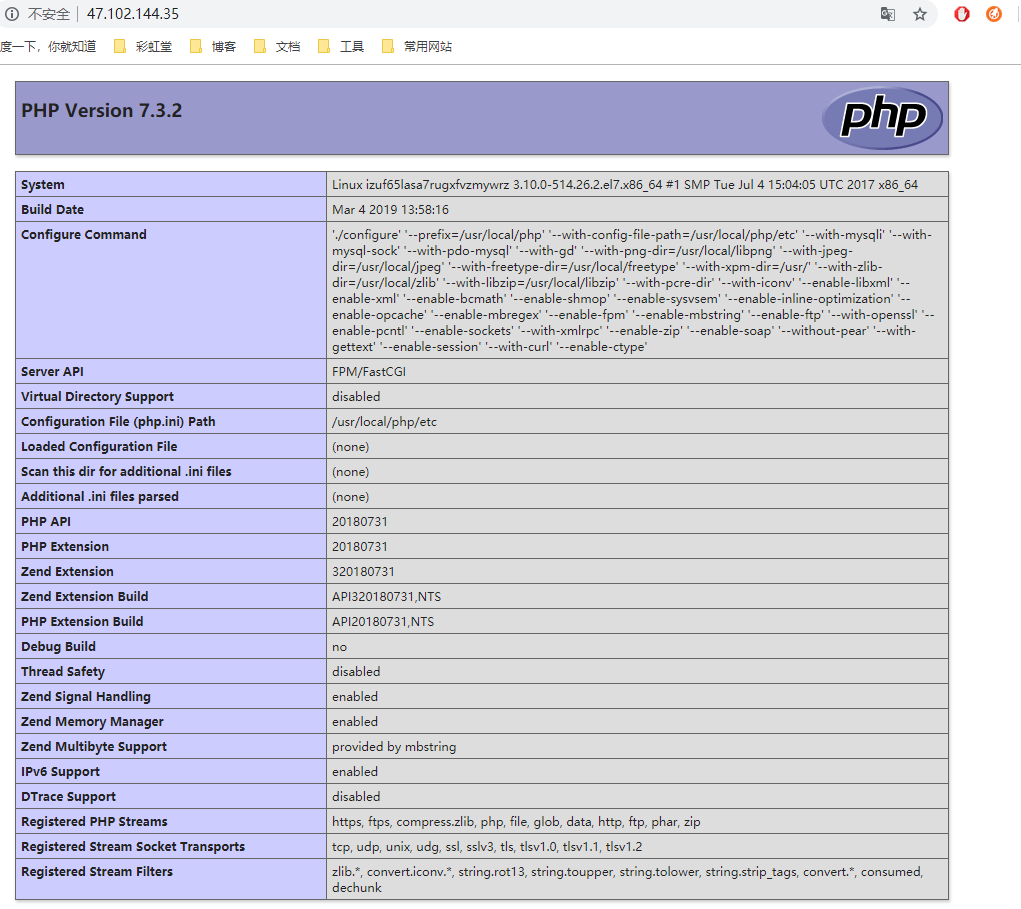
连接数据库后的效果: