一 基础使用
1. 简介
ansible是新出现的自动化运维工具,基于Python开发,集合了众多运维工具(puppet、cfengine、chef、func、fabric)的优点,实现了批量系统配置、批量程序部署、批量运行命令等功能。
ansible是基于模块工作的,本身没有批量部署的能力。真正具有批量部署的是ansible所运行的模块,ansible只是提供一种框架。主要包括:
(1). 连接插件connection plugins:负责和被监控端实现通信;
(2). host inventory:指定操作的主机,是一个配置文件里面定义监控的主机;
(3). 各种模块核心模块、command模块、自定义模块;
(4). 借助于插件完成记录日志邮件等功能;
(5). playbook:剧本执行多个任务时,非必需可以让节点一次性运行多个任务。
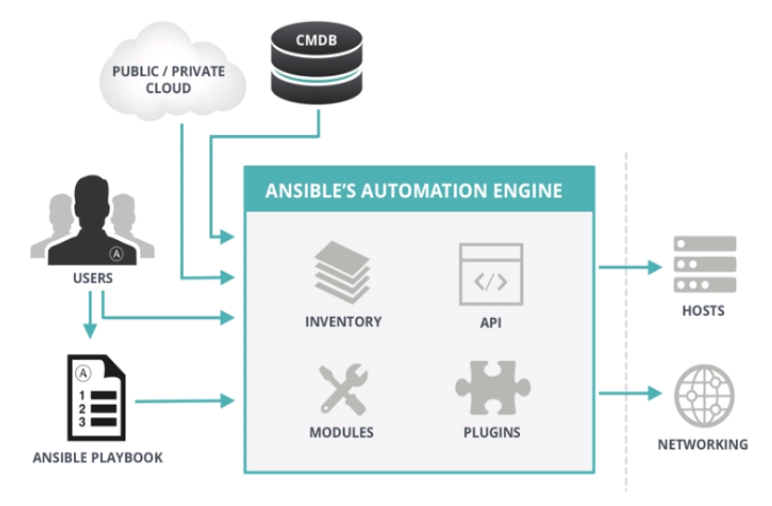
2. 总体架构
3. 应用场景
<1>. Dev开发环境
使用者:程序员
功能:程序员开发软件测试BUG的环境
管理者:千万不能是运维,一定是要程序员自已
<2>. 测试环境
使用者:qa测试工程师
功能:测试经过Dev环境测试通过的软件的功能
管理者:运维
备注:测试环境往往有多套(测试环境满足测试功能即可,不宜过多)
(1)测试者希望测试环境有多套
公司的产品多产品线并发,即多个版本,意味着多个版本同步测试
(2)通常情况下,测试环境有多少套和产品线数量保持一样
<3>. 发布环境(代码发布机,有些公司堡垒机(安全屏障))
使用者:运维
功能:发布代码至生产环境
管理者:运维(有经验的)
发布机:往往需要有2台(主备)
<4>. 生产环境
使用者:运维,只能是运维(极少数情况下会开放权限给核心开发人员,极少数公司将该 环境权限完全开放给开发人员并让开发人员维护)
功能:对用户提供公司产品的服务
管理者:只能是运维
生产环境服务器数量:一般比较多,且应用非常重要。往往需要自动工具协助部署配置应用。机器数量具体和公司业务规模相关。
<5>. 灰度环境(生产环境的一部分)
使用者:运维
功能:在全量发布代码前将代码的功能面向少量精准用户发布的环境
案例:
大家手头100台服务器,先发布其中的10台服务器,这10台服务器就是灰度服务器。
管理者:只能是运维
为什么灰度环境:往往该版本功能变更较大,为保险起见特意先让一部分用户优化体验该功能,待这部分用户使用没有重大问题的时候,再全量发布至所有服务器。
4. 优点
Agentless(去中心化)
Stupied Simple (上手简单,学习曲线平滑)
SSH by default (安全,无需安装客户端)
YAML no code,定制剧本 (语法简单,维护方便)
5. 任务执行流程

二 安装及配置
1. 安装
[root@node1 ~]# yum install ansible -y
[root@node1 ~]# ansible --version
ansible 2.2.1.0
  config file = /etc/ansible/ansible.cfg
  configured module search path = Default w/o overrides
2. ssh免秘钥登录设置
[root@node1 ~]# ssh-keygen
[root@node1 ~]# ssh-copy-id root@172.18.67.12
[root@node1 ~]# ssh-copy-id root@172.18.67.13
3. ansible配置
[root@node1 ~]# vim /etc/ansible/ansible.cfg
[defaults]
#inventory      = /etc/ansible/hosts                 # 主机列表配置文件
#library        = /usr/share/my_modules/             # 自定义库文件存放目录
#remote_tmp     = $HOME/.ansible/tmp                 # 生成的临时py命令文件存放在远程主机的目录
#local_tmp      = $HOME/.ansible/tmp                 # 本机的临时命令执行目录
#forks          = 5                                  # 默认并发数
#poll_interval  = 15                                 # 默认的线程池
#sudo_user      = root                               # 默认sudo 用户
#ask_sudo_pass = True
#ask_pass      = True
#transport      = smart
#remote_port    = 22
#module_lang    = C
#module_set_locale = False
#roles_path = /etc/ansible/roles  #roles默认存放目录
#host_key_checking = False                           # 检查对应服务器的host_key
#timeout = 10                                        #检查超时
[privilege_escalation]          #定义权限[paramiko_connection]
[ssh_connection]
[accelerate]            #定义加速
[selinux]
[colors] #命令输出颜色显示
三 ansible常用模块的使用
1. command模块:使用ansible自带模块执行命令,如果要用 > < | & ' ' 使用shell模块
[root@node1 ~]# ansible web -m command -a 'ls /tmp'                               #成功执行
[root@node1 ~]# ansible web -m command -a 'cat /tmp/mrlapulga.md | grep echo'     #执行失败,即使不返回失败结果也不会正常生效
- creates                                                          #command命令不能使用管道符,<>&等
        a filename or (since 2.0) glob pattern, when it already exists, this
        step will *not* be run.
        [Default: None]
2. shell 模块: 调用bash执行命令 类似 cat /tmp/mrlapulga.md | awk -F'|' '{print $1,$2}' &> /tmp/mrlapulga.txt 这些复杂命令,即使使用shell也会失败,解决办法:写到脚本时,copy到远程,执行,再把需要的结果拉回执行命令的机器(执行Ansible命令的机器往往称为:Master机或者中控机或者堡垒机)
[root@node1 ~]# ansible web -m shell -a 'echo 123456 | passwd –-stdin mrlapulga'
3. copy:复制本地文件至远程服务器,并且能够改属性等
[root@node1 ~]# ansible web -m copy -a 'src=/root/125.sh dest=/root/p.sh owner=mrlapulga group=mrlapulga backup=no mode=600'
4. cron:定时执行任务的模块
* * * * *
分 时 日 月 周
增加一条crontab
[root@node1 ~]# ansible web -m cron -a 'minute="*/5" job="/usr/sbin/ntpdate 172.18.0.1 &> /dev/null" name="Synctimemrlapulga"'
删除名为Synctimemrlapulga的crontab任务
[root@node1 ~]# ansible web -m cron -a 'state=absent name="Synctimemrlapulga"'
5. fetch模块: 从远程服务器拉取文件至本机
只能fetch文件,不能fetch目录,如果拉目录,先tar/zip 再拉到本机即可
[root@node1 ~]# ansible web -m fetch -a 'src=/root/p.sh dest=/root/ppp.sh'
6. file模块: 设置文件属性
[root@node1 ~]# ansible web -m file -a 'path=/root/p.sh mode=755'                               # 设置文件权限
[root@node1 ~]# ansible web -m file -a 'src=/root/p.sh dest=/tmp/pp.sh mode=644 state=touch'    # 复制文件并且设置文件属性
7. pip 模块: Python的包管理工具
[root@node1 ~]# ansible web -m pip -a 'name=pip2'
8. ping 模块: 检测主机存活
[root@node1 ~]# ansible web -m ping
9. yum模块: 安装软件
[root@node1 ~]# ansible web -m yum -a 'name=httpd state=latest'                                 # 安装httpd包
[root@node1 ~]# ansible web -m shell -a 'ss -tnl | grep 80 '
[root@node1 ~]# ansible web -m command -a 'ss -tnl '
[root@node1 ~]# ansible web -m command -a 'systemctl start httpd.service'
[root@node1 ~]# ansible web -m command -a 'systemctl stop httpd.service'
10. service模块
[root@node1 ~]# ansible web -m service -a 'name=httpd state=started'
[root@node1 ~]# ansible web -m service -a 'name=httpd state=stopped'
11.user模块
[root@node1 ~]# ansible web -m user -a 'name=mrlapulga home=/tmp/mrlapulga/ shell=/bin/bash uid=2000 comment="test user" group=root'