概述
Java NIO(New IO)是一个可以替代标准Java IO API 的IO API(从Jav a 1. 4开始),Java NIO提供了与标准IO不同的IO工作方式。由以下几个核心的部分组成:
- Buffers(缓冲区)
- Ch an n el s(通道)
- Sel ect ors(多路复用器)
- Buffers(缓冲区 )
除布尔类型外,每个基本类型数据都有对应的特定Buffer对象,如(ByteBuffer, CharBuffer, DoubleBuffer,FloatBuffer, IntBuffer, LongBuffer, ShortBuffer)。而Buffer是所有这些的父类。Buffer可以被理解为一个数据容器,或者说就是一个缓冲区,用来存放数据。Buffer
有四个重要的属性,分别是capacity(容量)、limit(限制)、position(位置)、mark(标记)。
- capacity:表示该缓冲的容量。
- limit:表示往Buffer中读或写时可以到的最大位置,当超出limit时,将会抛出异常。
- position:表示当前所在的位置。 mark:用来备份position,以便在之后可以重新退回position的位置。
- 如下图所示:
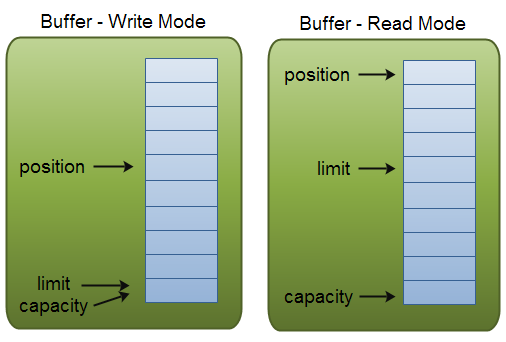
- 上述四种属性的关系是:0 <= 标记 <= 位置 <= 限制 <= 容量。
- 每个缓冲区都是可读,但并不是每个缓冲区都是可写的。以ByteBuffer为例,可以通过ByteBuffer.asReadOnlyBuffer()方法创建一个只读的缓冲区(asReadOnlyBuffer是一个抽象方法,具体实现交由其子类实现)。当对只读缓冲区进行写入操作时,会抛出ReadOnlyBufferException异常。另外,缓冲区并非是线程安全的,当多个线程操作缓冲区时,需要进行必要的同步操作。
- ByteBuffer重要api:
| 方法名 | 返回类型 | 说明 |
| capacity() | int | 返回此缓冲区的容量 |
| clear() | Buffer | 清除此缓冲区,会将limit设置为capaticy,将position设置为0,但是并不会清空Buffer中的内容,详见示例一 |
| flip() | Buffer | 反转此缓冲区,将limt设置为position的值,将position设置为0,一般用于读写转换 |
| limit() | int | 返回此缓冲区的limit |
| limit(int newLimit) | Buffer | 设置此缓冲器的limie,返回Buffer自身 |
| mark() | Buffer | 设置mark,返回Buffer自身 |
| position() | int | 返回position |
| position(int newPosition) | Buffer | 设置position,返回Buffer自身 |
| hasRemaining() | boolean | 判断position是否已经到达limit |
| remaining() | int | 返回limit和position之前的偏移量 |
| reset() | Buffer | 将posistion设置为mark的位置 |
示例一:
 1 public class BufferExercise1 {
 2     public static void main(String[] args){
 3         ByteBuffer buffer = ByteBuffer.allocate(1024);
 4
 5         buffer.put("hello world".getBytes());
 6         buffer.flip();
 7         //标记
 8         buffer.mark();
 9         while(buffer.hasRemaining()){
10             byte b = buffer.get();
11             System.out.println("position " + buffer.position() + ": " + (char)b);
12         }
13         System.out.println("before clear:");
14         System.out.println(buffer.position());
15         System.out.println(buffer.limit());
16
17         buffer.clear();
18         System.out.println("after clear:");
19         System.out.println(buffer.limit());
20         System.out.println(buffer.position());
21         System.out.println((char)buffer.get(3));
22     }
23 }
Channel(通道 )
Channel类主要的分为四种:
- FileChannel(用于文件读写的通道)
- DatagramChannel(可以收发UDP的通道)
- SocketChannel(连接TCP Socket的通道)
- ServerSocketChannel(可以监听到新的SOCKET连接的通道)
介绍这四种的Channel前,我们先由底层开始认识下主要的接口(注:以下介绍的都为interface)。
- Channel接口:继承了IO包中的Closeable接口,是通道的基本定义。通道是可处于打开或关闭状态的。因此该接口定义了close()方法用于关闭接口和isOpen()方法判断通道是否处于打开状态。一般情况下,通道都是线程安全的。
- InterruptibleChannel:实现此接口的通道是可异步关闭的。当一个线程阻塞在实现了该接口通道的I/O操作上,另一个接口可以调用该通道的close方法关闭。或者是调用阻塞线程的interupt方法关闭通道,并设置阻塞线程为可中断状态。
- WriteableByteChannel和ReadableByteChannel:分别定义了通道的写和读字节的操作。
- ByteChannel:继承了WriteableByteChannel和ReadableByteChannel。并未提供新的方法,只是对字节通道做了统一。
- GatteringByteChannel和ScatteringByteChannel:分别继承了WriteableByteChannel和ReadableByteChannel,提供了集中写(由多个缓冲区写入通道)和分散读(将通道中的数据依次读入多个缓冲区,一个缓冲区满了后开始填充下一个缓冲区)。
下面来介绍四种主要的Channel。
- FileChannel:用于读取、写入、映射和操作文件的通道。实现了ByteChannel,GatheringByteChannel和ScatteringByteChannel。因此具有读写甚至是批量读写的字节的功能。此外,它还提供了对文件的特定操作。
先通过代码了解一下FileChannel的一些基本用法。
 1 public class FileChannelExer1 {
 2
 3     public static void main(String[] args) throws IOException {
 4         // TODO Auto-generated method stub
 5         File file = new File("E:\exercise\learnNIO\data.txt");
 6
 7         FileInputStream fis = new FileInputStream(file);
 8
 9         FileChannel fc = fis.getChannel();
10
11         System.out.println(fc.position());
12
13         ByteBuffer buffer = ByteBuffer.allocate(1024);
14
15         //从通道读入数据到缓冲区,read返回有多少字节被读入缓冲区
16         while(fc.read(buffer) > 0){
17             buffer.flip();
18
19             //查看缓冲区中的数据
20             while(buffer.hasRemaining()){
21                 System.out.print((char)buffer.get());
22             }
23         }
24
25         //使用完通道后必须关闭通道
26         fc.close();
27
28         fis.close();
29     }
30
31
32 }
这里我们调用流的close()方法是想确认下通道的关闭是否会关闭流。
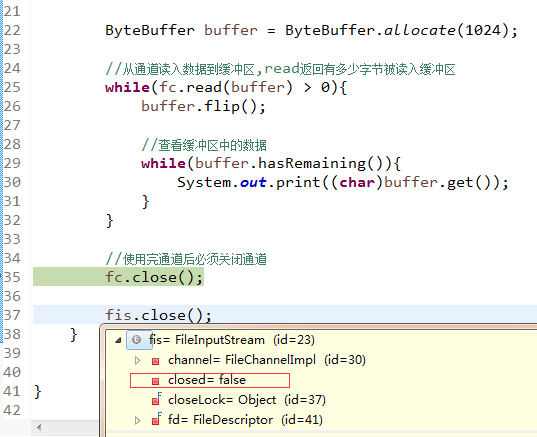
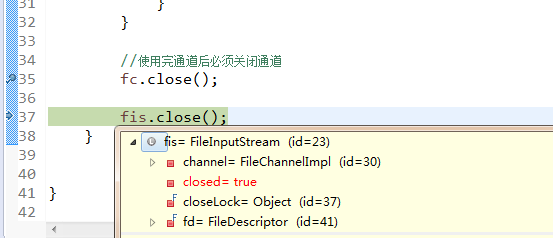
对比通道close()方法的执行前后,我们可以发现在通道关闭时,流也被关闭了。
我们在来测试下从InputStream中获取的通道是否为可写的:
public class FileChannelExer2 {

    public static void main(String[] args) throws IOException {
        // TODO Auto-generated method stub
        File file = new File("E:\exercise\learnNIO\data.txt");

        FileInputStream fis = new FileInputStream(file);

        FileChannel fc = fis.getChannel();

        System.out.println(fc.position());

        //验证从InputStream获取的Channel是否为可写
        ByteBuffer buffer = ByteBuffer.allocate(1024);

        buffer.put("say something".getBytes());

        //抛出NonWritableChannelException异常
        fc.write(buffer);

        System.out.println("ater write,the position is " + fc.position());

        //使用完通道后必须关闭通道
        fc.close();

    }

}
结果是抛出了异常,同理从FileOutputStream中获取的Channel是不可读的。
如果想要可读写的Channel,我们可以通过RandomAcessFile来获取。
 1 public class FileChannelExer4 {
 2
 3     public static void main(String[] args) throws IOException {
 4         File file = new File("E:\exercise\learnNIO\data.txt");
 5         //以读写的方式打开
 6         RandomAccessFile randF = new RandomAccessFile(file, "rw");
 7
 8
 9         FileChannel fc = randF.getChannel();
10
11         System.out.println(fc.position());
12
13         ByteBuffer buffer = ByteBuffer.allocate(1024);
14
15         while(fc.read(buffer) > 0){
16             buffer.flip();
17             System.out.println(fc.position());
18
19             while(buffer.hasRemaining()){
20                 System.out.print((char)buffer.get());
21             }
22         }
23
24         buffer.clear();
25
26         buffer.put("say something".getBytes());
27
28         buffer.flip();
29
30         fc.write(buffer);
31
32         //使用完通道后必须关闭通道
33         fc.close();
34     }
35
36 }
- DategramChannel(收发UDP的通道)
介绍下简单的用法:
 1 public class DatagramChannelExer1 {
 2     public static void main(String[] args) throws InterruptedException{
 3         Thread server = new Thread(new Server());
 4         server.start();
 5
 6         Thread.sleep(1000);
 7
 8         Thread client = new Thread(new Client());
 9         client.start();
10
11     }
12 }
13
14 class Server implements Runnable{
15
16     @Override
17     public void run() {
18         try {
19             //创建DatagramChannel的操作时用静态的open方法,此时获得DatagramChannel的对象已经为打开状态
20             DatagramChannel dc = DatagramChannel.open();
21             SocketAddress sc = new InetSocketAddress("localhost", 9988);
22             //为了建立连接,需要对dc的socket与监听的端口进行绑定
23             dc.socket().bind(sc);
24             //创建缓冲区
25             ByteBuffer buffer = ByteBuffer.allocate(1024);
26
27             //设置是否为阻塞模式,将会影响Channel的recive行为
28             //阻塞模式下,如果没有监听到可用的消息,recive()将会阻塞直到获取到可用消息
29             //非阻塞模式下,如果没有监听到可用的消息,recive()将会立即返回null
30             //dc.configureBlocking(true);
31
32             while(true){
33                 //recive会将收到的消息读到buffer中,若果buffer已经被写满,多余的信息将会被丢弃
34                 //recive返回的对象是发报源的一些信息
35                 SocketAddress address = dc.receive(buffer);
36                 if(address != null){
37                     System.out.println(address);
38                 }
39
40                 buffer.flip();
41                 while(buffer.hasRemaining()){
42                     System.out.print((char)buffer.get());
43                 }
44                 buffer.clear();
45
46             }
47         } catch (IOException e) {
48             e.printStackTrace();
49         }
50
51     }
52 }
53
54 class Client implements Runnable{
55
56     @Override
57     public void run() {
58         try {
59             DatagramChannel dc = DatagramChannel.open();
60
61             SocketAddress target = new InetSocketAddress("localhost", 9988);
62
63             ByteBuffer buffer = ByteBuffer.allocate(1024);
64
65             buffer.put("hello world".getBytes());
66             buffer.flip();
67
68             for(int i=0; i<10; i++){
69                 //让buffer从0开始再重新读
70                 buffer.position(0);
71                 //Datagram发送报文不需要手动绑定socket,只需要指定目标SocketAddress
72                 dc.send(buffer, target);
73                 Thread.sleep(1000);
74             }
75
76             //关闭通道
77             dc.close();
78         } catch (IOException e) {
79             e.printStackTrace();
80         } catch (InterruptedException e) {
81             // TODO Auto-generated catch block
82             e.printStackTrace();
83         }
84
85     }
86
87 }
以上代码我们是用send和receive方法取代了传统Channel的基本write和read方法,再来试试用write和read是否可以达到同样的效果。
 1 public class DatagramChannelExer2 {
 2     public static void main(String[] args) throws InterruptedException{
 3         Thread server = new Thread(new Server2());
 4         server.start();
 5
 6         Thread.sleep(1000);
 7
 8         Thread client = new Thread(new Client2());
 9         client.start();
10
11     }
12 }
13
14 class Server2 implements Runnable{
15
16     @Override
17     public void run() {
18         try {
19             //创建DatagramChannel的操作时用静态的open方法,此时获得DatagramChannel的对象已经为打开状态
20             DatagramChannel dc = DatagramChannel.open();
21             SocketAddress sc = new InetSocketAddress("localhost", 9988);
22             //为了建立连接,需要对dc的socket与监听的端口进行绑定
23             dc.socket().bind(sc);
24             //创建缓冲区
25             ByteBuffer buffer = ByteBuffer.allocate(1024);
26
27             System.out.println(dc.isConnected());
28             while(true){
29                 dc.read(buffer);
30
31                 buffer.flip();
32                 while(buffer.hasRemaining()){
33                     System.out.print((char)buffer.get());
34                 }
35                 buffer.clear();
36
37             }
38         } catch (IOException e) {
39             e.printStackTrace();
40         }
41
42     }
43 }
44
45 class Client2 implements Runnable{
46
47     @Override
48     public void run() {
49         try {
50             DatagramChannel dc = DatagramChannel.open();
51
52             SocketAddress target = new InetSocketAddress("localhost", 9988);
53
54             ByteBuffer buffer = ByteBuffer.allocate(1024);
55
56             buffer.put("hello world".getBytes());
57             buffer.flip();
58
59             for(int i=0; i<10; i++){
60                 //让buffer从0开始再重新读
61                 buffer.position(0);
62                 //Datagram发送报文不需要手动绑定socket,只需要指定目标SocketAddress
63                 dc.send(buffer, target);
64                 Thread.sleep(1000);
65             }
66
67             //关闭通道
68             dc.close();
69         } catch (IOException e) {
70             e.printStackTrace();
71         } catch (InterruptedException e) {
72             // TODO Auto-generated catch block
73             e.printStackTrace();
74         }
75
76     }
77
78 }
其他代码基本不变,我们将receive()换成了read()。我们发现程序抛出了NotYetConnectionedException。还未连接的异常。说明未连接的DatagramChannel是无法调用read操作的,write操作同理。那么如何让Channel变为connectioned呢?我们需要调用其connect()方法,让他和一个SocketAddress连接。
我尝试了下connect直接用wirte和read的方式去收发消息,但是程序一直在read的时候被阻塞。还不知道问题在哪,所以以下程序仍有问题,这里只是先做记录。
 1 public class DatagramChannelExer3 {
 2     public static void main(String[] args) throws InterruptedException{
 3         Thread server = new Thread(new Server3());
 4         server.start();
 5
 6         Thread.sleep(1000);
 7
 8         Thread client = new Thread(new Client3());
 9         client.start();
10
11     }
12 }
13
14 class Server3 implements Runnable{
15
16     @Override
17     public void run() {
18         try {
19             //创建DatagramChannel的操作时用静态的open方法,此时获得DatagramChannel的对象已经为打开状态
20             DatagramChannel dc = DatagramChannel.open();
21             SocketAddress sc = new InetSocketAddress("localhost", 9988);
22             //不采取bind的方式,而是改为connect的方式
23             dc.connect(sc);
24 //          dc.configureBlocking(false);
25             //创建缓冲区
26             ByteBuffer buffer = ByteBuffer.allocate(1024);
27
28             while(true){
29                 int length = dc.read(buffer);
30                 System.out.println(length);
31
32             }
33         } catch (IOException e) {
34             e.printStackTrace();
35         }
36
37     }
38 }
39
40 class Client3 implements Runnable{
41
42     @Override
43     public void run() {
44         try {
45             DatagramChannel dc = DatagramChannel.open();
46
47             SocketAddress connectAddress = new InetSocketAddress("localhost", 9988);
48 //          SocketAddress target = new InetSocketAddress("localhost", 9989);
49
50             ByteBuffer buffer = ByteBuffer.allocate(1024);
51
52             dc.connect(connectAddress);
53             buffer.put("hello world".getBytes());
54             buffer.flip();
55
56             dc.write(buffer);
57
58             //关闭通道
59             dc.close();
60         } catch (IOException e) {
61             e.printStackTrace();
62         }
63
64     }
65
66 }
我们再来看另一端代码:
 1 public class DatagramChannelExer4 {
 2     public static void main(String[] args) throws InterruptedException{
 3
 4         Thread client = new Thread(new Client4());
 5         client.start();
 6
 7     }
 8 }
 9
10
11 class Client4 implements Runnable{
12
13     @Override
14     public void run() {
15         try {
16             DatagramChannel dc = DatagramChannel.open();
17
18             SocketAddress connectAddress = new InetSocketAddress("localhost", 9988);
19
20             SocketAddress target = new InetSocketAddress("localhost", 9989);
21
22             ByteBuffer buffer = ByteBuffer.allocate(1024);
23
24             dc.connect(connectAddress);
25             buffer.put("hello world".getBytes());
26             buffer.flip();
27
28             //抛出异常:IllegalArgumentException: Connected address not equal to target address
29             dc.send(buffer, target);
30             dc.write(buffer);
31
32             //关闭通道
33             dc.close();
34         } catch (IOException e) {
35             e.printStackTrace();
36         }
37
38     }
39
40 }
当一个DatagramChannel调用connect连接了一个socket后,就只能够收发这个地址的消息。
对DatagramChannel的connect方法做个总结:
- 是调用write和read的前提条件
- 限制数据包的接收和发送来源,提高效率
- SocketChannel(连接TCP scoket的通道)
- ServerSocketChannel(可以监听新的TCP连接的通道)
先看一段简单的示例来看一下这两个类的基本用法:
 1 public class SocketChannel1 {
 2
 3     public static void main(String[] args){
 4         // TODO Auto-generated method stub
 5         Thread server = new Thread(new Server5());
 6         server.start();
 7
 8
 9         ScheduledExecutorService executors = Executors.newScheduledThreadPool(1);
10         executors.scheduleWithFixedDelay(new Client5(), 1, 2, TimeUnit.SECONDS);
11     }
12
13
14
15
16 }
17 class Server5 implements Runnable{
18
19     @Override
20     public void run() {
21         try {
22
23             ServerSocketChannel ssc = ServerSocketChannel.open();
24
25             SocketAddress target = new InetSocketAddress("localhost", 9988);
26
27             ssc.socket().bind(target);;
28             System.out.println("Server started.");
29
30             ByteBuffer buffer = ByteBuffer.allocate(1024);
31
32             while(true){
33
34                 //非阻塞模式将立即返回NULL,而阻塞模式会在此阻塞直到有可用的SokcetChannel进来
35                 SocketChannel sc = ssc.accept();
36                 System.out.println("SocketChannel accepted");
37                 sc.read(buffer);
38
39                 buffer.flip();
40                 while(buffer.hasRemaining()){
41                     System.out.print((char)buffer.get());
42                 }
43                 System.out.println("");
44                 buffer.clear();
45             }
46
47
48         } catch (IOException e) {
49             e.printStackTrace();
50         }
51     }
52
53 }
54 class Client5 implements Runnable{
55
56     @Override
57     public void run() {
58         SocketChannel sc;
59         try {
60             //和Datagram一样,都是利用静态方法open来获取一个通道对象
61             sc = SocketChannel.open();
62             SocketAddress remote = new InetSocketAddress("localhost", 9988);
63
64
65             System.out.println("Client starting connect");
66             boolean res = sc.connect(remote);
67             System.out.println("Client connected, res = " + res);
68
69             ByteBuffer buffer = ByteBuffer.allocate(1024);
70             buffer.put("Hello".getBytes());
71
72             buffer.flip();
73
74             sc.write(buffer);
75
76             sc.close();
77             System.out.println("close scoketChannel");
78         } catch (IOException e) {
79             e.printStackTrace();
80         }
81
82
83     }
84
85 }
我们用SocketServerChannel实现了一个服务器,而利用SocketChannel实现了一个客户端,来模拟服务器和客户端的通信。
以上的方法是在阻塞模式下,这种模式下和传统的IO行为基本一致,那么如何利用非阻塞模式呢。
先看一下将模式调整为非阻塞模式。
  1 import java.io.IOException;
  2 import java.net.InetSocketAddress;
  3 import java.net.SocketAddress;
  4 import java.nio.ByteBuffer;
  5 import java.nio.channels.ServerSocketChannel;
  6 import java.nio.channels.SocketChannel;
  7 import java.util.Random;
  8 import java.util.concurrent.Executors;
  9 import java.util.concurrent.ScheduledExecutorService;
 10 import java.util.concurrent.TimeUnit;
 11
 12 public class SocketChannel1 {
 13
 14     public static void main(String[] args){
 15         // TODO Auto-generated method stubA
 16         Thread server = new Thread(new Server5());
 17         server.start();
 18
 19
 20         Thread client = new Thread(new Client5("hello"));
 21         client.start();
 22  23     }
 24
 25
 26  27
 28
 29
 30
 31 }
 32 class Server5 implements Runnable{
 33
 34     @Override
 35     public void run() {
 36         try {
 37
 38             ServerSocketChannel ssc = ServerSocketChannel.open();
 39
 40             SocketAddress target = new InetSocketAddress("localhost", 9988);
 41
 42             ssc.configureBlocking(false);
 43
 44             ssc.socket().bind(target);
 45             System.out.println("Server started.");
 46
 47             ByteBuffer buffer = ByteBuffer.allocate(10240);
 48
 49             while(true){
 50
 51                 //非阻塞模式将立即返回NULL,而阻塞模式会在此阻塞直到有可用的SokcetChannel进来
 52                 SocketChannel sc = ssc.accept();
 53                 if(sc != null){
 54                     System.out.println("SocketChannel accepted");
 55                     System.out.println(sc.isBlocking());
 56                     sc.read(buffer);
 57
 58                     buffer.flip();
 59                     while(buffer.hasRemaining()){
 60                         System.out.print((char)buffer.get());
 61                     }
 62                     System.out.println("");
 63                 }
 64
 65             }
 66
 67
 68         } catch (IOException e) {
 69             e.printStackTrace();
 70         }
 71     }
 72
 73 }
 74 class Client5 implements Runnable{
 75
 76     private String msg;
 77
 78     public Client5(String msg){
 79         this.msg = msg;
 80     }
 81
 82     @Override
 83     public void run() {
 84         SocketChannel sc;
 85         try {
 86             //和Datagram一样,都是利用静态方法open来获取一个通道对象
 87             sc = SocketChannel.open();
 88             sc.configureBlocking(false);
 89
 90             SocketAddress remote = new InetSocketAddress("localhost", 9988);
 91
 92             sc.connect(remote);
 93
 94             while(!sc.finishConnect()){
 95
 96             }
 97             System.out.println("Client connected");
 98             ByteBuffer buffer = ByteBuffer.allocate(1024);
 99             buffer.put(msg.getBytes());
100
101             buffer.flip();
102
103             Thread current = Thread.currentThread();
104
105             System.out.println(current.getName() + " start write");
106             sc.write(buffer);
107             System.out.println(current.getName() + " writed");
108
109             int time = new Random().nextInt(1000);
110             Thread.sleep(time);
111             System.out.println(current.getName() + " sleep " + time + " mills");
112
113             sc.close();
114             System.out.println("close scoketChannel");
115         } catch (IOException e) {
116             e.printStackTrace();
117         } catch (InterruptedException e) {
118             // TODO Auto-generated catch block
119             e.printStackTrace();
120         }
121
122
123     }
124
125 }
注意到两点,一是即使Client设置了SocketChannel为非阻塞,在ServerSocketChannel在accept()到的SocketChannel仍然默认是阻塞的。二是非阻塞模式模式下,accept方法将立即返回,并不管是否有连接建立,而作为Client的SocketChannel的connect()方法也是如此。因为为了避免空指针或是NotYetConnectedException的异常,我们不得不采取忙等待的方式来手动等待连接状态完成。
乍一看非阻塞模式下不仅没有更便捷,反而让程序更复杂效率更低了。因此我们需要Selector来帮我们监听状态,实现多路复用。
Selector(选择器):
首先并不是所有的Channel都可以搭配选择器使用。要让通道可以通过选择器被监听状态,需要像选贼气进行注册,而注册的register方法就定义在SelectableChannel这个抽象类中,也就是只有其子类才是可以实现多路复用的(之前介绍的通道除了FileChannel外,均继承了SelectableChannel)
先看下SelectableChannel的主要方法:
| 方法名 | 返回值 | 说明 |
| register(Selector sel, int ops) | SelectionKey | 向给定的选择器注册此通道,返回一个选择键。选择键可以帮助我们判断这个通道的状态及注销掉该通道在此选择器中的注册 |
| register(Selector sel, int ops,Object att) | SelectionKey | 跟上方法基本一致,多的参数表示需要添加到选择键的附件。 |
| configureBlocking(boolean block) | SelectableChannel | 设置通道的阻塞模式,返回此通道自身 |
| blockingLock() | Object | 获取通道在configureBlock和register的锁对象,因此设置通道阻塞模式和注册是同一个竞态条件,并发的操作会导致一个操作阻塞另一个操作 |
| isRegistered() | boolean | 判断该通道是否像任何选择器注册 |
| keyFor(Selector sel) | SelectionKey | 获取表示通道向给定选择器注册的键 |
再看下SelectionKey
当通道向选择器注册时,都会返回一个SelectionKey。SelectionKey可以支持一下四种操作类型:
- OP_ACCEPT(Socket接受时)
- OP_CONNECT(Socket连接时)
- OP_READ(读取操作)
- OP_WRITE(写入操作)
以上四种操作类型分别对应isAcceptable(),isConnectable(),isReadable(),isWritable() 来确定某一种操作是否已经准备就绪。当然SelectionKey是否支持某个操作是由注册时设置的操作值决定的。
而SelectionKey对上述操作类型按状态分又可以分为两类:
- interest集合:表示下一次调用选择器的选择方法时,将测试集合内的操作是否就绪。可以用interestOps()来查看,或者可以通过interestOps(int ops)来设置interest集合
- ready集合:表示已经准备就行的操作集合,可以用readyOps()来查看
SelectionKey还有两个重要的方法是cancel()和isValidate()。分别用来取消注册和判断此键是否有效,取消操作不会立即注销此通道而是会在将此键移入已取消键集,并在下次选择操作的时候执行。
Selector:
对于选择器而言,最重要的过程莫过于选择操作。
选择操作主要分为三个步骤:
1. 将已取消键集中的每个键(调用过cancel方法的SelectionKey)从所有键集中移除(如果该键是键集的成员),并注销其通道。此步骤使已取消键集成为空集
2. 查询基础操作系统来更新通道的准备就绪信息。对于已经准备就绪的键集如果还未添加到已选择键集中(可用selectedKeys())方法来查看,对于在已选择键集中的键则更新已经就绪的操作。
3. 如果在步骤 2的执行过程中要将任意键添加到已取消键集中,则处理过程如步骤 1。
选择函数根据是否阻塞,以及阻塞时间可以分为3种:
- select():阻塞直到有通道就绪,
- select(long timeout):至多阻塞给定时长,到期若还没有通道就绪则返回,
- selectNow():如果没有通道就绪,则直接返回
对于处在select阻塞中的选择器,我们可以在另一线程中调用该选择器的方法,这将会使select操作直接返回。
简单的代码示例:
  1 import java.io.IOException;
  2 import java.net.InetSocketAddress;
  3 import java.net.SocketAddress;
  4 import java.nio.ByteBuffer;
  5 import java.nio.channels.SelectionKey;
  6 import java.nio.channels.Selector;
  7 import java.nio.channels.ServerSocketChannel;
  8 import java.nio.channels.SocketChannel;
  9 import java.util.Iterator;
 10 import java.util.Set;
 11 import java.util.concurrent.Executors;
 12 import java.util.concurrent.ScheduledExecutorService;
 13 import java.util.concurrent.TimeUnit;
 14
 15 public class SelectorExer1 {
 16     public static void main(String[] args){
 17         Thread server = new Thread(new Server6());
 18         server.start();
 19
 20         ScheduledExecutorService executors = Executors.newScheduledThreadPool(1);
 21         executors.scheduleWithFixedDelay(new Client6("111"), 1, 100, TimeUnit.MILLISECONDS);
 22     }
 23 }
 24
 25
 26 class Server6 implements Runnable{
 27
 28     private Selector selector;
 29
 30     public Server6(){
 31         initServer();
 32     }
 33
 34     private void initServer(){
 35         try {
 36             //通过静态方法open打开一个选择器
 37             selector = Selector.open();
 38
 39             ServerSocketChannel ssc = ServerSocketChannel.open();
 40
 41             SocketAddress target = new InetSocketAddress("localhost", 9988);
 42
 43             //通道必须设置为非阻塞模式,否则在注册时会抛出IllegalBlockingModeException异常
 44             ssc.configureBlocking(false);
 45
 46             ssc.socket().bind(target);
 47
 48
 49             System.out.println("Server started.");
 50
 51             //查看该通道支持的操作
 52             System.out.println(ssc.validOps());
 53
 54             //像选择器注册需要监听的操作,
 55             ssc.register(selector, SelectionKey.OP_ACCEPT);
 56
 57
 58         } catch (IOException e) {
 59             e.printStackTrace();
 60         }
 61
 62
 63     }
 64
 65     private void listen(){
 66         try {
 67
 68             ByteBuffer buffer = ByteBuffer.allocate(10240);
 69
 70             while(true){
 71                 //进行选择操作,返回值表示已就绪的操作数
 72                 int res = selector.select();
 73
 74                 if(res == 0){
 75                     continue;
 76                 }
 77
 78                 //获取所有已经就绪的键
 79                 Set<SelectionKey> selectedKeys = selector.selectedKeys();
 80
 81                 Iterator<SelectionKey> iterator = selectedKeys.iterator();
 82
 83                 while(iterator.hasNext()){
 84                     SelectionKey key = iterator.next();
 85
 86                     if(key.isAcceptable()){
 87                         ServerSocketChannel serverSocket = (ServerSocketChannel)key.channel();
 88
 89                         //非阻塞模式将立即返回NULL,而阻塞模式会在此阻塞直到有可用的SokcetChannel进来
 90                         SocketChannel sc = serverSocket.accept();
 91                         if(sc != null){
 92                             System.out.println("SocketChannel accepted");
 93                             System.out.println(sc.isBlocking());
 94                             sc.read(buffer);
 95
 96                             buffer.flip();
 97                             while(buffer.hasRemaining()){
 98                                 System.out.print((char)buffer.get());
 99                             }
100                             System.out.println("");
101 sc.close();
102                         }
103                     }
104 //需要                //异常已经处理过的键
105                     iterator.remove();
106                 }
107             }
108
109
110         } catch (IOException e) {
111             e.printStackTrace();
112         } finally {
113             if(selector != null){
114                 try {
115                     selector.close();
116                 } catch (IOException e) {
117                     e.printStackTrace();
118                 }
119             }
120         }
121     }
122
123     @Override
124     public void run() {
125         listen();
126     }
127
128 }
129 class Client6 implements Runnable{
130
131     private String msg;
132
133     public Client6(String msg){
134         this.msg = msg;
135     }
136
137     @Override
138     public void run() {
139         SocketChannel sc;
140         try {
141             //和Datagram一样,都是利用静态方法open来获取一个通道对象
142             sc = SocketChannel.open();
143
144             SocketAddress remote = new InetSocketAddress("localhost", 9988);
145
146             sc.connect(remote);
147             System.out.println("Client connected");
148
149             ByteBuffer buffer = ByteBuffer.allocate(1024);
150             buffer.put(msg.getBytes());
151
152
153           buffer.flip();
154             sc.write(buffer);
155             sc.close();
156             System.out.println("close scoketChannel");
157         } catch (IOException e) {
158             e.printStackTrace();
159         }
160
161
162     }
163
164 }
这里我们在使用了Selector之后,非阻塞模式下的通道可以不再忙等待一直校验accept状态,而是等待选择结果的返回(上述例子是选择过程的阻塞代替了之前accpet过程的阻塞)。
实际上,这里我们任然是使用了一个线程去管理一个通道的状态,而NIO真正的优势可以让一个线程
管理许多通道的就绪状态。我们将代码稍作修改,让更多的通道注册到这个Selector上,交由其管理。
  1 import java.io.IOException;
  2 import java.net.InetSocketAddress;
  3 import java.net.SocketAddress;
  4 import java.nio.ByteBuffer;
  5 import java.nio.channels.ClosedChannelException;
  6 import java.nio.channels.SelectableChannel;
  7 import java.nio.channels.SelectionKey;
  8 import java.nio.channels.Selector;
  9 import java.nio.channels.ServerSocketChannel;
 10 import java.nio.channels.SocketChannel;
 11 import java.util.Iterator;
 12 import java.util.Set;
 13 import java.util.concurrent.Executors;
 14 import java.util.concurrent.ScheduledExecutorService;
 15 import java.util.concurrent.TimeUnit;
 16
 17 public class SelectorExer2 {
 18     public static void main(String[] args) throws IOException{
 19         ServerListener listener = new ServerListener();
 20
 21         listener.register(ServerSocketChannelFactory.getServerSocketChannel("localhost", 9988), SelectionKey.OP_ACCEPT);
 22         listener.register(ServerSocketChannelFactory.getServerSocketChannel("localhost", 9989), SelectionKey.OP_ACCEPT);
 23
 24         ScheduledExecutorService executors = Executors.newScheduledThreadPool(2);
 25         executors.scheduleWithFixedDelay(new Client7("send to 9988", "localhost", 9988), 1, 4, TimeUnit.SECONDS);
 26         executors.scheduleWithFixedDelay(new Client7("send to 9989", "localhost", 9989), 2, 4, TimeUnit.SECONDS);
 27
 28         listener.listen();
 29     }
 30
 31 }
 32
 33 class ServerSocketChannelFactory{
 34     public static ServerSocketChannel getServerSocketChannel(String host, int port){
 35         ServerSocketChannel ssc = null;
 36         try {
 37             ssc = ServerSocketChannel.open();
 38
 39             SocketAddress target = new InetSocketAddress(host, port);
 40
 41             //通道必须设置为非阻塞模式,否则在注册时会抛出IllegalBlockingModeException异常
 42             ssc.configureBlocking(false);
 43
 44             ssc.socket().bind(target);
 45         } catch (IOException e) {
 46             // TODO Auto-generated catch block
 47             e.printStackTrace();
 48         }
 49         return ssc;
 50     }
 51 }
 52
 53 class ServerListener{
 54
 55     private Selector selector;
 56
 57     public ServerListener(){
 58         try {
 59             selector = Selector.open();
 60         } catch (IOException e) {
 61             e.printStackTrace();
 62         }
 63     }
 64
 65     public void register(SelectableChannel sc, int ops){
 66         if(selector != null && sc != null){
 67             try {
 68                 sc.register(selector, ops);
 69             } catch (ClosedChannelException e) {
 70                 e.printStackTrace();
 71             }
 72         }
 73     }
 74
 75     public void listen() throws IOException{
 76         if(selector != null){
 77             System.out.println("start listening");
 78             ByteBuffer buffer = ByteBuffer.allocate(1024);
 79
 80             while(true){
 81
 82                 //进行选择操作,返回值表示已就绪的操作数
 83                 System.out.println("start select");
 84                 int res = selector.select();
 85
 86                 if(res == 0){
 87                     continue;
 88                 }
 89                 System.out.println(res + "selectionkeys are ready");
 90
 91                 //获取所有已经就绪的键
 92                 Set<SelectionKey> selectedKeys = selector.selectedKeys();
 93
 94                 Iterator<SelectionKey> iterator = selectedKeys.iterator();
 95
 96                 while(iterator.hasNext()){
 97                     SelectionKey key = iterator.next();
 98
 99                     if(key.isAcceptable()){
100                         ServerSocketChannel serverSocket = (ServerSocketChannel)key.channel();
101
102                         //非阻塞模式将立即返回NULL,而阻塞模式会在此阻塞直到有可用的SokcetChannel进来
103                         SocketChannel sc = serverSocket.accept();
104
105                         sc.configureBlocking(false);
106                         sc.register(selector, SelectionKey.OP_READ);
107
108                     }else if(key.isReadable()){
109                         SocketChannel sc = (SocketChannel)key.channel();
110                         if(sc != null){
111
112                             buffer.clear();
113                             sc.read(buffer);
114
115                             buffer.flip();
116                             while(buffer.hasRemaining()){
117                                 System.out.print((char)buffer.get());
118                             }
119                             System.out.println(";");
120                         }
121                     }
122
123                     iterator.remove();
124                 }
125             }
126         }
127     }
128
129
130 }
131
132 class Client7 implements Runnable{
133
134     private String msg;
135
136     private SocketChannel sc;
137
138     private ByteBuffer buffer;
139
140     public Client7(String msg, String host, int port){
141         this.msg = msg;
142
143         try {
144             sc = SocketChannel.open();
145
146             SocketAddress remote = new InetSocketAddress(host, port);
147
148             sc.connect(remote);
149             System.out.println("connected " + host + ":" + port);
150
151             buffer = ByteBuffer.allocate(1024);
152         } catch (IOException e) {
153             // TODO Auto-generated catch block
154             e.printStackTrace();
155         }
156     }
157
158     @Override
159     public void run() {
160         try {
161             if(sc != null){
162                 buffer.clear();
163
164                 buffer.put(msg.getBytes());
165
166                 buffer.flip();
167                 sc.write(buffer);
168             }
169
170         } catch (IOException e) {
171             e.printStackTrace();
172         }
173
174
175     }
176
177 }
以上代码就是用程序的主线程对通道进行了管理。而线程池分配的线程模拟客户端进行写的任务。
再来看个更清晰点的例子:
  1 import java.io.IOException;
  2 import java.net.InetSocketAddress;
  3 import java.net.SocketAddress;
  4 import java.nio.ByteBuffer;
  5 import java.nio.channels.ClosedChannelException;
  6 import java.nio.channels.SelectableChannel;
  7 import java.nio.channels.SelectionKey;
  8 import java.nio.channels.Selector;
  9 import java.nio.channels.ServerSocketChannel;
 10 import java.nio.channels.SocketChannel;
 11 import java.util.Iterator;
 12 import java.util.Set;
 13 import java.util.concurrent.Executors;
 14 import java.util.concurrent.ScheduledExecutorService;
 15 import java.util.concurrent.TimeUnit;
 16
 17 public class SelectorExer3 {
 18     public static void main(String[] args) throws IOException{
 19         ServerListener listener = new ServerListener();
 20
 21         listener.register(ServerSocketChannelFactory.getServerSocketChannel("localhost", 9988), SelectionKey.OP_ACCEPT);
 22         listener.register(ServerSocketChannelFactory.getServerSocketChannel("localhost", 9989), SelectionKey.OP_ACCEPT);
 23
 24         ScheduledExecutorService executors = Executors.newScheduledThreadPool(2);
 25         executors.scheduleWithFixedDelay(new Client7("send to 9988", "localhost", 9988), 1, 4, TimeUnit.SECONDS);
 26         executors.scheduleWithFixedDelay(new Client7("send to 9989", "localhost", 9989), 2, 4, TimeUnit.SECONDS);
 27
 28         listener.listen();
 29     }
 30
 31 }
 32
 33 class ServerListener2{
 34
 35     private Selector selector;
 36
 37     public ServerListener2(){
 38         try {
 39             selector = Selector.open();
 40         } catch (IOException e) {
 41             e.printStackTrace();
 42         }
 43     }
 44
 45     public void register(SelectableChannel sc, int ops){
 46         if(selector != null && sc != null){
 47             try {
 48                 sc.register(selector, ops);
 49             } catch (ClosedChannelException e) {
 50                 e.printStackTrace();
 51             }
 52         }
 53     }
 54
 55     public void listen() throws IOException{
 56         if(selector != null){
 57             System.out.println("start listening");
 58             ByteBuffer buffer = ByteBuffer.allocate(1024);
 59
 60             while(true){
 61
 62                 //进行选择操作,返回值表示已就绪的操作数
 63                 System.out.println("start select");
 64                 int res = selector.select();
 65
 66                 if(res == 0){
 67                     continue;
 68                 }
 69                 System.out.println(res + "selectionkeys are ready");
 70
 71                 //获取所有已经就绪的键
 72                 Set<SelectionKey> selectedKeys = selector.selectedKeys();
 73
 74                 Iterator<SelectionKey> iterator = selectedKeys.iterator();
 75
 76                 while(iterator.hasNext()){
 77                     SelectionKey key = iterator.next();
 78
 79                     if(key.isAcceptable()){
 80                         ServerSocketChannel serverSocket = (ServerSocketChannel)key.channel();
 81
 82                         //非阻塞模式将立即返回NULL,而阻塞模式会在此阻塞直到有可用的SokcetChannel进来
 83                         SocketChannel sc = serverSocket.accept();
 84
 85                         buffer.clear();
 86                         sc.read(buffer);
 87
 88                         buffer.flip();
 89
 90                         while(buffer.hasRemaining()){
 91                             System.out.print((char)buffer.get());
 92                         }
 93                         System.out.println(";");
 94
 95                         sc.close();
 96                     }
 97
 98                     iterator.remove();
 99                 }
100             }
101         }
102     }
103
104
105 }
106
107 class Client8 implements Runnable{
108
109     private String host;
110
111     private int port;
112
113     private String msg;
114
115     private SocketChannel sc;
116
117     private ByteBuffer buffer;
118
119     public Client8(String msg, String host, int port){
120         this.host = host;
121         this.port = port;
122         this.msg = msg;
123
124         buffer = ByteBuffer.allocate(1024);
125     }
126
127     @Override
128     public void run() {
129         try {
130             sc = SocketChannel.open();
131
132             SocketAddress remote = new InetSocketAddress(host, port);
133
134             sc.connect(remote);
135             System.out.println("connected " + host + ":" + port);
136             buffer.clear();
137
138             buffer.put(msg.getBytes());
139
140             buffer.flip();
141             sc.write(buffer);
142
143             sc.close();
144         } catch (IOException e) {
145             e.printStackTrace();
146         }
147
148
149     }
150
151 }
我们用一条线程完成了服务器端两个端口的监听。线程池分配的线程只是用来模拟客户请求。