一,nuxt视频上传,视频播放
(1).nuxt视频上传,封装的组件,我开发的时候有eslint校验下面代码有一些相关的注释不用管
<template>
  <div class="container">
    <div class="upload">
      <div>
        <div class="filebox">
          <input id="fileUpload" type="file" class="filebtn" @change="fileChange($event)">
          <div class="flletit">
            选择视频
          </div>
        </div>
        <div class="filetitle">
          {{ fileTitle }}
        </div>
        <label class="status">上传状态: <span>{{ statusText }}</span></label>
      </div>
      <div class="upload-type">
        <el-button slot="trigger" size="small" type="primary" :disabled="uploadDisabled" @click="authUpload">
          开始上传
        </el-button>
        <el-button style="margin-left: 10px;" size="small" type="danger" :disabled="pauseDisabled" @click="pauseUpload">
          暂停
        </el-button>
        <el-button slot="trigger" size="small" type="success" :disabled="resumeDisabled" @click="resumeUpload">
          恢复上传
        </el-button>
      </div>
      <el-progress :text-inside="true" :stroke-width="15" :percentage="authProgress" :status="authProgress == 100 ?'success':'text'" />
    </div>
  </div>
</template>
<script>
export default {
  data() {
    return {
      vid: '',
      fileTitle: '',
      timeout: '',
      partSize: '',
      parallel: '',
      retryCount: '',
      retryDuration: '',
      region: 'cn-shanghai',
      userId: '输入阿里云账号ID',
      file: null,
      authProgress: 0,
      uploadDisabled: true,
      resumeDisabled: true,
      pauseDisabled: true,
      uploader: null,
      statusText: ''
    }
  },
  methods: {
    emitEventVod() {
      // eslint-disable-next-line no-console
      console.log('-----1-----')
      this.authProgress = 0
      this.fileTitle = ''
      this.statusText = ''
      this.pauseDisabled = true
      this.resumeDisabled = true
      this.uploadDisabled = true
    },
    fileChange(e) {
      this.file = e.target.files[0]
      if (!this.file) {
        this.$message.error('请先选择需要上传的文件!')
        return
      }
      if (this.file.type !== 'video/mp4') {
        this.$message.error('请选择.mp4文件!')
        return
      }
      this.fileTitle = this.file.name
      const userData = '{"Vod":{}}'
      if (this.uploader) {
        this.uploader.stopUpload()
        this.authProgress = 0
        this.statusText = ''
      }
      this.uploader = this.createUploader()
      // eslint-disable-next-line no-console
      console.log(userData)
      this.uploader.addFile(this.file, null, null, null, userData)
      this.uploadDisabled = false
      this.pauseDisabled = true
      this.resumeDisabled = true
    },
    authUpload() {
      // 然后调用 startUpload 方法, 开始上传
      if (this.uploader !== null) {
        this.uploader.startUpload()
        this.uploadDisabled = true
        this.pauseDisabled = false
      }
    },
    // 暂停上传
    pauseUpload() {
      if (this.uploader !== null) {
        this.uploader.stopUpload()
        this.resumeDisabled = false
        this.pauseDisabled = true
      }
    },
    // 恢复上传
    resumeUpload() {
      if (this.uploader !== null) {
        this.uploader.startUpload()
        this.resumeDisabled = true
        this.pauseDisabled = false
      }
    },
    createUploader(type) {
      const self = this
      // eslint-disable-next-line
      let uploader = new AliyunUpload.Vod({
        timeout: self.timeout || 60000,
        partSize: self.partSize || 1048576,
        parallel: self.parallel || 5,
        retryCount: self.retryCount || 3,
        retryDuration: self.retryDuration || 2,
        region: self.region,
        userId: self.userId,
        // 添加文件成功
        addFileSuccess: function (uploadInfo) {
          self.uploadDisabled = false
          self.resumeDisabled = false
          self.statusText = '添加文件成功, 等待上传...'
          // eslint-disable-next-line no-console
          console.log('addFileSuccess: ' + uploadInfo.file.name)
        },
        // 开始上传
        onUploadstarted: function (uploadInfo) {
          // 如果是 UploadAuth 上传方式, 需要调用 uploader.setUploadAuthAndAddress 方法
          // 如果是 UploadAuth 上传方式, 需要根据 uploadInfo.videoId是否有值,调用点播的不同接口获取uploadauth和uploadAddress
          // 如果 uploadInfo.videoId 有值,调用刷新视频上传凭证接口,否则调用创建视频上传凭证接口
          // 注意: 这里是测试 demo 所以直接调用了获取 UploadAuth 的测试接口, 用户在使用时需要判断 uploadInfo.videoId 存在与否从而调用 openApi
          // 如果 uploadInfo.videoId 存在, 调用 刷新视频上传凭证接口(https://help.aliyun.com/document_detail/55408.html)
          // 如果 uploadInfo.videoId 不存在,调用 获取视频上传地址和凭证接口(https://help.aliyun.com/document_detail/55407.html)
          if (!uploadInfo.videoId) {
            const title = uploadInfo.file.name.substr(0, uploadInfo.file.name.lastIndexOf('.'))
            self.$axios.get('/api/ossFile/createUploadVideo', { params: { title: title, fileName: uploadInfo.file.name } }).then(({ data: res }) => {
              if (res.code !== 0) {
                return self.$message.error(res.msg)
              }
              const uploadAuth = res.data.UploadAuth
              const uploadAddress = res.data.UploadAddress
              const videoId = res.data.VideoId
              self.vid = res.data.VideoId
              uploader.setUploadAuthAndAddress(uploadInfo, uploadAuth, uploadAddress, videoId)
            })
            self.statusText = '文件开始上传...'
            // eslint-disable-next-line no-console
            console.log('onUploadStarted:' + uploadInfo.file.name + ', endpoint:' + uploadInfo.endpoint + ', bucket:' + uploadInfo.bucket + ', object:' + uploadInfo.object)
          } else {
            // 如果videoId有值,根据videoId刷新上传凭证
            self.$axios.get('/api/ossFile/refreshUploadVideo', { params: { videoId: uploadInfo.videoId } }).then(({ data: res }) => {
              if (res.code !== 0) {
                return self.$message.error(res.msg)
              }
              const uploadAuth = res.data.UploadAuth
              const uploadAddress = res.data.UploadAddress
              const videoId = res.data.VideoId
              self.vid = res.data.VideoId
              uploader.setUploadAuthAndAddress(uploadInfo, uploadAuth, uploadAddress, videoId)
            })
          }
        },
        // 文件上传成功
        onUploadSucceed: function (uploadInfo) {
          // eslint-disable-next-line no-console
          console.log('onUploadSucceed: ' + uploadInfo.file.name + ', endpoint:' + uploadInfo.endpoint + ', bucket:' + uploadInfo.bucket + ', object:' + uploadInfo.object)
          self.statusText = '文件上传成功!'
        },
        // 文件上传失败
        onUploadFailed: function (uploadInfo, code, message) {
          // eslint-disable-next-line no-console
          console.log('onUploadFailed: file:' + uploadInfo.file.name + ',code:' + code + ', message:' + message)
          self.statusText = '文件上传失败!'
        },
        // 取消文件上传
        onUploadCanceled: function (uploadInfo, code, message) {
          // eslint-disable-next-line no-console
          console.log('Canceled file: ' + uploadInfo.file.name + ', code: ' + code + ', message:' + message)
          self.statusText = '文件已暂停上传'
        },
        // 文件上传进度,单位:字节, 可以在这个函数中拿到上传进度并显示在页面上
        onUploadProgress: function (uploadInfo, totalSize, progress) {
          // eslint-disable-next-line no-console
          console.log('onUploadProgress:file:' + uploadInfo.file.name + ', fileSize:' + totalSize + ', percent:' + Math.ceil(progress * 100) + '%')
          const progressPercent = Math.ceil(progress * 100)
          self.authProgress = progressPercent
          self.statusText = '文件上传中...'
        },
        // 上传凭证超时
        onUploadTokenExpired: function (uploadInfo) {
          // 上传大文件超时, 如果是上传方式一即根据 UploadAuth 上传时
          // 需要根据 uploadInfo.videoId 调用刷新视频上传凭证接口(https://help.aliyun.com/document_detail/55408.html)重新获取 UploadAuth
          // 然后调用 resumeUploadWithAuth 方法, 这里是测试接口, 所以我直接获取了 UploadAuth
          self.$axios.get('/api/ossFile/refreshUploadVideo', { params: { videoId: uploadInfo.videoId } }).then(({ data: res }) => {
            if (res.code !== 0) {
              return self.$message.error(res.msg)
            }
            const uploadAuth = res.data.UploadAuth
            uploader.resumeUploadWithAuth(uploadAuth)
            // eslint-disable-next-line no-console
            console.log('upload expired and resume upload with uploadauth ' + uploadAuth)
          })
          self.statusText = '文件超时...'
        },
        // 全部文件上传结束
        onUploadEnd: function (uploadInfo) {
          // eslint-disable-next-line no-console
          console.log('onUploadEnd: uploaded all the files')
          self.statusText = '文件上传完毕'
          self.emitEvent(self.vid)
        }
      })
      return uploader
    },
    emitEvent(vid) {
      this.$emit('my-event', vid)
    }
  }
}
</script>
<style>
  .container{
    text-align: center;
    line-height: 1;
  }
  .upload-type{
    margin: 15px 0;
  }
  .filebox{
     80px;
    height: 32px;
    color: #fff;
    background-color: #17B3A3;
    border-color: #17B3A3;
    position: relative;
    border-radius: 3px;
    text-align: center;
    line-height: 32px;
    margin: 0 auto;
  }
  .filebox .filebtn{
 100%;
    height: 100%;
    border: none;
    background: none;
    position: absolute;
    left: 0;
    top: 0;
    opacity: 0;

  }
 .filebox .flletit{
    100%;
   height: 100%;
 }
  .filetitle{
    margin: 10px 0;
  }
  .status span{
    color: #FF4C52;
  }
</style>
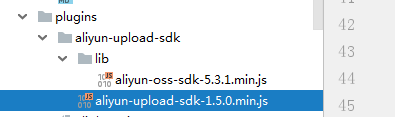
(2),nuxt引入阿里提供的上传js文件,添加ssr:false服务端渲染关闭,因为js里面有document,window,服务端渲染会报错undefined
(3),页面调用封装好的组件,里面涉及到父子组件相互调用,传值
<template>
  <div>
    <upload-vod ref="childVod" @my-event="getMyEvent" />
  </div>
</template>
<script>
import UploadVod from '../../components/uploadvod'
export default {
  components: {
    UploadVod
  },
  data() {
    return {
    }
  },
  created() {
    this.init()
  },
  methods: {
    init() {
      const that = this
      if (process.client) {
        that.$nextTick(() => {
          that.$refs.childVod.emitEventVod()
        })
      }
    },
    getMyEvent(vid) {
      // eslint-disable-next-line no-console
      console.log('接收的数据--------->' + vid)
      this.$message({
        message: '接收的数据---->' + vid,
        type: 'success'
      })
    }
  }
}
</script>
(4),nuxt视频播放相关,上传根据官方提供的demo修改的,自己封装了组件,引入的也是网络js文件
<template>
  <div :id="playerId" class="prism-player" />
</template>

<script>
export default {
  props: {
    aliplayerSdkPath: {
      // Aliplayer 代码的路径
      type: String,
      default: '//g.alicdn.com/de/prismplayer/2.8.2/aliplayer-min.js'
    }
  },
  data() {
    return {
      playerId: 'aliplayer_' + Math.random().toString(36).substr(2),
      scriptTagStatus: 0,
      isReload: false,
      instance: null,
      vid: '',
      playauth: '',
      cover: ''
    }
  },
  created() {
    this.init()
  },
  mounted() {
    if (window.Aliplayer !== undefined) {
      // 如果全局对象存在,说明编辑器代码已经初始化完成,直接加载编辑器
      this.scriptTagStatus = 2
      this.initAliplayer()
    } else {
      // 如果全局对象不存在,说明编辑器代码还没有加载完成,需要加载编辑器代码
      this.insertScriptTag()
    }
  },
  methods: {
    async init() {
      const { data } = await this.$axios.get('/api/ossFile/getVideoPlayAuth', { params: { videoId: '903d803f735e47c9aa12ef10721cb9a2' } })
      // eslint-disable-next-line no-console
      console.log('fetch---', data)
      this.cover = data.data.CoverUrl
      this.playauth = data.data.PlayAuth
      this.vid = data.data.VideoId

      // eslint-disable-next-line
      if (window.Aliplayer !== undefined) {
        // 如果全局对象存在,说明编辑器代码已经初始化完成,直接加载编辑器
        this.scriptTagStatus = 2
        this.initAliplayer()
      } else {
        // 如果全局对象不存在,说明编辑器代码还没有加载完成,需要加载编辑器代码
        this.insertScriptTag()
      }
    },
    insertScriptTag() {
      const _this = this
      let playerScriptTag = document.getElementById('playerScriptTag')
      // 如果这个tag不存在,则生成相关代码tag以加载代码
      if (playerScriptTag === null) {
        playerScriptTag = document.createElement('script')
        playerScriptTag.type = 'text/javascript'
        playerScriptTag.src = this.aliplayerSdkPath
        playerScriptTag.id = 'playerScriptTag'
        const s = document.getElementsByTagName('head')[0]
        s.appendChild(playerScriptTag)
      }
      if (playerScriptTag.loaded) {
        _this.scriptTagStatus++
      } else {
        playerScriptTag.addEventListener('load', () => {
          _this.scriptTagStatus++
          playerScriptTag.loaded = true
          _this.initAliplayer()
        })
      }
      _this.initAliplayer()
    },
    initAliplayer() {
      const _this = this
      // scriptTagStatus 为 2 的时候,说明两个必需引入的 js 文件都已经被引入,且加载完成
      if (
        _this.scriptTagStatus === 2 &&
        (_this.instance === null || _this.reloadPlayer)
      ) {
        _this.instance && _this.instance.dispose()

        document.querySelector('#' + _this.playerId).innerHTML = ''

        // Vue 异步执行 DOM 更新,这样一来代码执行到这里的时候可能 template 里面的 script 标签还没真正创建
        // 所以,我们只能在 nextTick 里面初始化 Aliplayer
        _this.$nextTick(() => {
          // eslint-disable-next-line
          const player = new Aliplayer({
            'id': _this.playerId,
            'width': '100%',
            'height': '500px',
            'autoplay': true,
            'isLive': false,
            'rePlay': false,
            'playsinline': true,
            'preload': true,
            'controlBarVisibility': 'hover',
            'useH5Prism': true,
            'vid': _this.vid,
            'playauth': _this.playauth,
            'cover': _this.cover
          }, function (player) {
            // console.log('123')
          })
        })
      }
    }
  }
}
</script>
<style>
  @import url(//g.alicdn.com/de/prismplayer/2.8.2/skins/default/aliplayer-min.css);
</style>
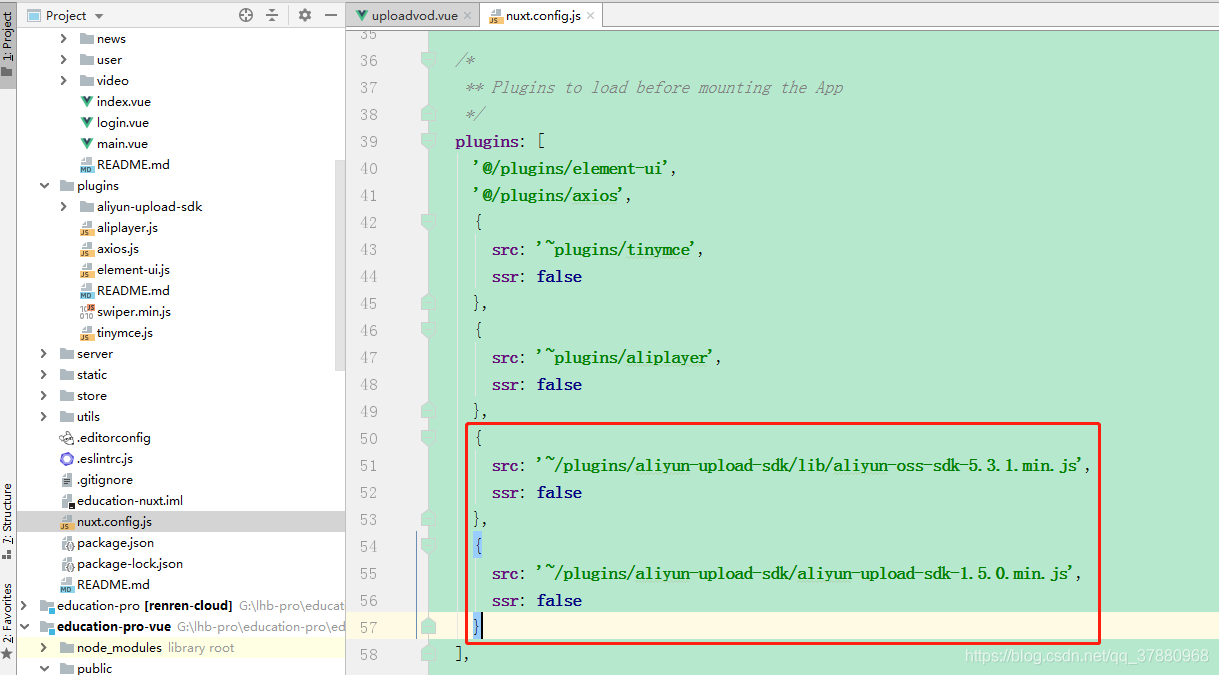
(5),将组件封装为一个插件js,然后引入js到nuxt中,以为组件里面有document,window,需要关闭ssr服务端渲染

import Vue from 'vue'
import AliplayerVod from '~/components/VideoPlayVod.vue'

Vue.component('ali-aliplayer-vod', AliplayerVod)
关闭ssr,如图

(6),使用播放的组件
<ali-aliplayer-vod />