使用IDEA整合SSM
spring核心配置文件:beans_core.xml/applicationContext.xml
<?xml version="1.0" encoding="UTF-8"?>
<beans xmlns:xsi="http://www.w3.org/2001/XMLSchema-instance"
       xmlns="http://www.springframework.org/schema/beans"
       xmlns:context="http://www.springframework.org/schema/context"
       xmlns:aop="http://www.springframework.org/schema/aop"
       xmlns:tx="http://www.springframework.org/schema/tx"
       xsi:schemaLocation="http://www.springframework.org/schema/beans
                            http://www.springframework.org/schema/beans/spring-beans-4.1.xsd
                            http://www.springframework.org/schema/context
                            http://www.springframework.org/schema/context/spring-context-4.1.xsd
                            http://www.springframework.org/schema/aop
                            http://www.springframework.org/schema/aop/spring-aop-4.1.xsd
                            http://www.springframework.org/schema/tx
                            http://www.springframework.org/schema/tx/spring-tx-4.1.xsd ">


    <!-- 开启spring的注解模式 1 -->
    <context:annotation-config/>
    <!--  扫描具体的注解包 1 -->
    <context:component-scan base-package="com.ujiuye.*"></context:component-scan>
    <!--  读取外部的数据库连接条件文件  2 -->
    <context:property-placeholder location="classpath:jdbc.properties"></context:property-placeholder>
    <bean name="dataSource" class="com.mchange.v2.c3p0.ComboPooledDataSource">
        <property name="driverClass" value="${jdbc.driverClassName}"></property>
        <property name="jdbcUrl" value="${jdbc.url}"></property>
        <property name="user" value="${jdbc.user}"></property>
        <property name="password" value="${jdbc.password}"></property>
    </bean>

    <!-- spring 整合mybatis 使用的工具类 2 -->
    <bean name="sessionFactory" class="org.mybatis.spring.SqlSessionFactoryBean">
        <property name="configLocation" value="classpath:mybatis/sqlMapConfig.xml"/>
        <property name="dataSource" ref="dataSource"/>
        <property name="mapperLocations" value="classpath:mybatis/mapper/*.xml"/>
    </bean>


    <!-- 扫描 mapper接口 -->
    <bean class="org.mybatis.spring.mapper.MapperScannerConfigurer">
        <property name="basePackage" value="com.ujiuye.mapper"/>
    </bean>


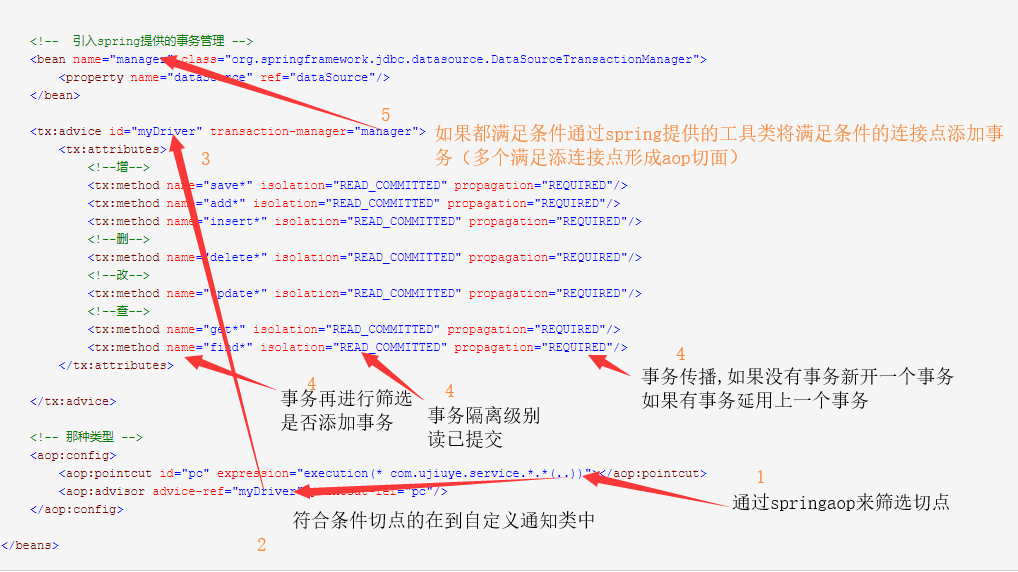
    <!--  引入spring提供的事务管理 -->
    <bean name="manager" class="org.springframework.jdbc.datasource.DataSourceTransactionManager">
        <property name="dataSource" ref="dataSource"/>
    </bean>

    <tx:advice id="myDriver" transaction-manager="manager">
        <tx:attributes>
            <!--增-->
            <tx:method name="save*" isolation="READ_COMMITTED" propagation="REQUIRED"/>
            <tx:method name="add*" isolation="READ_COMMITTED" propagation="REQUIRED"/>
            <tx:method name="insert*" isolation="READ_COMMITTED" propagation="REQUIRED"/>
            <!--删-->
            <tx:method name="delete*" isolation="READ_COMMITTED" propagation="REQUIRED"/>
            <!--改-->
            <tx:method name="update*" isolation="READ_COMMITTED" propagation="REQUIRED"/>
            <!--查-->
            <tx:method name="get*" isolation="READ_COMMITTED" propagation="REQUIRED"/>
            <tx:method name="find*" isolation="READ_COMMITTED" propagation="REQUIRED"/>
        </tx:attributes>

    </tx:advice>

    <!-- 那种类型 -->
    <aop:config>
        <aop:pointcut id="pc" expression="execution(* com.ujiuye.service.*.*(..))"></aop:pointcut>
        <aop:advisor advice-ref="myDriver" pointcut-ref="pc"/>
    </aop:config>

</beans>
配置文件理解:
1.为什么已经扫描具体的注解包了 还需要开启spring的注解模式?是不是重复了。
这个问题其实不写下面这句也不会有任何问题,但是官方介意先开启spring注解模式
<!-- 开启spring的注解模式 -->
<context:annotation-config/>
2.SqlSessionFactoryBean是整合mybatis的一个很重要的类,他的具体功能。
一、数据库的连接(mybatis毕竟是一个持久层框架)
二、扫描mybatis核心配置文件
三、mybatis逆向生成的mapper.xml文件(或者是自己写的mapper.xml文件)。
如果mapper.xml文件和mapper接口放在同一个文件夹中则不需要此操作,但是介意将配置文件放在同一个配置文件夹中管理(Mybatis反向工程位置)
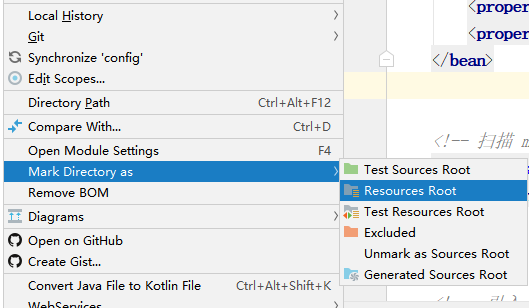
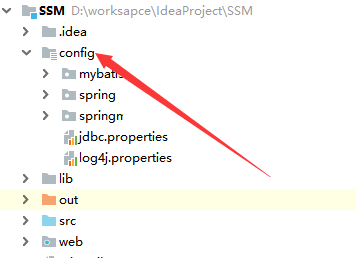
需要注意的是这个文件夹不是普通的文件夹,需要将文件夹变成Resources资源文件夹如下图


四、事务管理

springmvc配置文件 springmvc.xml
<?xml version="1.0" encoding="UTF-8"?>
<beans xmlns="http://www.springframework.org/schema/beans"
    xmlns:xsi="http://www.w3.org/2001/XMLSchema-instance"
    xmlns:p="http://www.springframework.org/schema/p"
    xmlns:context="http://www.springframework.org/schema/context"
    xmlns:mvc="http://www.springframework.org/schema/mvc"
    xsi:schemaLocation="http://www.springframework.org/schema/beans
                       http://www.springframework.org/schema/beans/spring-beans-4.1.xsd
                       http://www.springframework.org/schema/mvc
                       http://www.springframework.org/schema/mvc/spring-mvc-4.1.xsd
                       http://www.springframework.org/schema/context
                       http://www.springframework.org/schema/context/spring-context-4.1.xsd">

     <!-- 扫描具体控制层注解 -->
    <context:component-scan base-package="com.ujiuye.controller"/>
    <!--  开启springmvc的注解驱动模式 2 -->
    <mvc:annotation-driven/>
    <!-- 解决静态资源无法访问的问题 1 -->
    <mvc:default-servlet-handler/>
    <!--  视图解析器 2 -->
    <bean class="org.springframework.web.servlet.view.InternalResourceViewResolver">
        <property name="prefix" value="/"/>
        <property name="suffix" value=".jsp"/>
    </bean>

</beans>
配置文件理解:
1、静态文件问题
产出原因:由于我们在web.xml文件中配置了servlet,并且<url-pattern>/</url-pattern>会拦截静态支援文件,因为优先级问题 /* > *.jsp >/ 造成静态资源被servlet拦截,将我们的静态文件当初一个请来处理,所以在cotroller根本处理不了,所以会报一个404找不到的错误。
解决方法:在springmvc.xml文件中配置 <mvc:default-servlet-handler/> 这个标签会将我们cotroller处理不了的丢给默认tomcat中一个默认的DefaultServlet来处理。
我们都知道tomcat自身本来就有一个web.xml文件,而我们也写了一个servlet,程序会采用就近原则选择我们写的servle来执行所以就将原来默认的servlet覆盖掉。所以就造成了静态资源访问不到的问题
下图是默认web.xml源码


2.视图解析器:
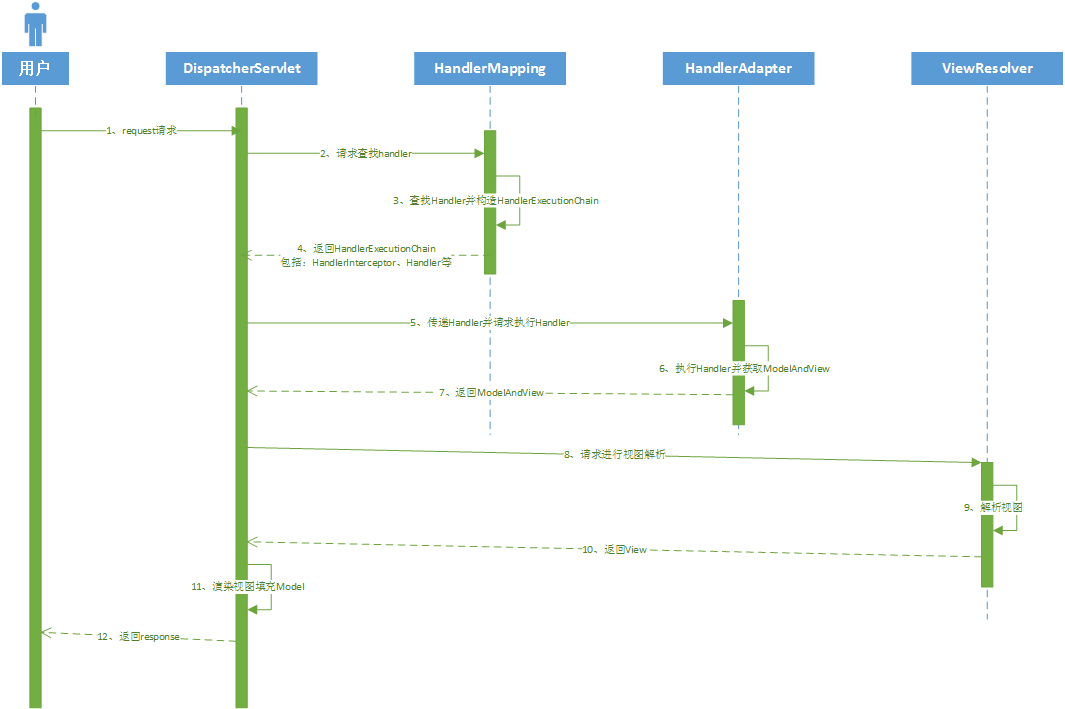
我们先来了解一个spring servlet执行流程

图片来源https://www.jianshu.com/p/0f981efdfbbd
一、用户发送一个请求spring的DispatchServlet(前置控制器)接收到请求后就会到RequestMappingHandlerMapping(处理映射器)中去寻找有没有符何条件的servlet就好像一张菜单。然后再返回到(前置控制器)中如果有,
二、DispatchServlet将拿到的结果到RequestMappingHandlerAdapter(处理器适配器)中寻找具体的那个servlet,返回一个ModelAndView 到(前置控制器)中,然后(前置控制器)在将ModelAndView给InternalResourceViewResolver(视图解析器),(视图解析器)进行处理将
三、将一个具体的视图返回到(前置控制器)中最后进行视图处理将结果返回给用户。(哇,很烦)。
接下来就会有人有疑问为什么。配置文件中没有看到
(处理映射器) (处理器适配器) 而只有 (视图解析器)
因为只要我们开启springmvc注解模式,就不需要配置这两个是配置了
mybatis核心配置文件 sqlMapConfig.xml
<?xml version="1.0" encoding="UTF-8" ?>
<!DOCTYPE configuration
  PUBLIC "-//mybatis.org//DTD Config 3.0//EN"
  "http://mybatis.org/dtd/mybatis-3-config.dtd">
<configuration>

    <settings>
        <!-- 打印查询语句 -->
        <setting name="logImpl" value="STDOUT_LOGGING" />
    </settings>

    <typeAliases>
        <package name="com.ujiuye.cus.bean"></package>
        <package name="com.ujiuye.pro.bean"></package>
        <package name="com.ujiuye.emp.bean"></package>
        <package name="com.ujiuye.mdo.bean"></package>
    </typeAliases>


</configuration>
配置文件理解:
1、需要在mybatis中填写的内容,声明也不写也可以(因为最主要的配置已经在spring核心配置文件中配置了) 但是一定要有这个文件。如果有器大需要配置的:懒加载、缓存。。。就需要在这个文件中配置
 作者:Pei-Qi

 博客:https://www.cnblogs.com/hwxxbc/

 github:https://github.com/Pei-Qi

 本人是一个刚刚接触IT行业的新人,有什么不到位的地方还请原谅,如果写的有什么错误的地方希望能够指出,蟹蟹。。。。